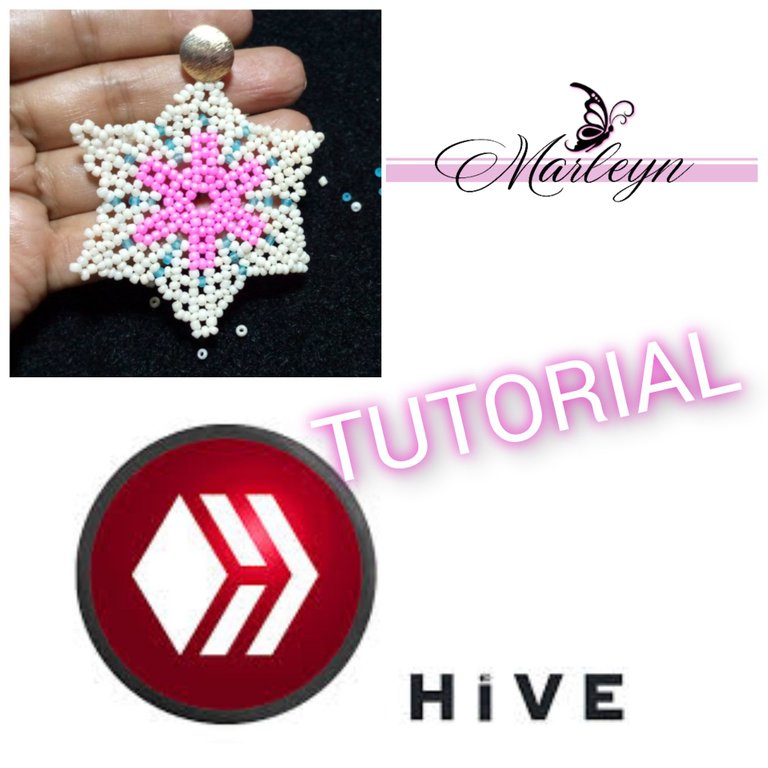
Feliz y Bendecido nuevo día, ante todo como siempre deseo estén bien llenos de vida, salud y en armonía con el Universo. El día de hoy les realizare un tutorial de unos zarcillos grandes en forma de flor tejidos en mostacillas, el proceso es sencillo y repetitivo todo esta en la practica... Como veras el proceso es 100% manual y lleva algo de tiempo si te gusta lo que haces como me ha gustado a mi realizar esta pieza sera un paseo y a la vez bastante entretenido, te lo explicare con una secuencia de imágenes consecutivo a una explicación escrita paso a paso, así como cambien estaré atenta a tus comentarios para aclarar cualquier inquietud.
Happy and Blessed new day, first of all as always I wish you to be full of life, health and in harmony with the Universe. Today I will make a tutorial of a large flower-shaped tendrils woven in beads, the process is simple and repetitive everything is in practice .... As you will see the process is 100% manual and takes some time if you like what you do as I have liked to me to make this piece will be a walk and at the same time quite entertaining, I will explain with a sequence of images consecutive to a written explanation step by step, as well as change I will be attentive to your comments to clarify any concerns.
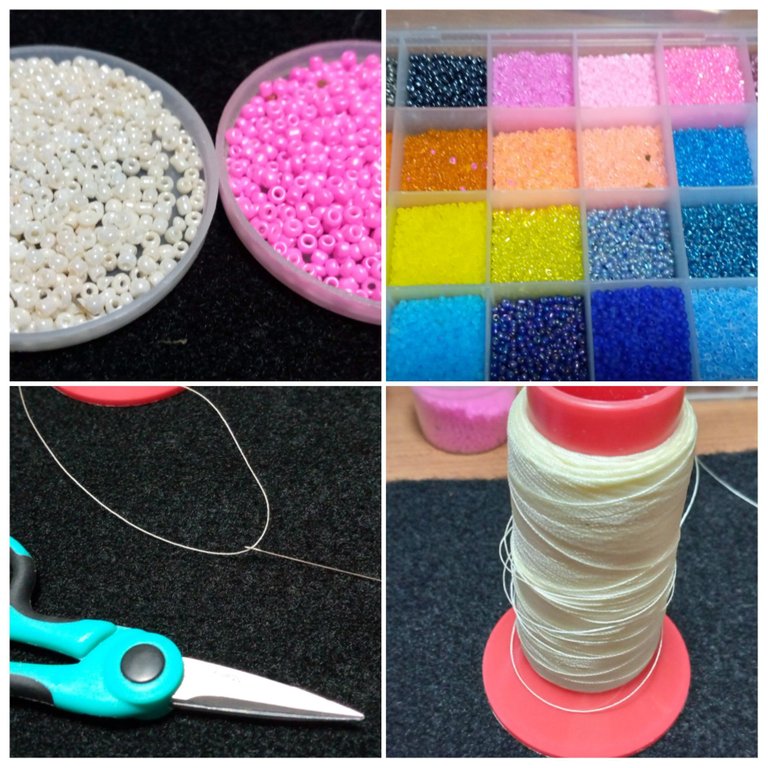
Todos los materiales son de fácil acceso y realmente económicos. Mostacillas blanca, rosada y azul #11, Nailon 0.20 milímetros, Aguja para mostacillas, Tijera y Base de zarcillo de acero inoxidable, Paciencia, Amor y ganas de aprender.
All materials are easily accessible and really inexpensive. White, pink and blue #11 beads, 0.20 mm nylon, beading needle, scissors and stainless steel tendril base, patience, love and willingness to learn.
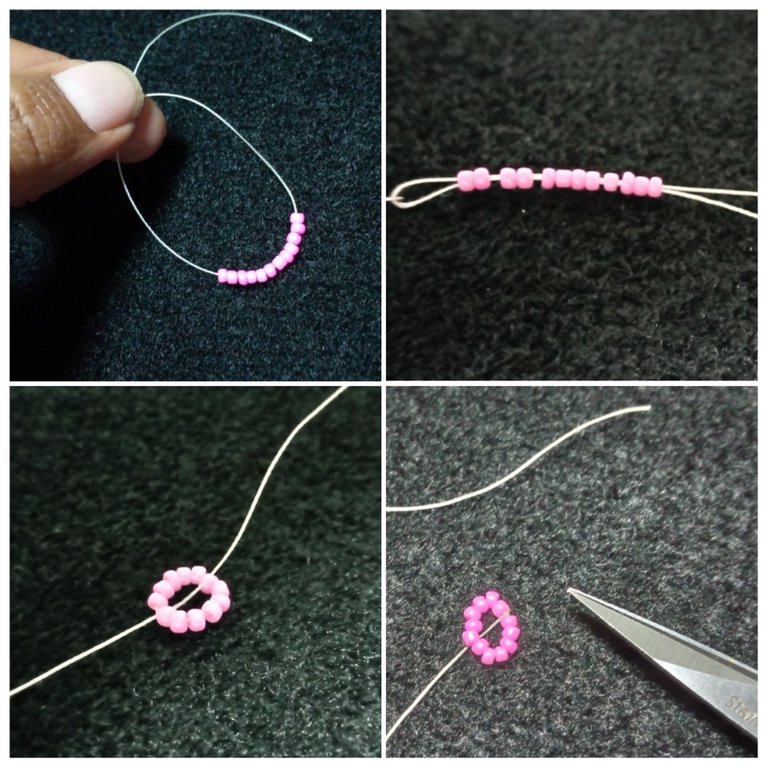
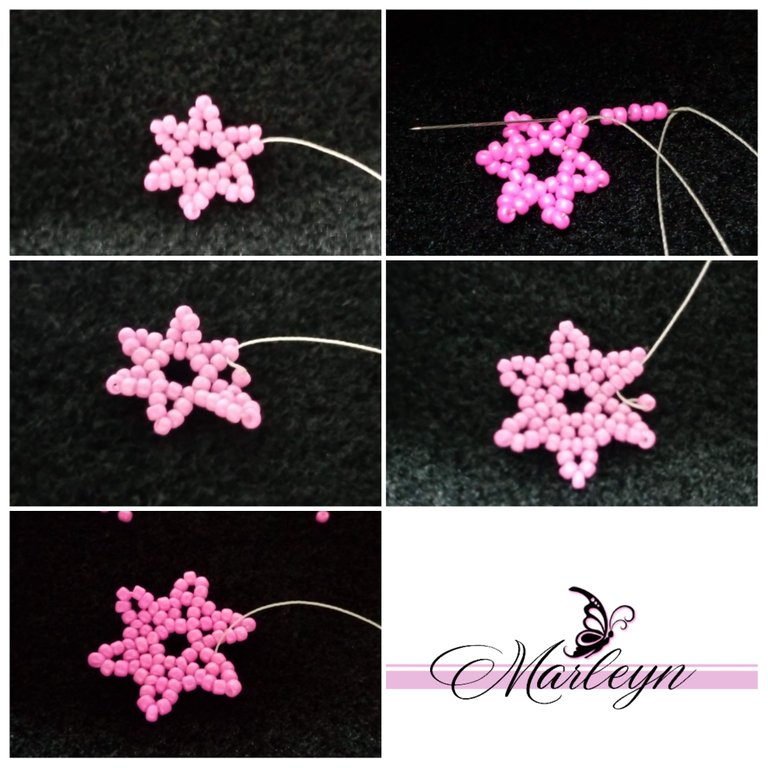
Paso 1. Para empezar ensartamos el hilo en la aguja, si tienes buen manejo con el hilo puedes tomar aproximadamente 1 metro si no toma un poco menos para que no se te enrede toma 12 mostacillas y llevarlas al final del hilo, realiza un amarre al final formando un circulo como te muestro en las imágenes de arriba, el hilo sobrante puedes cortarlo para que no nos moleste mientras armamos nuestra flor.
To begin we thread the thread on the needle, if you have good handling with the thread you can take approximately 1 meter if not take a little less so you do not get tangled take 12 beads and take them to the end of the thread, make a tie at the end forming a circle as I show you in the images above, the excess thread can cut it so that it does not bother us while we assemble our flower.
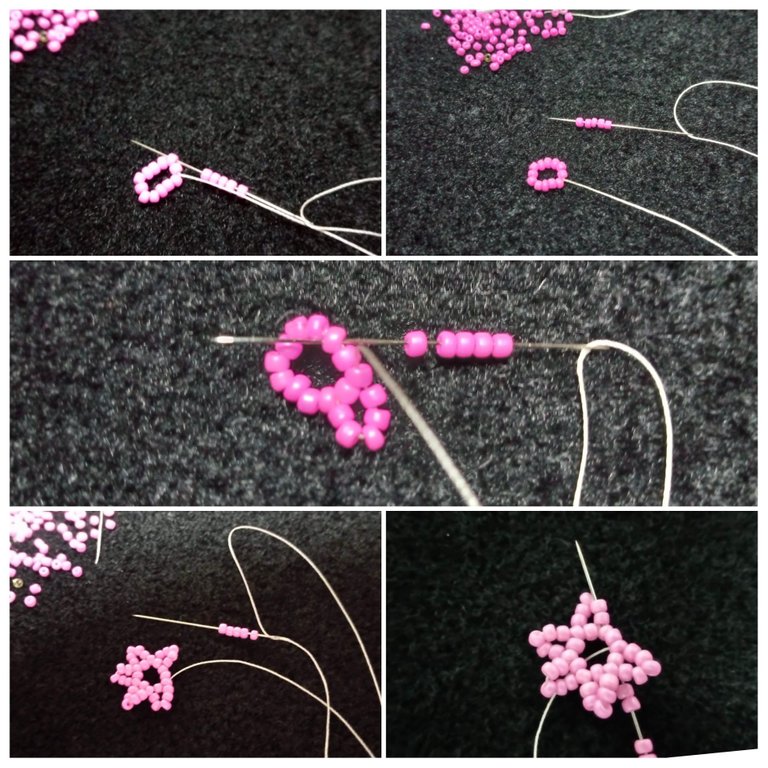
Paso 2. Introduce la aguja por entre las mostacillas para ocultar el nudo puedes pasar solo por 2 mostacillas y listo sacamos la aguja hacia arriba, introducimos 5 mostacillas rosadas en la aguja nos saltamos una mostacilla y en la tercera mostacilla introduces la aguja, puedes seguir la secuencia de las imágenes, luego volvemos a agregar 5 mostacillas en la aguja y repetimos el proceso, es decir, saltamos una mostacilla e introduces la aguja por la tercera mostacilla de esta manera estamos formando como picos como si formaras una estrella, sigue de esta manera hasta llegar al final en esta ultima parte al introducir la aguja en la tercera mostacilla sigue hasta arriba sube dos mostacillas y sacamos la aguja, y dejamos 3 mostacillas libres para esta parte puedes mirar la ultima imagen.
Step 2. Insert the needle between the beads to hide the knot you can go through only 2 beads and ready we take the needle up, we introduce 5 pink beads in the needle we skip a bead and in the third bead you introduce the needle, you can follow the sequence of the images, then we add again 5 beads in the needle and repeat the process, that is to say, we skip one bead and introduce the needle in the third bead, you can follow the sequence of the images, then we add 5 beads in the needle and repeat the process, skip a bead and introduce the needle through the third bead in this way we are forming as peaks as if you were forming a star, continue in this way until you reach the end in this last part by introducing the needle in the third bead continues up two beads and remove the needle, and leave 3 free beads for this part you can look at the last image.
Paso 3. En esta etapa tenemos la estrella central ya formada estamos en la parte superior de una de las puntas, es momento de introducir 5 mostacillas en la aguja, saltamos una mostacilla e introduces la aguja por la tercera mostacilla, puedes ver la segunda imagen ahora agregamos una mostacilla y subimos la aguja por la segunda mostacilla del siguiente pico y nuevamente agregamos 5 mostacillas a la aguja, saltamos una mostacilla e introducimos la aguja por la tercera mostacilla sigue la misma secuencia hasta llegar donde empezamos.
Step 3. At this stage we have the central star already formed we are at the top of one of the points, it is time to introduce 5 beads on the needle, skip a bead and introduce the needle through the third bead, you can see the second image now add a bead and raise the needle through the second bead of the next peak and again add 5 beads to the needle, skip a bead and introduce the needle through the third bead and follow the same sequence until you get where we started.
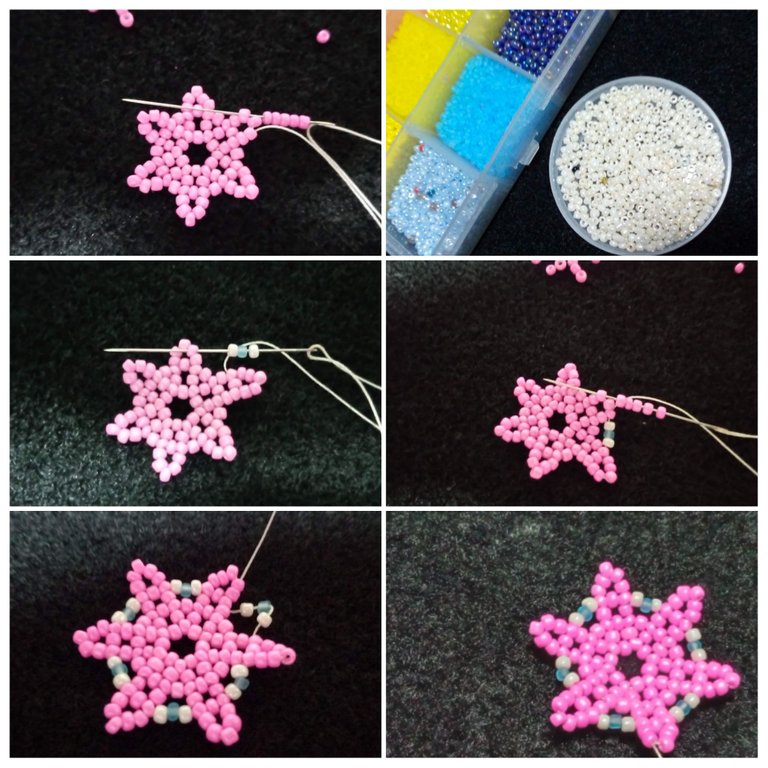
Paso 4. Esta vez vamos a repetir el mismo proceso del paso anterior en la parte superior es decir, agregamos 5 mostacillas para formar un nuevo pico, saltamos una mostacilla e introduces la aguja por la tercera mostacilla del pico anterior, ahora vamos a agregar colores, yo seleccione azul y blanco que haremos introduce en la aguja una mostacilla blanca, una azul y nuevamente una blanca, sube por la segunda mostacilla del siguiente pico y repetimos el proceso hasta nuevamente llegar a donde empezamos siempre subiendo la aguja para que salga por la segunda mostacilla del ultimo pico.
Step 4. This time we will repeat the same process of the previous step at the top, that is, add 5 beads to form a new peak, skip a bead and introduce the needle through the third bead of the previous peak, now we will add colors, I select blue and white that we will introduce in the needle a white bead, a blue one and again a white one, go up through the second bead of the next peak and repeat the process until we get back to where we started always going up the needle so it comes out through the second bead of the last peak.
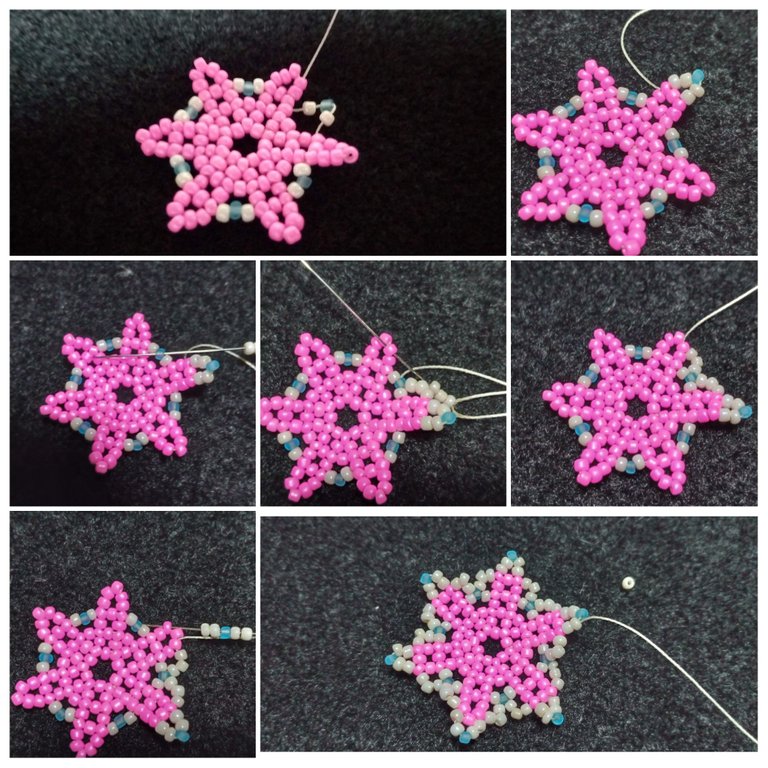
Paso 5. Seguimos agregando color a nuestra pieza esta vez vamos a realizar las puntas con azul y blanco en esta etapa ya terminamos con el rosado. Ahora bien en la aguja colocamos 2 mostacillas blancas, una mostacilla azul, y 2 mostacillas blancas otra vez saltamos una mostacilla, e introducimos la aguja por la tercera como lo hemos realizado desde el principio, ahora agregamos 3 mostacillas blancas en la aguja y pasamos la aguja por la mostacilla azul que esta en el centro, nuevamente agregamos 3 mostacillas blancas y subimos la aguja saliendo por la segunda mostacilla. puedes ayudarte con la secuencia de imágenes, debemos repetir este procedimiento hasta llegar nuevamente donde empezamos en esta vuelta.
Step 5. We continue adding color to our piece this time we are going to make the tips with blue and white at this stage we are done with the pink. Now on the needle we place 2 white beads, a blue bead, and 2 white beads again we skip a bead, and introduce the needle through the third one as we have done from the beginning, now we add 3 white beads on the needle and pass the needle through the blue bead that is in the center, again we add 3 white beads and go up the needle leaving through the second bead. you can help you with the sequence of images, we must repeat this procedure until we get back to where we started in this round.
Paso 6. Casi llegamos al final de nuestro tejido, esta vez las puntas serán totalmente blanca, coloca en la aguja 5 mostacillas blancas, salta una mostacilla e introduce la aguja por la tercera sacándola de una vez hacia afuera como te muestro en la primera imagen, ahora colocamos 3 mostacillas blancas en la aguja e introducimos la aguja por la segunda mostacilla de las blancas de abajo agregamos una mostacilla azul y ahora subes la aguja por la segunda mostacilla de las blancas, vuelve a agregar 3 mostacillas blancas en la aguja y la subes por la segunda mostacilla blanca del pico como te muestro en la tercera imagen,continua hasta llegar al pico donde empezaste.
Step 6. We are almost at the end of our weaving, this time the ends will be totally white, place 5 white beads on the needle, skip one bead and introduce the needle through the third one pulling it outwards as I show you in the first picture, now place 3 white beads on the needle and introduce the needle through the second white bead from the bottom, add a blue bead and now bring the needle up through the second white bead, add again 3 white beads on the needle and bring the needle up through the second white bead as shown in the third picture, continue until you reach the beak where you started.
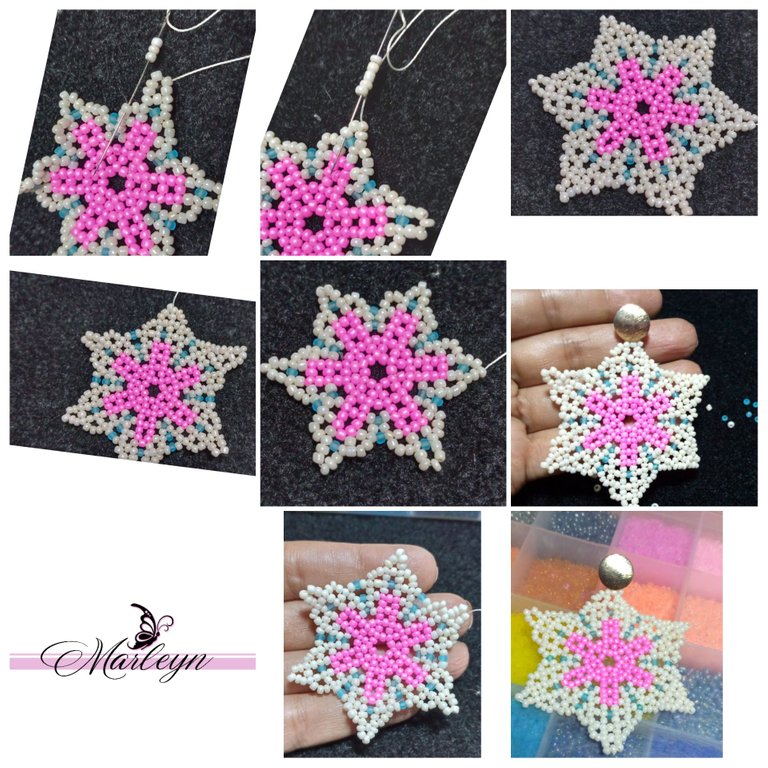
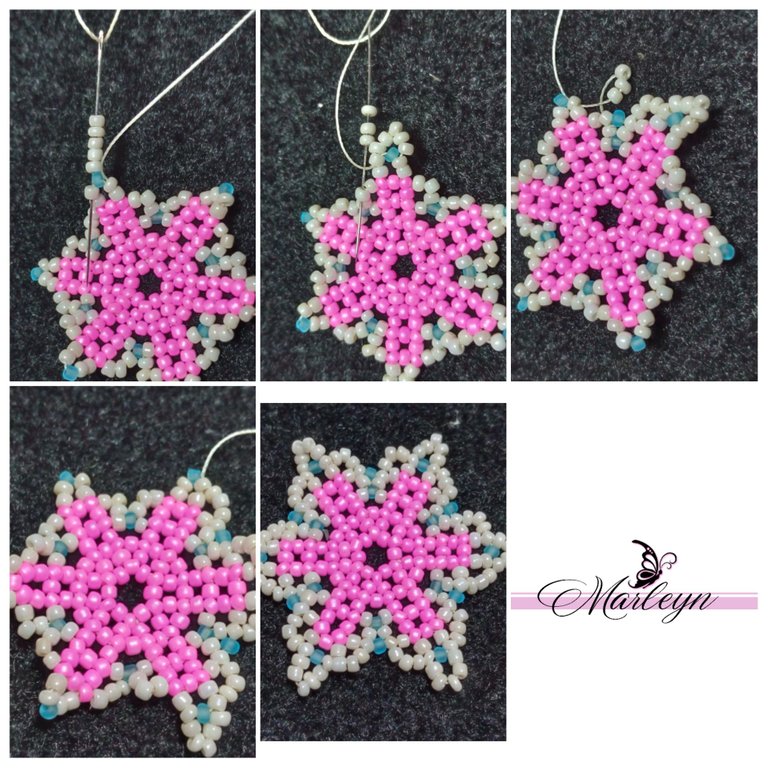
Paso 7. Colocaremos los últimos picos blancos para terminar nuestra bella pieza, Agregamos 5 mostacillas blancas, saltamos una mostacilla y entramos con la aguja por la tercera sacamos la aguja y agregamos 3 mostacillas blancas y haremos exactamente los mismo del paso anterior agregando en el medio una mostacilla azul... al terminar la vuelta nuevamente haremos picos blancos con 5 mostacillas blancas agregando en el centro 3 mostacillas blancas entrando por la azul central y seguido de 3 mostacillas blancas nuevamente para así salir y formar nuevamente el siguiente pico y de esta manera llegaremos al final de nuestra pieza es momento de realizar varios nudos escondidos y para terminar pasa la aguja por entre varias mostacillas antes de cortar el hilo sobrante, con ayuda de las pinzas bisutería coloca la base de zarcillo en una de las untas y de esta manera hemos terminado nuestra hermosa pieza!
Step 7. We will place the last white beaks to finish our beautiful piece, we add 5 white beads, skip a bead and enter with the needle through the third one, take out the needle and add 3 white beads and we will do exactly the same of the previous step adding in the middle a blue bead... at the end of the turn again we will make white peaks with 5 white beads adding in the center 3 white beads entering through the central blue one and followed by 3 white beads again to go out and form again the next peak and in this way we will reach the end of our piece it is time to make several hidden knots and to finish pass the needle through several beads before cutting the excess thread, with the help of the jewelry tweezers place the base of the tendril in one of the beads and in this way we have finished our beautiful piece!


IMAGENES CREADAS EN CANVA
IMAGES CREATED IN CANVA
