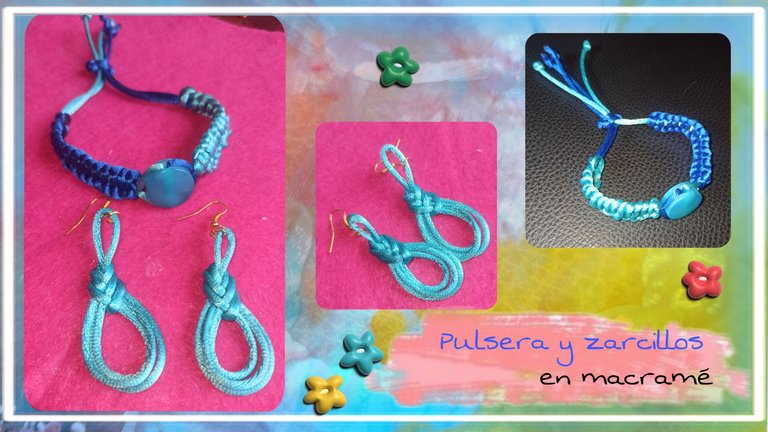


🔵 ¡Hola amigos! Hace unos días fui al centro de mi ciudad a hacer unos recados, paseando por uno de los centros comerciales, encontré una tienda donde vendían muchas cositas para hacer bisutería. Decidí comprar una bolsita con piedras de diferentes modelos y colores que tenían a buen precio y otras cositas que me servirían para hacer hermosos accesorios para compartir con ustedes. ¿Soy una experta en hacer bisutería? Pues no, pero hace años vendía collares, pulseras y pendientes que hacía yo misma, me quedaban bien lindos.
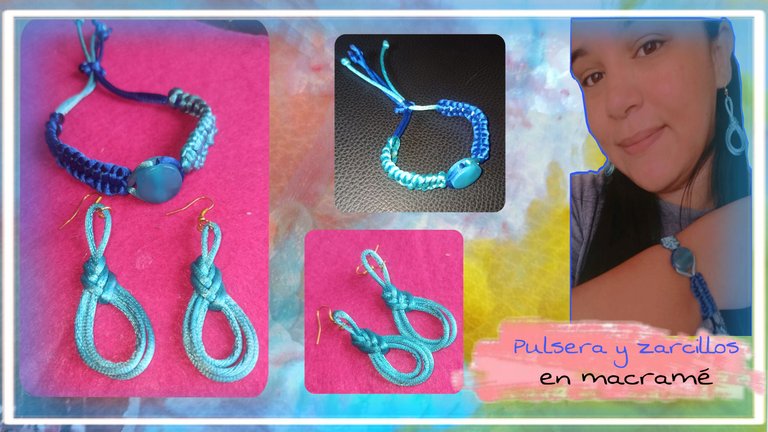
Hoy quiero compartir el proceso para hacer unos pendientes y pulsera con cola de ratón utilizando la técnica del macramé. Son sencillos pero indudablemente bonitos.
🔵 Hello friends! A few days ago I went to the center of my city to do some errands, walking through one of the malls, I found a store where they sold many little things to make jewelry. I decided to buy a little bag with stones of different models and colors that they had at a good price and other little things that would help me to make beautiful accessories to share with you. Am I an expert in making jewelry? Well no, but years ago I used to sell necklaces, bracelets and earrings that I made myself, they were very nice.
Today I want to share the process to make some earrings and bracelets with mouse tail using the macramé technique. They are simple but undoubtedly cute.
| Pulcera |
|---|
| * Cola de ratón azul claro 80 cm |
| Cola de ratón azul oscuro 80 cm |
| * Piedra azul |
| Tijera |
| Encendedor |
| Tirro |
| Zarcillos (aretes- pendientes) |
|---|
| Cola de ratón azul 30 cm |
| Argolla |
| Anzuelos para zarcillos |
| Silicona caliente |
| Bracelet |
|---|
| Light blue mouse tail 80 cm |
| Dark blue mouse tail 80 cm |
| Blue stone |
| Scissors |
| Lighter |
| Scissors |
| Earrings |
|---|
| Blue mouse tail 30 cm |
| Hooks for earrings |
| Hooks for earrings |
| Hot silicone |
▶️ Paso 1:
- Cortar dos tiras azul claro de 30 cm y 60 cm. Dos tiras azul oscuro de 30 cm y 50 cm.
- Pasar las dos tiras de 30 cm por el centro de la piedra. Coloca un color en un lado y el otro color en el otro lado.
▶️ Step 1 :
- Cut two light blue strips of 30 cm and 60 cm. Two dark blue strips of 30 cm and 50 cm.
- Pass the two 30 cm strips through the middle of the stone. Position one color on one side and the other color on the other side.
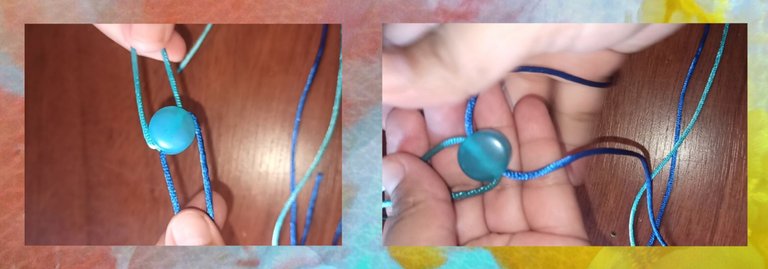
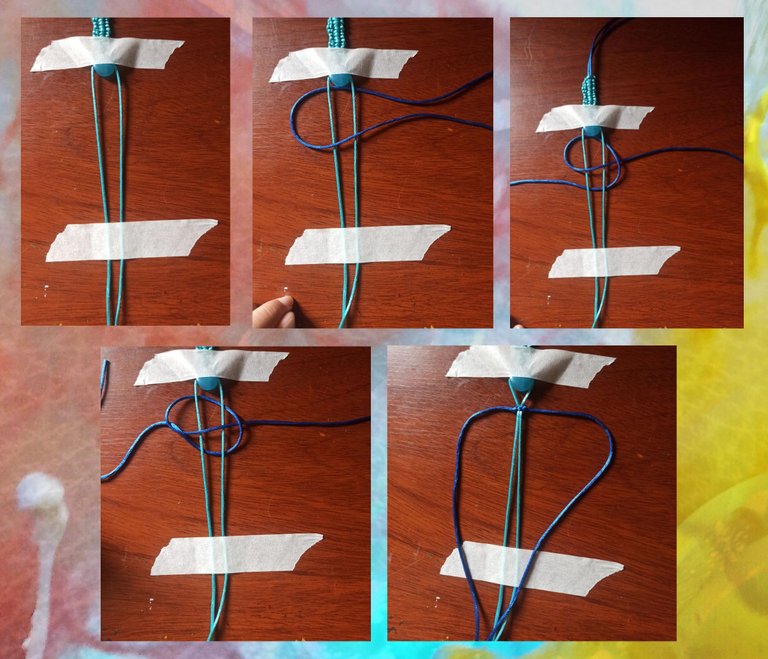
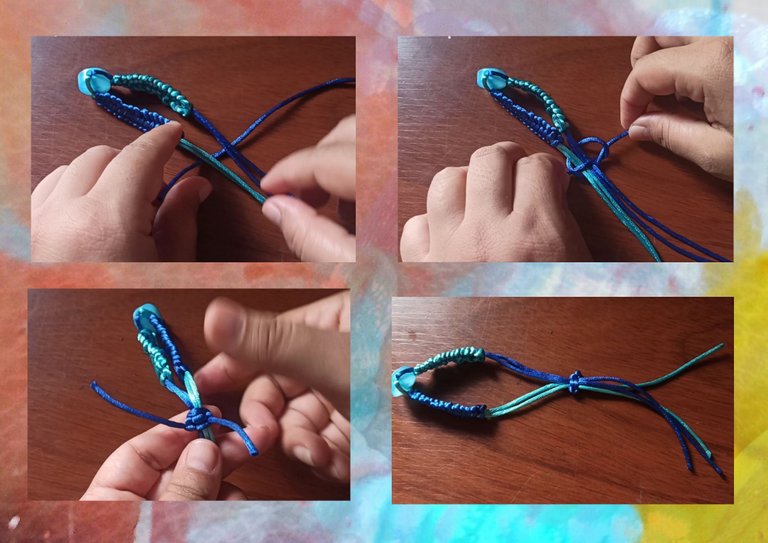
▶️ Paso 2:
- Trabajaremos primero un lado de la pulsera (en las imágenes fíjate que ya está tejida por un lado, el mismo procedimiento que explicaré se hace por ambos lados).
- 1.ª imagen: Se fija la base de la pulsera en el mesón que estamos trabajando con tiro, esto es para trabajar con facilidad.
- 2.ª imagen: Colocamos la tira de 50 cm por debajo de la base de la pulsera (las tiras del centro) nos quedará la mitad de esta tira a un lado (izquierda) y la mitad al otro lado (derecha).
Pasamos el lado izquierdo por encima de la base hacia el lado derecho.
- 3.ª imagen: Pasamos la tira derecha por encima de la tira izquierda, por debajo de la base y finalmente por él dentro del lado izquierdo.
- 4.ª imagen: apretamos el nudo.
▶️ Step 2 :
- We will work first one side of the bracelet (in the images note that is already woven on one side, the same procedure that I will explain is done on both sides).
- 1st image: The base of the bracelet is fixed on the table that we are working with shot, this is to work easily.
- 2nd image: We place the strip of 50 cm below the base of the bracelet (the strips in the center) we will have half of this strip on one side (left) and half on the other side (right).
We pass the left side over the base to the right side.
- 3rd image: We pass the right strip over the left strip, under the base and finally through it into the left side.
- 4th image: we tighten the knot.
▶️ Paso 3 :
- El mismo procedimiento se realiza una y otra vez hasta terminar la tira.
▶️ Step 3:
- The same procedure is performed again and again until the strip is finished.
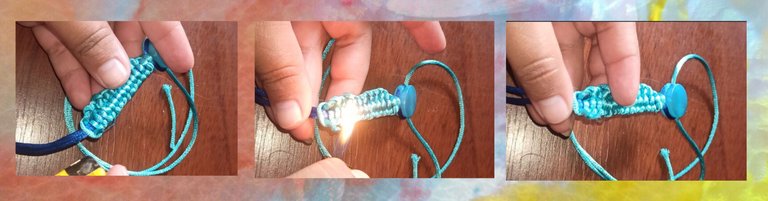
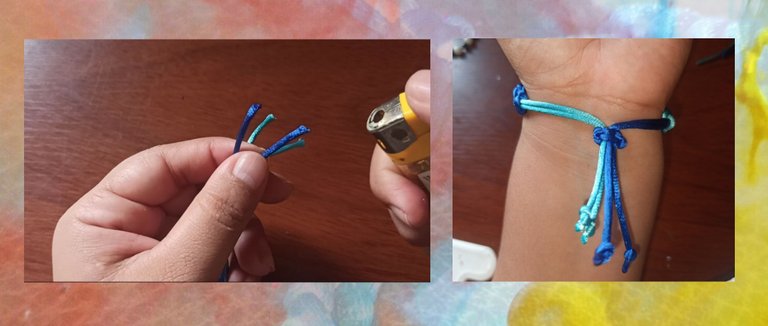
▶️ Paso 4 :
- Las puntas se quema con el encendedor y se pega.
▶️ Step 4:
- The tips are burned with the lighter and stick together.
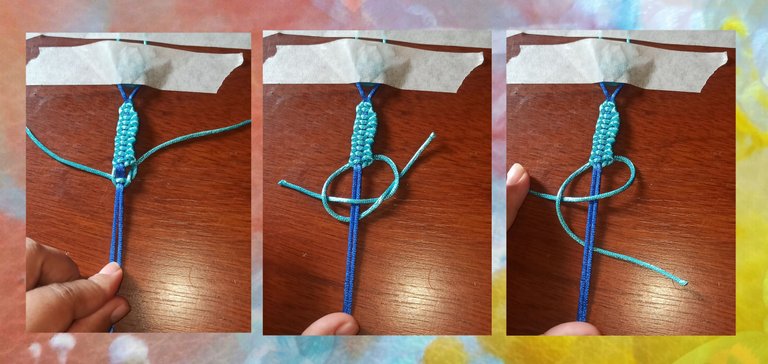
▶️ Paso 5 :
- En este quinto paso vamos a realizar un nudo para ajustar la pulsera a nuestra muñeca. Juntamos las cuatro puntas, con una tira de unos 6 cm, vamos a hacer dos nudos del que ya hemos aprendido, solo dos, y verás como se deslizan y se puede ajustar la pulsera.
▶️ Step 5 :
- In this fifth step we will make a knot to adjust the bracelet to our wrist. We join the four ends, with a strip of about 6 cm, we will make two knots that we have already learned, only two, and you will see how they slide and you can adjust the bracelet.
▶️ Paso 6:
- Para terminar la pulsera, las puntas las quemamos con el encendedor y hacemos un nudo en cada una. (En esta última parte, antes de anudar, se puede colocar piedras, todo a nuestro gusto)
▶️ Step 6 :
- To finish the bracelet, we burn the ends with the lighter and make a knot in each one. (In this last part, before knotting, we can place stones, all to our liking).
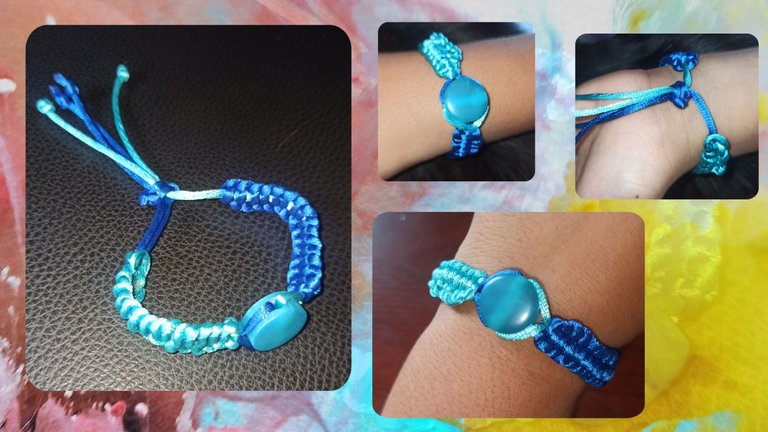
▶️ Resultado :
- Como puedes ver, es una bonita pulsera con tonos azules, sin muchos detalles, muy de mi gusto. ¿Te gusta?
▶️ Result :
- As you can see, it is a nice bracelet with blue tones, without many details, very much to my taste. Do you like it?
Seguimos con los pendientes a juego con la pulsera.
We continue with the earrings that match the bracelet.
 |  |
|---|
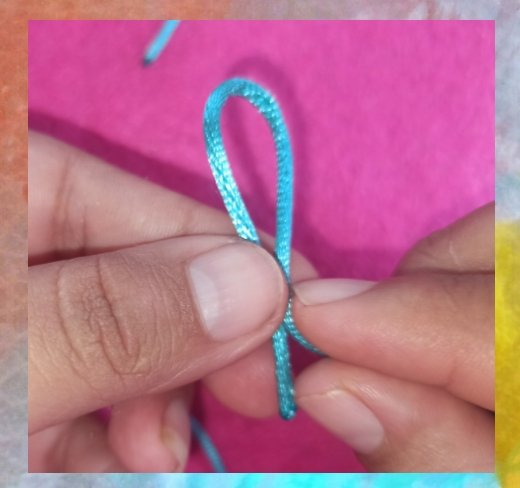
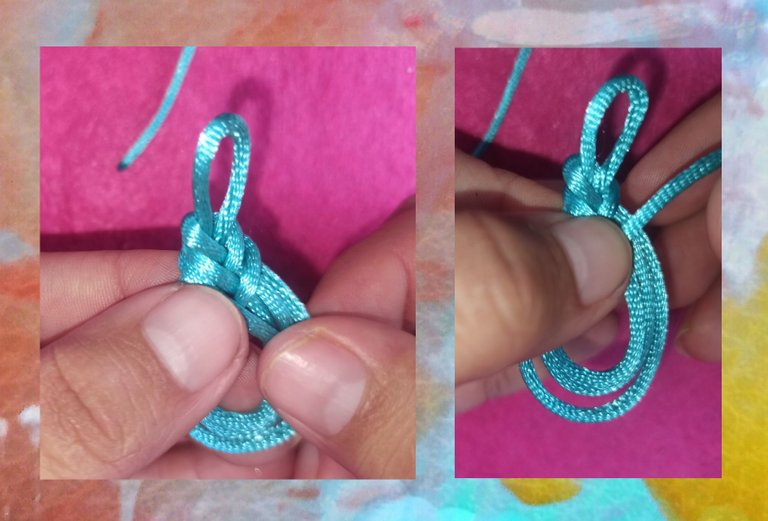
▶️ Paso 1 :
- Agarramos la cinta dejando un pequeño margen. Hacemos un pequeño círculo hacia arriba.
▶️ Step 1:
- We grab the ribbon leaving a small margin. We make a small circle upwards.
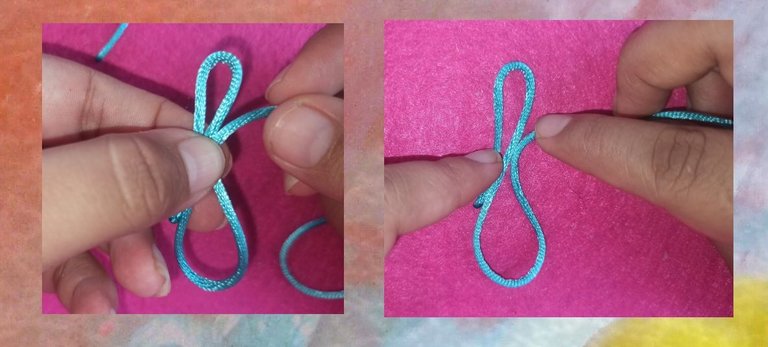
▶️ Paso 2 :
- Otro más grande hacia abajo (el círculo de abajo, es el tamaño que le quieres dar a los zarcillos)
En la segunda imagen pueden observar como tengo agarrada la tira en mis dedos.
▶️ Step 2:
- Another larger one downwards (the circle below is the size you want to give to the tendrils).
In the second image you can see how I have the strip gripped in my fingers.
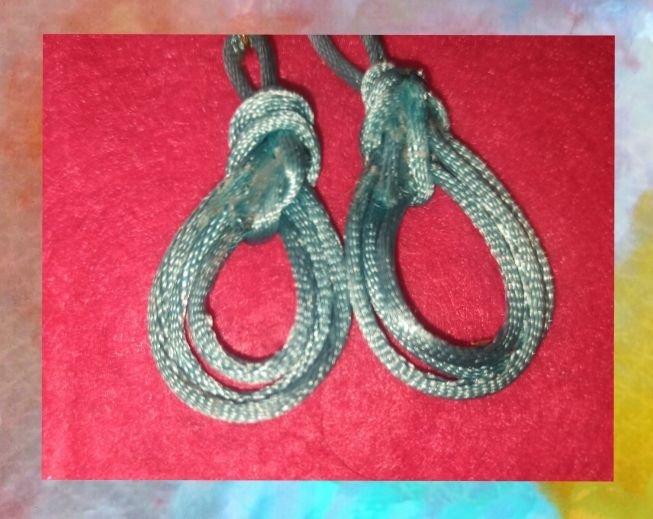
▶️ Paso 3:
- Pasamos la tira por detrás, luego hacia adelante y hacemos otro círculo que quedará dentro del primer círculo. Repetimos el proceso: pasemos la tira por detrás , luego por delante para crear otro círculo que quedará dentro del segundo.
▶️ Step 3:
- We pass the strip behind, then forward and make another circle that will be inside the first circle. Repeat the process: pass the strip behind, then in front to create another circle that will be inside the second circle.

▶️ Paso 4:
- Podemos crear tantos círculos como queramos, hasta cerrar completamente o dejarlo, como en este caso hasta tres.
▶️ Step 4:
- We can create as many circles as we want, until completely closed or leave it, as in this case up to three.
▶️ Paso 5:
- Para sellar, pasamos la tira por el centro del último círculo. Pegamos los dos extremos por la parte de atrás.
▶️ Step 5:
- To seal, we pass the strip through the middle of the last circle. Glue the two ends together at the back.
▶️ Resultado :
*Para terminar colocar la argolla y el anzuelo.
▶️ Result :
*To finish, place the ring and the hook.

Estaré encantada de leer y responder a sus comentarios. Gracias totales a todos los que aprecian mi contenido, y que se toman el tiempo de leer y dejar un comentario, gracias, muchas gracias. Les deseo lo mejor.
Hasta pronto.
I will be happy to read and respond to your comments. Total thanks to all of you who appreciate my content, and who take the time to read and leave a comment, thank you, thank you very much. I wish you all the best.
See you soon.

Fotografías de mi propiedad tomadas con el celular Redmi note 8 pro, editadas en canva
Traducción realizada con la versión gratuita del
traductor DeepL
Todos los diseños fueron creados en canva
Video editado desde mi teléfono en la App Inshop y CapCut
Música: Gingerbread Happy Time
Músico: EnjoyMusic
URL: https://enjoymusic.ai
Photographs of my property taken with the Redmi note 8 pro cell phone, edited in canva
Translation made with the free version of
translator DeepL
All designs were created in canva
Video edited from my phone in the Inshop App and CapCut
Música: Gingerbread Happy Time
Músico: EnjoyMusic
URL: https://enjoymusic.ai
▶️ 3Speak


