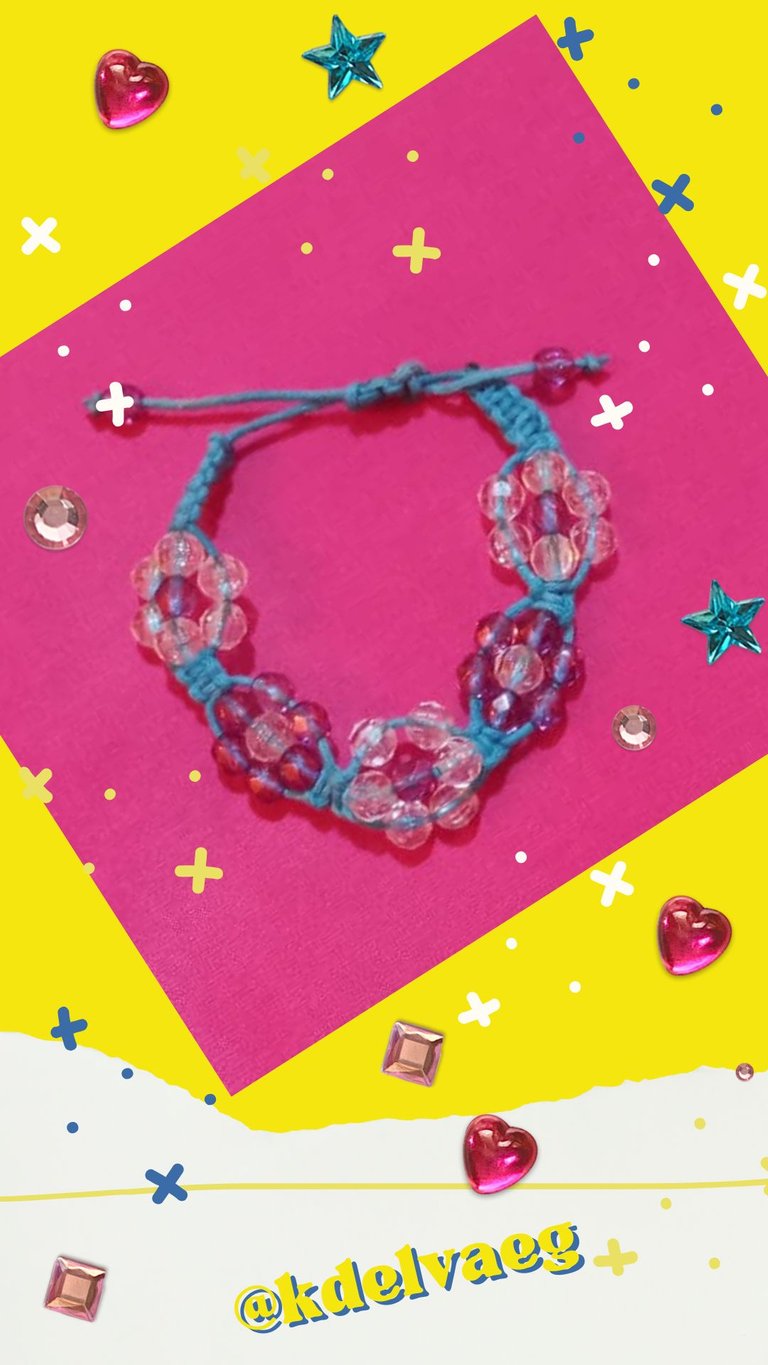


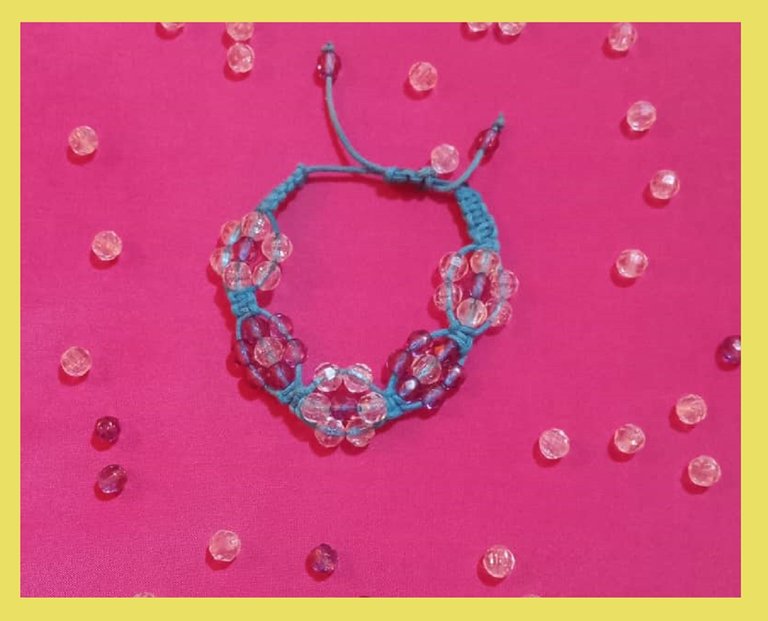
Hello my dear readers, I hope you are well and that you have or have had an excellent day. Today I want to share with you how I made a bracelet, super easy to make, quick and simple and which is very nice.
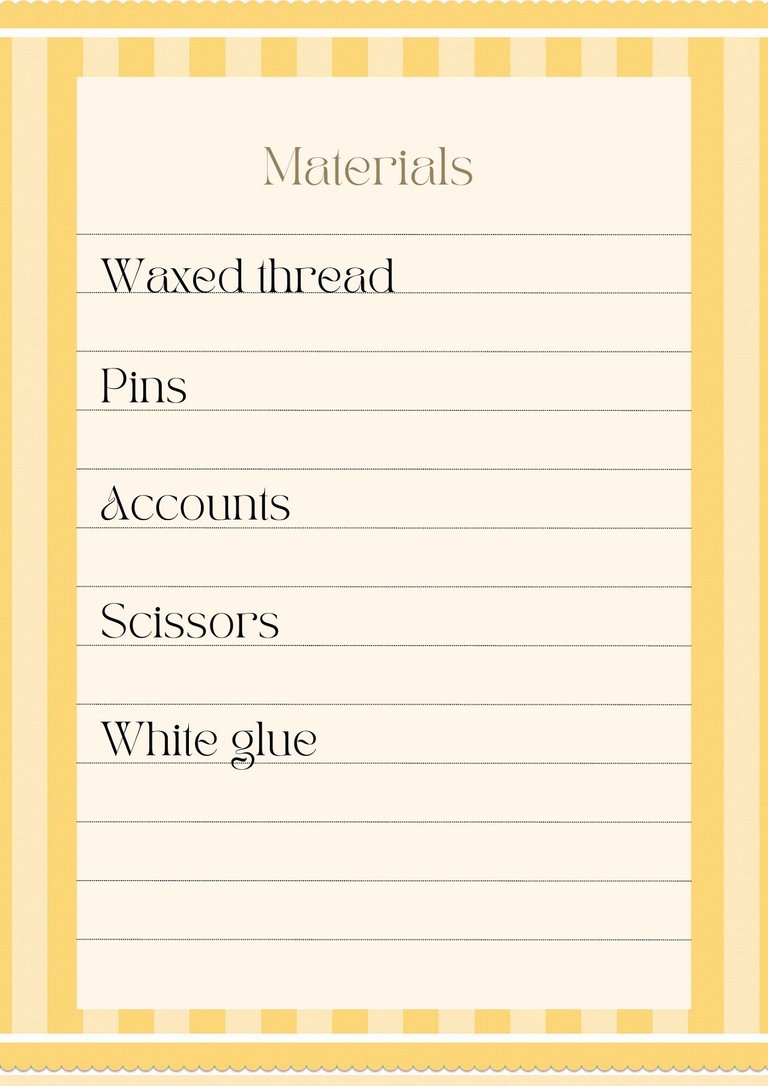
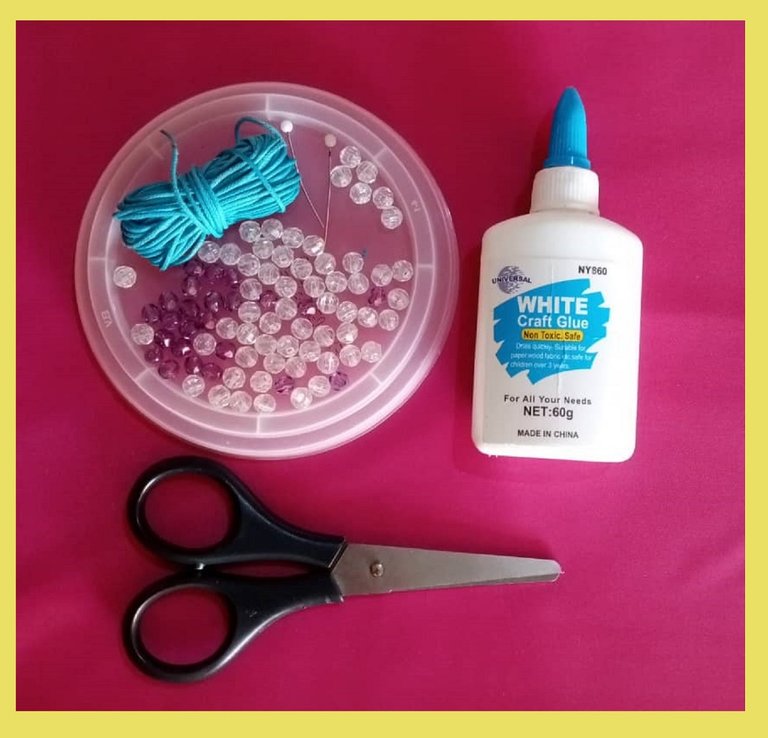
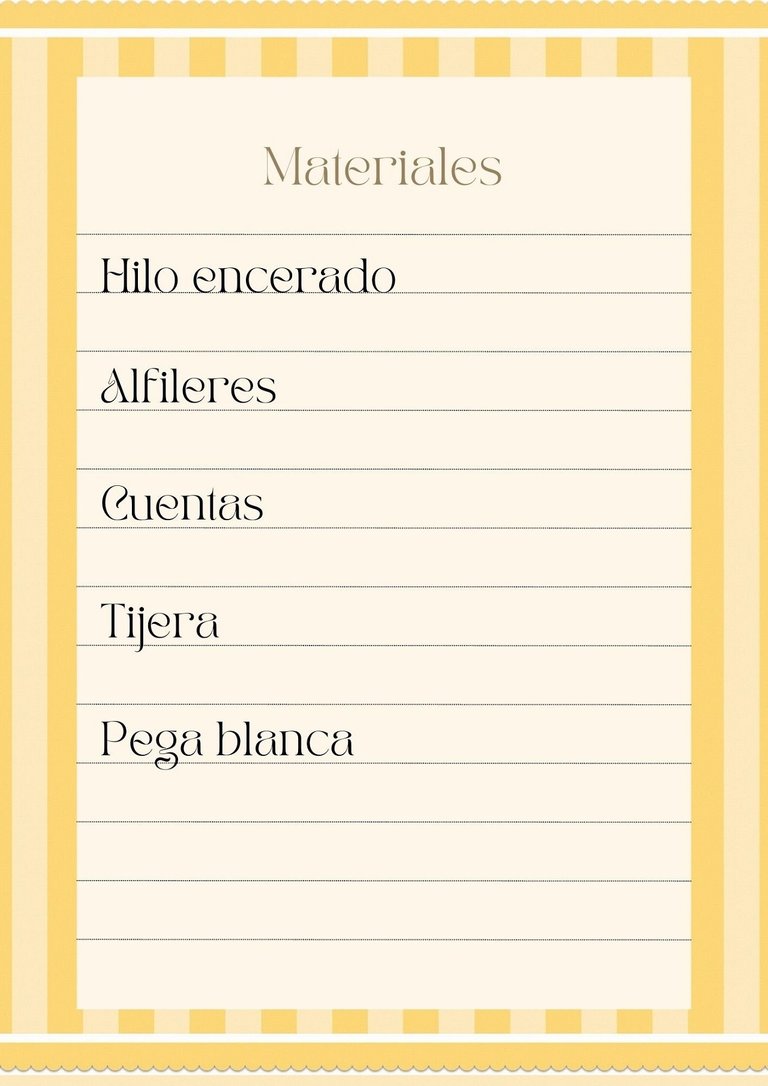
For this I used very few materials, I had a bracelet that had been damaged some time ago and I was left with the beads, so I looked for others of another color and decided to remake the bracelet but with another design.
Without further ado I show you how I did it and here is the step by step.
PROCEDURE:
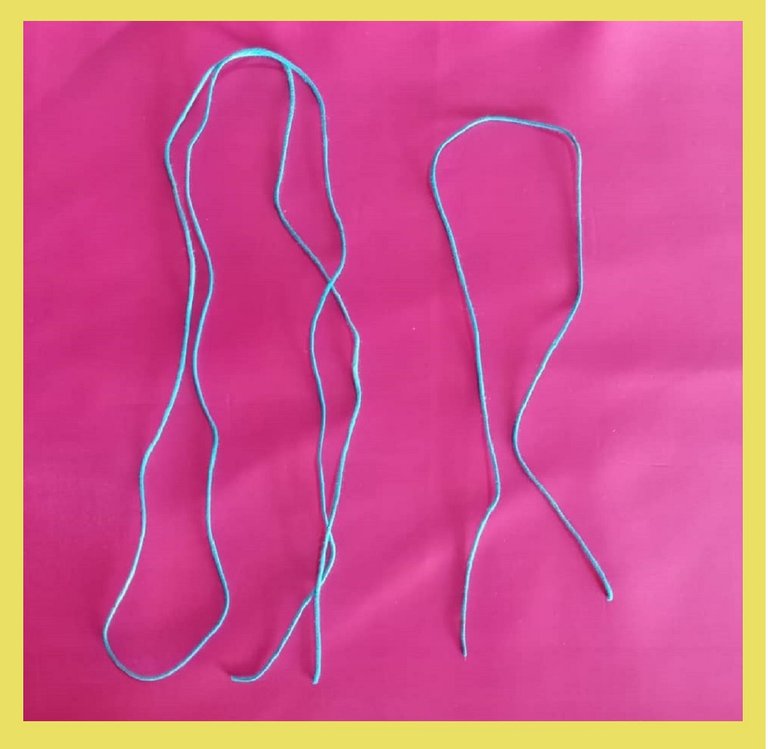
The first thing I did was to cut two threads, one 40 cm long and the other 1 meter long. I will make the bracelet with two threads, one will be fixed in the center and the longer one will be used to make the knots that will give shape to the bracelet.
Once I had my two threads cut, I proceeded to seal the ends and for that I used the white glue. I put a small amount on my finger and smeared it on the tip of the thread, I went around it and pressed well so that the tip was well soaked, I let it dry and once dry it will be easier to insert the beads. This is how I did with the rest of the tips. You can also place adhesive tape on the tip, the idea is that the tips do not open and make it difficult to place the beads.

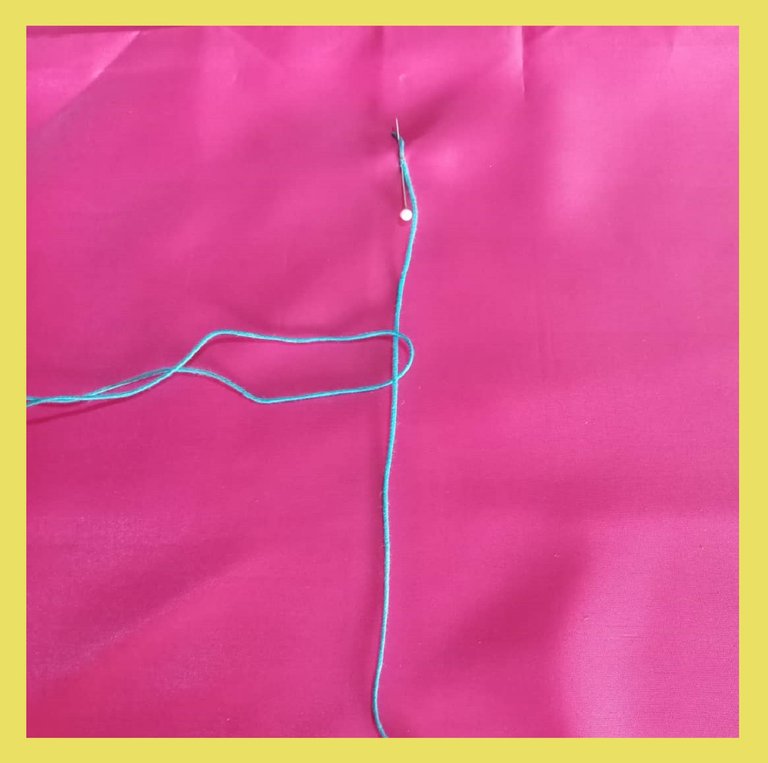
The shorter thread (I will call it main thread) I will fix it to the surface on which I will work, in this case on the fabric, with the pin I will attach it to a point, as you can see in the image. And with the longer thread I will place it around the main thread.
I will tie the thread about 7 cm from the end to the center and I will make a knot as follows: I will place the thread behind the main thread, the end of the left side I will pass it over the main thread and the thread of the right side I will place it over the left thread and then I will pass it under the main thread and I will take it out through the loop that I made with the left thread. I will pull the ends very carefully until the knot is closed and tighten it very well.
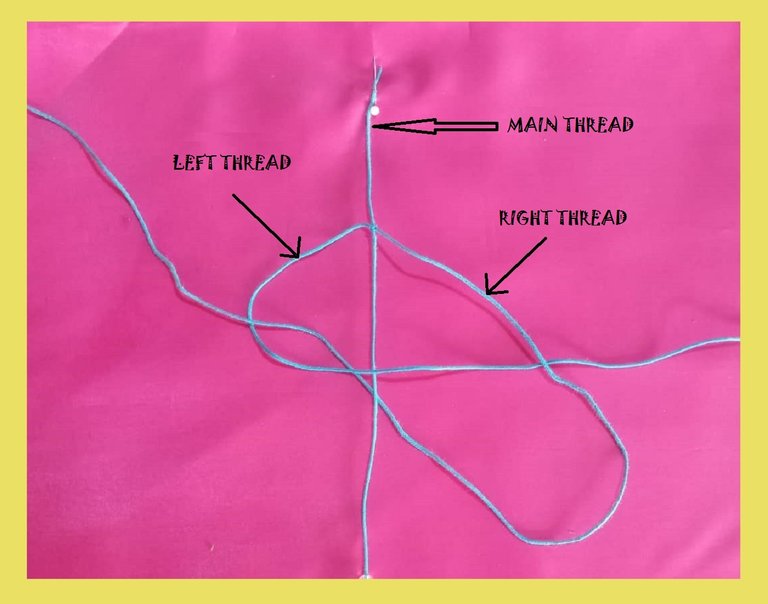
Continue making the stitch, but now in reverse, I mean, now I will place the right yarn behind the main yarn and the left yarn I will place it over the right yarn and pass it over the main yarn and take it out through the loop of the right yarn. And so on, I will knit one stitch over and one stitch under until I reach the desired length.
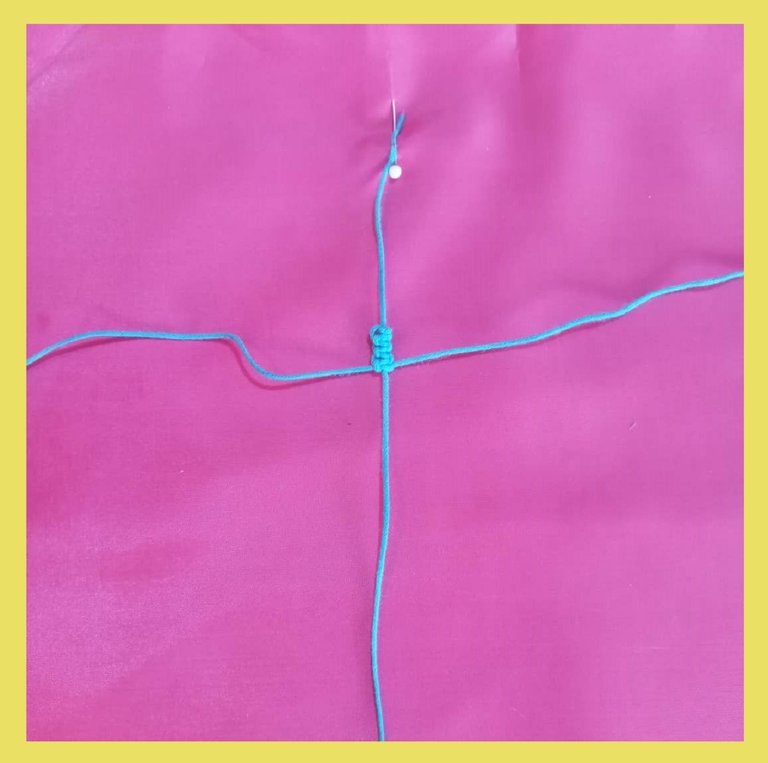
In my case I wanted it to be a short stitch so I knit 6 stitches.
This stitch is called flat knot or two-beat knot, it is so called because it is made up of two simple knots, one knot started with the right yarn and the other with the left yarn and vice versa. It is actually a fairly simple knot once you get the hang of it. It is not as complicated as it looks in the explanation.
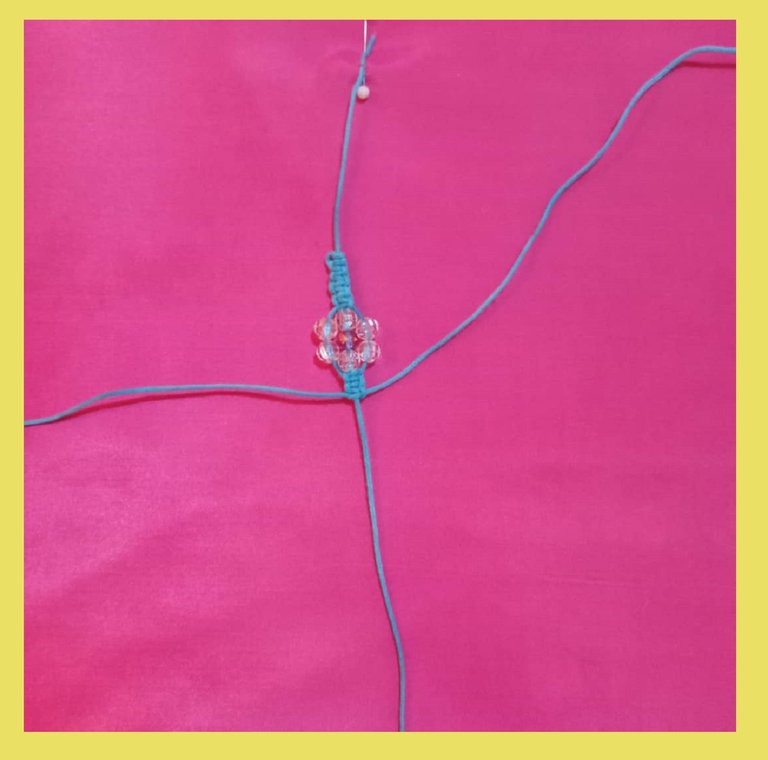
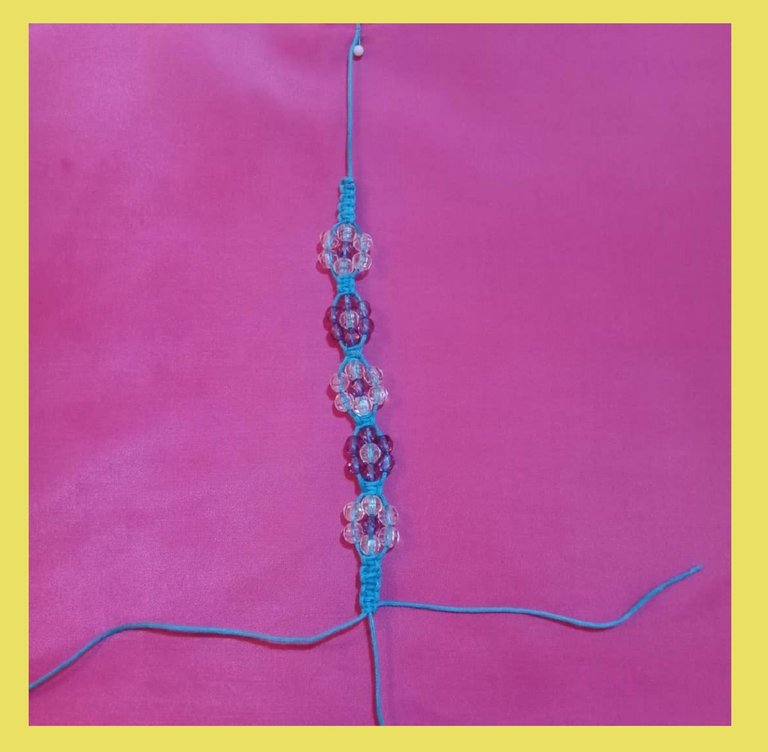
After I weaved all the knots to the desired length, I proceed to introduce the beads. I am going to make a flower with the beads and for that I will place three beads on the main thread, as I have two colors of beads I will take advantage of that to make the flower of one color and the center of another. So I place a transparent bead, a purple bead and another transparent bead. On the other two strands I will place two transparent beads on each strand.
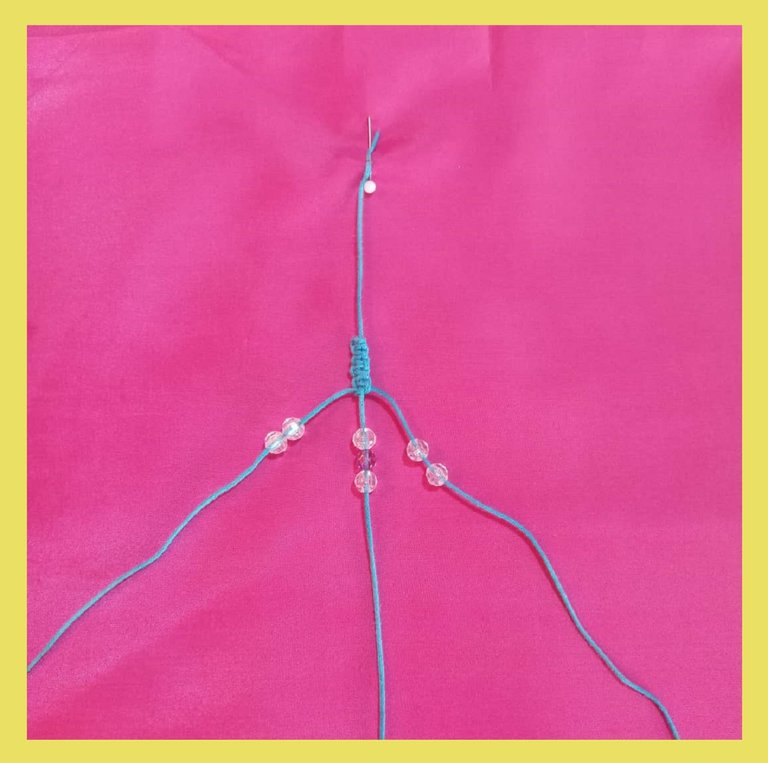
I will bring the beads up to where the knot is and so that they do not move I will make 6 flat stitches, as shown in the image.
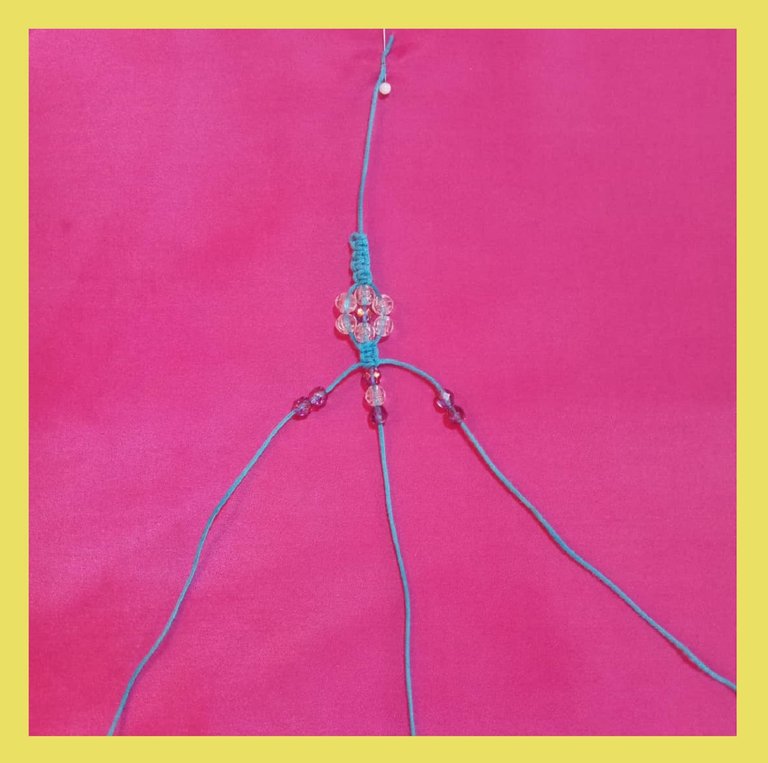
As I told you I have two colors of beads, so if the previous flower was transparent with a purple center, now I will do the opposite, I will do the purple flower with a transparent center.
And did the same procedure as before, three beads on the main strand, purple, transparent, purple and on the remaining strands two purple beads on each strand.
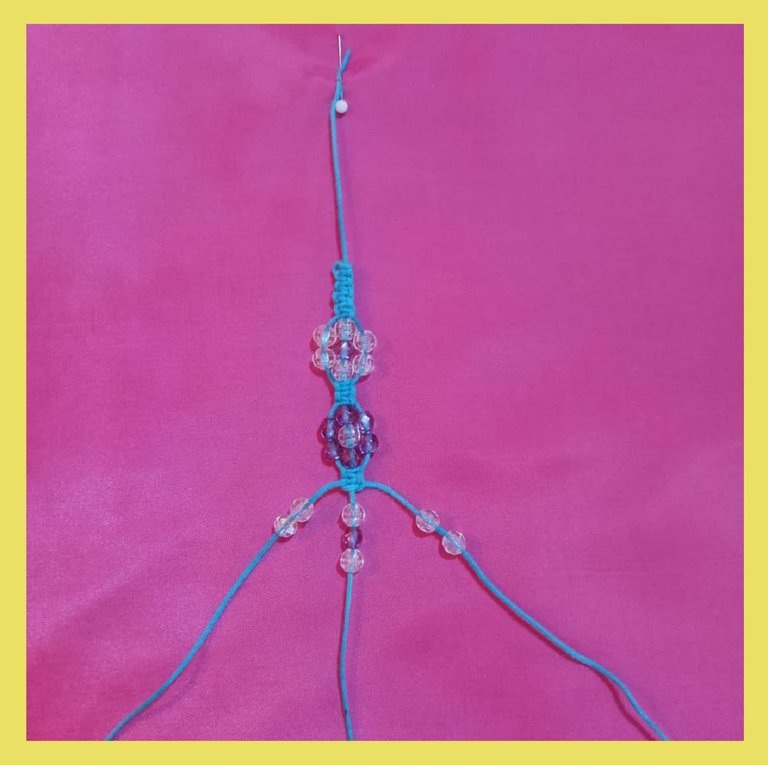
I will repeat the same step I did to make the transparent flower and then I will make another purple flower and finish with a transparent flower. Always making in the middle of each flower, the 6 flat stitches. I will finish with 6 flat stitches and cut the remaining ends.
 |  |  |
|---|
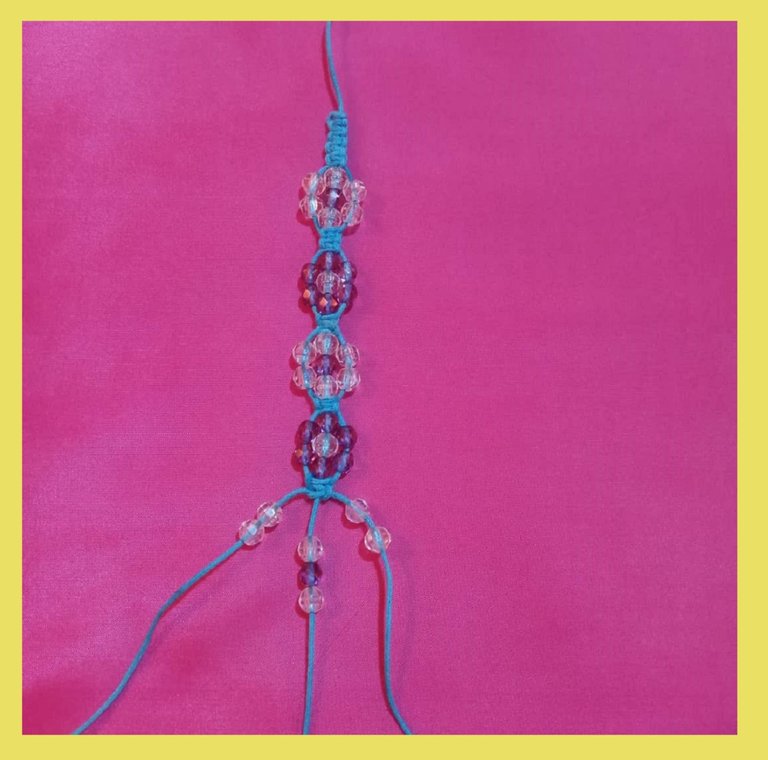
At the ends of the main thread, I will insert a purple bead to decorate the tip and tie a knot at the end to keep it from coming off.
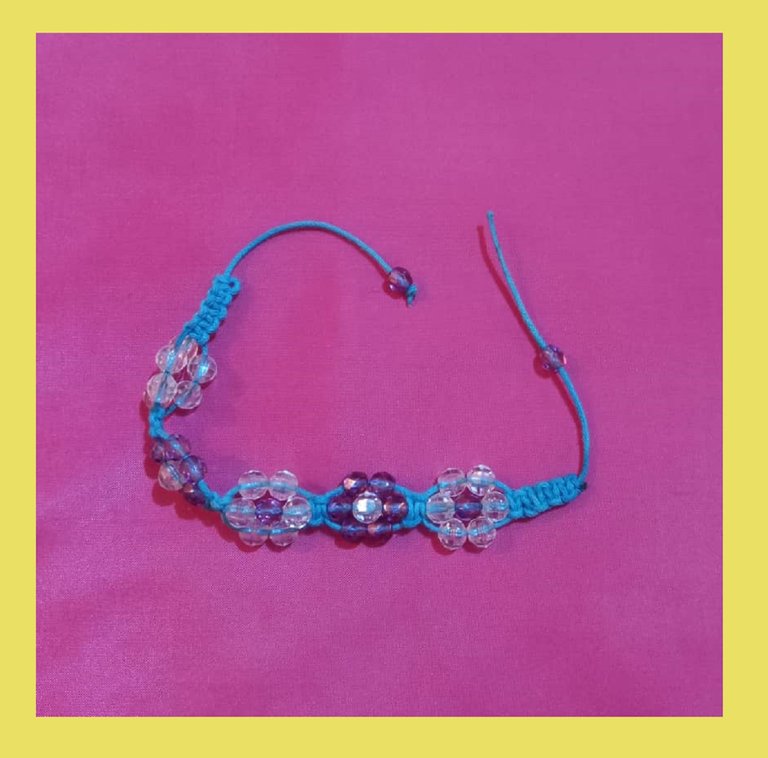
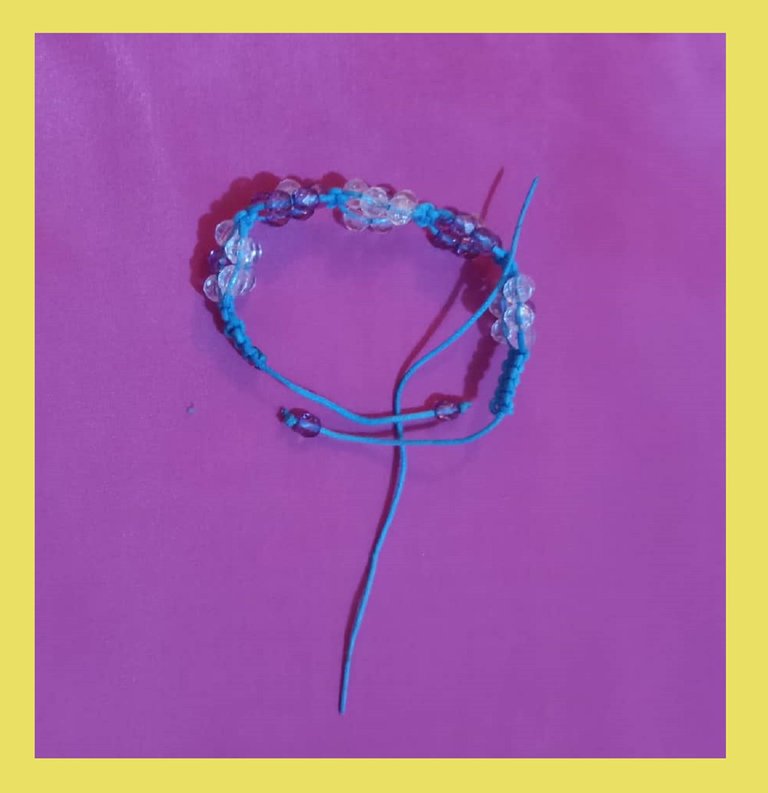
To make the clasp of the bracelet, I will use a piece of thread about 10 cm long and make flat stitches around the remaining ends of the bracelet, tighten the knots well and cut the remaining ends, as shown in the picture.
 |  |
|---|
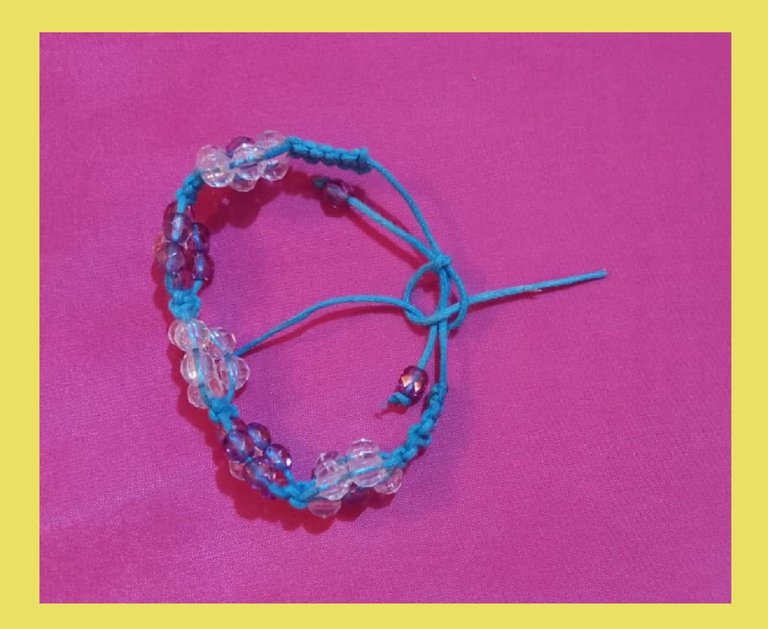
As you can see, the bracelet is ready.
Did you see how quick and easy it was?
It's just a matter of practicing the knots well and the rest is just a matter of letting your imagination run wild to make any design.
I hope you liked it, that you can make it too, either for yourselves or as a gift, the truth is that it looks very nice and it is a detail that you will surely appreciate.
I say goodbye as always, but not before thanking you for taking a little of your valuable time to visit my blog and to leave a comment, I hope to see you in my next publication, be well and take care of yourselves.
Original creation content:
✴️ All photos are my own taken and edited with my Alcatel cell phone.
✴️ The cover image was made with the Canva application and edited by me.
✴️ The divider was taken from Canva and edited by me in Paint.
✴️ The English translation was done with the help of DeepL.
✴️ The language indication letters, were taken from the Cooltext page and edited by me.

Hola mis queridos lectores, espero que se encuentren bien y que tengan o hayan tenido un excelente día. Hoy quiero compartir con ustedes como realice una pulsera, super fácil de hacer, de manera rápida y sencilla y la cual queda muy bonita.
Para ello use muy pocos materiales, tenía una pulsera que se me había dañado hacía tiempo y me quedaron las cuentas, así que busque otras de otro color y decidí rehacer la pulsera pero con otro diseño.
Sin más preámbulo les muestro como lo realice y aquí está el paso a paso.
PROCEDIMIENTO:
Lo primero que hice fue cortar dos hilos, uno de 40 cm y el otro de 1 metro de largo. La pulsera la realizaré con dos hilos uno va a quedar fijo en el centro y con el más largo es con el que realizaré los nudos que le darán forma a la pulsera.
Una vez que ya tengo mis dos hilos cortados, procedí a sellar las puntas y para eso utilice la pega blanca. Coloque una pequeña cantidad en mi dedo y la unte a la punta del hilo, le fui dando vueltas y apretando bien para que la punta quedara bien empapada, la deje secar y una vez seco se hará más fácil introducir las cuentas. Así hice con el resto de las puntas. También pueden colocar cinta adhesiva en la punta, la idea es que las puntas no se abran y se nos dificulte colocar las cuentas.
El hilo más corto (lo llamaré hilo principal) lo fijaré a la superficie en la que trabajaré, en este caso en la tela, con el alfiler lo sujete a una punta, como pueden observar en la imagen. Y con el hilo más largo lo colocaré alrededor del hilo principal.
Ataré el hilo a unos 7 cm desde la punta hacia el centro y haré un nudo de la siguiente manera: colocaré el hilo por detrás del hilo principal, la punta del lado izquierdo la pasaré por encima del hilo principal y el hilo del lado derecho lo colocaré por encima del hilo izquierdo y luego lo pasaré por debajo del hilo principal y lo sacaré por la lazada que hice con el hilo izquierdo. Iré halando las puntas con mucho cuidado hasta cerrar bien el nudo y apretaré muy bien.

Continúe haciendo el punto, pero ahora de manera inversa, me explico, ahora el hilo derecho lo colocaré por detrás del hilo principal y el hilo izquierdo lo colocaré por encima del derecho y lo pasaré por encima del principal y lo sacaré por la lazada del hilo derecho. Y así sucesivamente, realizaré un punto por encima y otro por debajo hasta completar el largo deseado.
En mi caso quería que fuera un corto así que realice 6 puntos.
A este punto se le llama nudo plano o nudo a dos tiempos, se le dice así porque está conformado por dos nudos simples, un nudo comenzado con el hilo derecho y el otro con el hilo izquierdo y viceversa. En realidad es un nudo bastante simple una vez que lo logras dominar. No es tan complicado como se ve en la explicación.
Después que tejí todos los nudos hasta el largo deseado, procedo a introducir las cuentas. Voy a hacer una flor con las cuentas y para eso colocaré en el hilo principal tres cuentas, como tengo dos colores de las cuentas voy a aprovechar eso para hacer la flor de un color y el centro de otro. Así que coloco una cuenta transparente, una morada y otra transparente. En los otros dos hilos colocaré dos cuentas transparentes en cada hilo.
Llevaré las cuentas bien arriba hasta donde está el nudo y para que no se muevan voy a realizar 6 puntos planos, tal como se ve en la imagen.
Como le había comentado tengo dos colores de cuentas, así que si la flor anterior fue transparente con el centro morado, ahora la haré todo lo contrario, haré la flor morada con el centro transparente.
Y realizó el mismo procedimiento anterior, tres cuentas en el hilo principal, morada, transparente, morada y en los hilos restantes dos cuentas moradas en cada hilo.
Repetiré el mismo paso que hice para hacer la flor transparente y luego haré otra flor morada y terminaré con una flor transparente. Siempre realizando en el intermedio de cada flor, los 6 puntos planos. Terminaré con 6 puntos planos y cortaré las puntas restantes.
| | |
|---|
En las puntas del hilo principal, introduciré una cuenta morada para decorar la punta y haré un nudo en la punta para que no se salga.
Para hacer el cierre de la pulsera, usaré un pedazo de hilo como de 10 cm y realizaré puntos planos alrededor de las puntas restantes de la pulsera, apretamos bien los nudos y cortamos las puntas restantes, tal como se muestra en la imagen.
| |
|---|
Como pueden ver ya está lista la pulsera.
¿Vieron que fue rápido y fácil?
Solo es cuestión de practicar bien los nudos y ya lo demás es solo dejar volar la imaginación para hacer cualquier diseño.
Espero que les haya gustado, que lo puedan realizar ustedes también, bien sea para ustedes mismos o para obsequiar, la verdad es que queda muy lindo y es un detalle que seguro apreciaran.
Me despido como siempre, no sin antes agradecerles que me hayan dedicado un poco de su valioso tiempo para visitar mi blog y para dejar un comentario, los espero en mi próxima publicación, pórtense bien y cuídense mucho.
Contenido de creación original:
✴️ Todas las fotos son de mi propiedad tomada y editadas con mi celular Alcatel.
✴️ La imagen de portada fue realizada con la aplicación Canva y editada por mí.
✴️ El separador fue tomado de la página Canva y editado por mí en Paint.
✴️ La traducción al idioma inglés fue realizada con ayuda de DeepL.
✴️ Las letras de indicación de los idiomas, fueron tomadas de la página Cooltext y editadas por mí.


