(ENG)
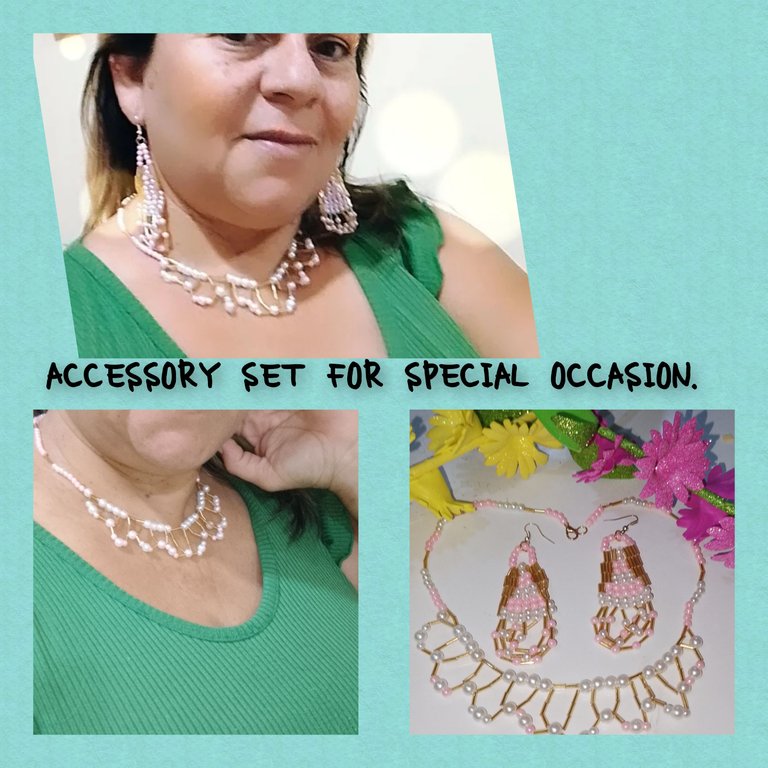
Hello beautiful people, from @jewelry, I am pleased to be with you, on this occasion, I show you a very simple step by step, to make a very beautiful and striking set of accessories, ideal to fall in love with, on a special occasion, made of beads and pearls of different sizes. I invite you to follow me.
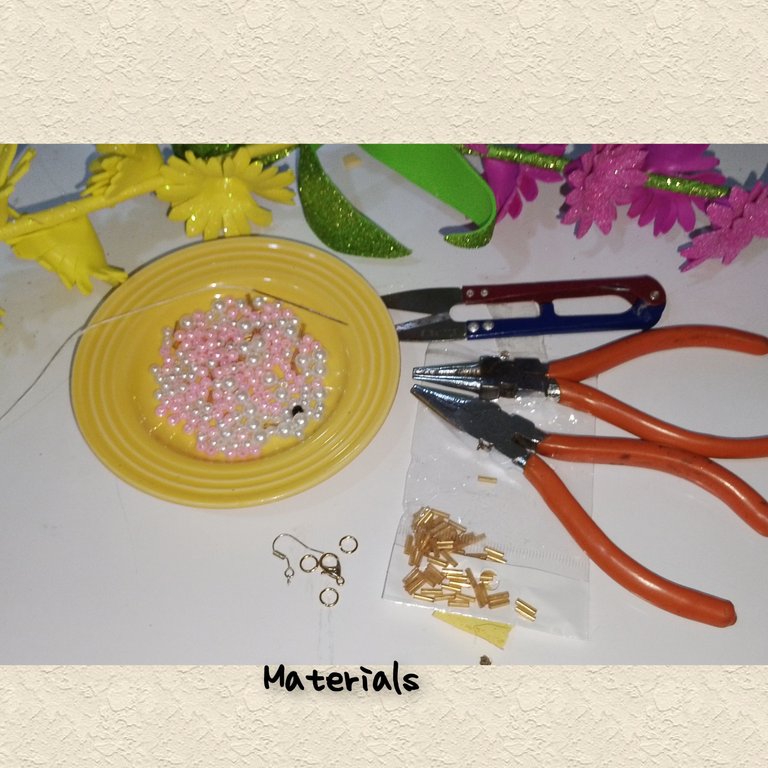
Materials.
. White pearls, 4 and 8mm.
. 4mm pink pearls.
. Golden beads
.needle and thread.
. Jewelry earrings.
. Necklace pin.
. Earring hook.
. Scissors.
. Jewelry tweezers.
Steps:
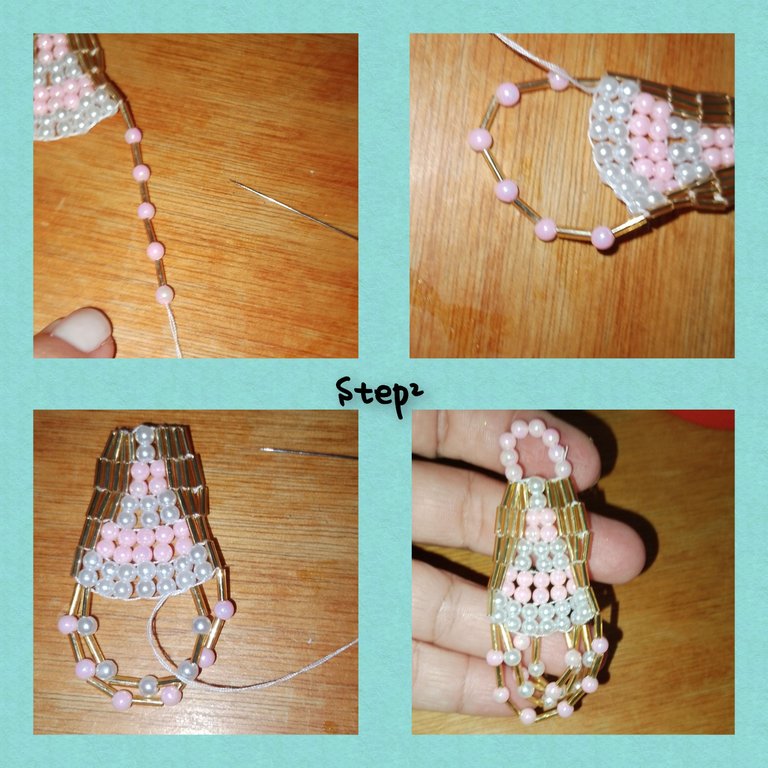
1.) I insert two golden strands into the needle and thread together in a pair of two and tie, with several knots, I place a new strand, I take it to the bottom of the thread, and to match with the first two, I insert, in the same way. In this way, I place another bead, I continue, but this time, I place two 4mm beads, to glue it to the bead, I introduce the needle inside bead number 4, and then I pass inside the beads, in this way, I repeat the row of eclairs. I make four more rounds, for this I will use the same number of golden beads, but I alternate the colors and quantity of pearls. For this round two I no longer place a row of two pearls but rather two rows each with two pearls, and on this occasion, I use the pink color in pearls. For rows 3/5, I start to decrease the gold beads, but increase the rows of pearls. That is to say, I started with one row, for the second pass, two rows, for the third three, for the fourth, five, and for the fifth and final pass seven.

2.) Located at last number 5, I place seven beads on the needle separated by a pink bead and transfer from one side to the other and introduce the needle through the bridge, which leaves the thread, I advance to the next bridge . Now I place six golden beads on the needle, separated by white pearls, transfer to the next side or end, maintaining the same distance between the bridges, I advance one more bridge and place four beads separated by white pearls, like this I advance twice more, making decreases in beads and beads, alternating between colors. Achieving four attractive pendants, I tie very well and with the needle, I walk inside the beads until I am at the top. I place eight pink pearls on the needle and go to the other side. Now I tie very well and cut the residual thread.
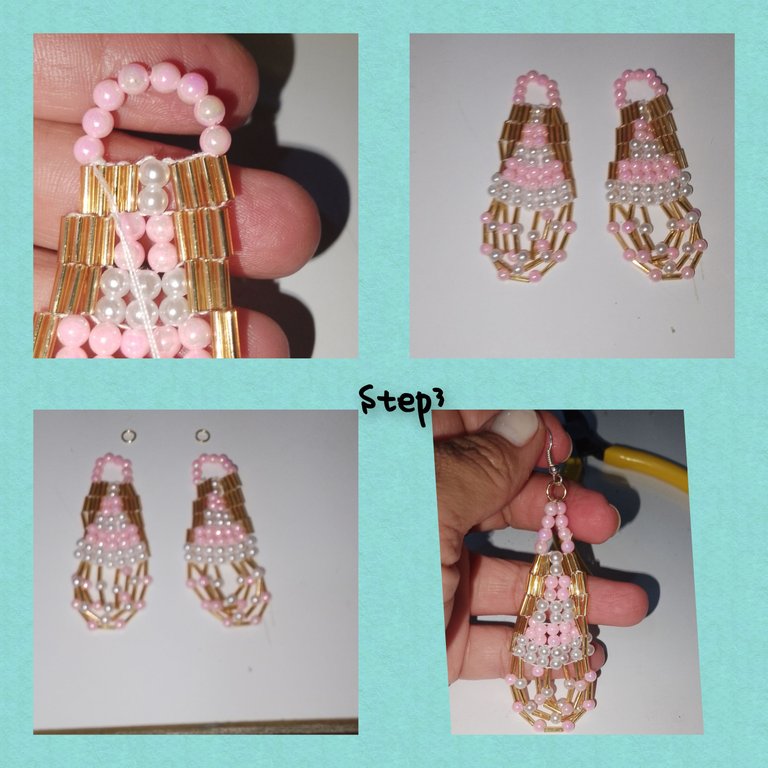
 3.) The next thing will be to place a jewelry ring on the upper part and inside it, the hook, using the jewelry pliers I open and close the ring, then repeat to
4.) I start by tying the necklace pin with the thread, then I place three pink pearls in a row, then two gold beads, I continue, and place a group of three white pearls and three pink ones, separated by two beads. I repeat two more times, separating with two beads, I will place four groups of pearls n8, reaching group n4, pearls n8, I repeat, the beginning, but this time, I will place a small jewelry earring.
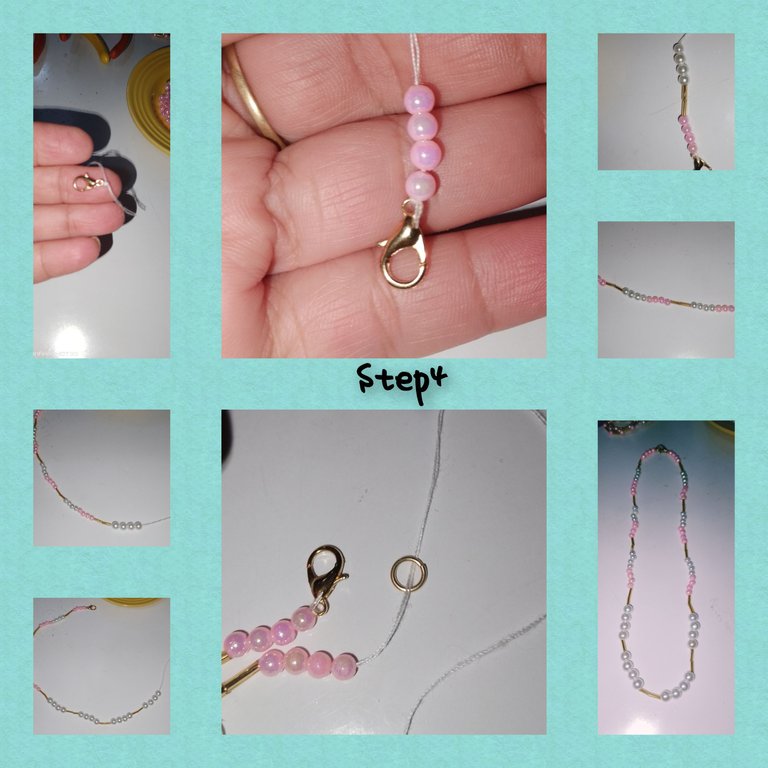
5.) Without cutting the thread yet, but well tied to the ring, I return to the center of the necklace, inside the pearls and beads and I position myself before the first group of pearls n8, which in the previous pass or In the previous step it was group n4. That is, in the beads that separate it, I place a bead, a white bead #8, and a bead on the needle. I advance and pass inside the first bead #8.I now place two beads, a pearl and two beads and I advance by introducing the needle, through the pearl before the beads, I repeat two more times, and located in the center of the necklace, I place three beads and a pearl, then three beads and I move forward, once this is done I repeat.
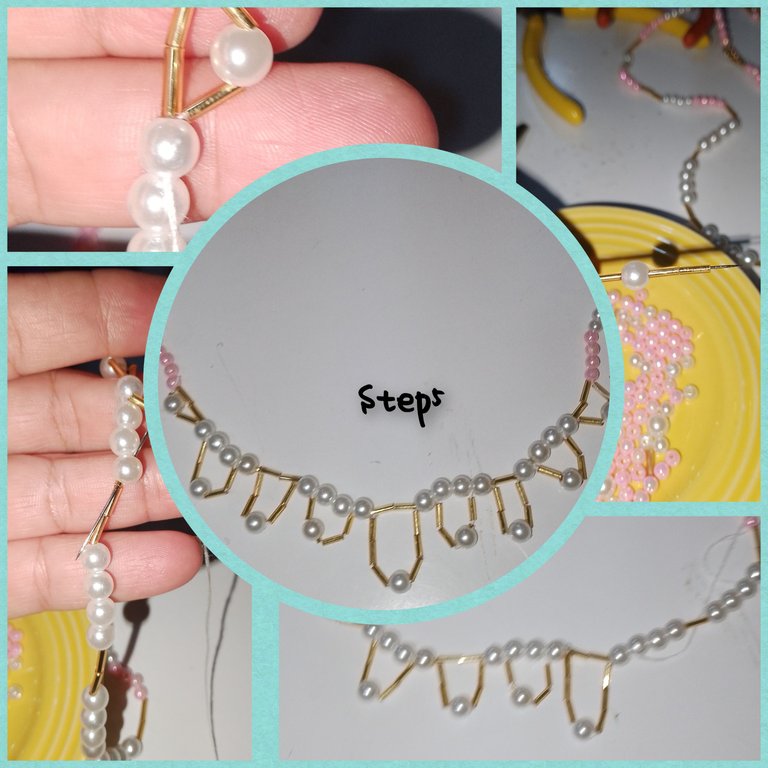
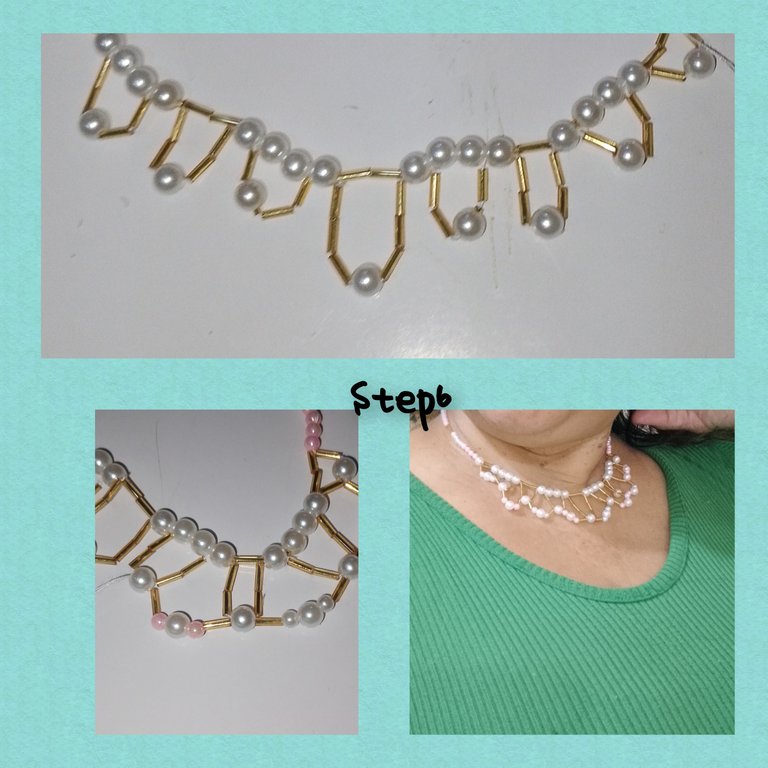
6.) I continue with the decoration of the necklace, and now in the separation spaces, I will place A bead, a bead no. 4, in the center a no.8 and a number four, and I proceed by inserting the needle into the bead no. placing 4 four white pearls in one and pink in the next. In this way, he lengthened the necklace a little more, making it more attractive and elegant.
. All photos were taken with my smartphone.
. Use incollage.
. Use language translator.
Grateful for following me to the end, see you soon.
(ESP)
Hola gente bonita, de @jewelry, me complace estar, con ustedes, en esta ocasión, les muestro un muy sencillos paso a paso, para hacer un muy hermoso y llamativo, set de accesorios, ideales para enamorar, en una ocasión especial, hecho de canutillos y perlas de diferentes tamaño. Les invito a seguirme.
Materiales.
. Perlas de color blanca, 4 y 8mm.
. Perlas rosadas 4mm.
. Mostacillas doradas.
.aguja e hilo.
. Aritos de bisutería.
. Pasador para collar.
. Anzuelo para aretes.
. Tijeras.
. Pinzas de bisutería.
Pasos:
1.) Introduzco en la aguja e hilo, dos canutillos dorados junto en par de dos y ato, con varios nudos, coloco un nuevo canutillo,llevo hasta el fondo de el hilo, y para justar con los dos primeros, introduzco, de igual manera, coloco otro canutillo, continuo, pero esta vez, coloco dos perlitas de 4mm,para pegarla a los canutillos introduzco la aguja por dentro de el canutillo n4, y luego paso por dentro de oas perlas, de esta forma, repito la fila de canutillos. Doy cuatro vueltas más, para ello usaré la misma cantidad de canutillos dorados, pero alterno los colores y cantidad de perlas,Para esta vuelta dos ya no coloco una fila de dos perlas sino dos filas cada una con dos perlas, y en esta oportunidad,uso el color rosado en perlas. Para las pasadas 3/5, comienzo a disminuir las mostacillas doradas, pero aumento las filas de perlas. Es decir que comencé con una fila, para la segunda pasada, dos filas, para la tercera tres, para la cuarta, cinco y para la quinta y última pasada siete.
2.) Ubicada en la pasado n5, coloco en la aguja, siete canutillos separados por una perlita de color rosa y traspaso de un lado a el otro e introduzco la aguja, por el puente, que deja el hilo, avanzo hasta el siguiente puente. Ahora coloco en la aguja seis, canutillos dorados, separados por perlitas de color blanca, traspaso hasta el siguiente lado o extremo, manteniendo la misma distancia entre los puentes, avanzo un puente más y coloco cuatro canutillos separados por perlas de color blanca,, así doy avance dos veces más, haciendo disminuciones en canutillos y perlas, alternando entre colores.logrando cuatro atractivos colgantes, ato muy bien y con la aguja, voy caminando por dentro de los canutillos hasta ubicarme en la parte superior. Coloco en la aguja ocho perlitas rosadas y paso a el otro lado. Ahora sí, ato muy bien y corto el hilo residual.
3.) Lo siguiente será, colocar una arito de bisutería en la parte superior y dentro de el, el anzuelo, usando las pinzas de bisutería abro y cierro el arito, luego repito para
4.) Comienzo atando con el hilo, el pasador para collar, luego coloco tres perlitas, rosadas seguidas, luego dos canutillos dorados, continuo, y coloco un grupo de tres perlitas blancas y tres rosadas, separadas por dos canutillos. Repito dos veces más, separando con dos canutillos, colocaré cuatro grupos de perlas n8, llegado a el grupo n4, de perlas n8, repito, el inicio, pero en esta oportunidad, colocaré un pequeño arito de bisutería.
5.) Sin cortar aún el hilo, pero bien atado a el arito, me devuelvo hasta el centro de el collar, por dentro de las perlas y canutillos y me ubico antes de el primer grupo de perlas n8, que en la pasada anterior o en el paso anterior fue el grupo n4. Es decir en los canutillos que lo separan, coloco en la aguja un canutillo, una perla n8 de color blanca y un canutillo.avanzo y paso por dentro de la primer perla n8. Coloco ahora dos canutillos, una perla y dos canutillos y avanzo introduciendo la aguja, por la perla antes de los canutillos, repito dos veces más, y ubicada en el centro de el collar, coloco, tres canutillos y una perla, luego tres canutillos y avanzo, hecho esto repito.
6.) Continuo, con la decoración de el collar, y ahora en los espacios de separación, colocaré
Un canutillos, un perla n4, en el centro un n.8 y una número cuatro, y vanzo introduciendo,ñla aguja, en la perla n8 de la pasada anterior, y de esta manera, avanzo, por todo el centro de el collar, colocando en un perlitas 4cuatro de color blanca y en la siguiente rosada. De esta manera, alargó un poco más el collar, haciéndolo más vistoso y elegante.
. Todas las fotos, fueron tomadas con mí teléfono inteligente.
. Use incollage.
. Use traductor lenguaje.
Agradecida me hayas seguido hasta el final, será hasta pronto.
