(ENG)
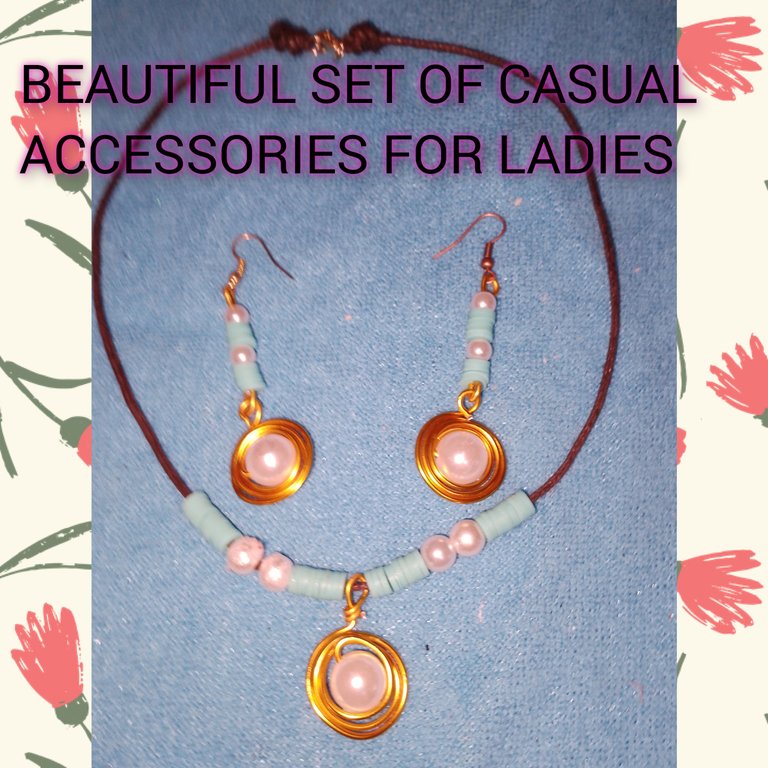
Hello, I hope everyone is here, very well, full of enthusiasm and new ideas to show. I am pleased to be, for this beautiful @jewelry Community. I'm going to show you a very easy tutorial on how to make a beautiful set of casual accessories, ideal for going out to work, college, shopping, or even a big youth party. It is very simple to make and its result is very satisfactory, its cost is very low, and they are materials that you could even have at home. So the invitation is to follow me, until the end.
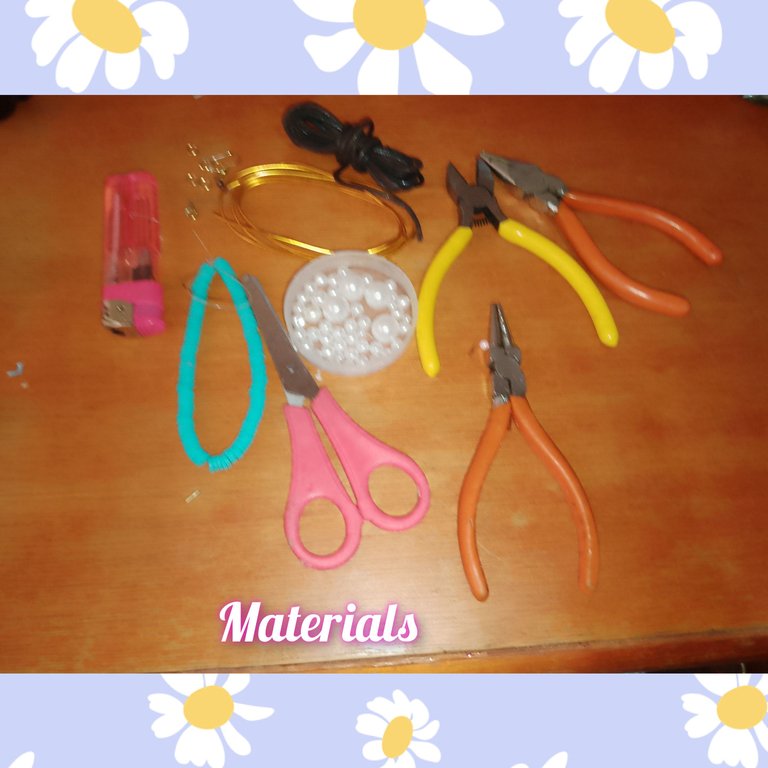
Materials.
. Pearls n8 and n10, white.
. Leather, round.
. Blue pucca.
. Necklace pin.
. Jewelry earrings
. Earring hooks.
. Wire n 18.
. Jewelry tweezers
. Yeskero
. Toothpick.
. Scissors.
. Ruler.
 Steps:
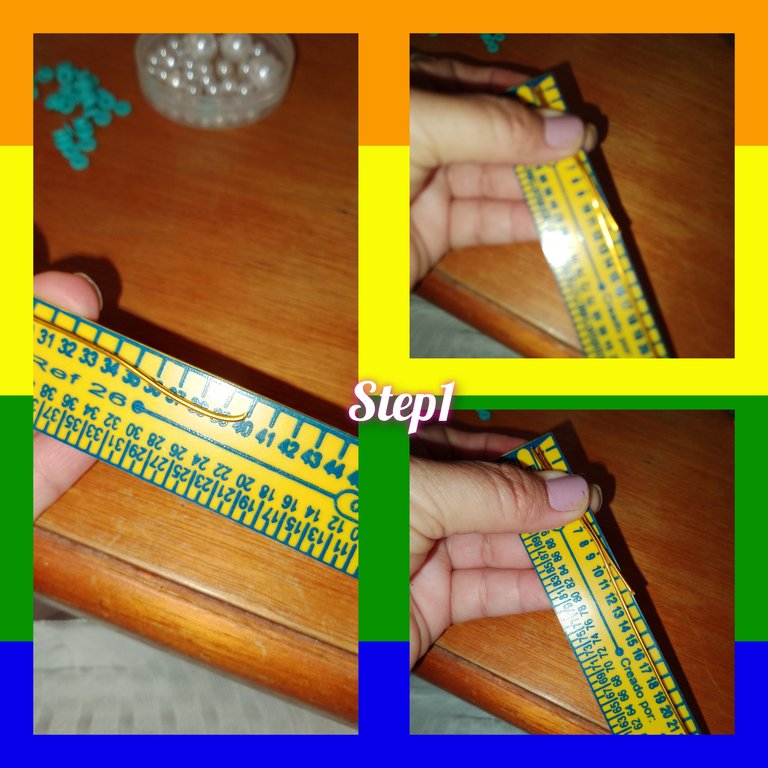
1.) I start by marking and cutting three pieces of wire 40 cm long. Frame and cut two 12cm long.
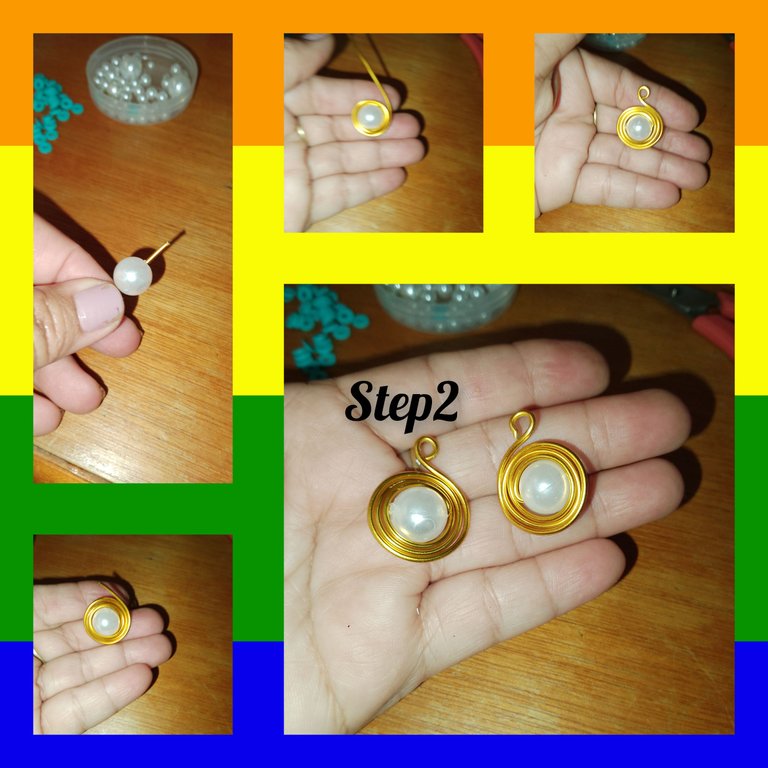
2.) I take a first piece of wire and insert it into one of the beads number 10, and I make turns with it, I make a total of four turns, first around the beads, and the next following the sequences of the wire, in the end, with the help of the round tip pliers, I make a small ring and under the coil, the residual wire, in this way, I repeat and formed two small charms.
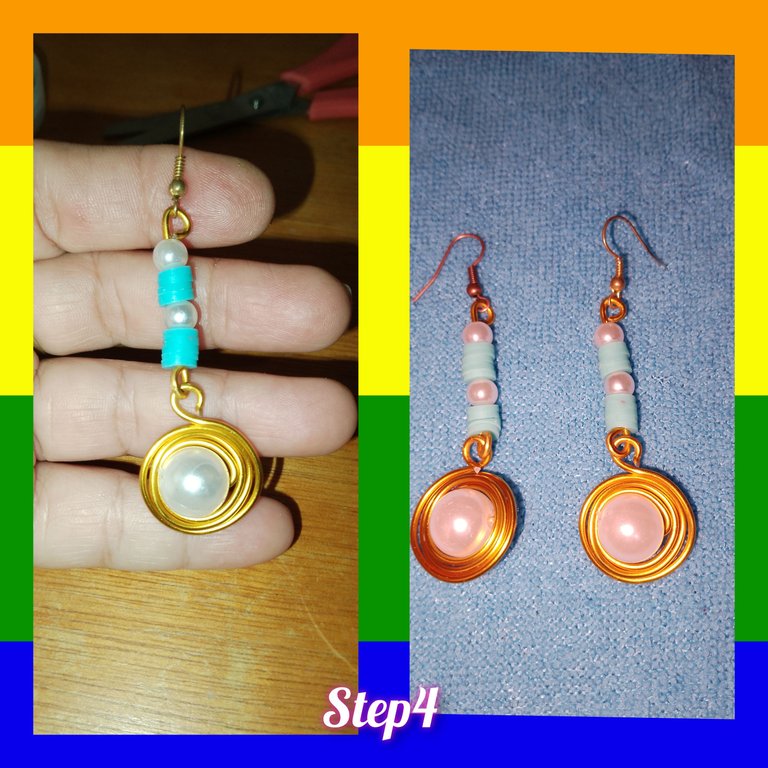
3.) I take the 12 cm wire, I make a ring at one end, with the help of the round tip pliers, I insert into it a number 8 pearl, five puccas, a new n8 pearl and five puccas. To continue, I make a ring at the next end, without closing the last ring I place it on the pendant made in step two.
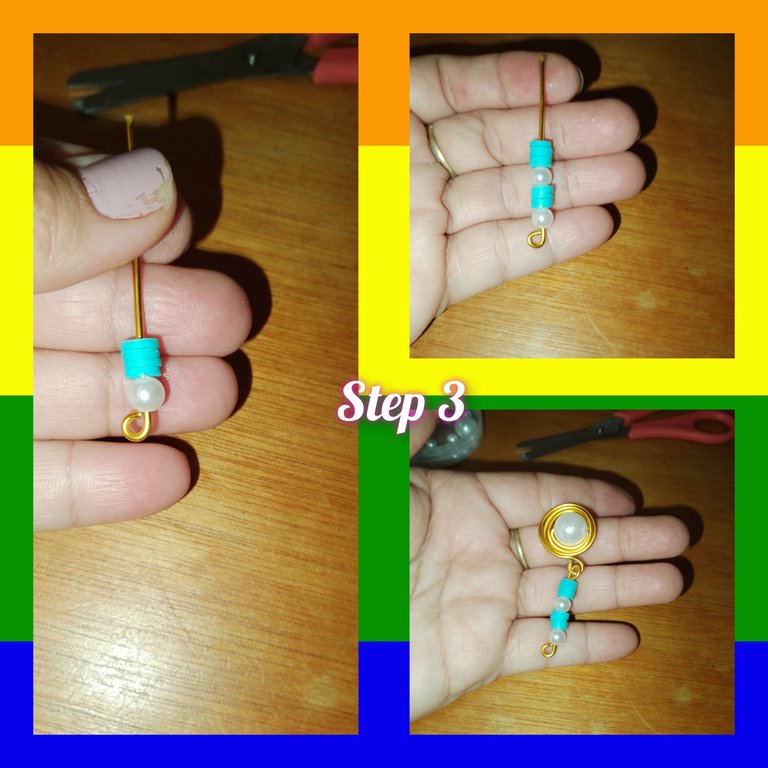
3.) To assemble the earrings, now all that remains is to place the earring hook and that's it. In this way, the earrings in this accessory set are assembled.
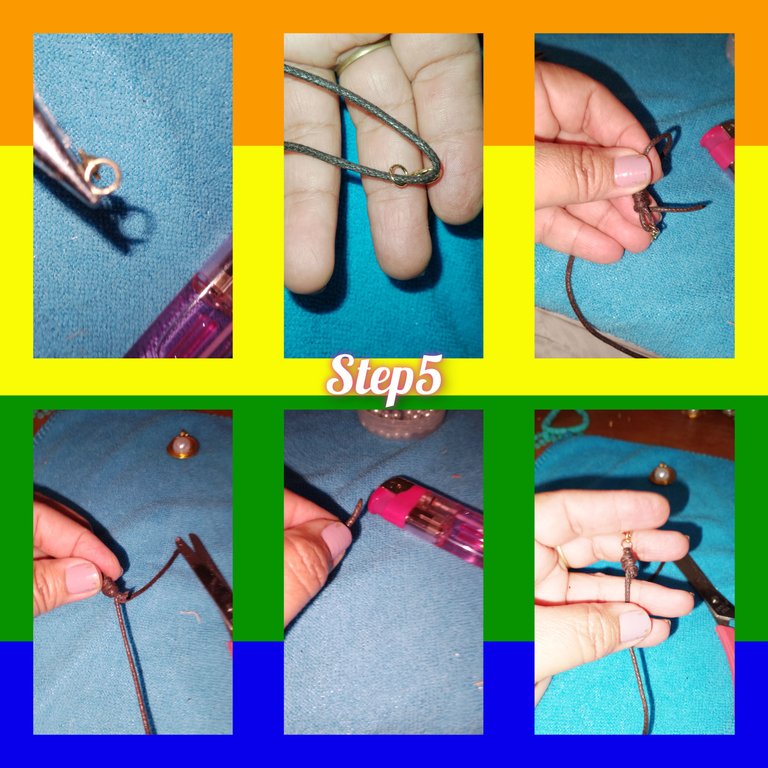
4.) I cut a piece of round leather, insert a jewelry earring and to fix it and prevent it from escaping, I tie a Franciscan macramé knot, put a little fire on the residue and apply pressure, not to make it stick.
5.) I cut the thin tip of a wooden stick, put fire to the next end of the leatherette and glue the toothpick, this to make it easier for me to get the pieces into the leatherette.
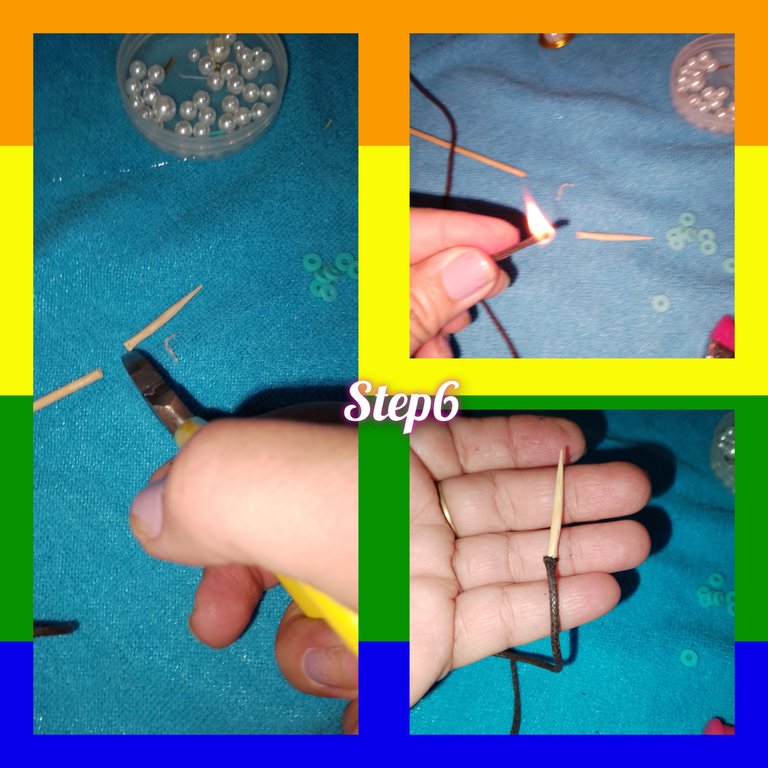
6.) I introduce ten picas to the leatherette, followed by two pearls n8, then 10 more puccas, and incerti, the last one says, done with the same process of step n2.

7.) Now continue, the other side of the necklace, repeating the processformer.
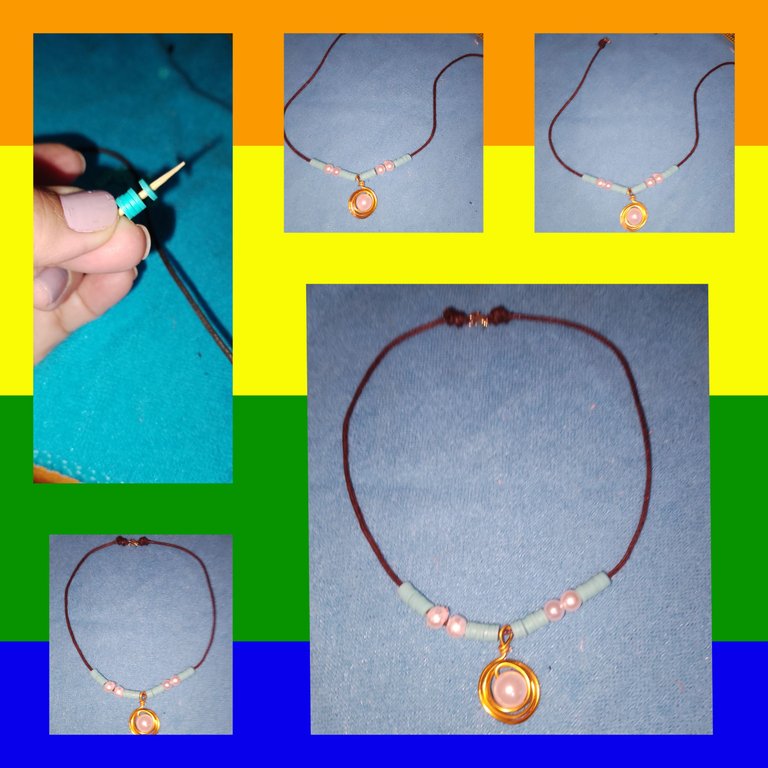
8.) To finish, I place a rite, on the other side, and repeat the Franciscan knot. In this way, I conclude the making of the necklace.
. All photos are my property, taken with my smartphone.
. Use incollage to show the steps. Use language translator.
Grateful for following me until the end, it will be until the next opportunity.
(ESP)
Hola, espero todos se encuentren por acá, muy bien, llenos de mucho entusiasmo e ideas nuevas para mostrar. Me complace estar, por esta linda Comunidad @jewelry. Paso a mostrarles un muy fácil, tutorial, de como hacer un hermoso juego de accesorios casuales, ideales para salir a el trabajo,a la universidad, de compras en fin hasta una gran fiesta juvenil. Es muy sencillo de hacer y su resultado muy, satisfactorio, su costo es muy bajo, y que son materiales que incluso, podrías tener en casa. Así que la invitación es a seguirme, hasta el final.
Materiales.
. Perlas n8 y n10, de color blanca.
. Cuerito, redondo.
. Pucca azules.
. Pasador para collar.
. Aritos de bisutería
. Anzuelos para aretes.
. ALambre n 18.
. Pinza de bisutería
. Yeskero
. Palillo de dientes.
. Tijeras.
. Regla.
Pasos:
1.) Comienzo marcando y cortando, tres pedazos de alambre de 40 cm de largo. Marco y corto dos de 12cm de largo.
2.) Tomo un primer pedazo de alambre e introduzco en una de las perlas n10, y doy vueltas con el, doy un total de cuatro vueltas, primero al alrededor de la perlas, y las siguiente siguiendo las secuencias de el alambre, en el extremo, con ayuda de la pinza punta redonda, hago un pequeño arito y debajo de el enrollo, el alambre residual, de esta manera, repito y formó dos pequeños dijes.
3.) Tomo el alambre de 12 cm, hago en uno de los extremos un arito, con ayuda de la pinza punta redonda, introduzco en el, una perla número 8, cinco puccas, una nueva perla n8 y cinco puccas. Para continuar, hago un arito en el siguiente extremo,sin cerrar el último arito coloco en el dije hecho en paso dos.
3.) Para armar los aretes, ahora solo queda, colocar el anzuelo para aretes y listo. De esta manera, quedan armado los aretes de este set accesorios.
4.) Corto un pedazo de cuerito redondo, introduzco un arito de bisutería y para fijar y evitar se escape, hago un nudo Franciscano, de macramé, pongo un poco de fuego a el residuo y hago presión,nopara que este pegue.
5.) Corto la punta delgada de un palillo de madera, pongo fuego a el siguiente extremo de el cuerito y pego el palillo, esto, par que me facilite la entrada de las piezas a el cuerito.
6.) Introduzco a el cuerito, diez picas, seguida de dos perlas n8, luego 10puccas más, e incerti, el último dice, hecho con mismo proceso de paso n2.
7/8.)Ahora continuo, el otro lado de el collar, repitiendo el proceso anterior, )para finalizar coloco un arito, en el otro lado, y repito el nudo Franciscano. De esta manera, doy por concluido, la elaboración de el collar.
. Todas las fotos son de mí propiedad, tomadas con mí teléfono inteligente.
. Use incollage para mostrar los pasos.
Use traductor lenguaje.
Agradecida me hayas seguido hasta el final, será hasta una próxima oportunidad.