( ENG)
Very nice Three Kings night, I wish you all at @jewelry, I am pleased to be with all of you, also wishing me infinite success and good health this year. Today I am going to show you a very, easy, beautiful and delicate Ser of accessories, ideal to show off on this very special date, such as Three Kings Night, it is a set of earrings, inspired by the beautiful crowns that they wear and a colorful red necklace that completes the third crown. Use jewelry and wire making techniques for them, the result is incredible. I invite you. Follow me.

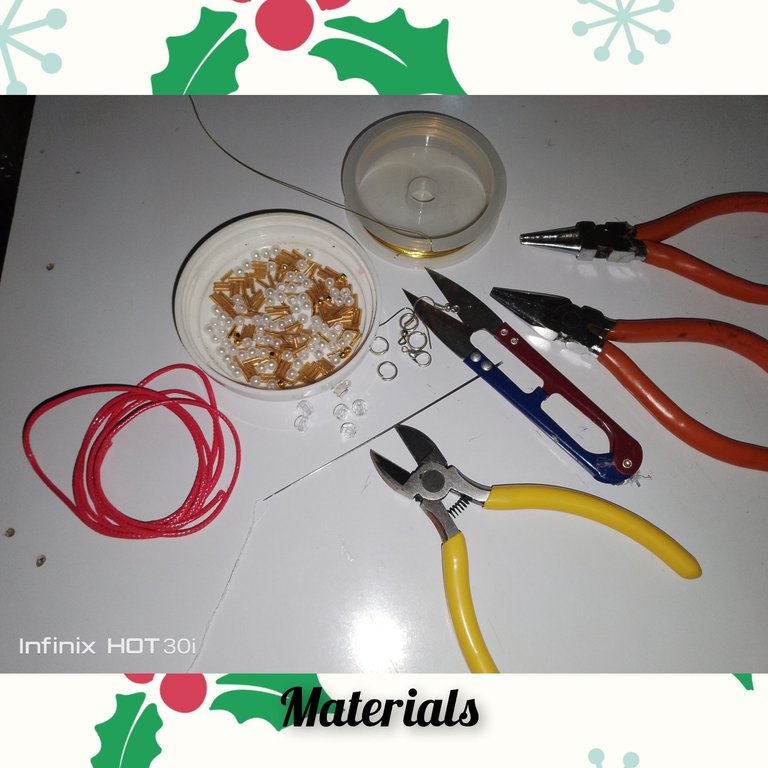
Materials.
. Golden eclairs.
. No. 6 white pearls.
. Golden pearls.
. Needle and thread.
. Wire n 0.5 . Red leather.
. Square staples.
. Jewelry earrings.
. Necklace pin.
. Earring hooks.
. Jewelry tweezers.
. Scissors .
. Czech crystals
Steps:
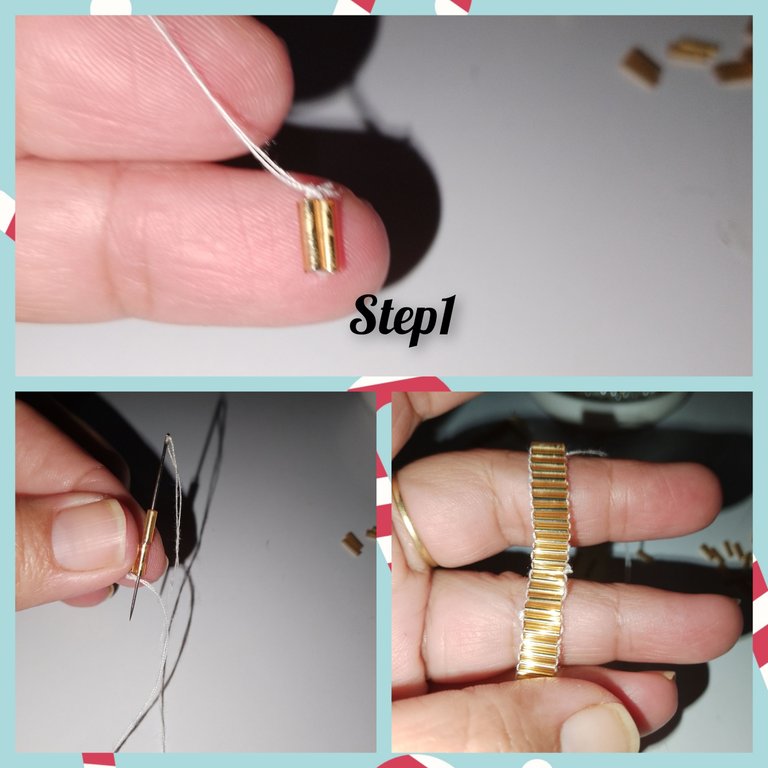
1.) I begin by introducing and tying two bead beads with several knots, I introduce a third bead bead, and I pass through the previous one with the needle, and in this way, I introduce a total of thirty golden bead beads, which one to each other, introducing the needle , inside the first.
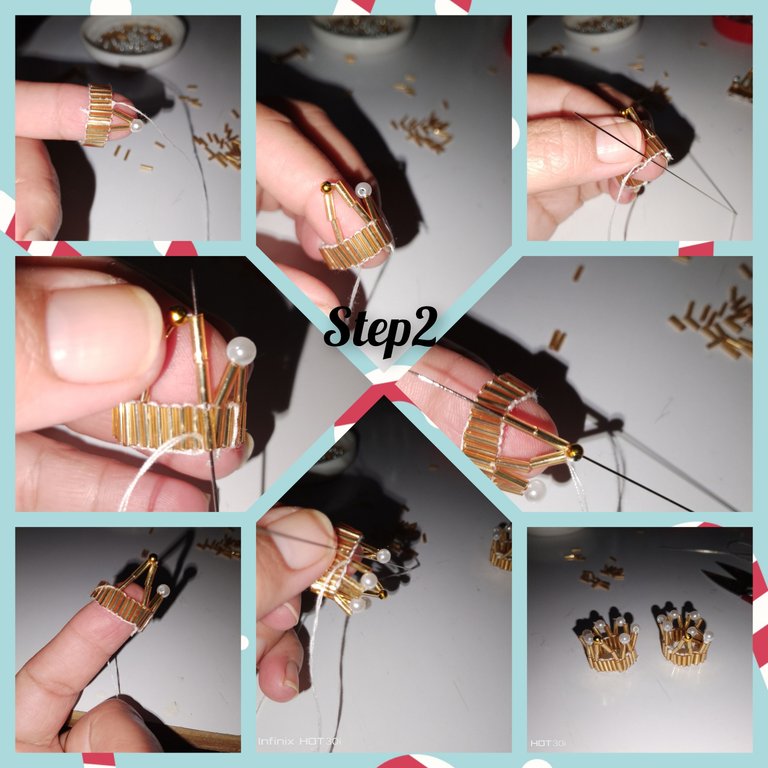
2.) I put a bead, a white pearl and a bead on the needle, I leave two bead beads and insert the third bead, then I place two bead beads, a golden pearl and two bead beads, I leave four bead beads and insert the needle into the fifth one. , these will be in stitch shape, now, I begin to make the route with a bead and a white pearl, removing one bead from the hoop made in the previous step, this and the following ones will be square. Once I arrive at the starting point, I tie several knots to tie it well.
3.) I run two pieces of wire, insert the white bead into the white bead, which forms the first square, put the wire in equal parts and begin to circle each other, repeat on the other side.
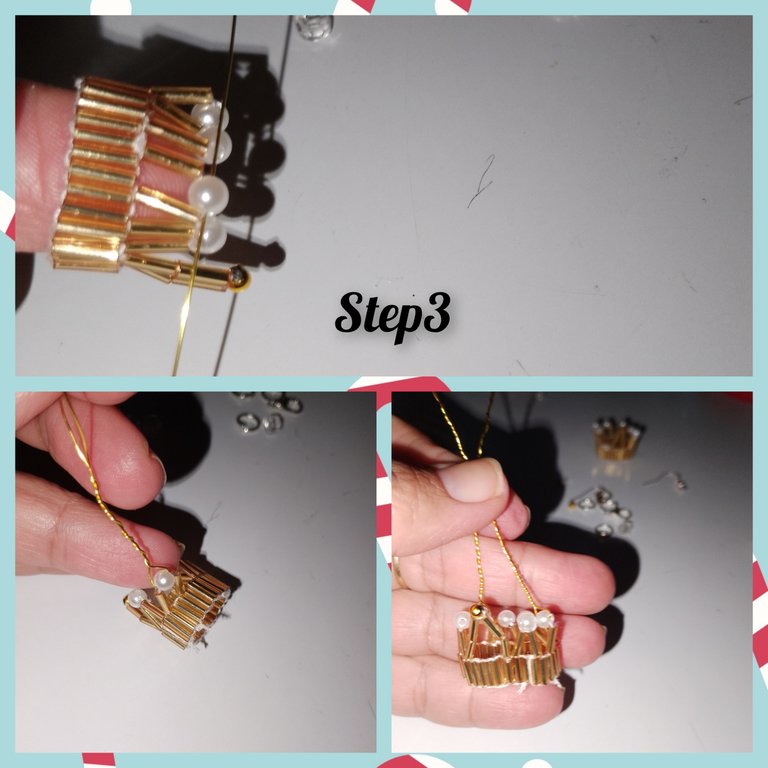
4.) I place three crystals on each side, separated by a golden pearl. When complete, I twist both wires around each other.
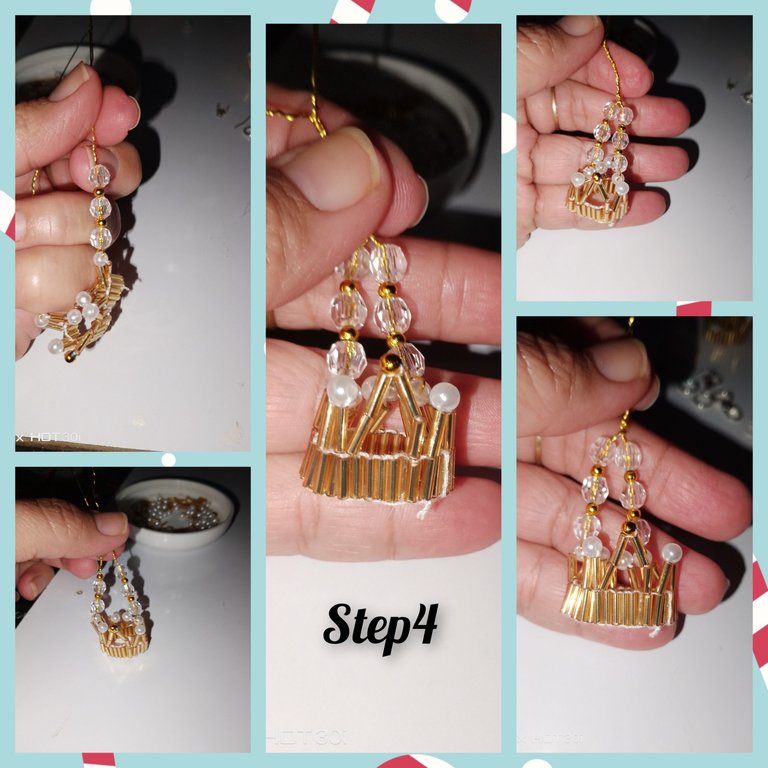
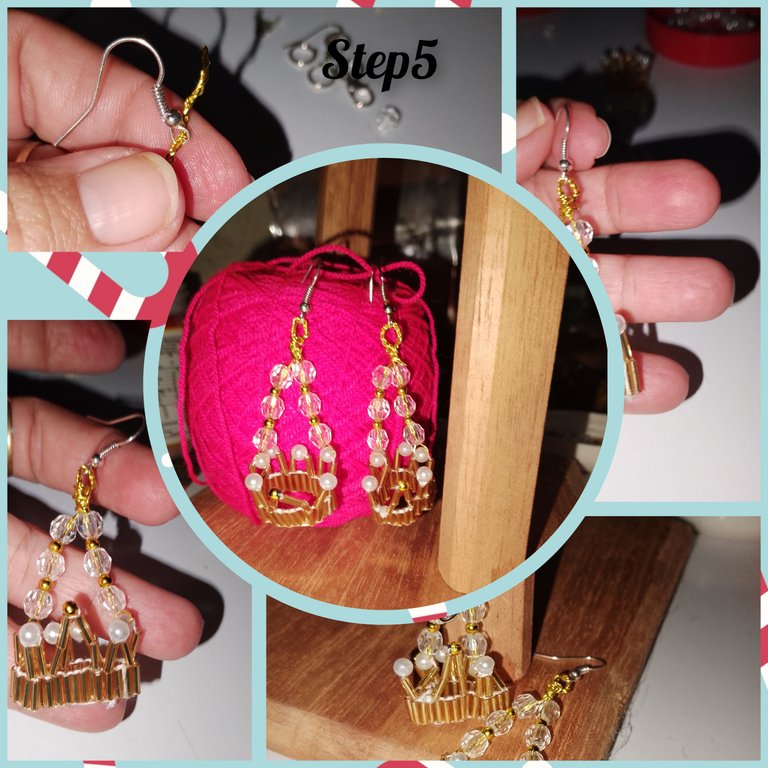
5.) I insert the earring hook through the wire and with the round tip pliers, I make a ring, with the rest of the wire I make turns right at the bottom of the ring. I repeat to make the complete set of earrings, and in this way I conclude it.
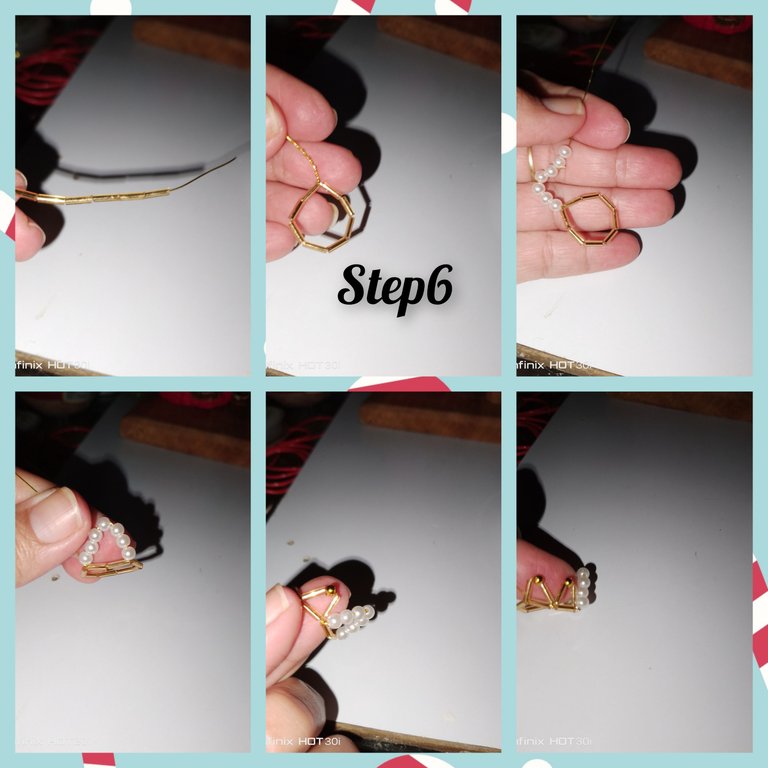
6.) I placed 8 beads on the wire and fixed them with several turns, and made a small circle, I now place seven white pearls and leaving two spaces for beads, I make a small triangle, I continue the route, but this time, with a bead, a golden pearl and a bead, I leave a space and turn around in the place of separation between the eclairs. In this way he completes the journey of the circle.
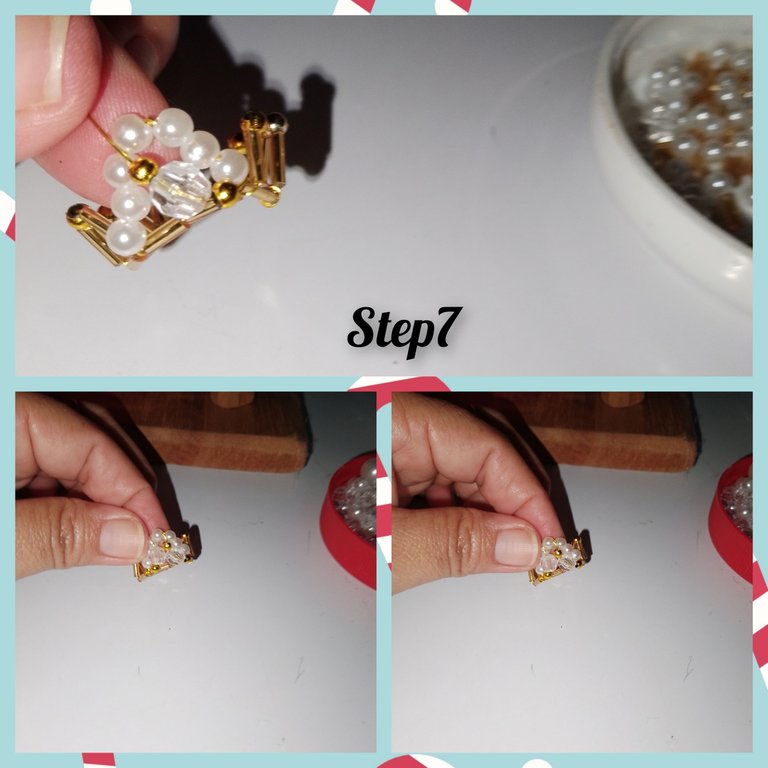
7.) Arrived at the starting port, I place a crystal and a golden pearl on the wire. I make two turns in the space between the beads, place a pearl, followed by a crystal and move with the wire to the bottom one and tie with several turns. I cut the residual wire. Thus leaving the necklace pendant ready, now I only place it in the central part of the crown, where it will beThey find the pearl a jewelry earring.
8.) I attach a staple to the leather cord, apply pressure with the flat clamp and place a jewelry ring and inside it the pin. I leave a space of approximately 15cm, and with the help of my index finger, I make a Franciscan, macramé knot, for which I make a total of five turns, I leave the same space as the previous one and repeat the knot, I introduce the crown, he says, wise men and in just 5cm I make a new knot, leaving little space for it to move. I continue the elaboration by repeating the next knot, and placing the staple and the ring at the other end.
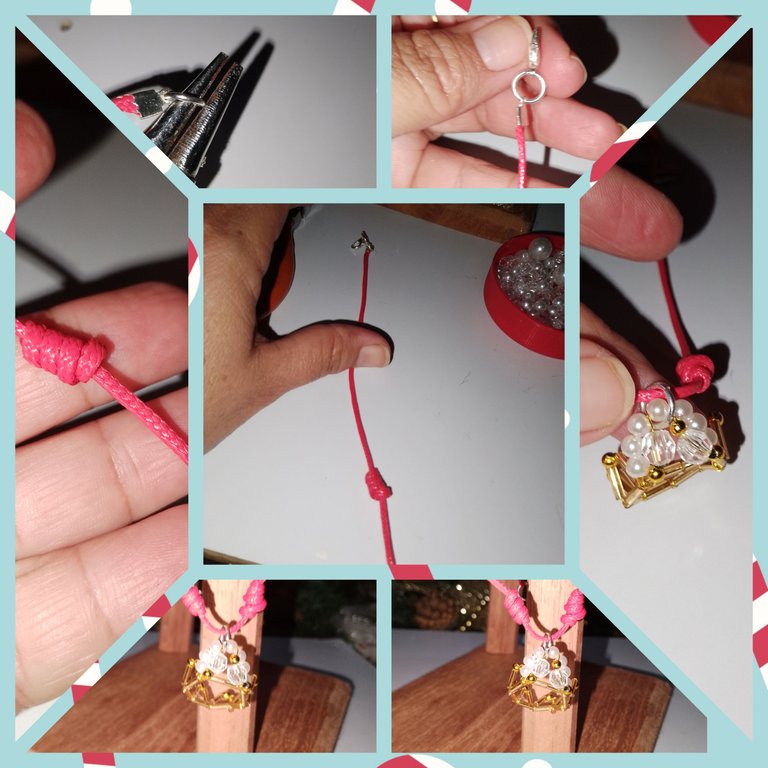
In this way, I conclude today's project.
. All photos are my property, taken with my smartphone.
. Use incollage
. Use language translator.
Grateful for following me until the end, it will be until the next opportunity. Grateful for your view.
(ESP)
Muy bonita noche de Reyes Magos, deseo tengan todos en @jewelry, me complace, estar con todos ustedes, además deseando este año sea me infinitos éxitos y muchas salud. Hoy paso a mostrarles un muy, fácil y bonito y delicado, Ser de accesorios, ideal para lucir en esta fecha tan especial, cómo lo es la noche de Reyes, se trata de un juego aretes, inspirados en las coronas hermosas que ellos llevan puesta y un collar, de vistoso color rojo,que completa la tercera corona. Use para ellos, las técnicas de bisutería y alambrismo, su resultado es increíble. Les invito. Seguirme.
Materiales.
. Canutillos dorados.
. Perlas n6de color blanca.
. Perlitas doradas.
. Aguja e hilo.
. Alambre n 0.5
. Cuerito color rojo.
. Grapas cuadradas.
. Aritos de bisutería.
. Pasador para collar.
. Anzuelos para aretes.
. Pinzas de bisutería.
. Tijeras
. Cristales checos
Pasos:
1.) Comienzo introduciendo y atando con varios nudos dos, canutillos, introduzco un tercer canutillo, y paso por el anterior con la aguja, y de esta manera, introduzco un total de treintas canutillos dorados, los cuales uno entre sí, introduciendo la aguja, por dentro de el primer.
2.) Pongo en la aguja, un canutillo, una perla de color blanco y un canutillo, dejo dos canutillos e introduzco en el tercero, luego coloco dos canutillos una perlita dorada y dos canutillos, dejo cuatro canutillos y en el quinto introduzco la aguja, estos quedarán en forma puntada, ahora, comienzo a hacer el recorrido con un canutillo y una perla de color blanca, saldando un canutillos de el aro hecho en paso anterior, este y los siguientes quedaran cuadraditos. Llegado a el lugar de partida, hago varios nudos para atar bien.
3.) Corro dos pedacitos de alambre, introduzco en la perla de color blanca, que forma el primer cuadradito, pongo en partes iguales el alambre y comienzo a dar vueltas entre sí, repito en el otro lado.
4.) Coloco en cada uno de los lados tres cristales, separados por una perlita dorada. Al completar doy vueltas entre sí a ambos alambres.
5.) Introduzco por el alambre el anzuelo para aretes y con la pinza punta redonda, hago una arito, con el resto de el alambre doy vueltas justo en la parte inferior de el arito. Repito para hacer el completo de el juego de aretes,by de esta manera lo concluyo.
6.) Coloco en el alambre 8 canutillos y con varias vueltas fijo, y armó un pequeño circulo,
Coloco ahora siete perlita de color blanca y dejando dos espacios de canutillos, Argo un pequeño triángulo, continuo el recorrido, pero está vez, con un canutillo, un perla dorada y un canutillo, dejo un espacio y doy vuelta en el lugar de separación entre los canutillos. De esta forma completo el recorrido de el círculo.
7.) Llegado en el puerto de inicio, coloco en el alambre un cristal y una perlita dorada. Doy dos vueltas en el espacio de separación entre perlas, coloco, una perlita, seguido de un cristal y me muevo con el alambre hasta el inferior y ato con varias vueltas. Corto el alambre residual. Quedando así listo el dije de el collar, ahora solo coloco en la parte central de la corona, dónde se encuentran las perla un arito de bisutería.
8.) Coloco a el cordón de cuerito, una grapa, hago presión con la pinza plana y coloco un arito de bisutería y dentro de el el pasador.
Dejo un espacio de 15cm aproximados, y con ayuda de mi dedo índice, hago un nudo Franciscano, de macramé, para el doy un total de cinco vueltas, dejo el mismo espacio de el anterior y repito el nudo, introduzco la corona dice, de reyes magos y en solo 5cm hago un nuevo nudo, dejando poco espacio para que este se movilice. Continuo la elaboración repitiendo el siguiente nudo, y colocando la grapa y el arito en el otro extremo.
De esta manera, concluyo el proyecto de el día de hoy.
. Todas las fotos son de mí propiedad, tomadas con mí teléfono inteligente.
. Use incollage
. Use traductor lenguaje.
Agradecida me hayas seguido hasta el final, será hasta Aúna próxima oportunidad. Agradecido por su vista.