
feliz y bendecido día tengan todos ustedes, es un gran placer para mí el pasar el día de hoy por esta hermosa comunidad para compartir con ustedes me último elaboración, bellos y elegantes zarcillos elaborados con la técnica del alambrismo ideales para lucir y combinar en cualquier ocasión además si está interesado en aprender actualizar tus propios accesorios Este es un muy buen proyecto que puedes realizar con un poco de práctica. Este diseño quise elaborarlo con piedras cristales color transparentes tornasol para así poder combinarlo con cualquier vestimenta sin embargo este es un diseño que podemos elaborarlo del color de nuestra preferencia Y de igual manera nos quedará hermoso.
Happy and blessed day to all of you, it is a great pleasure for me to spend today in this beautiful community to share with you my latest creation, beautiful and elegant tendrils made with the wire technique, ideal to show off and combine on any occasion also if you are interested in learning to update your own accessories This is a very good project that you can do with a little practice.
I wanted to make this design with transparent iridescent crystal stones so that we could combine it with any outfit, however this is a design that we can make in the color of our preference and it will still look beautiful.
For all of you I have prepared this simple tutorial for all of you to which I invite you to join me below.
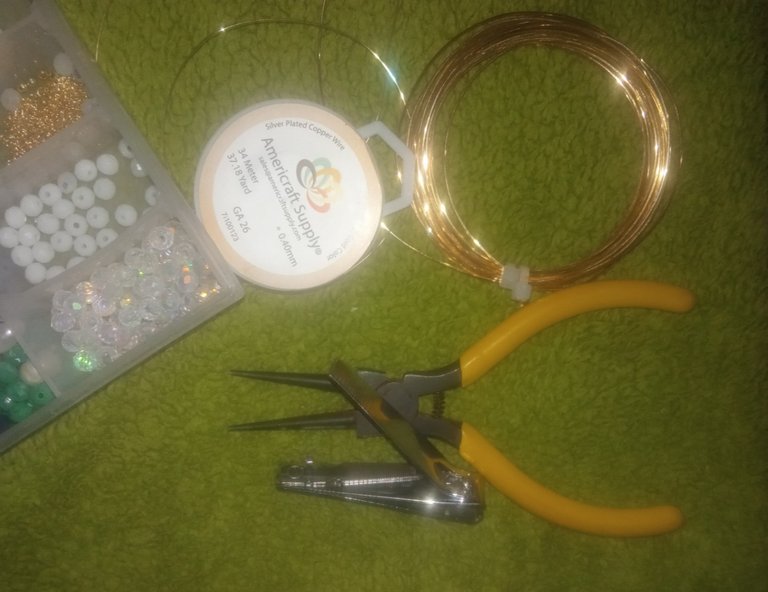
- alambre de bisutería calibre 20.
- alambre de bisutería calibre 26.
- piedras cristales transparentes tornasol pequeños.
- piedras cristales transparentes tornasol medianos.
- balines dorados.
- pinza de bisutería.
- 20 gauge jewelry wire.
- 26 gauge jewelry wire.
- small iridescent transparent crystal stones.
- medium-sized transparent crystal stones.
- golden pellets.
- jewelry clamp.
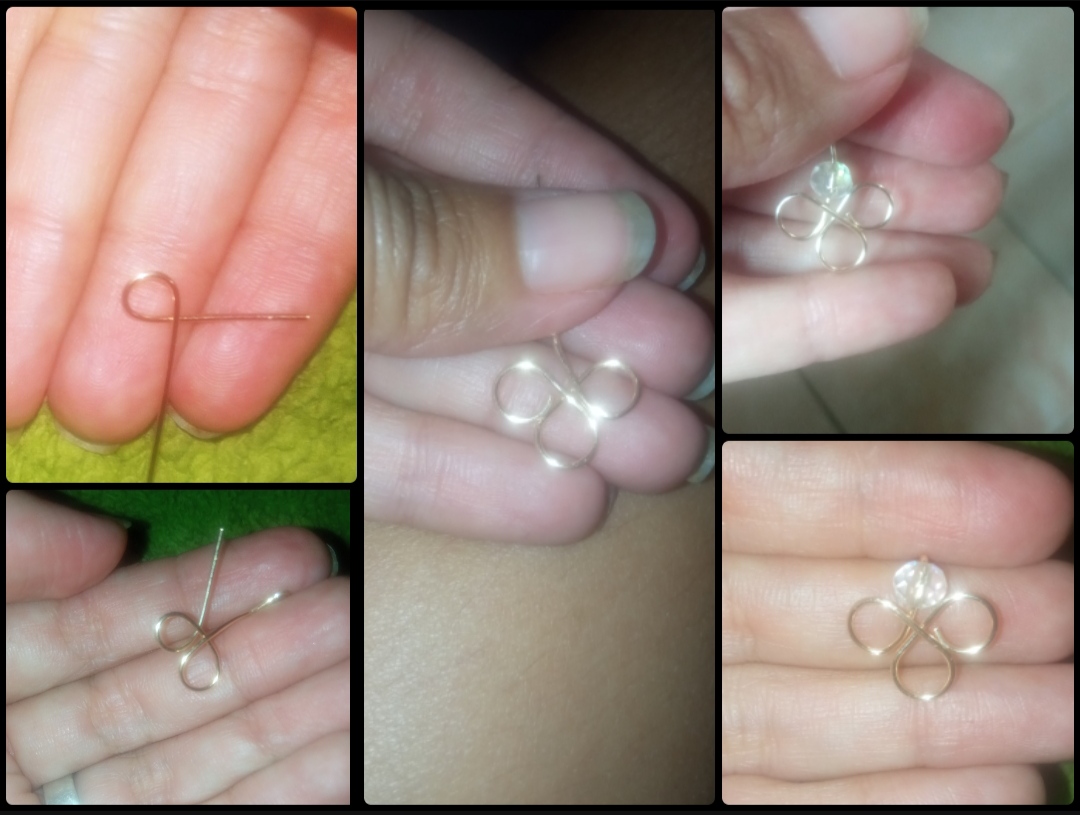
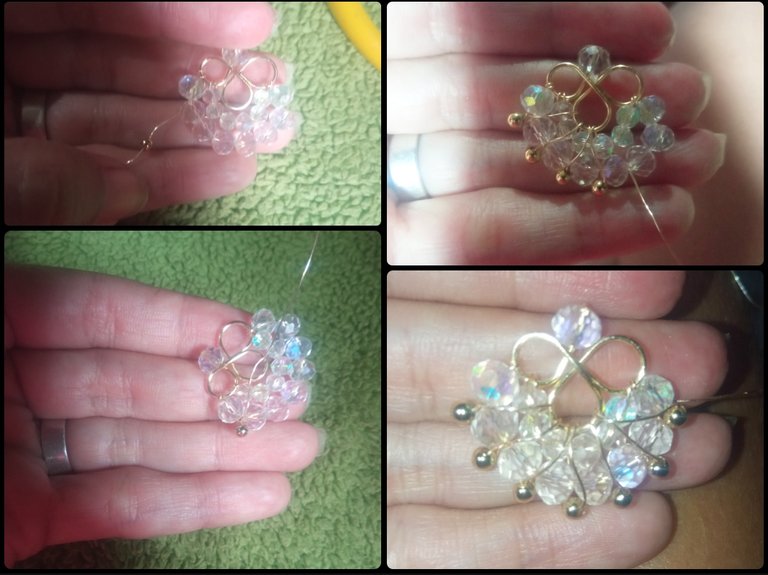
⭐ Paso 1: para iniciar la elaboración de este hermoso diseño lo primero que debemos hacer es tomar el alambre de bisutería calibre 20 y cortaremos un pedazo de 12 cm aproximadamente y con ayuda de la pinza de bisutería elaboraremos una forma semicircular tal cual puede observarla En las siguientes imágenes de igual manera elaboraremos una del otro extremo Y por último elaboraremos una forma en la parte central debajo de las dos piezas elaboradas, y nos quedará una pieza en forma de trébol y dejaremos un pedazo de alambre largo hacia arriba por el cual introduciremos un cristal mediano y encima de el alambre que nos excede lo doblaremos hacia la parte de atrás forma de clavo para colocarnos el zarcillo. Y de esta manera ya tendremos la base principal de nuestro diseño solo debemos realizar el decorado con la pedrería.
⭐ Step 1: to start making this beautiful design, the first thing we must do is take the 20 gauge jewelry wire and we will cut a piece of approximately 12 cm and with the help of the jewelry tweezers we will make a semicircular shape as is. You can see it. In the following images we will make one at the other end in the same way. And finally we will make a shape in the central part below the two made pieces, and we will have a piece in the shape of a clover and we will leave a long piece of wire up. which we will introduce a medium-sized crystal and on top of the wire that exceeds us we will bend it towards the back in the shape of a nail to place the tendril.
And in this way we will have the main basis of our design, we only have to decorate it with the rhinestones.
⭐ Paso 2: para continuar procederemos a la decoración de nuestra base para ello tomaremos un pedazo muy largo de alambre de bisutería calibre 26 y lo uniremos a la base enrollando un par de vueltas en la primera orejita o en uno de los lados de la base y por este alambre introduciremos los cristales pequeños suficientes para moldear el alrededor de la forma de abajo, en mi caso utilicé seis y de igual manera sujetaremos el alambre en el otro extremo o pieza semicircular del otro lado realizando un par de vueltas con el alambre calibre 26.
⭐ Step 2: to continue, we will proceed to decorate our base. To do this, we will take a very long piece of 26 gauge jewelry wire and attach it to the base by winding a couple of turns around the first ear or on one of the sides. of the base and through this wire we will introduce enough small crystals to mold around the shape below, in my case I used six and in the same way we will hold the wire at the other end or semicircular piece on the other side making a couple of turns with 26 gauge wire.
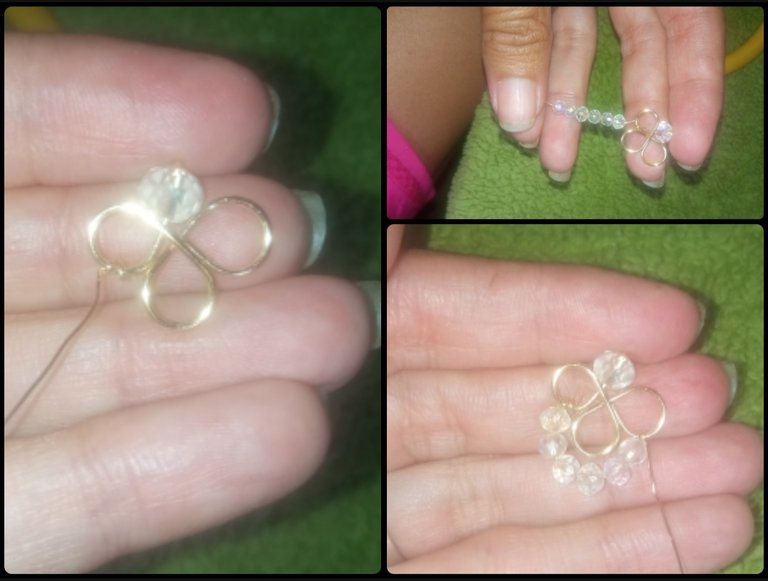
⭐ Paso 3: seguidamente procederemos a introducir ahora los cristales medianos yo introduje ocho cristales los cuales al realizar la vuelta hacia el otro lado queda perfectamente alrededor de los cristales pequeños como pueden observar en las siguientes imágenes y de igual manera sujetamos el alambre calibre 26 en este otro lado para así sostener las piedras en forma de arco tal cual pueden observar.
⭐ Step 3: Next we will proceed to introduce the medium crystals. I introduced eight crystals which, when turned to the other side, fit perfectly around the small crystals as you can see in the following images and in the same way we hold the wire 26 gauge on this other side to hold the stones in the shape of an arch as you can see.
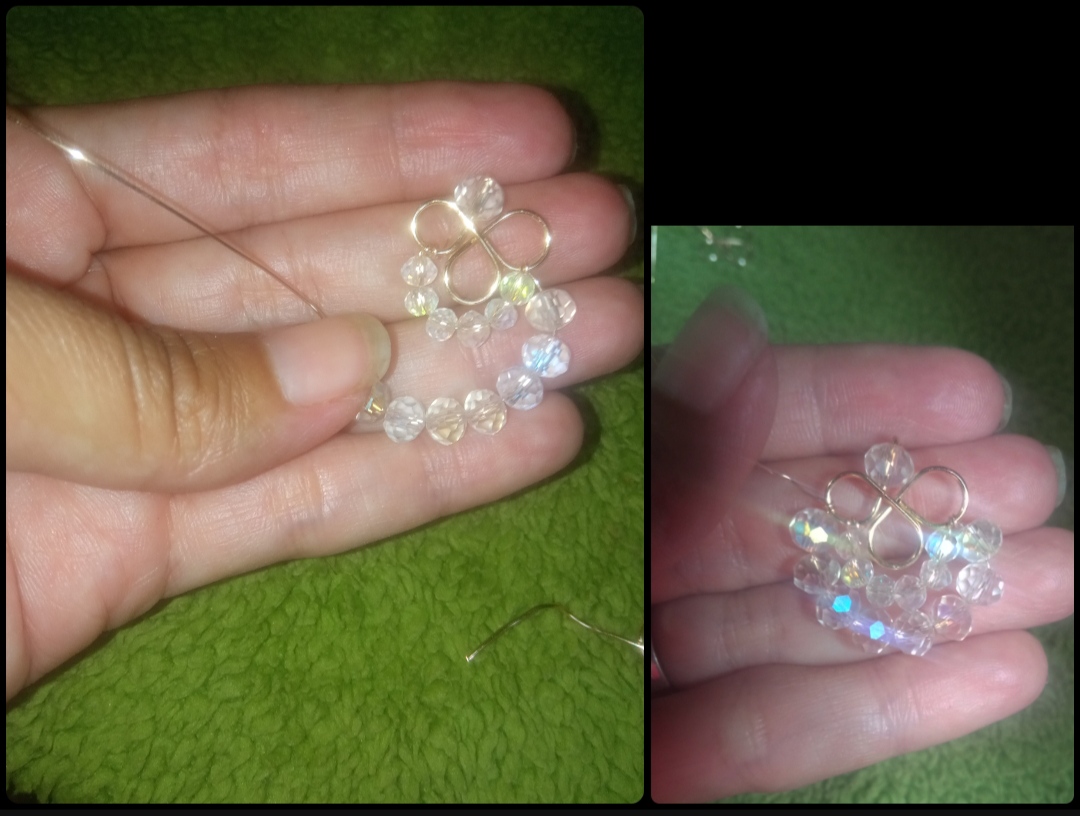
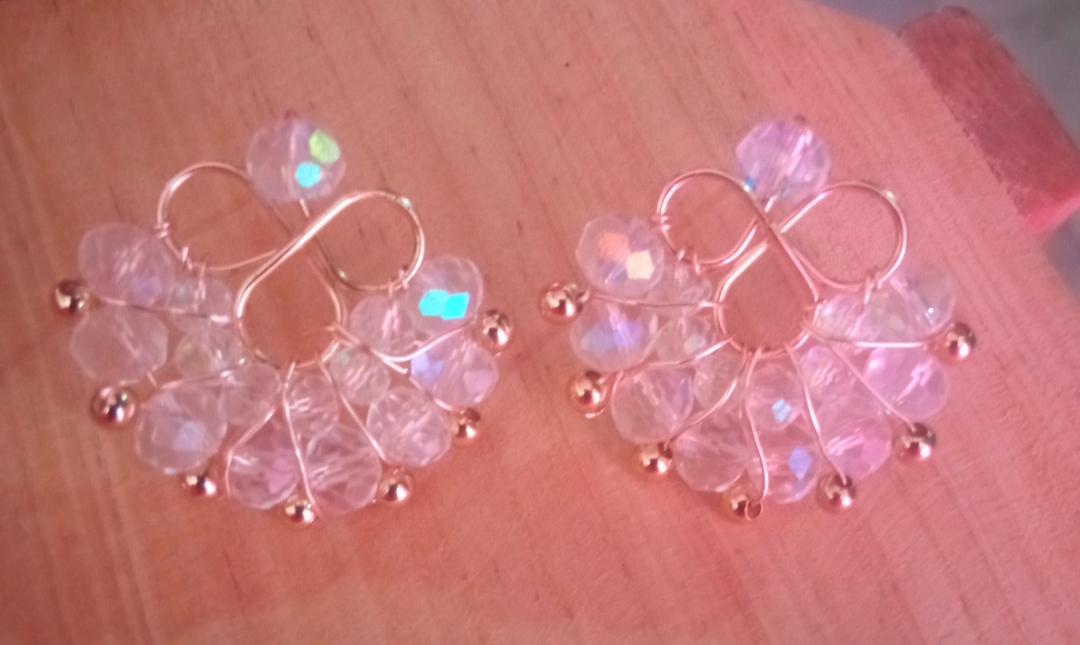
⭐ Paso 4: por último para dar un poco más de vistosidad y belleza a nuestra decoración con el exceso de alambre que nos queda lo pasaremos hacia la parte de abajo donde están los cristales medianos e introduciremos un pequeño balín dorado el cual dejaremos en la parte de abajo entre los dos primeros cristales medianos y subiremos el alambre al medio de los dos cristales pequeños de arriba luego cruzaremos el alambre por la parte de atrás y lo llevaremos al medio de los dos siguientes cristales medianos de igual manera introduciremos un nuevo balín dorado el cual colocaremos en el centro de estos dos cristales y subiremos el alambre decorando en forma hacia los dos cristales pequeños de la parte superior Y así sucesivamente iremos intercalando el alambre de abajo hacia arriba estas con pequeños balines dorados en la parte posterior hasta lograr llegar hasta la última cristales. Y así culminaremos la decoración de nuestros hermosos y elegantes zarcillos.
⭐ Step 4: finally, to give a little more viscosity and beauty to our decoration, with the excess wire that we have left, we will pass it to the bottom part where the medium crystals are and we will introduce a small golden ball which we will leave at the bottom between the first two medium crystals and we will raise the wire to the middle of the two small crystals above then we will cross the wire at the back and take it to the middle of the next two medium crystals in the same way we will introduce a new golden ball which we will place in the center of these two crystals and we will raise the wire, decorating in shape towards the two small crystals at the top. And so on, we will intersperse the wire from bottom to top, these with small golden balls on the back until we achieve Get to the last crystals.
And thus we will complete the decoration of our beautiful and elegant tendrils.
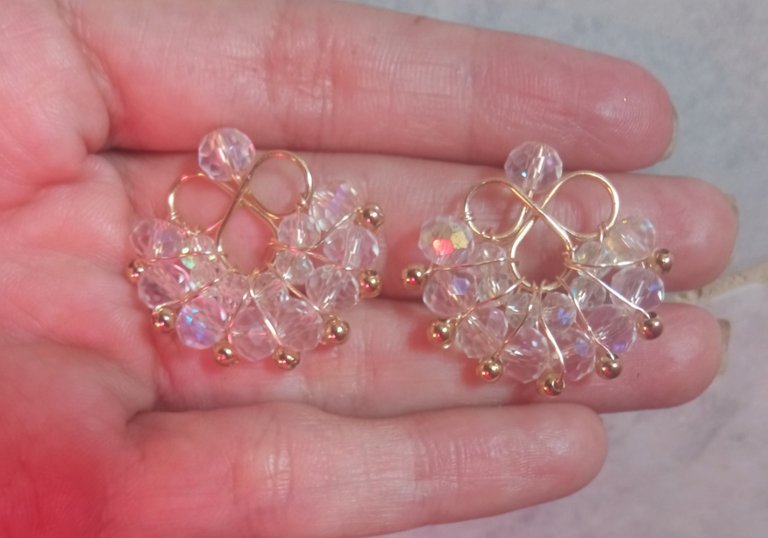
Todas las Fotos son de mi autoría y fueron tomadas con mi Celular Redmi 9.And in this easy and simple way we will be able to make a flirtatious and elegant tendrils which we can adapt to our taste and preference, my dear and appreciated friends, this has been my preparation today with great love for all of you and which I hope has been of your complete pleasure, now I must say goodbye for this opportunity but not before thanking you for your visit.
Greetings and blessings.
All Photos are my authorship and were taken with my Redmi 9 Cellphone

