Hola hivers de esta linda comunidad, es mi primera vez compartiendo algo por aquí, me gusta hacer cositas con mi mano de este estilo y quise compartir esta linda pulsera realizada con hilo chino, para mi son mis favoritas, ademas que con este material puedes hacer tantos diseños y es tan facil de usar, espero le guste este lindo paso a paso, lo hice lo mejor que pude. 😊
Hello hivers of this nice community, this is my first time sharing something here, I like to do little things with my hand in this style and I wanted to share this nice bracelet made with Chinese thread, for me they are my favorite, besides with this material you can make so many designs and it is so easy to use, I hope you like this nice step by step, I did the best I could 😊.
Portada creada en Canvas

Materiales / Materials
Para esta pulsera fueron sencillos lo materiales, dos colores de hilo chino, un yesquero, si desean colocarles unas cuentas al final de la pulsera también seria ideal, yo quise colocar solo los materiales principales para realizar el nudo y pulsera.
For this bracelet the materials were simple, two colors of Chinese thread, a tinder, if you want to place some beads at the end of the bracelet would also be ideal, I wanted to place only the main materials to make the knot and bracelet.

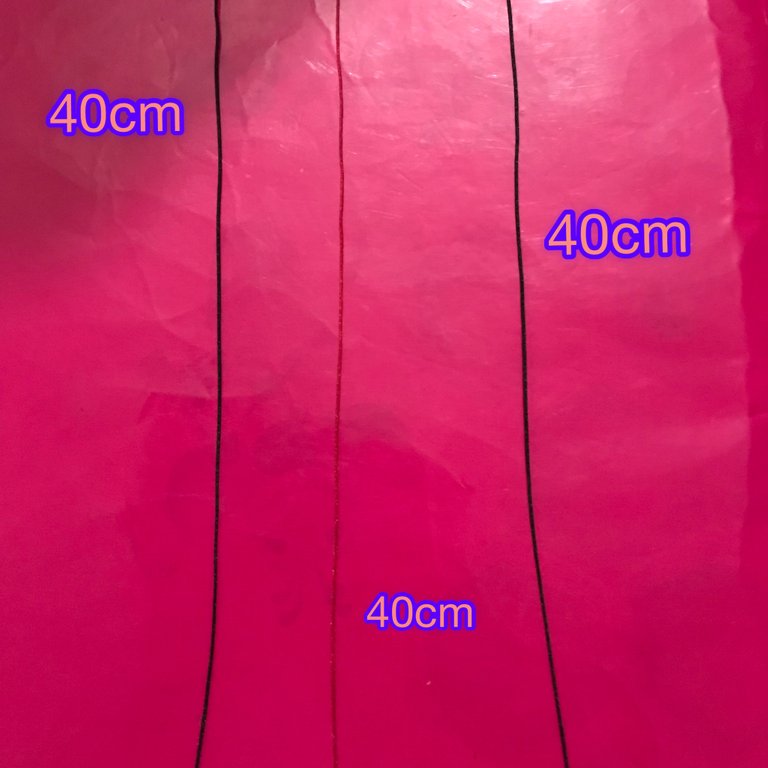
Vamos a necesitar 4 tiras negras de 40cm y 2 rojas de 40cm igualmente.
We will need 4 black strips of 40cm and 2 red strips of 40cm.
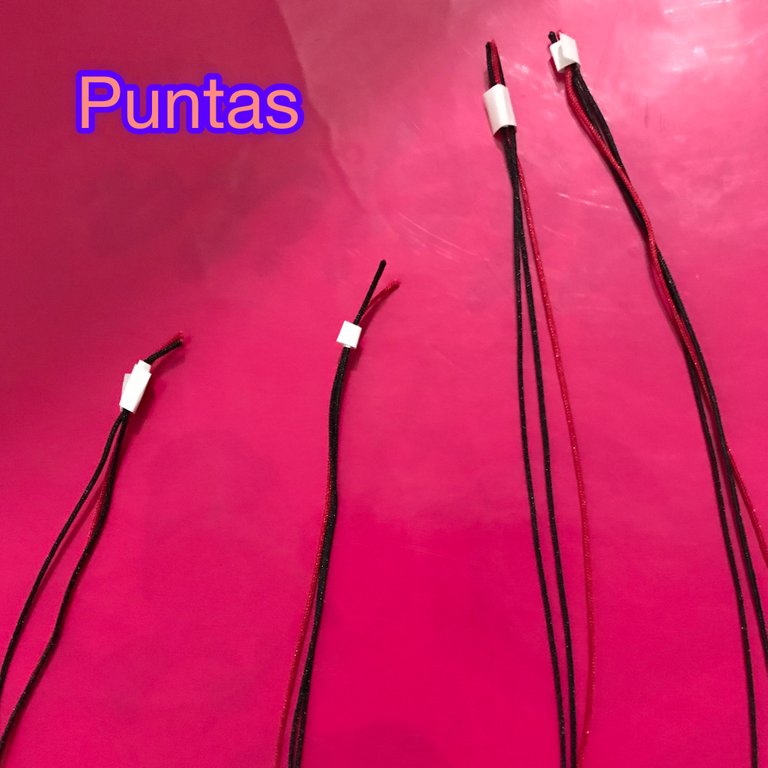
Las puntas de nuestras tiras las vamos a envolver con un pedazo de papel (como se muestra en la imagen) para que a la hora de hacer nuestro nudo, no se nos haga incomodo.
The ends of our strips will be wrapped with a piece of paper (as shown in the image) so that when we make our knot, it will not be uncomfortable.
Paso a Paso / Step by Step
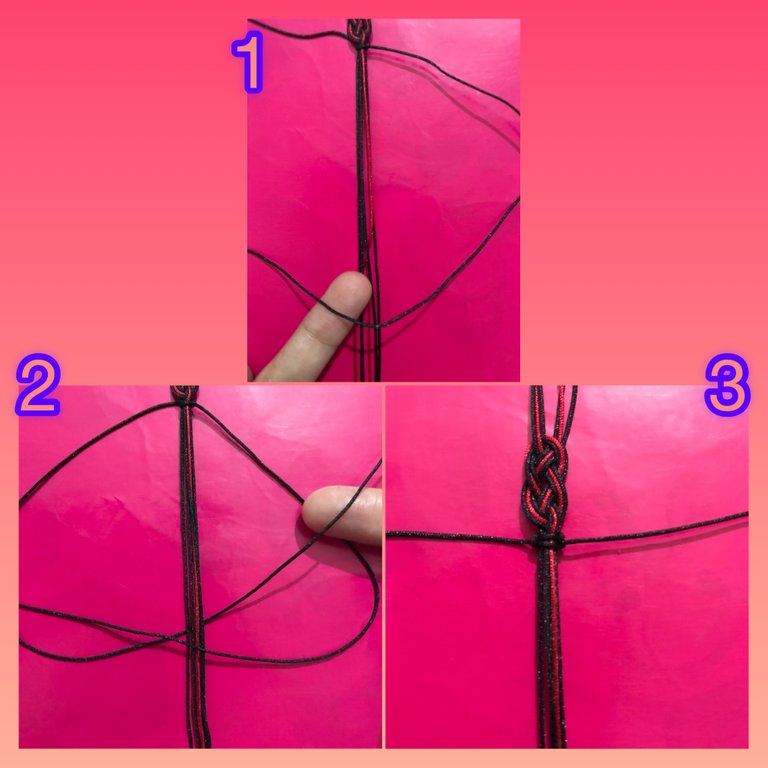
Lo primero que haremos es colocar nuestra primera tira como lo indico en la imagen numero 1, que la tira que va hacia arriba quede por encima de la cuerda que va hacia abajo.
The first thing we will do is to place our first strip as shown in image number 1, so that the strip that goes up is above the rope that goes down.
Con nuestra segunda tira, haremos nuestra imagen numero 2, la colocaremos de esa manera, por encima de nuestra primera tira.
With our second strip, we will make our image number 2, we will place it that way, above our first strip.
Tomaremos la punta que quedo hacia abajo y la pasaremos por debajo de nuestra primera cuerda que esta hacia abajo, como se muestra en la tercera imagen.
We will take the end that is down and pass it under our first rope that is down, as shown in the third image.
Luego la pasaremos por encima de nuestra cuerda que esta hacia arriba, por encima. Ejemplo la imagen numero 4.
Then we will pass it over our rope that is upwards, over the top. Example image number 4.

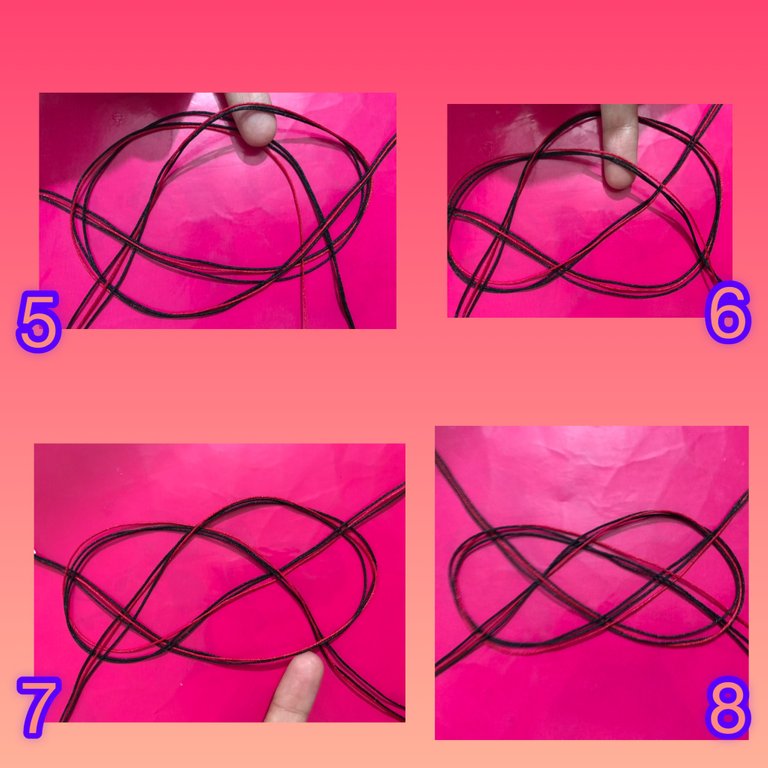
Seguimos con la imagen numero 5, donde seguiremos usando nuestra tira como anteriormente, pero ahora la pasaremos por debajo de lazo.
We continue with image number 5, where we will continue using our strip as before, but now we will pass it under the loop.
Luego por encima de nuestro lazo que quedo hacia arriba de nuestra imagen numero 2. Ejemplo imagen numero 7.
Then over the top of our loop that was left on top of our image number 2. Example image number 7.
Y por ultimo nuestra imagen 7 donde nuestra tira pasara por debajo de la otra parte del lazo, como les estoy señalando.
And finally our image 7 where our strip will pass under the other part of the loop, as I am pointing out.
Así como esta la imagen numero 8 debería quedar nuestro nudo, de esta manera se puede detallar un poco la manera en que se unen las tiras.
Our knot should look as shown in image number 8, this way you can detail a little bit the way the strips are joined.
Aquí les enseño de cerca como quedo mi nudo marinero, después de haber estirado bien ambas esquinas, después que este armado, trataremos de ordenar los hilos, intentando que el hilo rojo quede en medio de los hilos negros, para que se vea mas bonito.
Here I show you how my sailor knot looks like, after having stretched well both corners, after it is assembled, we will try to order the threads, trying that the red thread is in the middle of the black threads, so that it looks more beautiful.

Ahora vamos a crear nuestro nudo básico, para culminar la pulsera.
Now we are going to create our basic knot, to complete the bracelet.
Necesitaremos 2 hilos de color negro con un largo de 80cm.
We will need 2 black threads with a length of 80cm.
El primer paso es colocar nuestro hilo justo en el centro, para que no nos quede descuadrado, tomaremos el hilo ubicado del lado izquierdo y lo colocaremos como muestro en la imagen numero 1. por encima de nuestra pulsera.
The first step is to place our thread right in the center, so that it is not out of square, we will take the thread located on the left side and place it as shown in the image number 1. above our bracelet.
Luego el hilo derecho, que queda sobrante lo pasaremos por encima de nuestro primer hilo y luego por debajo, hasta pasar el medio de nuestra pulsera, luego lo pasaremos por arriba y estiraremos hasta realizar el nudo.
Then the right thread, which is left over, we will pass it over our first thread and then underneath, until we pass the middle of our bracelet, then we will pass it over the top and stretch it until we make the knot.

Repetiremos el mismo paso, pero ahora comenzamos con el lado derecho y así sucesivamente, hasta lograr un nudo a lo largo de nuestra pulsera de 5-6cm aproximadamente.
We will repeat the same step, but now we start with the right side and so on, until we have a knot along the length of our bracelet of approximately 5-6cm.
Aquí tome la medida, así lo haremos de ambos lados de nuestra pulsera.
Here take the measurement, so we will do it on both sides of our bracelet.

Cuando terminemos, cortaremos el hilo que este sobrante y quemaremos, para que no se nos desarme.
When we finish, we will cut the excess thread and burn it, so that it does not fall apart.

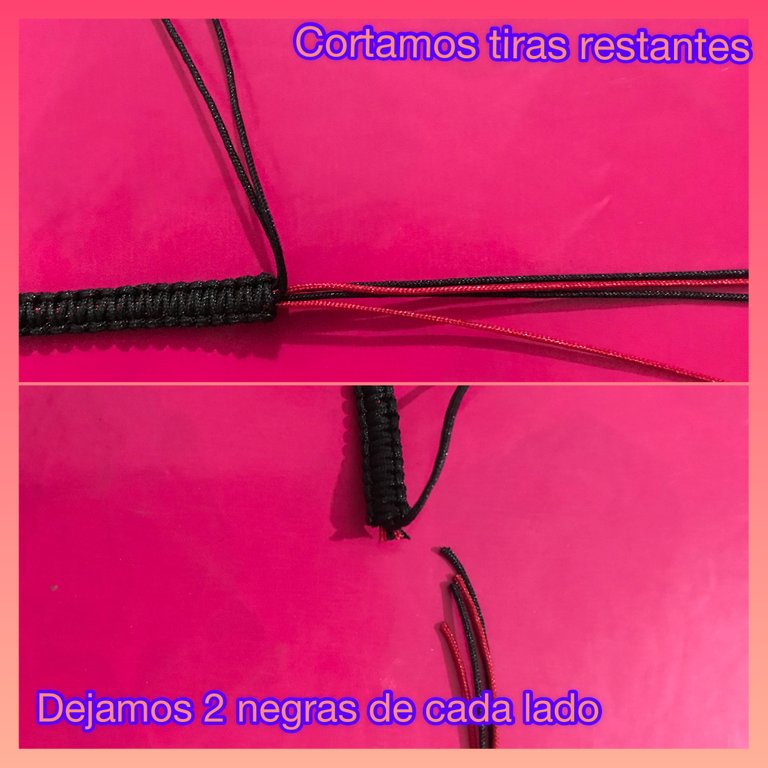
Cuando este terminada, tomaremos ambos lados de la pulsera y cortaremos los hilos rojos y dos hilos negros sobrantes, solo nos quedaremos con 2 hilos negros para después hacer nuestro nudo ajustable.
When it is finished, we will take both sides of the bracelet and cut the red threads and two black threads left over, we will only keep 2 black threads to make our adjustable knot.
De esta manera, nos debe quedar nuestra pulsera, el nudo ajustable se hace de la misma manera que el nudo básico de la pulsera. solo deben unir ambos lados de la pulsera y comenzar hacer el nudo con por lo menos 10 cm de hilo negro, para que se haga mas cómodo.
In this way, we should have our bracelet, the adjustable knot is made in the same way as the basic knot of the bracelet, just join both sides of the bracelet and start making the knot with at least 10 cm of black thread, to make it more comfortable.


.gif)