In this post, I'll guide you through installing OpenProject, an open-source project management tool similar to Jira, on your Raspberry Pi 4. We'll be using the Docker version since there's no Debian package available for the Raspberry Pi's ARM architecture.
What is OpenProject?
OpenProject is a web-based project management tool that allows teams to collaborate on tasks, track progress, and manage resources. It's a free and open-source alternative to popular project management platforms like Jira.
Checking Server Load
Before we begin the installation, I wanted to ensure that my Raspberry Pi can handle the additional workload. We'll use the top command to check the system's load average.
top

The Raspberry Pi 4 8Gb is really comfortable as a personal server
The top command displays information about the processes running on your system, including the CPU load average. The load average indicates how busy your CPU is. Ideally, it should be lower than the number of CPU cores available on the Raspberry Pi (which is 4 in this case). An average load of 0.12 over 15 minutes suggests my Raspberry Pi has ample capacity for running many other applications.
Installation
We'll follow the official OpenProject installation guide for Docker available here: https://www.openproject.org/docs/installation-and-operations/installation/docker/
Configure Your Domain Name (Optional)
If you have a custom domain name for your Raspberry Pi, you can configure a CNAME record to point to your OpenProject instance. This step is optional, but it allows you to access OpenProject using a more user-friendly URL.
Create Directories
Next, create two directories to store OpenProject's data:
sudo mkdir -p /mnt/usb/openproject/{pgdata,assets}
This command creates two directories (pgdata and assets) inside the /mnt/usb/openproject directory. You can adjust the path based on your storage configuration. I connected an SSD drive on my Raspberry Pi using a SATA to USB connector and I store most of my dockers on it. My usage is not very intensive and I don't feel limited by the USB.
Run the Docker Container
Now, we'll use the docker run command to create and start a Docker container for OpenProject. Here's a breakdown of the command options:
-d: Runs the container in detached mode (in the background)-p 8081:80: Maps the container's port 80 (default for web applications) to port 8081 on your Raspberry Pi. We're doing this because port 80 might already be in use by another application (like Apache in this case).--name openproject: Assigns the name "openproject" to the container-e OPENPROJECT_HOST__NAME=openproject.yourdomain.com: Sets the hostname within the container to "openproject.yourdomain.com". Replace this with your actual domain name if you're using one.-e OPENPROJECT_SECRET_KEY_BASE=muchprivacyhere1: Sets a secret key for the OpenProject application. Replace this with a strong, random string for security reasons.-v /mnt/usb/openproject/pgdata:/var/openproject/pgdata: Mounts the/mnt/usb/openproject/pgdatadirectory on your Raspberry Pi to the/var/openproject/pgdatadirectory within the container. This stores OpenProject's database files on your persistent storage.-v /mnt/usb/openproject/assets:/var/openproject/assets: Similar to the previous option, this mounts the/mnt/usb/openproject/assetsdirectory on your Raspberry Pi to the/var/openproject/assetsdirectory within the container, storing uploaded files.openproject/community:13: Specifies the Docker image to use, which is the official OpenProject community image with version 13.
Create SSL Certificate (Optional)
If you want to secure your OpenProject installation with HTTPS, you'll need an SSL certificate. You can refer to my previous blog post on setting up Nextcloud with Let's Encrypt for instructions on obtaining a certificate.
Once you've set up Let's encrypt, run the following command to generate the certificate:
sudo certbot --apache -d openproject.yourdomain.com
Configure Apache
1. Edit Apache Configuration
Begin by navigating to the directory containing available Apache virtual host configurations:
cd /etc/apache2/sites-available/
Here, create a new virtual host configuration file for OpenProject. You can name it anything descriptive, but a common convention is to use a prefix like 00x- followed by the application name (e.g., 00x-openproject.conf). I use vim as the text editor, but you can choose your preferred editor if needed.
sudo vim 00x-openproject.conf
2. Add Virtual Host Configuration
Paste the following configuration into the newly created file. Remember to replace openproject.yourdomain.com with the actual domain name you're using :
<VirtualHost *:80>
  ServerName openproject.yourdomain.com

  RewriteEngine on
  RewriteCond %{HTTPS} !=on
  RewriteRule ^/?(.*)$ https://%{SERVER_NAME}/$1 [R,L]
</VirtualHost>

<VirtualHost *:443>
  ServerName openproject.yourdomain.com

  SSLEngine on
  SSLCertificateFile /etc/letsencrypt/live/openproject.yourdomain.com/fullchain.pem
  SSLCertificateKeyFile /etc/letsencrypt/live/openproject.yourdomain.com/privkey.pem

  RewriteEngine on
  RewriteRule "^$" "/" [R,L]

  ProxyRequests off

  <Location "/">
    RequestHeader set X-Forwarded-Proto 'https'

    ProxyPreserveHost On
    ProxyPass http://127.0.0.1:8081/
    ProxyPassReverse http://127.0.0.1:8081/
  </Location>
</VirtualHost>
Explanation of the Configuration:
- The first
<VirtualHost>block configures Apache to listen for traffic on port 80 (default for HTTP). It redirects any non-HTTPS traffic to the HTTPS version using theRewriteEngineandRewriteRuledirectives. - The second
<VirtualHost>block configures Apache for HTTPS (port 443). It enables SSL encryption using the provided certificate and key file paths. - The
ProxyPassandProxyPassReversedirectives within the<Location>block forward requests to the OpenProject container running on port 8081.
3. Enable Virtual Host and Restart Apache
Once you've saved the configuration file, create a symlink in the sites-enabled directory to activate the virtual host:
sudo ln -s /etc/apache2/sites-available/00x-openproject.conf /etc/apache2/sites-enabled/00x-openproject.conf
Finally, restart the Apache service to apply the changes:
sudo systemctl restart apache2
4. Access OpenProject
With these steps completed, your OpenProject instance should be ready to access. You can now open your web browser and navigate to https://openproject.yourdomain.com (or the appropriate URL if you didn't use a custom domain).
Discover OpenProject
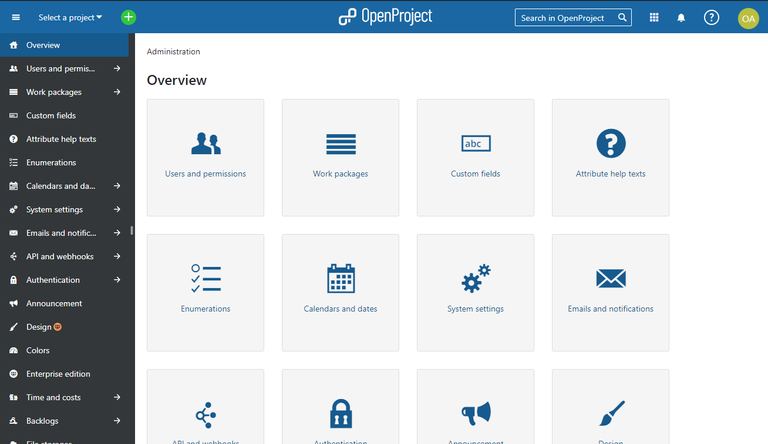
Administration
The administration page is quite comprehensive and offers everything you might need for effective project management. Here, you can manage users and permissions, incorporate custom fields into forms, configure calendar settings, set up email notifications, and integrate third-party authentication services.
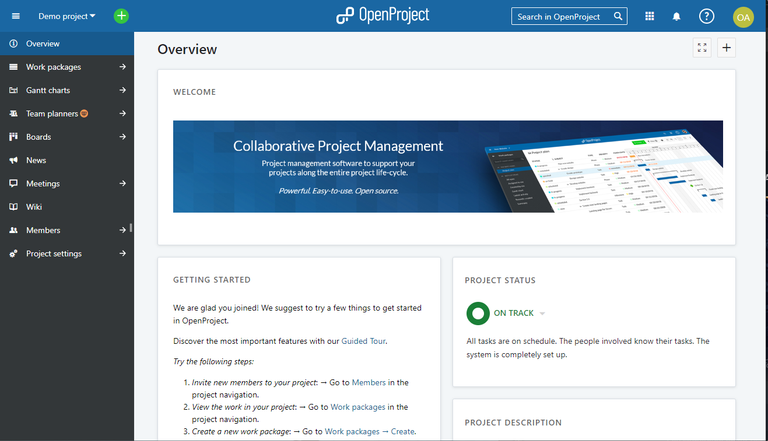
Demo Project
Upon initiating a fresh installation, OpenProject comes preconfigured with a Demo project. This serves as a useful introduction to the fundamental features of the platform. Each project includes a Welcome/Overview page, which can be personalized using widgets to highlight key aspects of your project.
Work packages function similarly to tickets in Jira. They are categorized by type (which can be customized), and you can seamlessly apply your preferred SCRUM or Kanban workflow.
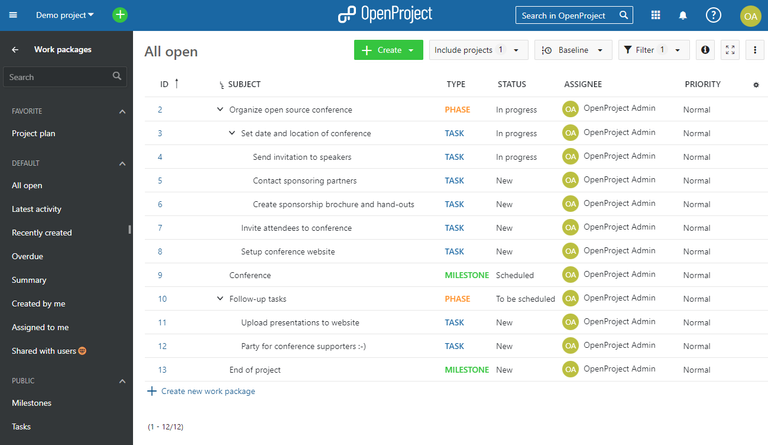
The interface is clean and user-friendly, in my opinion, less cluttered compared to Jira. The influence of Redmine is evident; if you have prior experience with Redmine, you'll find OpenProject familiar. However, it feels like a more refined and organized version.
Conclusion
OpenProject is a highly comprehensive tool, offering a wide range of functionalities. While I may only utilize a fraction of its capabilities, the ease of installation and the fact that I already have the necessary infrastructure in place (domain name, dynamic IP, etc.) make it a shame not to take advantage of its features!
Informations
To craft this post, I wrote an initial draft that was then input into ChatGPT, which generated an article that was nearly ready for publication. I added additional lines and paragraphs, revised the text and incorporated even more information to get the current revision.
For the thumbnail image, I used Bing Copilot Designer with the following prompt: "A bald white man, in front of colleagues, writing stuff on a whiteboard, he seems to explain a new project. Cartoon style" and reworked it using Canva.
