Espero hayan tenido un gran día amig@s, el día de hoy les muestro cómo hice algunos separadores para las publicaciones en mi blog, desde hace algún tiempo tenía esto en mente y llegó el momento de hacerlo.
En primer lugar, ingresaremos al sitio web: https://www.canva.com, imagino que muchos aquí ya hacemos uso de esta herramienta para diseñar nuestras portadas y otras imágenes, pero en esta ocasión la usaré para crear dividers.
Si no la has usado, debes primero crear tu cuenta, lo que resulta algo muy sencillo.
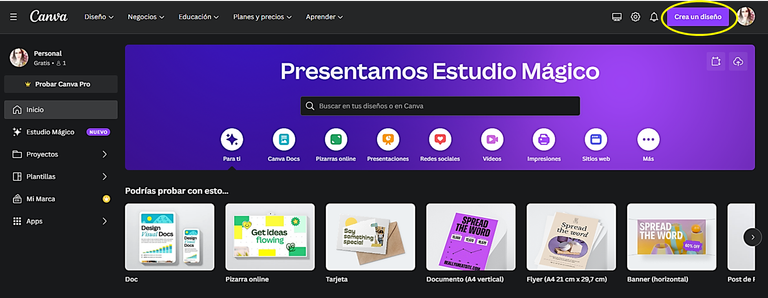
Ahora bien, para iniciar, debemos ingresar en "Crear un diseño" , cuyo acceso está en la parte superior derecha de la página, como se muestra en la siguiente imagen:
I hope you had a great day friends, today I show you how I made some separators for my blog posts, for some time I had this in mind and it was time to do it.
First of all, let's go to the website: https://www.canva.com, I imagine that many of us here already use this tool to design our covers and other images, but this time I will use it to create separators.
If you have not used it, you must first create your account, which is very easy.
Now, to start, we must go to "Create a design", whose access is at the top of the page. whose access is at the top right of the page, as shown in the following image:
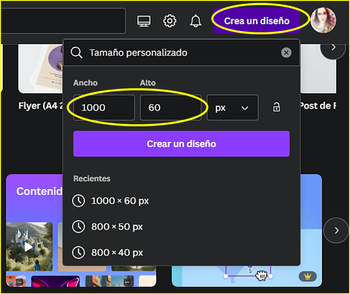
Luego se despliega una ventana en la que vamos a colocar las dimensiones de lo que será el lienzo para nuestros diseños.
En mi caso, como pretendo quitarle el fondo con otra aplicación que le disminuye la resolución, usé un tamaño de 1000 por 60 píxeles.
Se colocan las dimensiones en las casillas para tal fin, como se muestra en la imagen siguiente y se hace click en "Crear un diseño"
Then a window is displayed in which we are going to place the dimensions of what will be the canvas for our designs.
In my case, as I intend to remove the background with another application that decreases the resolution, I used a size of 1000 by 60 pixels.
Place the dimensions in the boxes for this purpose, as shown in the following image, and click on "Create a design".
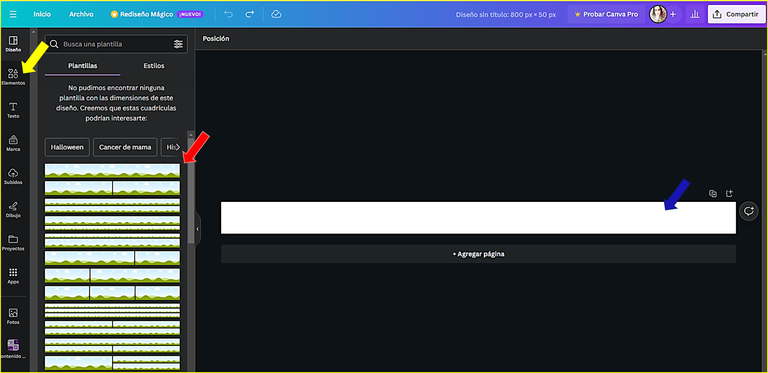
Podremos ver ahora la siguiente ventana, que muestra la plantilla blanca por defecto (señalada con la fecha azul), además, podemos ver las diferentes configuraciones disponibles para la plantilla (flecha roja). Sin embargo, para este caso, me iré a la sección "Elementos" (flecha amarilla), para ver los recursos disponibles para diseñar mi separador.
We can now see the following window, which shows the default white template (marked with the blue date), in addition, we can see the different configurations available for the template (red arrow). However, for this case, I will go to the "Elements" section (yellow arrow), to see the resources available to design my separator.
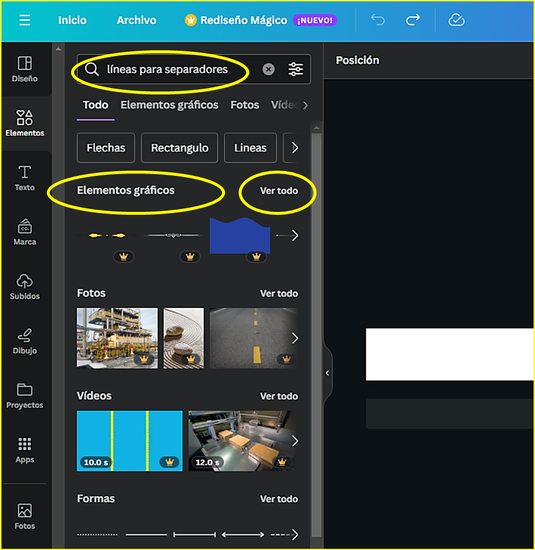
Luego, en la parte izquierda superior, donde está una casilla con una lupa, debemos colocar la frase o palabra clave de los elementos que deseamos buscar, por ejemplo, yo coloqué: líneas para separadores, pero también funciona si coloco sólo líneas o separadores; o si busco algo más específico como flores, puedo colocar: flores para separadores.
La web va a mostrar una lista con las opciones disponibles: "Elementos gráficos", fotos, videos, formas... En este caso usaré: "Elementos gráficos" y debo hacer click en "Ver todo" para que despliegue las opciones que hay en esa sección.
Then, in the upper left part, where there is a box with a magnifying glass, we must put the phrase or keyword of the elements we want to search for, for example, I put: lines for separators, but it also works if I put only lines or separators; or if I am looking for something more specific like flowers, I can put: flowers for separators.
The web will show a list with the available options: "Graphic elements", photos, videos, shapes... In this case I will use: "Graphic elements" and I must click on "See all" to display the options available in that section.
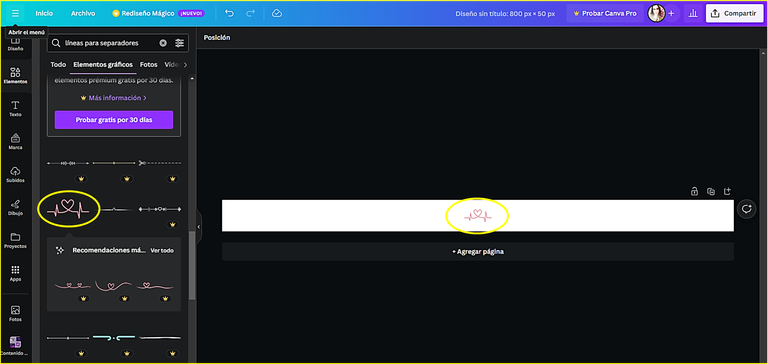
Después de revisar un poco lo que había, elegí una figura que tenía un corazón que me gustó mucho, para usarla sólo se hace click sobre ella y aparecerá sobre nuestra base o lienzo, como se puede observar en la siguiente figura:
After reviewing a little of what there was, I chose a figure that had a heart that I really liked, to use it just click on it and it will appear on our base or canvas, as shown in the following figure:
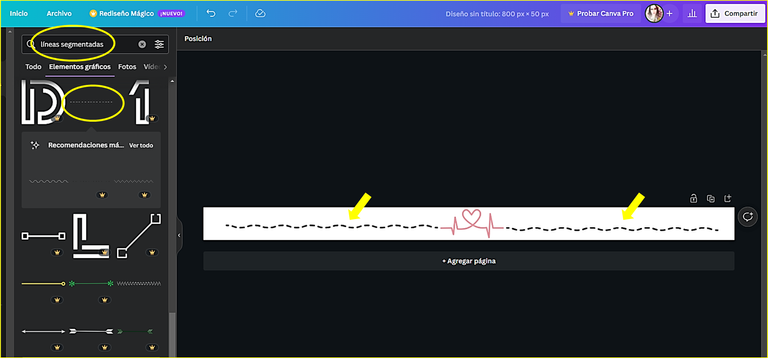
Ya tenía la idea de usar unas líneas punteadas para completar el diseño, por lo que de una vez coloqué: líneas punteadas, en la casilla de búsqueda de la sección "Elementos gráficos" y al conseguir la opción que me gustó más hice click sobre ella, esta vez en dos ocasiones, para que se añadiera dos veces en mi plantilla base y luego las ordené una de cada lado. Esto se puede entender mejor en la siguiente imagen, donde señalo con unas flechas amarillas las líneas punteadas que elegí:
I already had the idea of using dotted lines to complete the design, so at once I put: dotted lines, in the search box of the "Graphic elements" section and when I got the option I liked the most I clicked on it, this time twice, so that it would be added twice in my base template and then I ordered them one on each side. This can be better understood in the following image, where I point out with yellow arrows the dotted lines I chose:
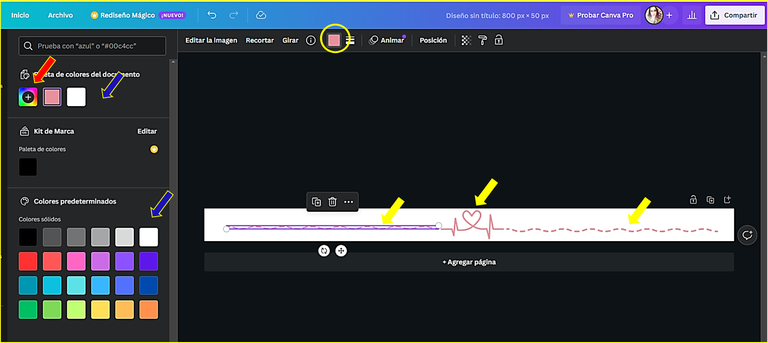
Como son de color negro y quiero cambiarlas al rosa que tiene el corazón, al hacer click sobre la línea, en la parte central superior de la ventana, veremos una casilla donde podemos seleccionar el color que más nos agrade.
Hay disponibles unos colores por defecto, que los señalo en la próxima imagen con unas flechas azules, pero si quieres otro, puedes usar la opción de la casilla multicolor, que señalo con una flecha roja, que es para colores personalizados.
As they are black and I want to change them to the pink that has the heart, when clicking on the line, at the top center of the window, we will see a box where we can select the color that we like.
There are some default colors available, which I point out in the next image with blue arrows, but if you want another one, you can use the option of the multicolor box, which I point out with a red arrow, which is for custom colors.
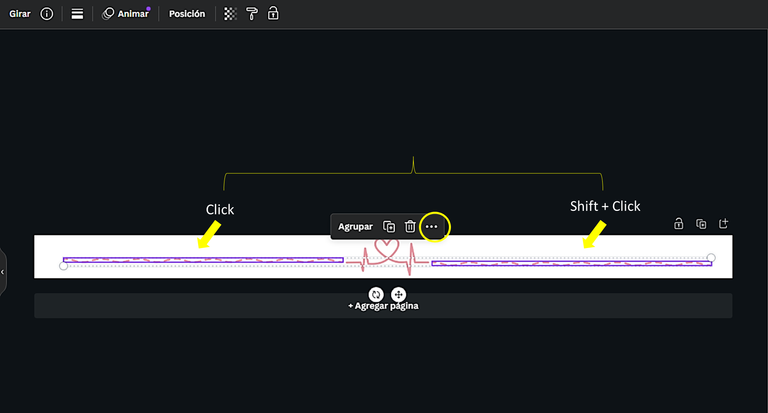
Ahora que está todo rosa, quise alinear los dos segmentos de líneas entrecortadas, para lo que los seleccioné al igual que en Power Point, haciendo click en el primer elemento y luego shift + click en el segundo (flechas amarillas). Luego aparece una ventanita con varias opciones, entre ellas, tres puntos (...), justo allí haremos click ahora.
Now that everything is pink, I wanted to align the two segments of broken lines, so I selected them just like in PowerPoint, by clicking on the first element and then shift + click on the second (yellow arrows). Then a small window appears with several options, among them, three dots (...), right there we will click now.
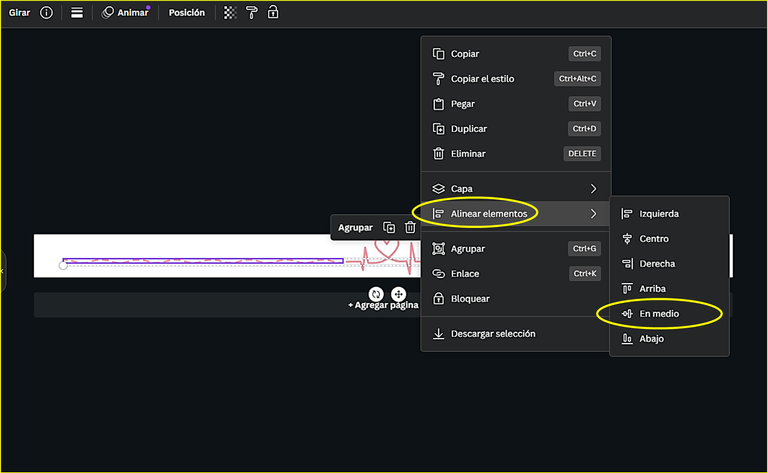
Se desplegará otra ventana de herramientas que también es muy parecida a la de Power Point y allí seleccionaremos la opción : "Alinear elementos" y luego usé la subcategoría: "En medio", para que usara un promedio de la posición vertical de los dos segmentos.
Another tool window will be displayed which is also very similar to the one in Power Point and there we will select the option: "Align elements" and then I used the subcategory: "In the middle", so that it will use an average of the vertical position of the two segments.
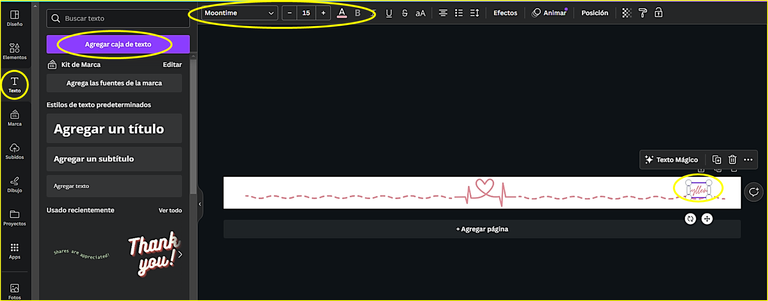
Quedé contenta con el resultado, pero para añadir más herramientas útiles para esta pequeña guía, le añadí también mi nombre de usuario en Hive, para eso voy al panel lateral izquierdo y selecciono la categoría "Texto", hago click en "Agregar cuadro de texto" y se añade uno en el centro de la plantilla.
Ahora sólo queda mover el cuadro de texto a la posición deseada y colocarle tanto el tamaño como el color que elijamos, en mi caso seguí usando el mismo color rosa.
En la siguiente imagen, se puede ver la caja de texto con mi nombre de usuario, resaltada en un óvalo amarillo.
I was happy with the result, but to add more useful tools for this little guide, I also added my user name in Hive, for that I go to the left side panel and select the category "Text", click on "Add text box" and one is added in the center of the template.
Now just move the text box to the desired position and set both the size and the color we choose, in my case I kept using the same pink color.
In the following image, you can see the text box with my username, highlighted in a yellow oval.
Como mi idea inicial era hacer el separador sin fondo, dejaré la plantilla en blanco, si alguna persona quiere hacer otro diseño, hay muchísimos fondos para colocarle, sólo debería ajustar la altura de la plantilla a una con la que se sienta cómoda, en mi caso, si fuera a usar un fondo, quizás utilizaría una altura de 30 o 40 píxeles.
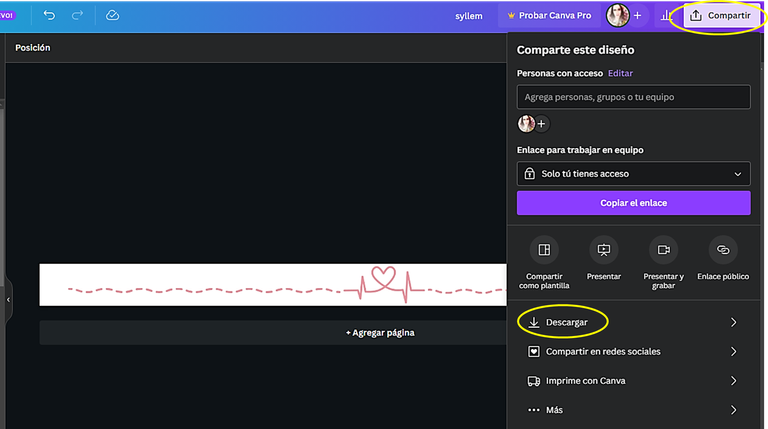
En este caso entonces sólo me queda descargar mi separador, para lo que voy a la parte superior derecha a una casilla que dice "Compartir", una vez allí, elijo la opción "Descargar".
As my initial idea was to make the separator without background, I will leave the template blank, if someone wants to make another design, there are many backgrounds to place, you should only adjust the height of the template to one that you feel comfortable with, in my case, if I were to use a background, perhaps I would use a height of 30 or 40 pixels.
In this case then I just have to download my separator, for which I go to the top right to a box that says "Share", once there, I choose the option "Download".
Se usa la opción por defecto en "Tipo de archivo" que es "PNG" y luego se selecciona otra vez la opción "Descargar" (Ver imagen siguiente).
Use the default option in "File Type" which is "PNG" and then select the "Download" option again (See image below).
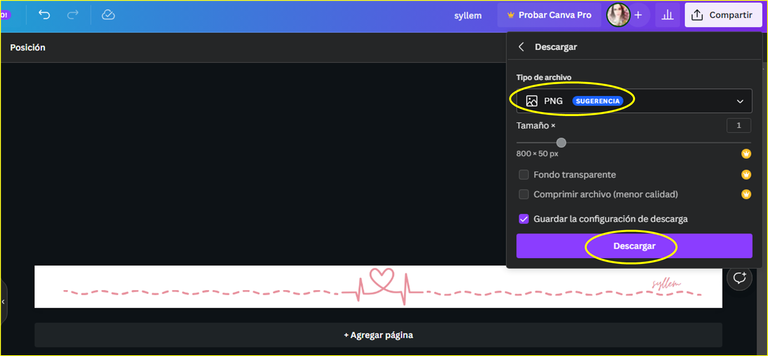
De esa manera ya tendremos la imagen en nuestra PC y al usarla en nuestra publicación lucirá así:
That way we will already have the image in our PC and when using it in our publication it will look like this:

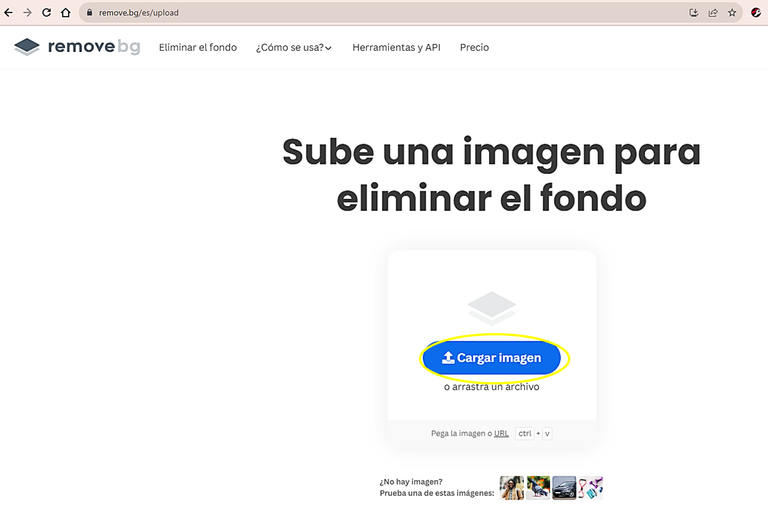
Ahora procederé a quitarle el fondo blanco. La herramienta "Canva" en su versión "Pro" lo hace en un clic, pero como yo uso la versión gratuita me apoyaré en la página web: https://www.remove.bg/es, con la que puedo hacerlo de manera fácil.
Al ingresar verás la siguiente pantalla, luego sólo cargas la imagen a la que le quieres quitar el fondo, ya se arrastrándola o buscándola en la ubicación donde está.
Now I will proceed to remove the white background. The tool "Canva" in its "Pro" version does it in one click, but as I use the free version I will rely on the website: https://www.remove.bg/es, with which I can do it easily.
When you enter you will see the following screen, then just load the image you want to remove the background, either by dragging it or looking for it in the location where it is.
En cuestión de segundos ya la tendrás sin fondo, por lo que sólo queda hacer click en "Descargar" y ¡listo!
In a matter of seconds you will have it without background, so all you have to do is click on "Download" and that's it!
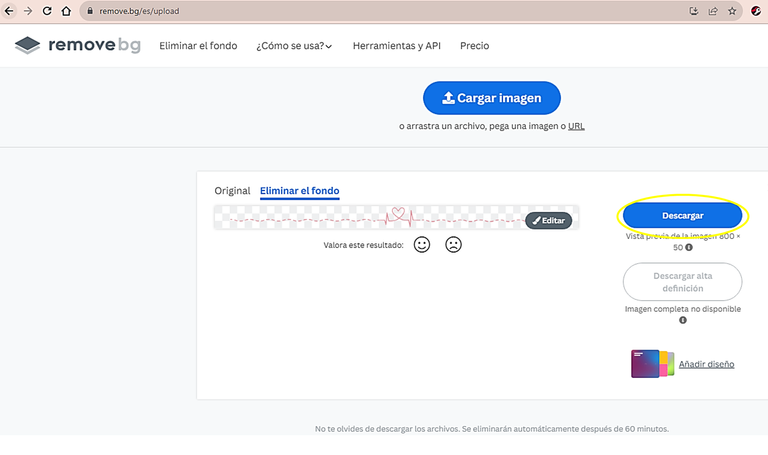
El resultado de todo este proceso es el siguiente separador:
The result of this process is the following separator:

Es la primera vez que lo intento y la verdad me parece algo fascinante, experimenté haciendo unos de flores, siguiendo en mismo procedimiento y obtuve los siguientes:
It is the first time I try it and the truth is something fascinating, I experimented making some of flowers, following the same procedure and I got the following:


Y eso fue todo lo que practiqué por hoy amigos, creo que tengo diversión para rato, espero hacer separadores hermosos para embellecer mis publicaciones, también tengo pendiente diseñar un banner.
A ustedes, gracias por haberme acompañado en esta lectura.
And that was all I practiced for today friends, I think I have fun for a while, I hope to make beautiful separators to beautify my publications, I also have to design a banner.
To you, thank you for joining me in this reading.

Thank you very much
Portada diseñada en Canva.
Las imágenes mostradas son capturas de pantalla de las páginas web "Canvas" y "removebg".
Fondos removidos con removebg.
Emoji de Bitmoji.
Separadores hechos con Canva.
Traducción cortesía de deepl.com.
Cover designed in Canva.
The images shown are screenshots from the "Canvas" and "removebg" web pages.
Backgrounds removed with remove.bg.
Emoticon from Bitmoji.
Dividers made with Canva.
Translation courtesy of deepl.com.