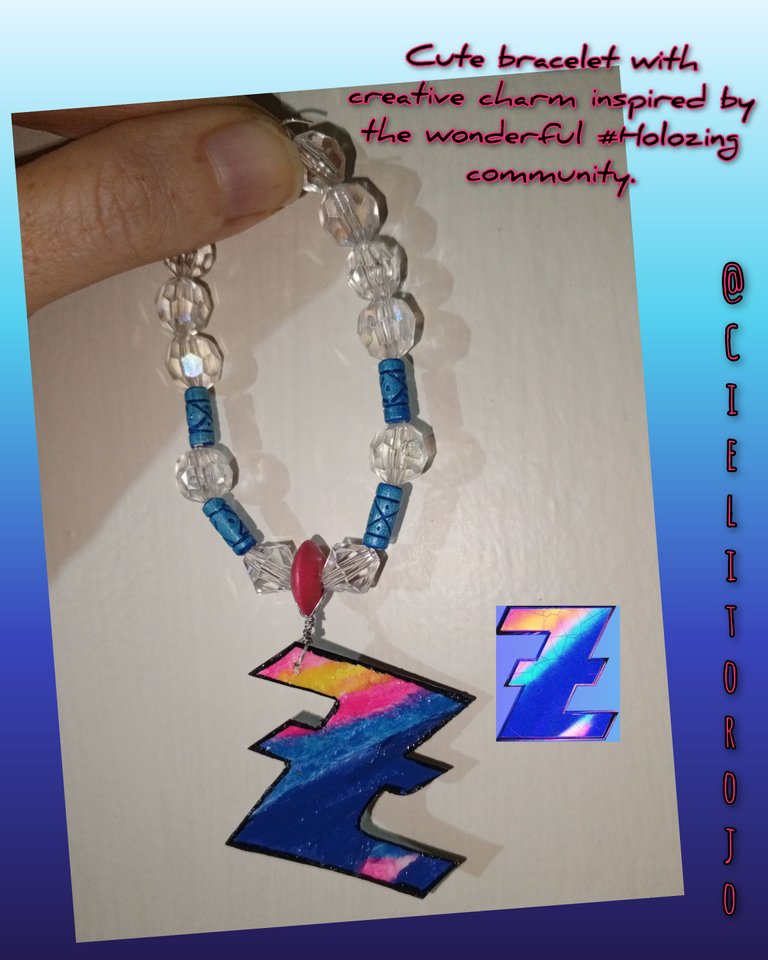
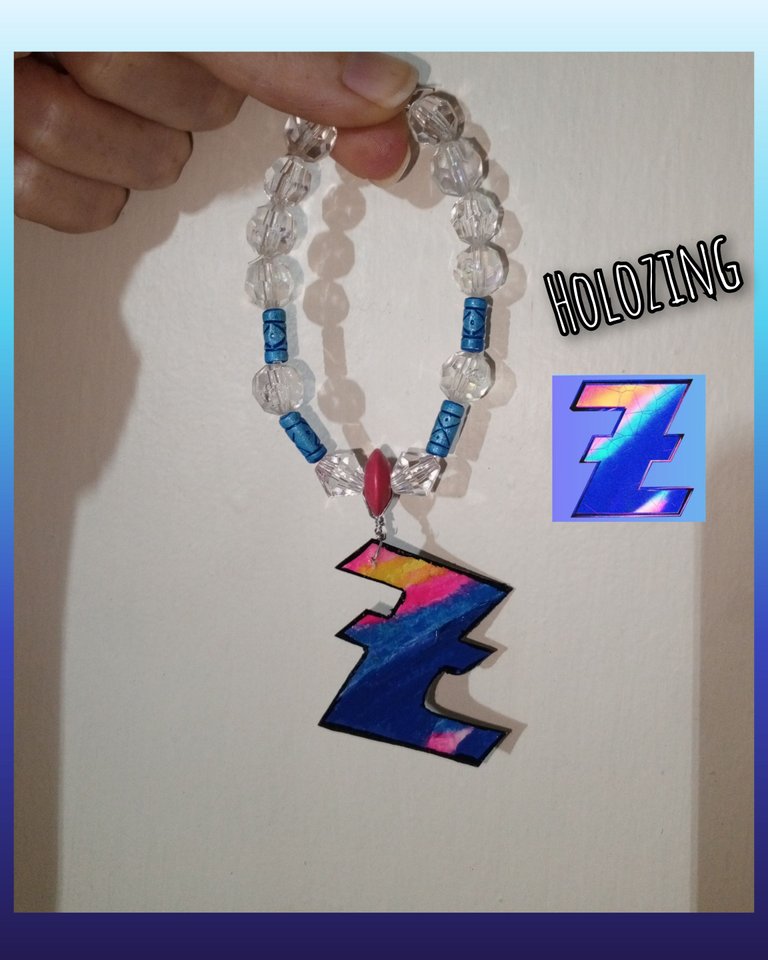
Hello 👋🏼 beautiful community of #holozing, today I come to present my second presentation, it is a craft inspired by the handmade elaboration of a nice bracelet and pendant, inspired by the logo that represents this amazing community, this is a way to support and contribute to strengthening it, so I encourage you to join me until the end hoping that the content is to your liking.
This is a bracelet, easy and simple to elaborate we only use some transparent, blue, pink rhinestones and a fascinating pendant or pendant that will allow us to wear and carry to every place giving go with the purpose of making known to the general public that represents the same.
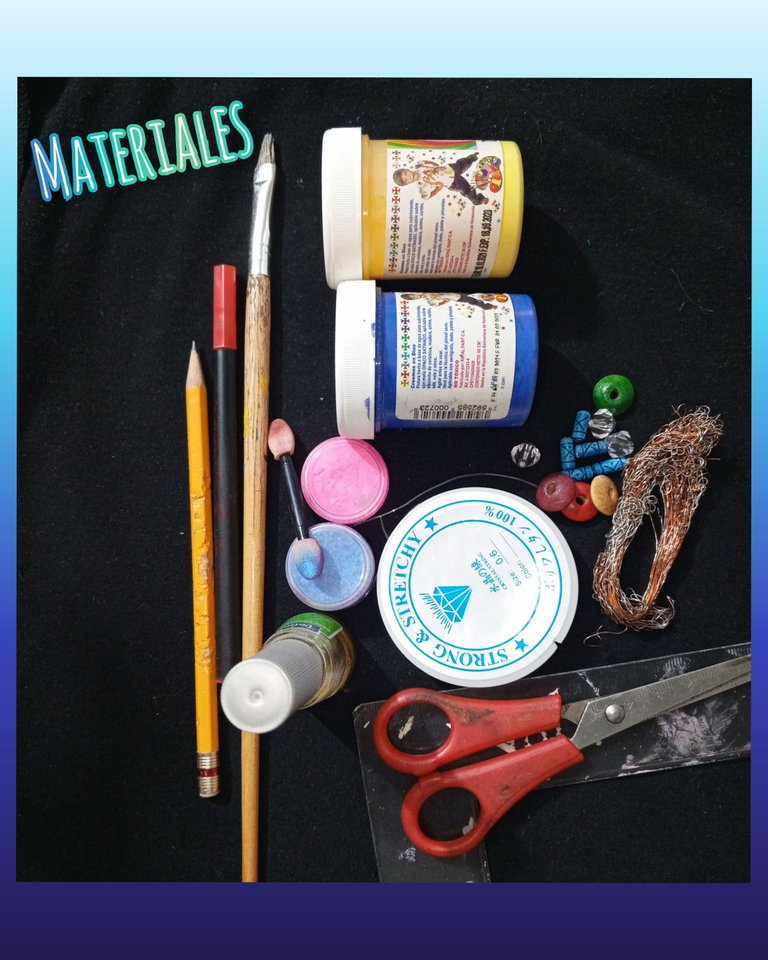
Materials:
Cut out of a stripe leaf.
Cut out of white cardboard.
Pencil.
Scissors.
Liquid white glue and glue stick.
Paintbrush.
Blue and yellow paints.
Light blue and fuchsia shades.
Black fine point marker.
Black marker.
Nail polish.
Punch.
Thin wire.
Elastic nylon thread.
10 round transparent rhinestones.
4 blue rhinestones.
2 clear triangular rhinestones.
1 pink round rhinestones.
2 handles.
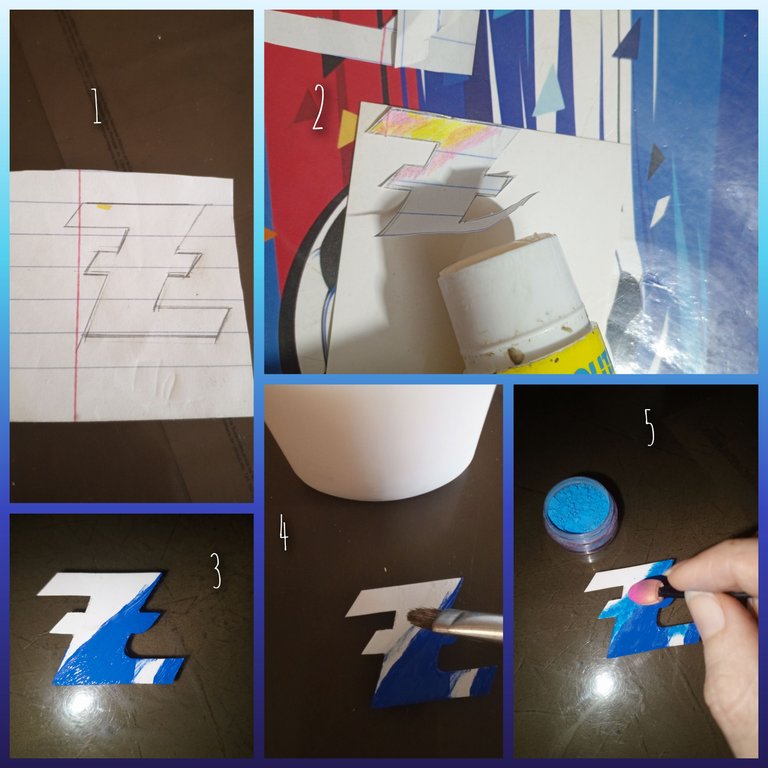
✓Procedures for making the charm or pendant.
Step #1 to #5.
On the stripe sheet we are going to proceed to make the mold of the figure that is going to be representative of our logo, with the following measurements 3.5 cm wide by 3.5 cm high.
Step #2
Cut out our mold and then paste it on the cardboard cutout and then proceed to cut it out.
Step #3
Apply dark blue paint to the logo as shown in the images.
Step #4
Then with the help of a brush we put some liquid glue.
Step #5
Next apply some light blue eye shadow, as shown in the image.
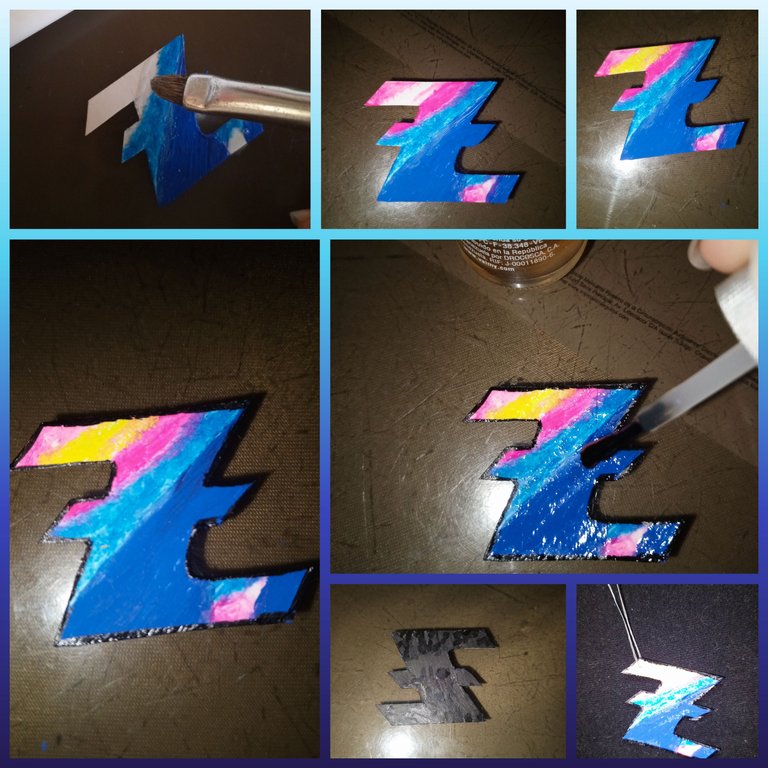
Step #6 to #12.
Repeat the procedure applying some liquid glue.
Step #7
Continue by applying some fuchsia eyeshadow as shown in the image.
Step #8
Continue with a brush applying in a nuanced way the yellow color.
Step #9
To continue outline the entire edge of the logo with the black pen.
Step #10
Varnish and cover the entire logo with the nail polish to give it the necessary shine.
Step #11
Cover the back of the logo in black with a marker.
Step #12
With the punch we will make a small hole in the upper left corner and then insert a thin wire that will allow us to hang the pendant.
✓Procedures for making the bracelet:
Step #1.
Measure and cut 22 cm length of elastic nylon thread.
Step #2
On one of the ends proceed to tie a gripper, insert the elastic thread through one of the ends and tie several knots.
Step #3
Begin to introduce through the elastic thread, 4 round transparent rhinestones.
Step #4
Next introduce a blue rhinestone, then a round transparent one, after repeating the procedure with another blue one, we will place a transparent one in a triangular shape.
Step #5
At this point, we have reached the middle of the bracelet and we will place the pink round beads.
Step #6
At this point we are going to repeat the procedure by placing the transparent triangular beading then a blue beading followed by a round transparent beading and the other blue beading.
Step #7
Next place the four round transparent rhinestones.
Step #8
At the end of the nylon thread we are going to knot another hook.
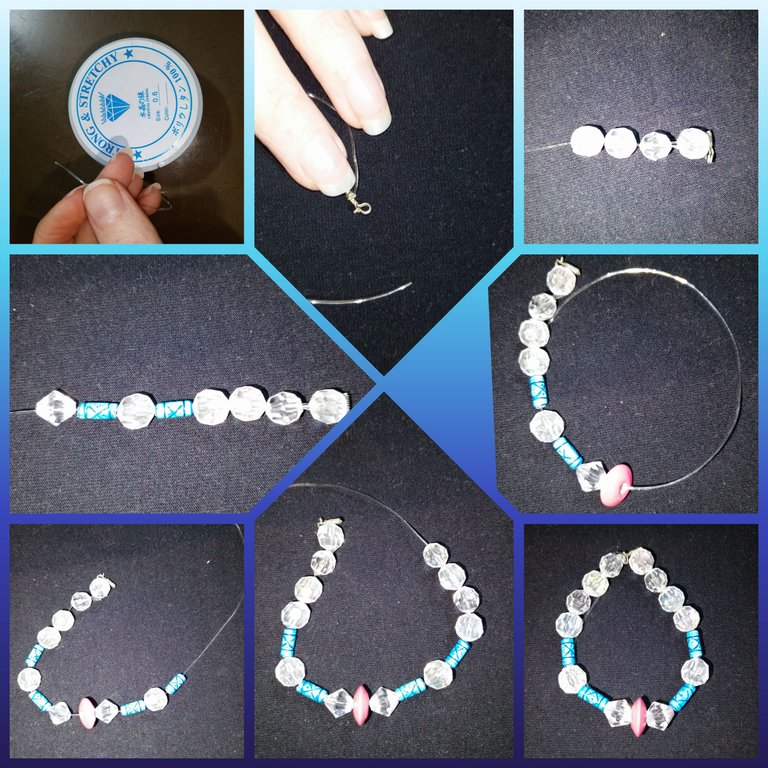
Step #9
At this point we are going to introduce the thin wire through the hole of the pink rhinestones and we are going to adjust it by winding it so that it remains fixed, as shown in the image.
Thank you for joining me here and see you another time.
Thanks for reading me and your valuable support.
The photos are of me @cielitorojo with my Tecno Spark 10 Pro.
Translated with Deepl translator.
Hola 👋🏼 bonita comunidad de #holozing, hoy vengo a presentarles mi segunda presentación, es una manualidad inspirada en la elaboración hecha a mano de un bonito brazalete y dije o colgante, inspirado en el logo que representa está sorprendente comunidad, está es una manera de apoyar y contribuir al fortalecimiento de la misma, así que les animo a que me acompañen hasta el final esperando que el contenido sea de su agrado.
Este es un brazalete, fácil y sencillo de elaborar tan solo utilizamos unas pedrerías transparente, azules, rosada y un fascinante dije o colgante que nos va a permitir lucir y llevar a cada lugar dando vaya con la finalidad de dar a conocer al público en general que representa la misma.
✓Materiales:
Recorte de hoja de raya.
Recorte de cartulina blanca.
Lápiz.
Tijera.
Pega blanca líquida y en barra.
Pincel.
Pinturas azul, amarilla.
Sombras azul Clara, fucsia.
Marcador punta fina negro.
Marcador negro.
Brillo de uñas.
Punzón.
Alambre Delgado.
Hilo de nylon elástico.
10 pedrerías transparente redonda.
4 pedrerías de color azul.
2 pedrería transparente triangular.
1 pedrería redonda rosada.
2 agarradores.
✓Procedimientos para la elaboración del dije o colgante:
Paso #1 al #5.
En la hoja de raya vamos a proceder a realizar el molde de la figura que va a ser representativa de nuestro logo, con las siguientes medidas 3.5 cm de ancho por 3.5 cm de alto.
Paso #2
Recortar nuestro molde y luego pegarlo en el recorte de la cartulina seguidamente procedemos a recortarlo.
Paso #3
Colocarle pintura azul oscuro al logo así como muestran las imágenes.
Paso #4
Luego con ayuda de un pincel le colocamos un poco de pega líquida.
Paso #5
Seguidamente aplicar un poco de sombra de ojo de color azul claro, tal cual como les muestro en la imágen.
Paso #6 al #12.
Repetir el procedimiento aplicando un poco de pega líquida.
Paso #7
Continuamos aplicando un poco de sombra de ojos color fucsia así como le presento la imágen.
Paso #8
Continuar con un pincel aplicando de manera matizada el color amarillo.
Paso #9
Para continuar delinear todo el borde del logo con el plumón negro.
Paso #10
Barnizar y cubrir todo el logo con el brillo de uñas para darle el brillo necesario.
Paso #11
Cubrir de negro la parte posterior del logo con ayuda de un marcador.
Paso #12
Con él punzón vamos a realizar un pequeño orificio en el extremo superior izquierdo luego introducir un fino alambre que nos va a permitir colgar el dije.
✓Procedimientos para la elaboración del brazalete:
Paso #1
Medir y cortar 22 cm de largo de hilo de nylon elástico.
Paso #2
En uno de los extremos se procede a amarrar un agarrador, introducir el hilo elástico por uno de los extremos y realizar varios nudos.
Paso #3
Comenzar a introducir por el hilo elástico, 4 pedrerías transparente redondas.
Paso #4
Seguidamente introducir una pedrería azul luego una redonda transparente después de repetir el procedimiento con otra azul y colocaremos una transparente de forma triangulada.
Paso #5
A esta altura, ya llegamos a la mitad del brazalete y colocaremos la pedrería redonda de color rosado.
Paso #6
En este punto vamos a repetir el procedimiento colocando la pedrería transparente triangular luego una pedrería azul seguidamente una redonda transparente y la otra de color azul.
Paso #7
Seguidamente colocar las cuatro pedrerías transparentes redondas.
Paso #8
En el extremo del hilo de nylon vamos a anudar otro gancho.
Paso #9
En este punto vamos a introducir el fino alambre por el orificio de la pedrería rosada y vamos a ajustar enrollando el mismo para que nos quede fijo, quedando como les presento la imágen.
Gracias por acompañarme por aquí y hasta otra ocasión.
Gracias por leerme y su valioso apoyo.
Las fotos son mías @cielitorojo con mi Tecno Spark 10 Pro.
Traducido con el traductor Deepl.