Creating ✨️ pom-pom keychain 🧶 // Creando ✨️ llavero pompón 🧶

in #hive-1305604 months ago

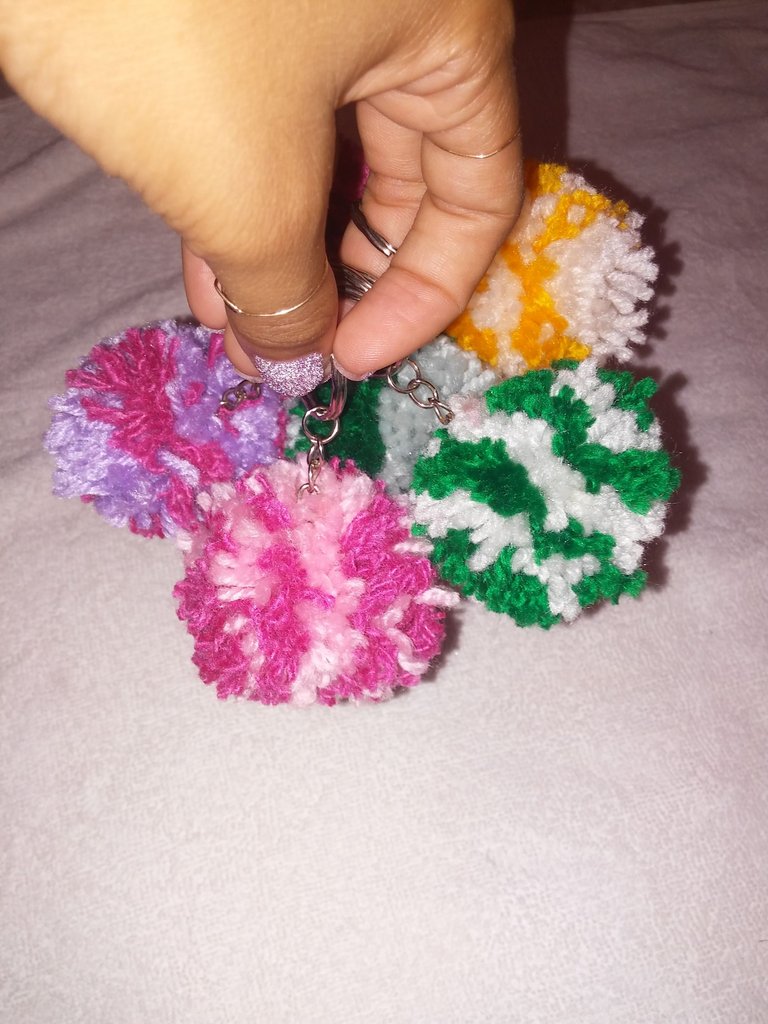
Greetings 🤗 to all the creative friends in this community, a pleasure to be posting here. My best wishes 🥰 to everyone, I hope you are well and happy. As for myself, I am, very excited and happy to belong to this fantastic world where art is so important. I wanted to share with you a tutorial on how I make these beautiful pom-pom keychains ✨️ that I love so much.

20220913_140032.jpg

I love creating things with my ✋️hands and I am very happy that this community exists for people who love crafts, to share what we do and also learn from other artisans, so I am delighted to share it with you 😁.
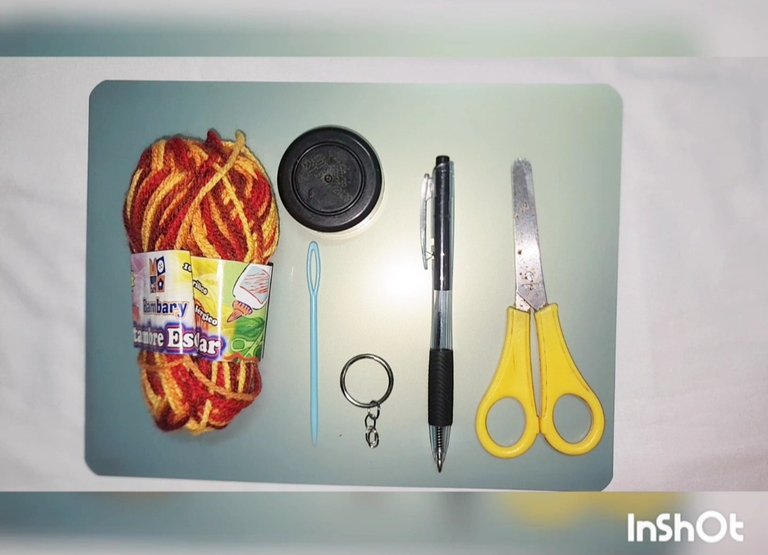
Materials

  • Cardboard or plaque
  • Circle for marking
  • Scissors
  • Pencil
  • Yarn
  • Wool needle
  • Keychain ring

Screenshot_20240624_001606_Gallery.jpg

Steps to create

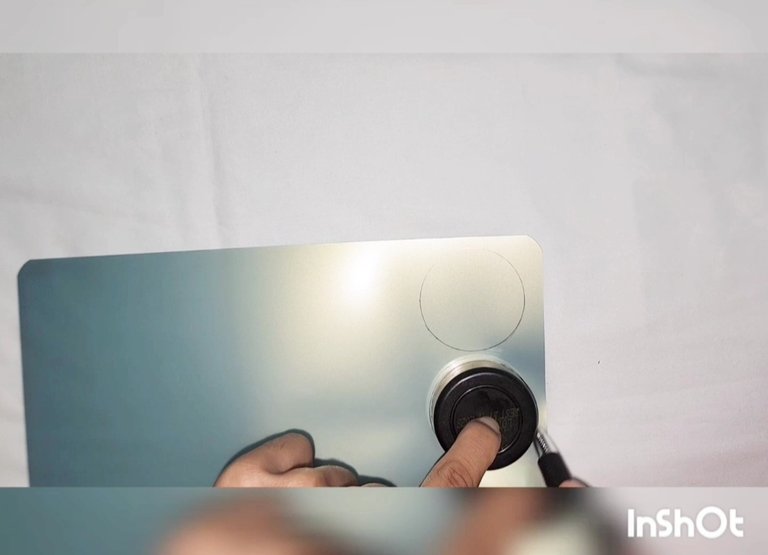
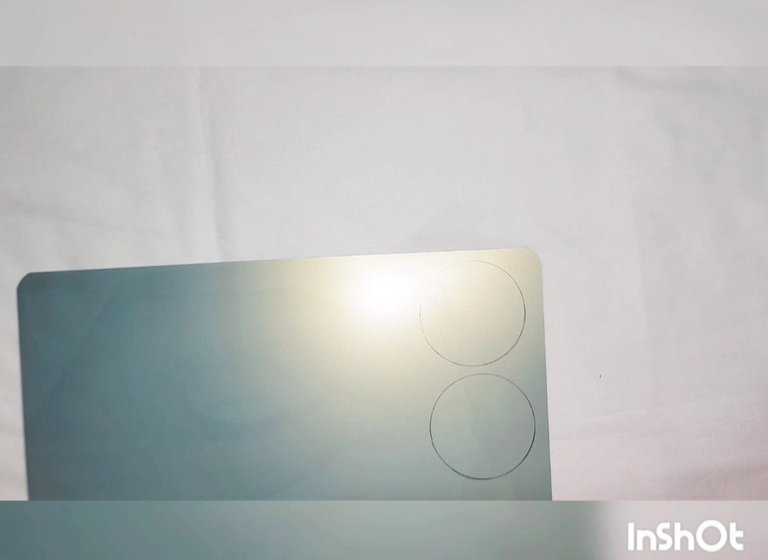
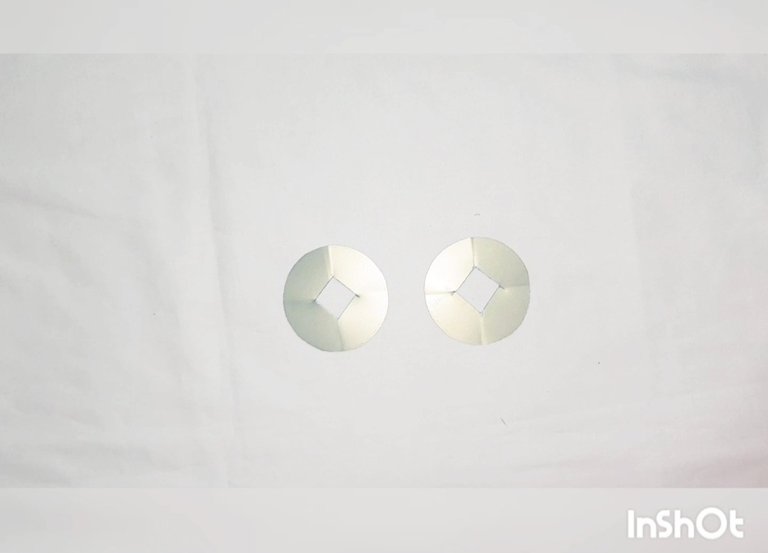
1- Start by marking two circles on the cardboard or plaque.

Screenshot_20240624_001656_Gallery.jpg

Screenshot_20240624_001623_Gallery.jpg

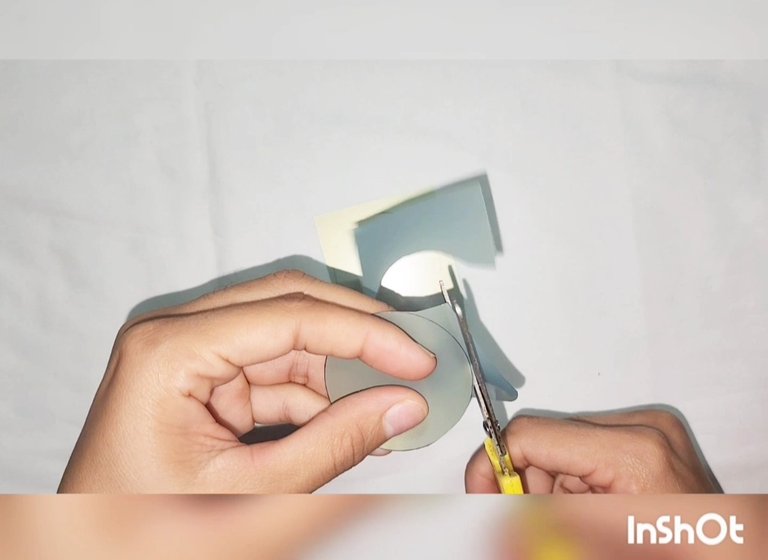
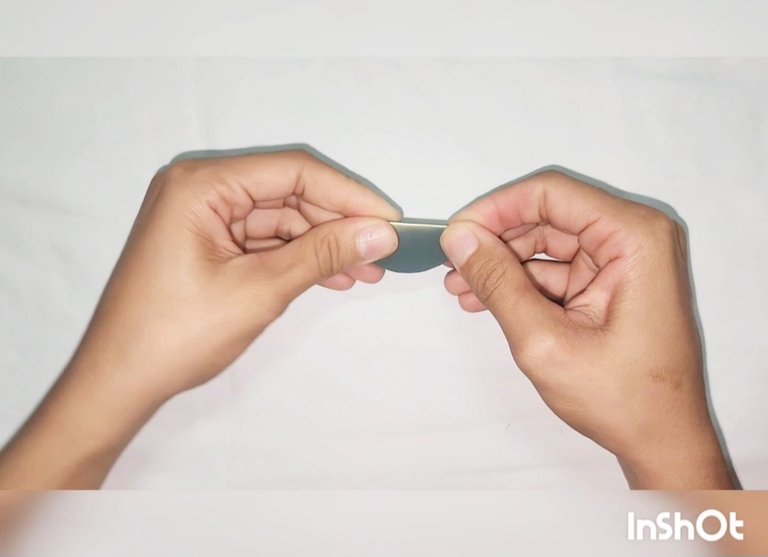
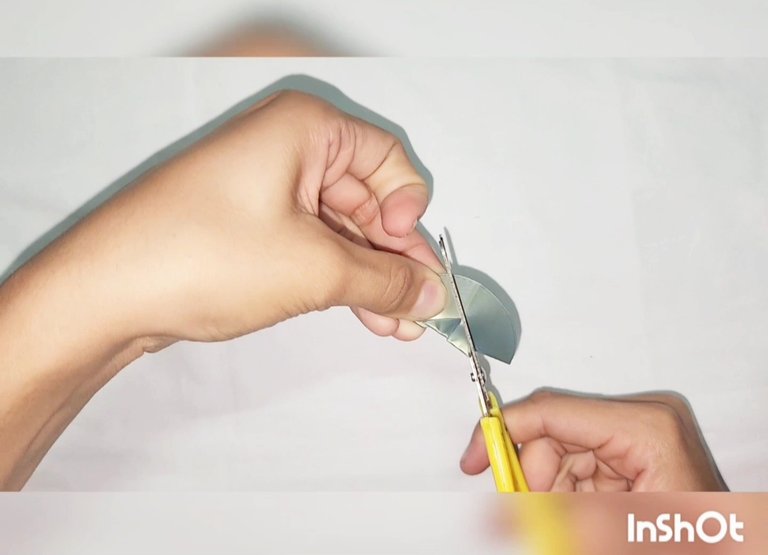
2- Cut the two circles, join them, and fold them together to find the center where we will make a hole that is not too small.

Screenshot_20240624_001702_Gallery.jpg

Screenshot_20240624_001727_Gallery.jpg

Screenshot_20240624_001758_Gallery.jpg

Screenshot_20240624_001842_Gallery.jpg

3- Cut the yarn a little long depending on the size of the circles we use.
4- Thread the yarn through the needle hole, double if possible for easier handling.

Screenshot_20240624_001855_Gallery.jpg

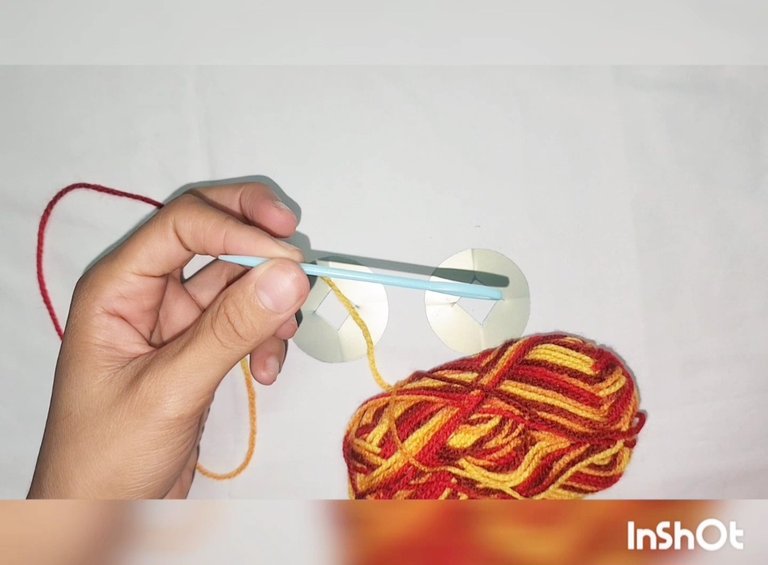
5- Join the two circles, and start passing the needle from the center to the outside, until the needle no longer fits through the hole.

Screenshot_20240624_001936_Gallery.jpg

Screenshot_20240624_001900_Gallery.jpg

Screenshot_20240624_001924_Gallery.jpg

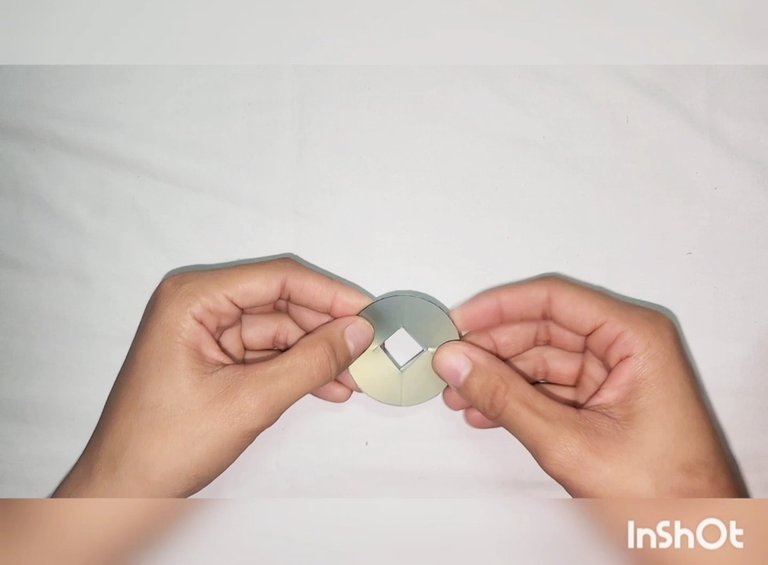
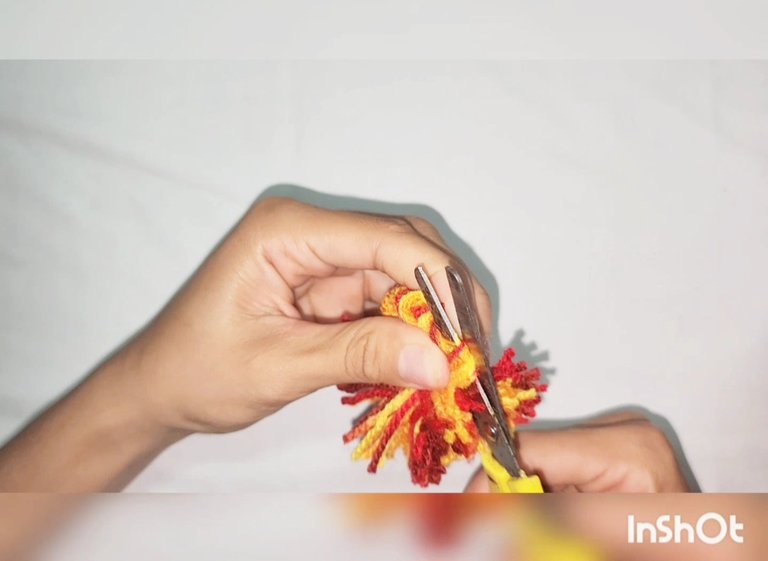
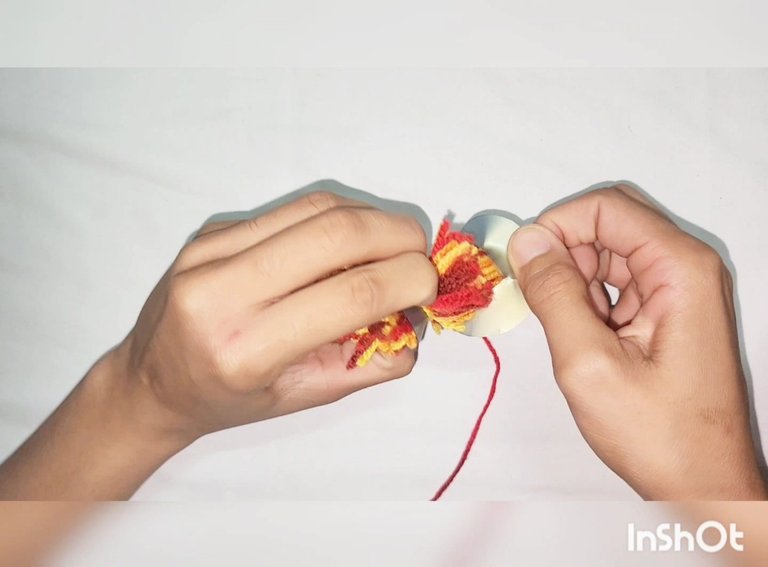
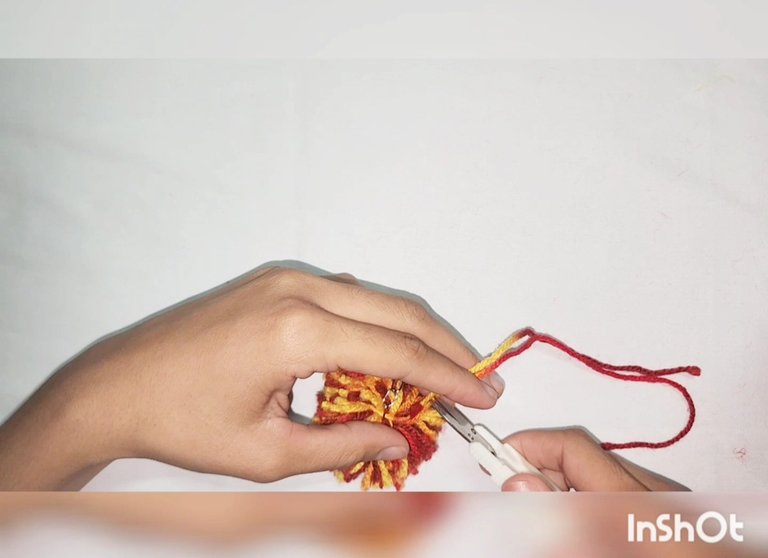
6- Cut the yarn around the edge of the circle.

Screenshot_20240624_002003_Gallery.jpg

Screenshot_20240624_001950_Gallery.jpg

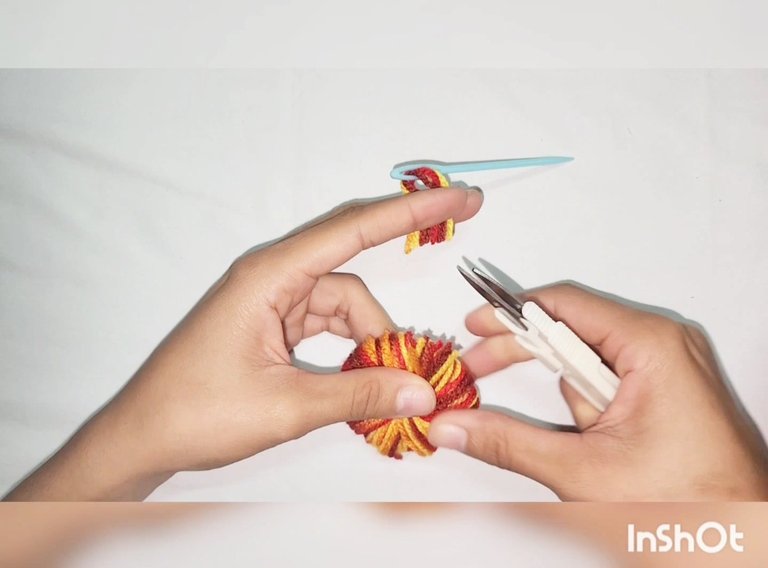
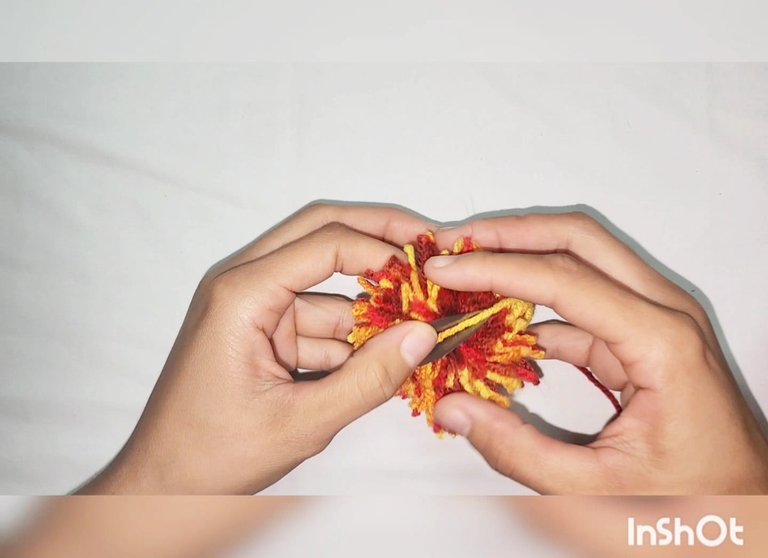
7- Cut another strand of yarn, separate the edges of the two circles, and place the yarn strand around the center and make a knot. Twice is better.

Screenshot_20240624_002057_Gallery.jpg

Screenshot_20240624_002021_Gallery.jpg

Screenshot_20240624_002023_Gallery.jpg

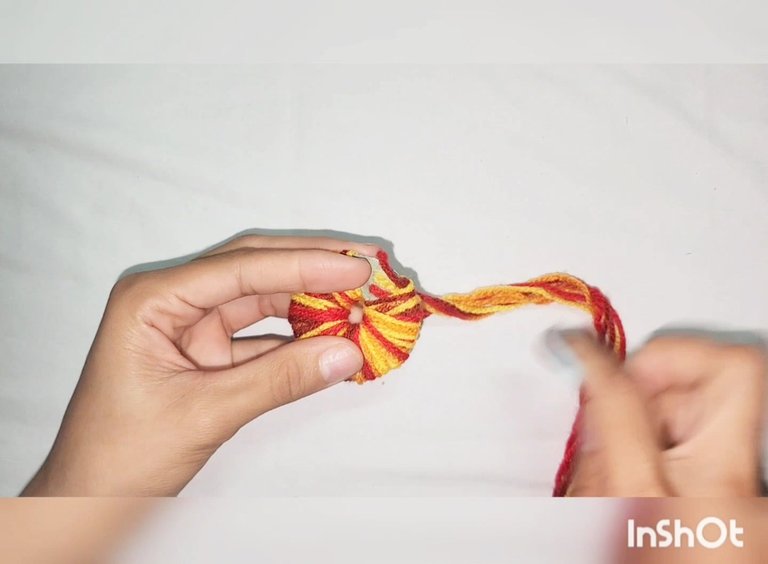
8- Carefully remove the circles.

Screenshot_20240624_002117_Gallery.jpg

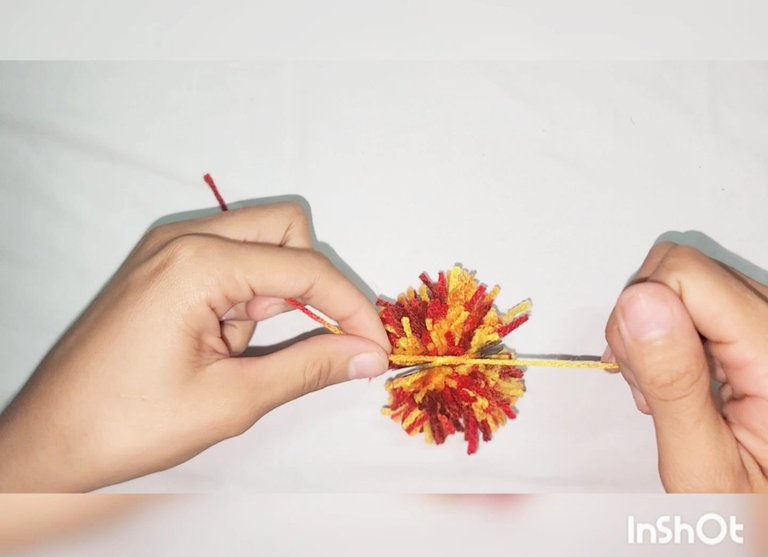
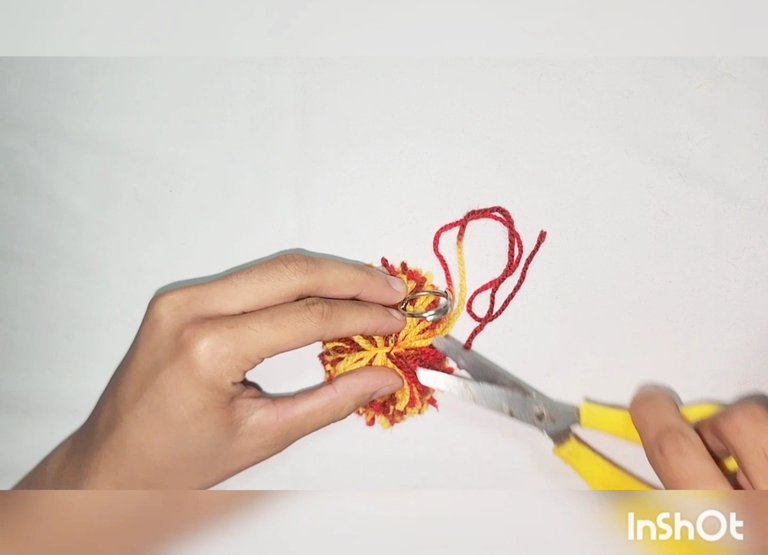
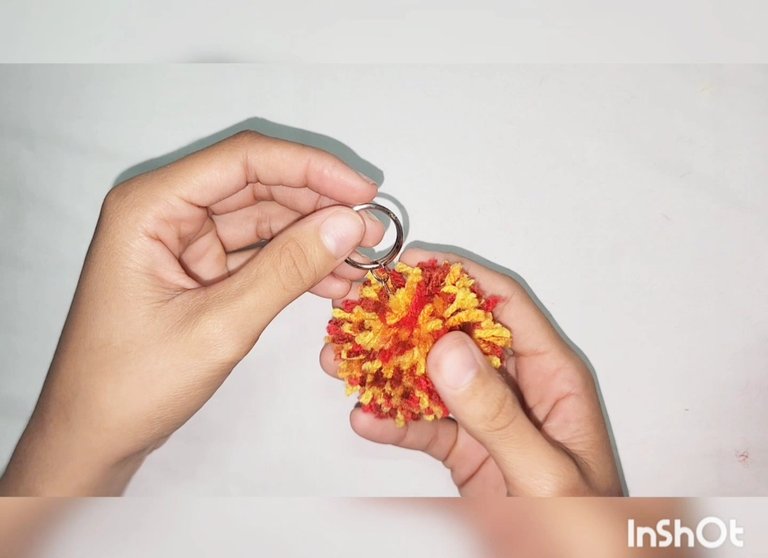
9- Take the keychain ring, find the yarn strand that we passed through the center, and hang it from there.

Screenshot_20240624_002514_Gallery.jpg

Screenshot_20240624_002417_Gallery.jpg

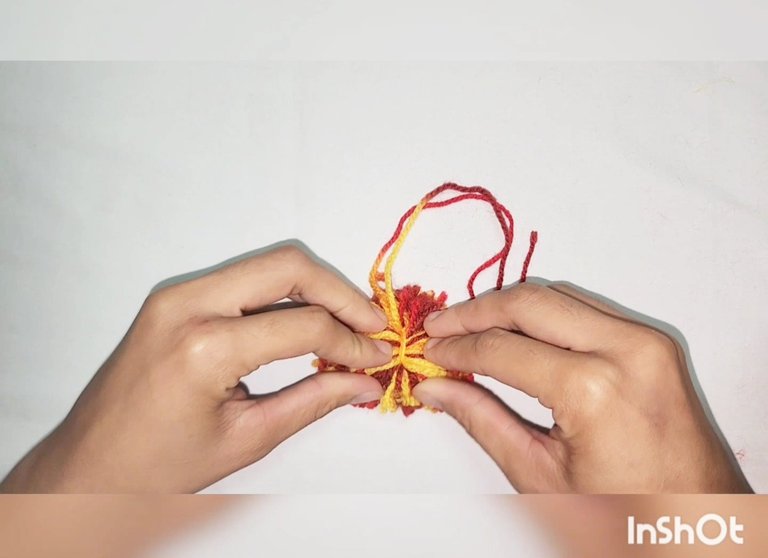
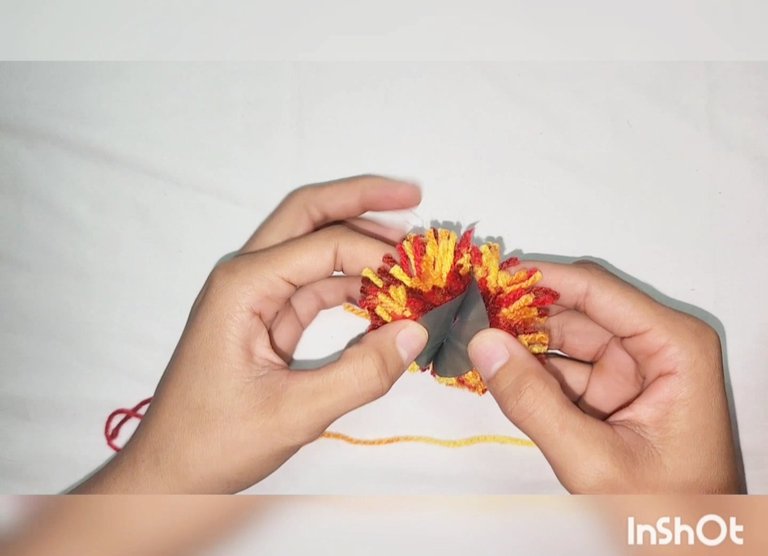
10- Cut the excess yarn.

Screenshot_20240624_002520_Gallery.jpg

11- Fluff up the cut yarns to make them take a circular shape.

Screenshot_20240624_002526_Gallery.jpg

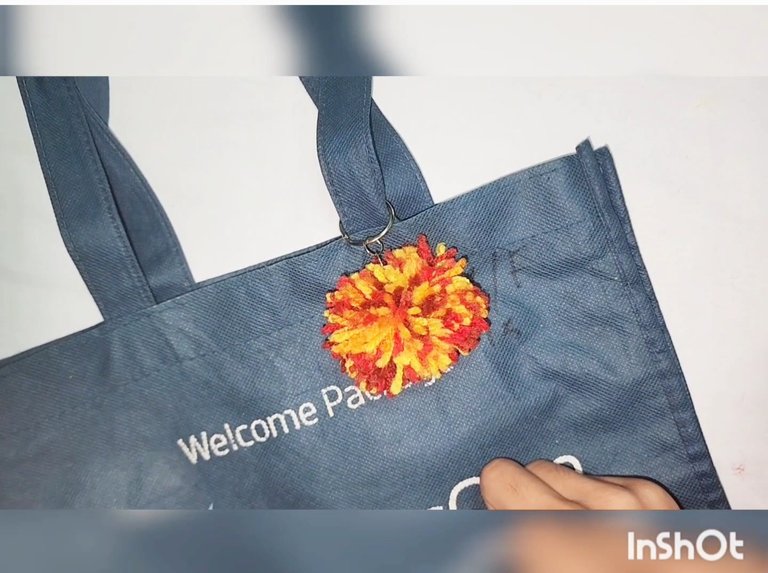
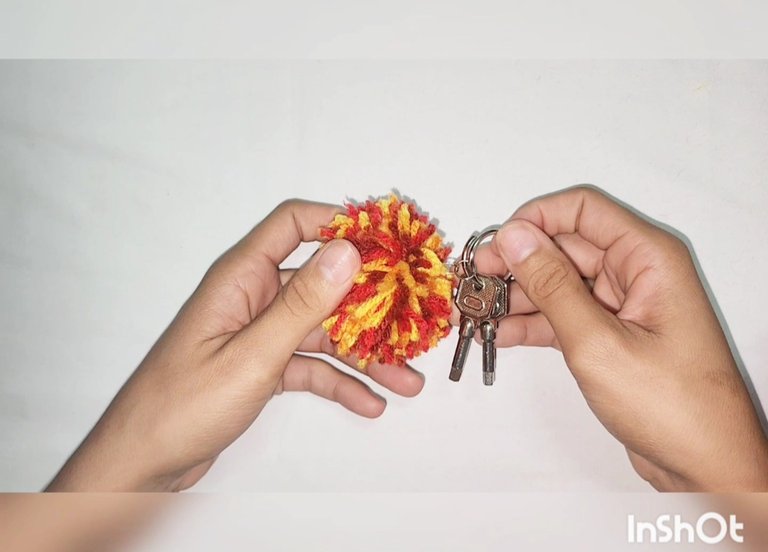
And there you have it, a pom-pom keychain for your keys, to hang on your favorite bag, or to decorate whatever you wish.

Screenshot_20240624_002537_Gallery.jpg

Screenshot_20240624_002532_Gallery.jpg

Happy to share this tutorial with all of you, I hope you like it so I can continue sharing what I know how to do. Blessings, thousands, and hugs to all.

Versión en Español

Saludos 🤗 para todos los amigos creativos de esta comunidad, un placer estar publicando en ella. Mis mejores deseos 🥰 para todos, espero que estén bien y felices. Yo por mi parte lo estoy, muy emocionada y feliz de poder pertenecer a este mundo fantástico donde es tan importante el arte.
Quise compartir con ustedes un tutorial de como hago estos hermosos llaveros pompones ✨️ que a mí me gustan muchísimo.

20220913_140032.jpg

Me encanta crear cositas hechas con mis ✋️manos y estoy muy contenta de que esta comunidad exista para las personas que amamos las manualidades, poder compartir lo que hacemos y también aprender de los demás artesanos, así que yo encantada de compartirlo con ustedes 😁.

Materiales

  • Cartón o placa
  • Círculo para marcar
  • Tijera - Lapicero
  • Estambre - Aguja lanera
  • Erraje de llavero

Screenshot_20240624_001606_Gallery.jpg

Pasos para crear

1- Comenzamos marcando dos círculos en la placa o cartón.

Screenshot_20240624_001656_Gallery.jpg
!

Screenshot_20240624_001623_Gallery.jpg

2- Cortamos los dos círculos, los unimos y lo doblamos juntos para buscar el centro donde le haremos un agujero que no quede muy pequeño.

Screenshot_20240624_001758_Gallery.jpg

Screenshot_20240624_001727_Gallery.jpg

Screenshot_20240624_001702_Gallery.jpg

Screenshot_20240624_001842_Gallery.jpg
3- Cortamos la lana que quede un poco larga dependiendo del tamaño de los círculos que utilicemos. 4- Pasamos la lana por el hueco de la aguja, si es doble mejor para menor dificultad.

Screenshot_20240624_001855_Gallery.jpg

5- Unimos los dos círculos, y comenzamos a pasar la aguja desde el centro hasta afuera, hasta que la aguja ya no tenga espacio en el agujero.

Screenshot_20240624_001924_Gallery.jpg

Screenshot_20240624_001900_Gallery.jpg

Screenshot_20240624_001936_Gallery.jpg

6- Cortamos la lana por toda la orilla del círculo.

Screenshot_20240624_002003_Gallery.jpg

Screenshot_20240624_001950_Gallery.jpg

7- Cortamos otra hebra de lana, separamos las orillas de los dos círculos y colocamos la hebra de lana por todo el centro y hacemos un nudo. Si lo hacemos dos veces mejor.

Screenshot_20240624_002021_Gallery.jpg

Screenshot_20240624_002057_Gallery.jpg

Screenshot_20240624_002023_Gallery.jpg
8- Sacamos los círculos con cuidado.

Screenshot_20240624_002117_Gallery.jpg
9- Tomamos el herraje de llavero, buscamos la hebra de lana que pasamos por el centro y lo colgamos de ahí.

Screenshot_20240624_002417_Gallery.jpg

Screenshot_20240624_002514_Gallery.jpg

10- Cortamos el sobrante de la hebra de lana.

Screenshot_20240624_002520_Gallery.jpg

11- Despeinamos las lanas ya cortadas haciendo que tomen forma de círculo.

Screenshot_20240624_002526_Gallery.jpg

Y listo, ya tenemos un llavero pompón para las llaves, para colgar de tu bolso favorito o para adornar lo que desees.

Screenshot_20240624_002532_Gallery.jpg

Screenshot_20240624_002537_Gallery.jpg

Feliz de compartir este tutorial con todos ustedes, espero les guste para seguir compartiendo de lo que sé hacer. Bendiciones, miles y abrazos a todos.

Vote for HiveCuba witness

Recursos empleados

RECURSO / RESOURCEFUENTE / SOURCE
Edición / Edition:@yunacrochet
Imágenes / Pictures:Samsung Galaxy s22 Ultra
Translated / Traducción:Hive Translator by @noakmilo
Sort:  

Muy lindos los pompones. Saludos desde Colombia!!!

Muchas gracias, contenta de que te haya gustado. Saludos desde Cuba.

The keychain looks real nice. Would feel great to

Te quedaron lindos, saludos ☺️

Thank you for your witness vote!
Have a !BEER on me!
To Opt-Out of my witness beer program just comment STOP below

Muchas gracias. Bendiciones 😘.


Hey @marile21, here is a little bit of BEER from @isnochys for you. Enjoy it!

We love your support by voting @detlev.witness on HIVE .

Que bonito. Me encantan los colores, son super alegres. Sigue creando amiga ❤🙏🪄

Gracias amiga, la verdad esos colores me encantaron mucho. Besitos 😘 😘 😘

Hola amiga, te quedaron muy bonita y es una técnica que no conocía y es fascinante la manera como vas armando y luego al final se logra el pom pom, ademas los colores que usas son llamativos. Un buen objeto para decorar.

Muchas gracias, feliz de que les haya gustado 😊. Saludos y bendiciones.

Keep up the good work. 👏

You are loved. 🤗 + u deserve the best. 💪

Curated by Mystic artist Gudasol

Interested to to help me spread more positivity (musically) on Hive?.

Congratulations @yunacrochet! You have completed the following achievement on the Hive blockchain And have been rewarded with New badge(s)

You received more than 300 upvotes.
Your next target is to reach 400 upvotes.

You can view your badges on your board and compare yourself to others in the Ranking
If you no longer want to receive notifications, reply to this comment with the word STOP

The keychain is an absolute delight
!diy
!discovery 30


This post was shared and voted inside the discord by the curators team of discovery-it
Join our Community and follow our Curation Trail
Discovery-it is also a Witness, vote for us here
Delegate to us for passive income. Check our 80% fee-back Program
@stevenson7 just sent you a DIY token as a little appreciation for your post dear @yunacrochet! Feel free to multiply it by sending someone else !DIY in a comment :) You can do that x times a day depending on your balance so:

Don't be shy - share some DIY!

You can query your personal balance by !DIYSTATS

Excelente idea para usar como llavero, te ha quedado muy hermoso y los colores lo hacen llamativo, gracias por compartir.

Excellent idea to use as a keychain, it has been very beautiful and the colors make it eye-catching, thanks for sharing.

Escrito por lionsaturbix / Written by lionsaturbix

¡¡¡Buen trabajo!!! Gracias por publicar tu excelente contenido en Hive Diy.

Great job!!! Thanks for posting your excellent content on Hive Diy.