A las chicas les encanta contar con llaveros llamativos y grandes, diseñados a gustos y personalizados. El Diy Llavero y Porta Credencial que compartí en mi anterior publicación fue un éxito total entre mis hijas. Tanto fue así que en el acto hice dos para ellas y uno para mí, y es que debo reconocer que realmente ayuda a localizar las llaves en el bolso o en cualquier sitio.
Una de mis hijas quería que le hiciera en ese mismo material, un mini bolsito donde pudiera colocar una labial y un espejito por ejemplo. Este mini bolsito piensa llevarlo en el mismo gancho del llavero, para hacerlo a su gusto y más grande todo este elemento. Así que, hoy les presento este Nuevo Complemento "Mini Bolsito"...
! [ENGLISH VERSION] Girls love having big, eye-catching keychains, designed to their tastes and personalized. The DIY Keychain and Badge Holder that I shared in my previous post was a total success among my daughters. So much so that I immediately made two for them and one for myself, and I must admit that it really helps to locate the keys in the bag or anywhere.
One of my daughters wanted me to make her a mini purse in the same material, where she could put a lipstick and a mirror for example. This mini purse is intended to be carried on the same hook as the keychain, to make it to her liking and make this whole element bigger. So, today I present to you this New "Mini Purse" Accessory...
Como les he mencionado en varias oportunidades, es importante usar nuestra creatividad para diseñar los bolsos, carteras, morrales, nuestras prendas de vestir, etc. Es muy satisfactorio poder crear o ajustar un elemento para nosotras.
Este Mini Bolsito, lo he realizado en otras ocasiones, aunque no lo había publicado antes. Es uno de los bolsos más fáciles de hacer, ya que se trata de una Medialuna, de hecho creo que cuando aprendemos a realizar bolsos, éste es uno de los primeros que aprendemos, y ya posteriormente lo ajustamos al tamaño que queremos, incluso lo podemos hacer grande como un bolso de viaje de ese modelo.
! [english version] As I have mentioned on several occasions, it is important to use our creativity to design bags, purses, backpacks, our clothes, etc. It is very satisfying to be able to create or adjust an item for ourselves.
I have made this Mini Bag on other occasions, although I had not published it before. It is one of the easiest bags to make, since it is a Half Moon, in fact I think that when we learn to make bags, this is one of the first we learn, and later we adjust it to the size we want, we can even make it large like a travel bag of that model.

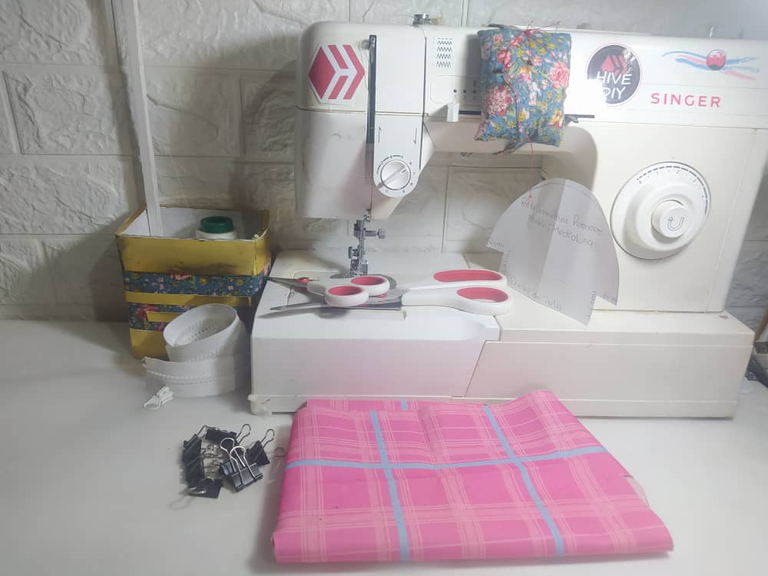
- Máquina de coser.
- Aguja, hilo, tijeras.
- Loneta Sky.
- Patrón de Mini Bolsito.
- Cierre blanco y deslizador.
- Clips de presión.
- Sewing machine.
- Needle, thread, scissors.
- Sky canvas.
- Mini bag pattern.
- White zipper and slider.
- Snap clips.

Aprovechando al máximo los materiales, ubiqué mi patrón en el doblez, tal y como lo requiere éste. Entonces, es recomendable hacerlo en una parte que permita dibujar el patrón, pero sin desperdiciar espacios, ya que todos esos recortes siempre son muy valiosos para realizar otros proyectos.
En este género que estoy utilizando, es decir la Loneta Sky, sería muy difícil fijar con alfileres por ser tan grueso, así que para fijar el patrón mientras lo dibujo y lo recorto, me valgo de Clips de Presión que es lo que dispongo. Se que hay pinzas especializadas para la costura, pero por ahora utilizo los Clips de Presión y me va súper bien.
! [ENGLISH VERSION] Making the most of the materials, I placed my pattern on the fold, as required by the pattern. So, it is advisable to do it in a part that allows you to draw the pattern, but without wasting space, since all those cuts are always very valuable for other projects.
In this fabric that I am using, that is, the Sky Canvas, it would be very difficult to pin because it is so thick, so to fix the pattern while I draw and cut it, I use Pressure Clips, which is what I have. I know that there are specialized tweezers for sewing, but for now I use the Pressure Clips and it works great for me.
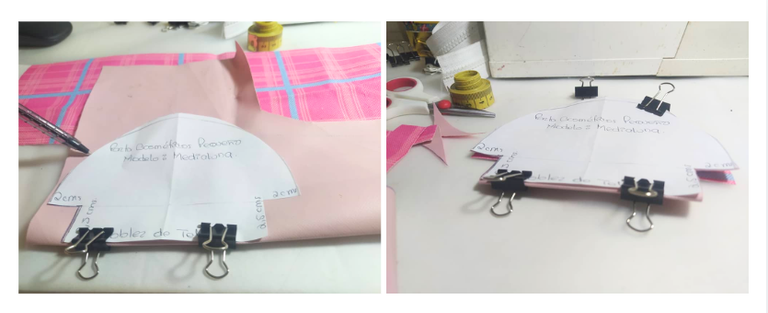
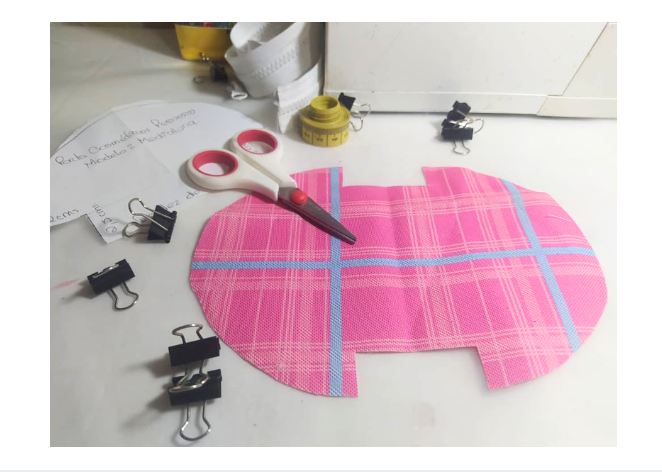
Mi patrón indicaba Doblez de tela, y así lo dibujé y recorté, y ahora tengo esta pieza que al abrirla luce de esta forma:
! [ENGLISH VERSION] My pattern says Fold Fabric, so I drew it out and cut it out, and now I have this piece that when opened looks like this:
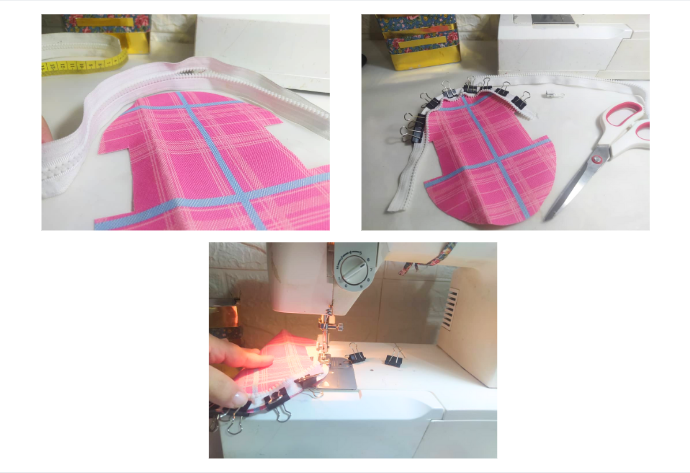
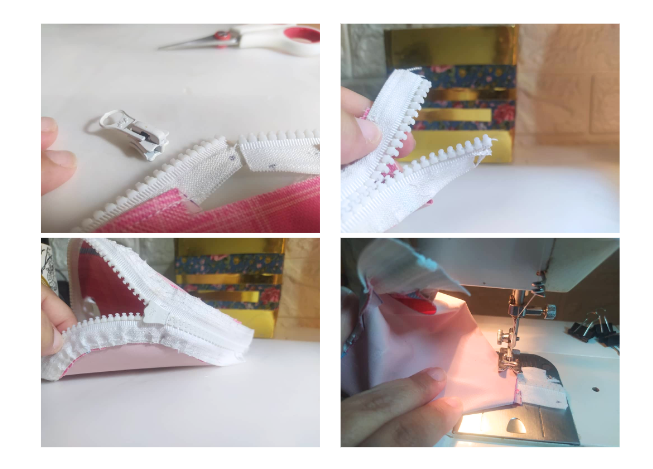
En la parte curva del diseño, va ubicado el cierre. No es necesario medir con la cinta métrica, ya que el Bolsito es muy pequeño.
Lo que hago es simplemente colocar el cierre para que se ubique en una de las curvas o Media Luna y recorto. Separo las dos partes del cierre y la ubico con los Clips de Presión, para fijarlo y me permita realizar una costura recta. Conforme voy cosiendo, voy también retirando los clips.
! [ENGLISH VERSION] The closure is located on the curved part of the design. It is not necessary to measure with the measuring tape, since the bag is very small.
What I do is simply place the closure so that it is located on one of the curves or half moon and cut it out. I separate the two parts of the closure and place it with the Pressure Clips, to secure it and allow me to make a straight seam. As I sew, I also remove the clips.
Al terminar esa primera costura recta, realizo piquetes en toda la curva, esto facilitará que la pieza se abra al derecho con más facilidad y sin formar arrugas.
! [ENGLISH VERSION] After finishing that first straight seam, I make notches along the entire curve, this will make it easier for the piece to open to the right side without forming wrinkles.
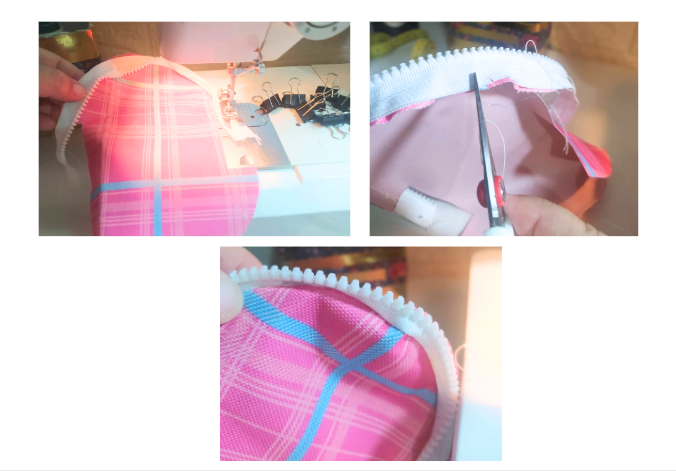
Este paso es uno de mis preferidos, y es realizar una costura de repise, le aporta belleza a las terminaciones y calidad a la pieza.
Es importante, fijarnos que todo va quedando en los bordes con las mismas distancias y sobre todo que no interrumpa el camino del deslizador o cierre.
! [ENGLISH VERSION] This step is one of my favorites, and it is to make a ledge seam, it adds beauty to the finishes and quality to the piece.
It is important to make sure that everything is left at the edges with the same distances and above all that it does not interrupt the path of the slider or zipper.
Repetimos los mismos pasos en la otra curva. Como pueden ver este diseño luce de esta forma ya que está abierto, pero en el siguiente paso se verá bien el diseño de Media Luna.
! [ENGLISH VERSION] We repeat the same steps on the other curve. As you can see this design looks like this because it is open, but in the next step the Half Moon design will be seen correctly.
Introducimos el deslizador o cierre, fijándonos bien que éste quede para el derecho de la Loneta. Y ahora cosemos o cerramos una de las esquinas que forman el fondo de este Mini Bolsito.
! [ENGLISH VERSION] We insert the slider or closure, making sure that it is facing the right side of the canvas. Now we sew or close one of the corners that form the bottom of this Mini Bag.
Después de coser esa esquina en el paso anterior, cortamos los excedentes de cierre.
Deberíamos de repetir estos dos últimos paso en la otra esquina o fondo, pero antes voy a realizar una tira para que se pueda colgar de cualquier argolla o llavero. Para esto corté una tira de 4 cms de ancho por 10 cms de largo, y llevo los largos al centro y luego doblo, fijo con las clips de presión para asegurar y facilitar su costura.
! [ENGLISH VERSION] After sewing that corner in the previous step, we cut off the excess closure.
We should repeat these last two steps in the other corner or bottom, but first I am going to make a strip so that it can be hung from any ring or key ring. For this I cut a strip 4 cm wide by 10 cm long, and I bring the lengths to the center and then fold it, securing it with the pressure clips to secure and make it easier to sew.

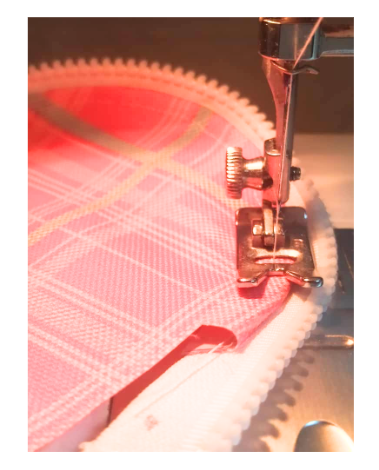
Le paso una costura recta a mi tira, la doblo y la introduzco en la esquina que falta por coser.
Le paso costura recta a la esquina con la tira, y este paso lo debo hacer con mucho cuidado, ya que al pasar la aguja de la máquina por los dientes del cierre, podría romper la aguja. Para evitar esto lo que hay que hacer es, empezar a coser pero cuando pasemos por los dientes, lo hacemos no con el pie de la máquina, sino moviendo la aguja dándole vueltas a la rueda con la mano, y con mucho cuidado. Luego, continuamos lo que falta normalmente pisando el pie de la máquina.
! [ENGLISH VERSION] I sew a straight stitch on my strip, fold it over and insert it into the corner that needs to be sewn.
I sew a straight stitch on the corner with the strip, and I have to do this step very carefully, because when the machine needle passes through the teeth of the zipper, it could break the needle. To avoid this, what you have to do is start sewing, but when we pass through the teeth, we do it not with the foot of the machine, but by moving the needle by turning the wheel with our hand, and very carefully. Then, we continue what is left normally by stepping on the foot of the machine.

Volteamos el diseño del Mini Bolsito al derecho y así luce de hermoso. La tira que coloqué en el extremo es para poder colocarlo en algún gancho como del llavero o del morral, pero también es funcional ya que nos facilita al momento de abrir el Bolsito.
! [ENGLISH VERSION] We turned the Mini Purse design right side out and it looks beautiful. The strip I placed on the end is so that it can be attached to a hook like a keychain or backpack, but it is also functional as it makes it easier to open the Purse.
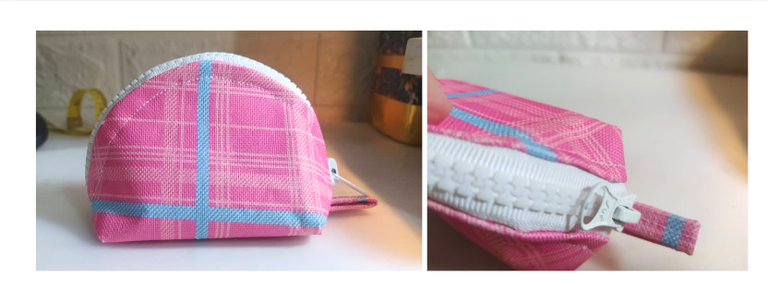
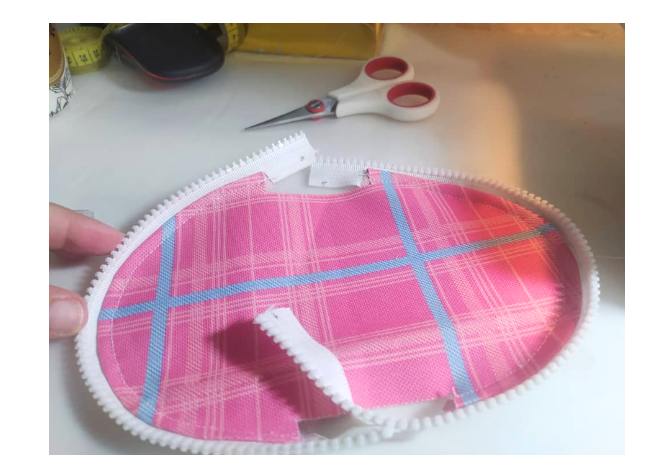
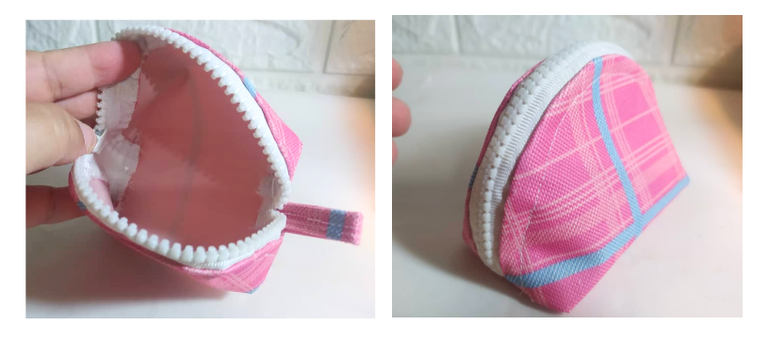
Decidí no colocar forro a este Bolsito, ya que la Loneta tiene buena terminación por dentro y porque es muy pequeño, creo que no lo necesita.
Luce muy bien por dentro y por fuera.
! [ENGLISH VERSION] I decided not to put a lining on this bag, since the canvas has a good finish on the inside and because it is very small, I don't think it needs one.
It looks great inside and out.
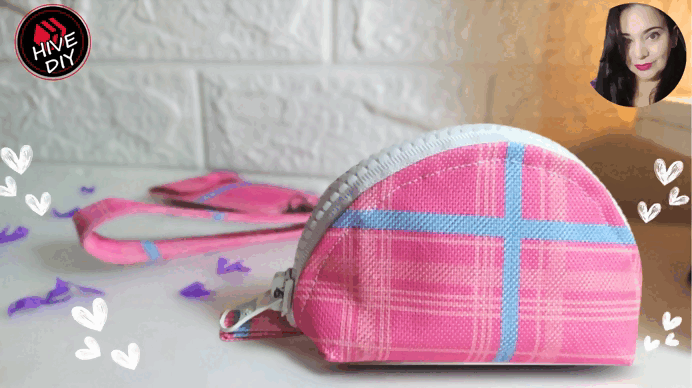
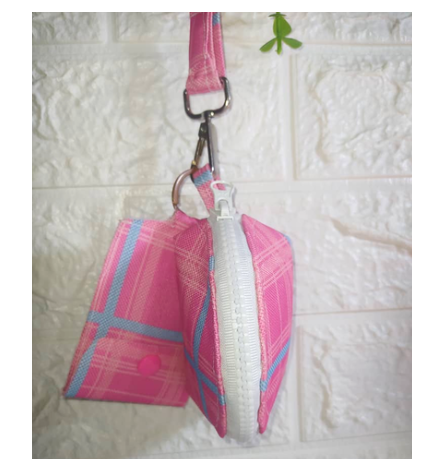
Y así luce este Mini Bolsito, ya colocado en el gancho del Llavero y Porta Credencial.
En realidad me gustó como luce todo junto, los colores son hermosos. Esto es lo que podemos hacer las costureras o artesanas, lograr cosas que personalizan a nuestros clientes y que no se encuentran tan fácilmente en el mercado. Hacer la diferencia.
! [ENGLISH VERSION] And this is what this Mini Purse looks like, already attached to the hook of the Keychain and Badge Holder.
I really liked how it all looks together, the colors are beautiful. This is what we seamstresses or artisans can do, create things that personalize our clients and that are not so easily found on the market. Make a difference.
Deseo que les haya gustado, que lo intenten realizar, no solo este proyecto, sino también todos los hermosos tutoriales que tenemos en el Feed de nuestra Comunidad Hive Diy.
! [ENGLISH VERSION] I hope you liked it and that you try to do it, not only this project, but also all the beautiful tutorials we have in our Hive DIY Community Feed.


Las fotos las tomé con mi teléfono Redmi Note 8
Apps que utilicé:
Canva Pro para la Portada, Collage y Banners
Utilicé el Traductor Deepl
Mi redes sociales:
Discord: YennysYaneth#0189
Twitter: @yennysferm
Instagram: @yennysyaneth
I took the photos with my phone Redmi Note 8
Apps I used:
Canva Pro for Cover, Collage and Banners
I used Deepl Translator
My social networks:
Discord: YennysYaneth#0189
Twitter: @yennysferm
Instagram: @yennysyaneth


