¡Bienvenidos amigos creativos!👩🎨
🙋♀️ ¡Hola gente bonita y creativa! Espero que se encuentren súper bien y hayan tenido días llenos de gratos momentos. Por este lado de la pantalla todo bien gracias a Dios feliz de estar una vez más aquí, en esta oportunidad mostrándoles el paso a paso de cómo realice una bolsa de regalo con motivo a la época más tenebrosa, el Halloween, en muchos países se celebra tal ocasión y con ello muchos cumpleañeros en esta temporada, de esa forma yo decidí decorar una bolsa con detalles de Drácula y así regalar un emotivo regalo.
Welcome creative friends!👩🎨
🙋♀️Hello beautiful and creative people! I hope you are super well and have had days full of pleasant moments. On this side of the screen all well thank God happy to be here once again, this time showing you the step by step of how to make a gift bag on the occasion of the spookiest time, Halloween, in many countries such occasion is celebrated and with it many birthday boys and girls in this season, so I decided to decorate a bag with details of Dracula and thus give an emotional gift.
¡Llegó la hora de crear! / It's time to create!👩🎨
|
|---|
¿Cuál es el proceso?/ What is the process?⬇️
🦇 Paso 1 / Step1
El tamaño dependerá de que tan grande o pequeña deseas la bolsa de regalo, en mi caso use una cartulina un poco más grande que una hoja tamaño carta. Procedí a llevar ambos extremos de la cartulina hasta el centro de la misma. Luego en la parte superior realice unos dobles aproximadamente de 5cm de ancho.
The size will depend on how big or small you want the gift bag to be, in my case I used card stock a little larger than a letter size sheet. I proceeded to bring both ends of the cardboard to the center of it. Then at the top I made some folds approximately 5cm wide.

🦇 Paso 2 / Step 2
Después que fije muy bien los dobles abrí ambas caras e inserte las pestañas hasta el centro también quedando en forma de triángulo.
After I fixed the doubles very well, I opened both sides and inserted the tabs to the center, also in the shape of a triangle.
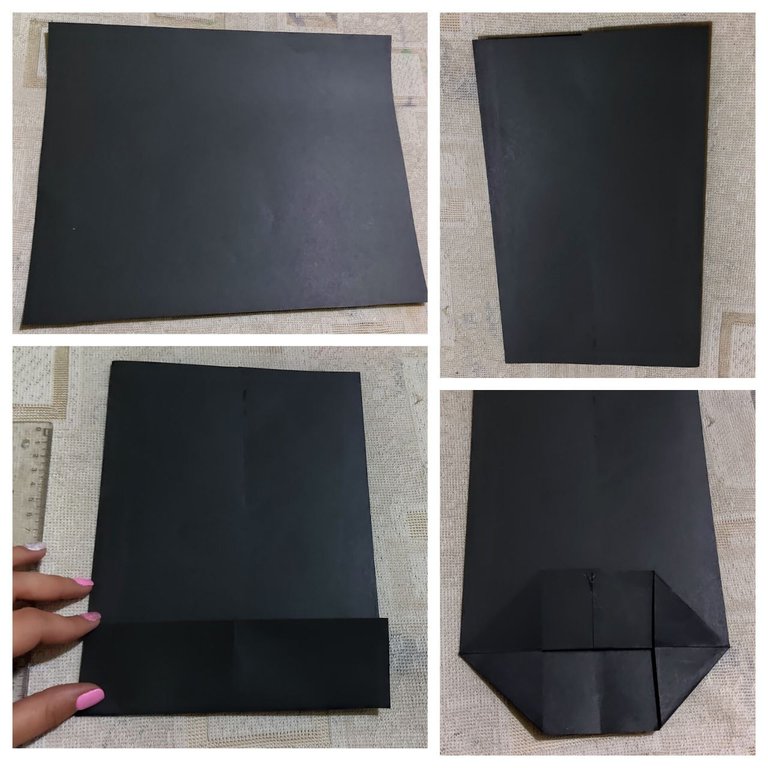
🦇 Paso 3 / Step 3
Luego pegue las pestañas de arriba y abajo solo agregando silicón en los cuatro triángulos formados. Posteriormente realice unos dobles en los lados laterales de la bolsa, remarcando muy bien los dobles para que fuese mejor para abrir y quedará firme la bolsa.
Then glue the top and bottom tabs by adding silicone only on the four triangles formed. Afterwards, make some doubles on the lateral sides of the bag, marking the doubles very well so that it will be better to open and the bag will be firm.

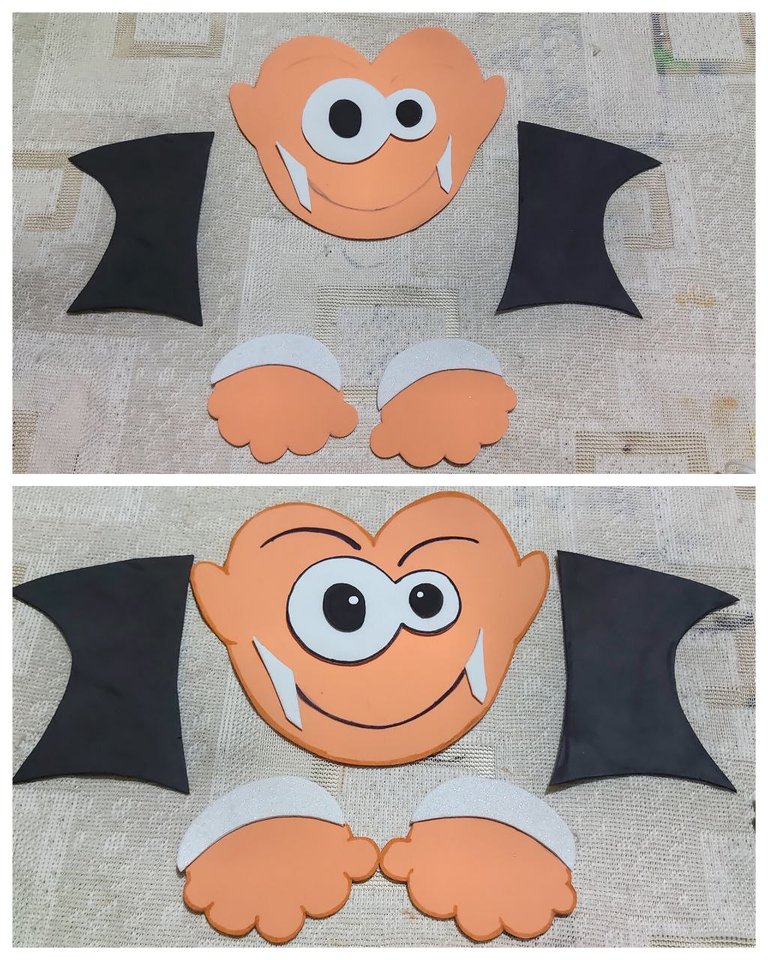
🦇 Paso 4 / Step 4
En hoja blanca realice los moldes a utilizar de las fracciones de Drácula, para ello solo realice la cara, mano y alas de murciélago, para luego ser transferí dos al foami de color correspondiente, en mi caso use color piel para la cara y las manos, negro para las alas, blanco para los ojos y mangas.
On a white sheet I made the molds to be used for the fractions of Dracula, for this I only made the face, hand and wings of the bat, and then I transferred them to the corresponding color foami, in my case I used skin color for the face and hands, black for the wings, white for the eyes and sleeves.

🦇 Paso 5 / Step 5
Seguidamente fui pegando las partes realizadas anteriormente, pegando los colmillos, ojos y las mangas en las manos. Luego con marcador realice delineados al borde de las piezas, también remarcando cejas y boca.
Then I glued the parts previously made, gluing the fangs, eyes and sleeves on the hands. Then with a marker I made outlines on the edges of the pieces, also highlighting eyebrows and mouth.
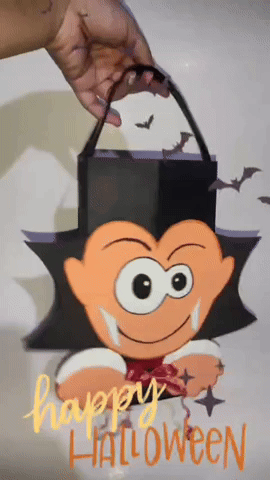
🦇 Paso 6 / Step 6
Con cinta roja decore la parte superior de la bolsa y pegue el Drácula realizado en foami anteriormente, pegando las manos, cara y alas, no hice cabello y otra cosa parecida puesto que por el color de la bolsa que es negra hace esa similitud. Adicional en el centro pegue un pequeño lazo rojo.
With red ribbon I decorated the top of the bag and glued the Dracula previously made in foami, gluing the hands, face and wings, I did not make hair and other similar things since the color of the bag is black and makes that similarity. Additionally in the center I glued a small red ribbon.
🦇 Paso 7 / Step 7
Con cartulina negra realice la manga para el soporte de la bolsa, solo recorte una tira de ese material y pegue de un extremo a otro.
With black cardboard make the sleeve for the bag support, just cut a strip of that material and glue from one end to the other.

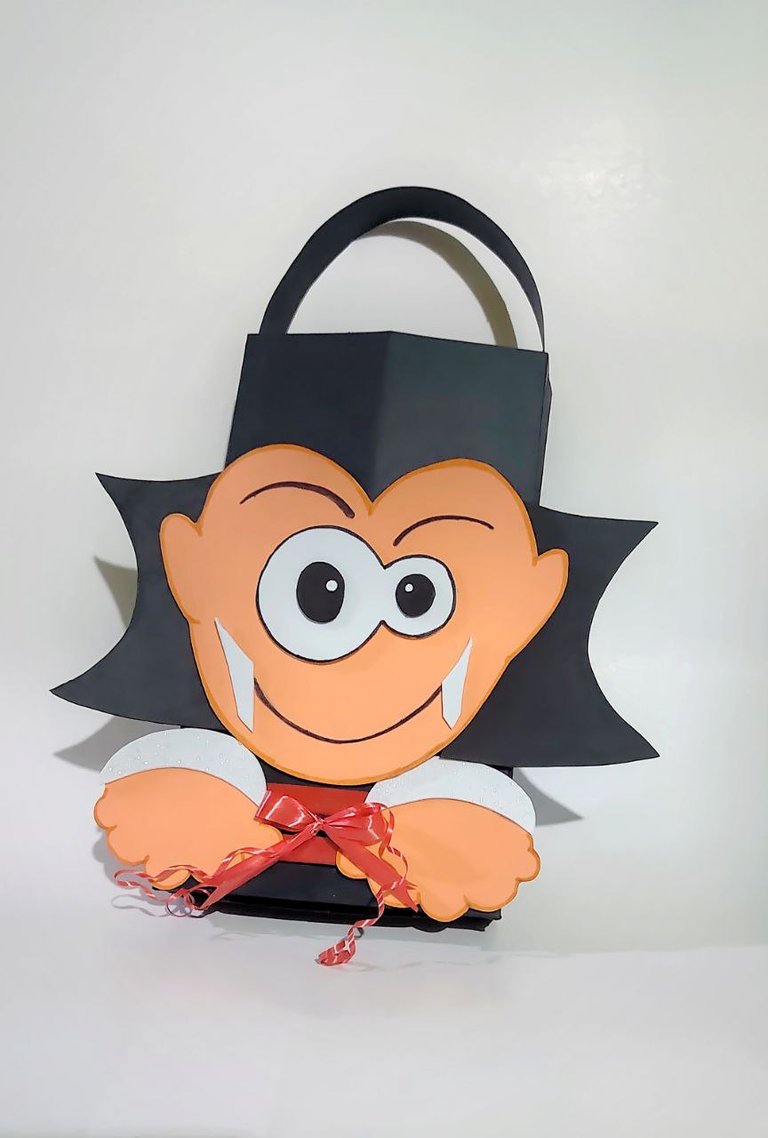
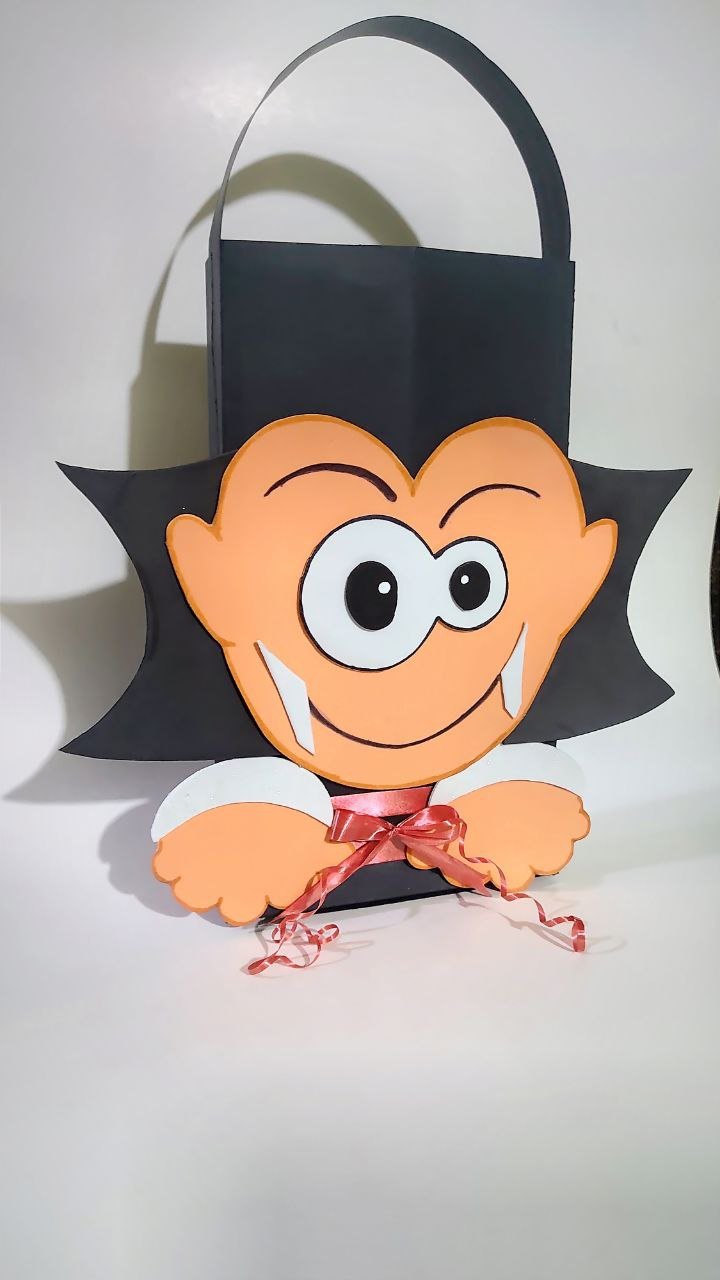
Creación finalizada / Creation completed⬇️
¡Y de esta forma obtuve una bolsa de regalo con temática de Halloween!🎁🦇
Esta idea me encanta, siento que al personalizar nuestras bolsas de regalo nuestros detalles se verán muchísimo más lindos que en cualquier bolsa tradicional, y si cuentas con materiales como yo quizás hasta te ahorres más que comprar cualquier otra con un diseño bonito. Se puede adaptar a cualquier ocasión o temática que desees. Espero les haya gustado tanto como a mi😍.
And this way I got a Halloween-themed gift bag!🎁🦇
I love this idea, I feel that by personalizing our gift bags our details will look so much nicer than in any traditional bag, and if you have materials like me you might even save more than buying any other bag with a nice design. It can be adapted to any occasion or theme you want. I hope you liked it as much as I did😍.
See you in a new creation👩🎨
Mil gracias por leerme una vez
Nos vemos en una próxima publicación.
Muchas bendiciones y abrazos digitales🤗
Thank you very much for reading me once
See you in an upcoming post.
Many blessings and digital hugs🤗
👩🏼💻 Edición: Inshot y Canva / Edition: Inshot and Canva
✨ Traducción: DeepL.com / Translation: DeepL.com