🙋🏻♀️¡Hola a todos! Espero que se encuentren súper bien y hayan o estén teniendo un lindo día, por este lado de la pantalla todo bien gracias a Dios.
Deseando para ustedes, un lindo inicio de semana✨.
En redes vemos tantas decoraciones hermosas para la época de Navidad, siendo inevitable no quererlas tener todas para una amante a estas fechas como yo, el principal adorno en casa es el árbol de navidad, pesebre o en su efecto ambas. Recuerdo que en casa se adornaba con pesebre, años más tarde por alguna razón que no conozco se comenzó a adornar un pequeño árbol de navidad, y he visto tantas hermosuras para decorar este último, que me da nostalgia porque no cuento con uno, pero si estuviera en casa de mamá créanme que ya llevará muchos de esos detalles que he visto, mas sin embargo decidí tener una parte de lo que soy en lo que es ahora mi espacio, sin más acá te muestro como hice un lindo adorno para decorar el árbol de navidad, y si no cuentas con uno asi como yo, no te preocupes mira como lo hice👩🎨✨.
Welcome, creative friends🎨💜
🙋🏻♀️Hello everyone! I hope you are feeling super well and have or are having a nice day, on this side of the screen all is well thank God.
Wishing you a pleasant start of the week✨.
In networks we see so many beautiful decorations for Christmas time, being inevitable not to want to have them all for a lover of these dates like me, the main decoration at home is the Christmas tree, manger or in its effect both. I remember that at home was decorated with manger, years later for some reason that I do not know began to decorate a small Christmas tree, and I have seen so many beautiful things to decorate the latter, which makes me nostalgic because I do not have one, but if I were at home mom believe me that already take many of those details that I've seen, but nevertheless I decided to have a part of who I am in what is now my space, without further ado here I show you how I made a nice ornament to decorate the Christmas tree, and if you do not have one like me, do not worry look at how hice👩🎨✨.

👩🎨Paso 1: Luego de seleccionar las fotos las ubique en Word en forma de círculo, las cuales decidí imprimir en papel fotográfico y de esta forma fueran mucho más nítidas y duraderas, escogí los miembros más importantes en casa, la familia que nos dio la vida, y la que cada uno ha decidió crear, por supuesto incluyendo a los más bebés de la casa nuestra perrita y nuestra gata, posterior a ello recorte cada foto.
👩🎨 Step 1: After selecting the photos I placed them in Word in the shape of a circle, which I decided to print on photographic paper so they would be much sharper and more durable, I chose the most important members at home, the family that gave us life, and the one that each of us has decided to create, of course including the babies of the house, our dog and our cat, after that I cut out each photo.

👩🎨 Paso 2: Después en un foami de cualquier color, en mi caso escogí uno beige medio el círculo de la foto el cual plasme del mismo tamaño en el foami, luego realice un borde de igual forma en círculo (no importa que no sea lo más derecho posible, igual eso se tapara😅) y este lo recorte dando como resultado dos círculos por supuesto el primero es del tamaño de la foto el segundo sería como el reborde de la foto.
👩🎨 Step 2:Then in a foami of any color, in my case I chose a medium beige one the circle of the photo which I shaped of the same size in the foami, then make a border of the same shape in a circle (no matter if it is not as straight as possible, that will be covered😅) and cut it out resulting in two circles of course the first one is the size of the photo the second would be like the border of the photo.
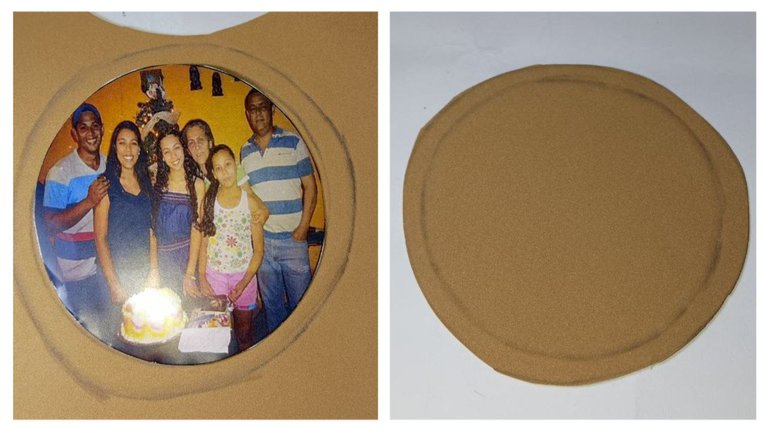
👩🎨 Paso 3: Seguidamente recorte el primer circulo que hice (el que medí con la foto), este si lo recorte lo más derecho que pude porque en ese espacio que queda, es donde se apreciará la foto que quería, para cubrir la foto y está no se dañará pegue un pedazo de acetato y recorte el excedente.
👩🎨 Paso 4: Luego realice otro círculo del mismo color de foami antes utilizado en el cual pegue la foto y encima lo que sería la tapa el cual es el círculo con el acetato.
👩🎨 Step 3: Next I cut the first circle I made (the one I measured with the photo), this one I cut as straight as I could because in that space that is left is where the photo I wanted will be appreciated, to cover the photo and it will not be damaged I glued a piece of acetate and cut the excess.
👩🎨 Step 4: Then make another circle of the same color of foami used before on which I glued the photo and on top of it what would be the cover which is the circle with the acetate.
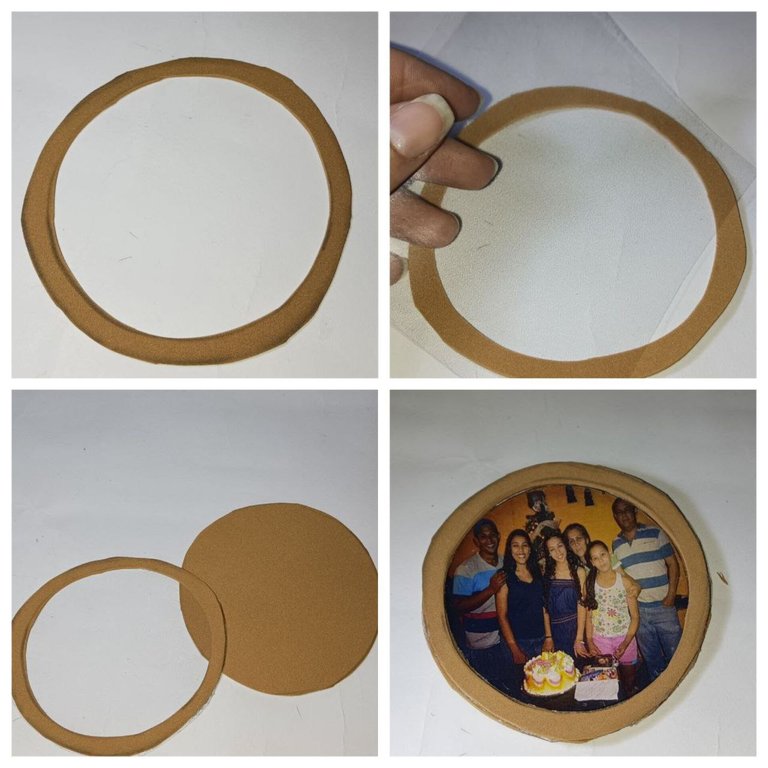
👩🎨 Paso 5: En foami escarchados color verde y blanco realice pequeños círculos, los cuales pegue alrededor de la foto.
👩🎨 Step 5: In green and white frosted foami, make small circles and glue them around the photo.

👩🎨 Paso 6: Repetí los pasos anteriores hasta completar todas las fotos que decidí imprimir, pero realice en diferentes colores, unas de blanco y rojo, otras de blanco y verde y por último de los tres colores.
👩🎨 Step 6: I repeated the previous steps until all the photos I decided to print were complete, but I did them in different colors, some in white and red, others in white and green and finally in all three colors.

👩🎨 Paso 7: Como estás fotografías van en un arbolito de navidad, por la parte de atrás de la foto pegue un hilo dorado soportándolo con un pedazo de foami. Realice esto, en todas las fotografías.
👩🎨 Step 7: As these pictures go on a Christmas tree, glue a golden thread on the back of the picture, supporting it with a piece of foami. Do this on all the pictures.
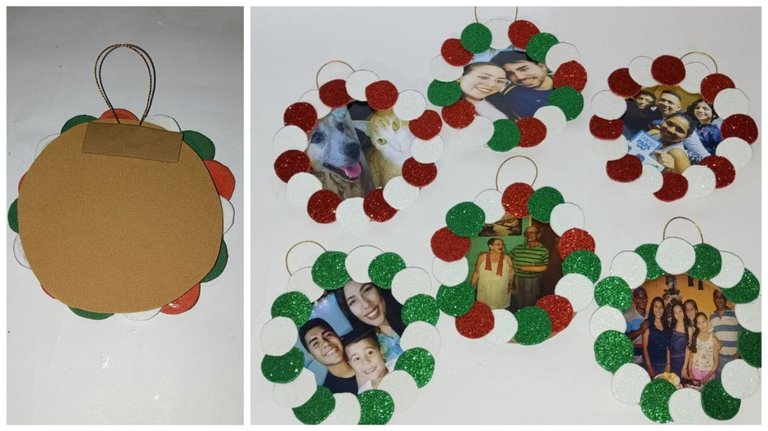

¡Y listo, de esta forma obtuve un tipo de adorno para el árbol de navidad🎄!.
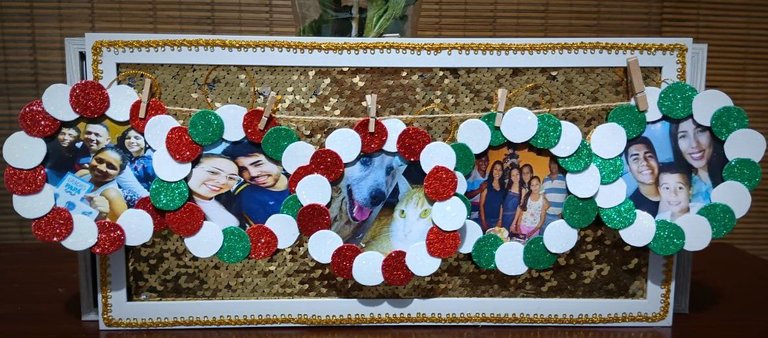
Créanme que la idea la ame totalmente, se siente tener cerca a esas personas especiales en la navidad. Al principio les conté que no tenía arbolito, pero si contaba un cuadro de madera con colgantes el cual me pareció perfecto y lo ubique en el centro de la sala, espero que estos detalles duren y en algún momento ser colgados en casa de mi mamá disfrutando la navidad que tanto deseamos. Puedes darle el diseño que desees, en forma de corazón, casa y demás… Recuerda dejar volar tu imaginación✨.
Nos vemos en una nueva creación👩🎨
And presto, this way I got a kind of ornament for the Christmas tree🎄!
Believe me I absolutely loved the idea, it feels like having those special people close to me at Christmas. At the beginning I told you that I didn't have a tree, but I did have a wooden picture with pendants which I thought was perfect and I placed it in the center of the living room, I hope these details will last and at some point be hung in my mom's house enjoying the Christmas we want so much. You can give it the design you want, in the shape of a heart, house and others... Remember to let your imagination fly✨.
See you in a new creation👩🎨


Mil gracias por leerme una vez
Nos vemos en una próxima publicación.
Muchas bendiciones y abrazos digitales🤗
Thank you very much for reading me once
See you in an upcoming post.
Many blessings and digital hugs🤗


