Hola queridos amigos de esta creativa comunidad de Hive, espero que todos se encuentren muy bien. En el post de hoy les enseñaré paso a paso como realizar un hermoso y fácil muñeco de nieves haciendo uso de materiales de provecho.
Hello dear friends of this creative Hive community, I hope you are all doing well. In today's post I will teach you step by step how to make a beautiful and easy snowman using useful materials.
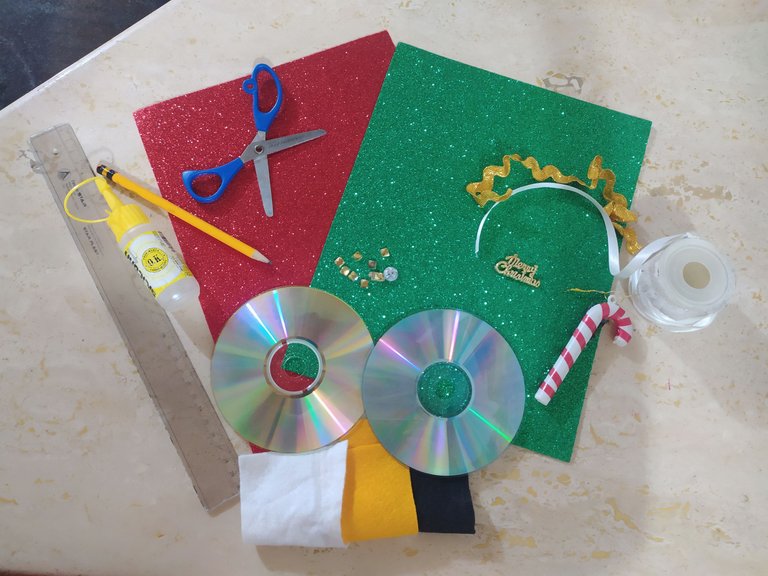
✓Materiales:
•Foami rojo y verde escarchados
•2 CD
•2 Botones
•Recortes de fieltro blanco y naranja
•Hilo marrón y dorado
•Recortes de foami
•Cinta dorada y plateada
•Accesorios
•Silicón frío
•Tijera
•Regla
•Hoja blanca
Cabe destacar que, estos materiales no ajuro los tienes que comprar, sino que son cosas que puedes tener en tu hogar y hacer uso de ellos, materiales de provecho. Por ejemplo, los detalles en cuanto a accesorios que yo utilicé, los tome de adornos de navidad que ya se me habían dañado o roto.
✓Materials:
• Red and green frosted foam
• 2 CD
• 2 Buttons
• White and orange felt cutouts
• Brown and gold thread
• Foami cuttings
• Gold and silver ribbon
•Accessories
•Cold sylicon
•Scissor
•Rule
• White sheet
It should be noted that these materials do not necessarily have to be bought, but they are things that you can have in your home and make use of them, useful materials. For example, the details regarding accessories that I used, I took from Christmas decorations that had already been damaged or broken.
✓Realización:
✓Realization:
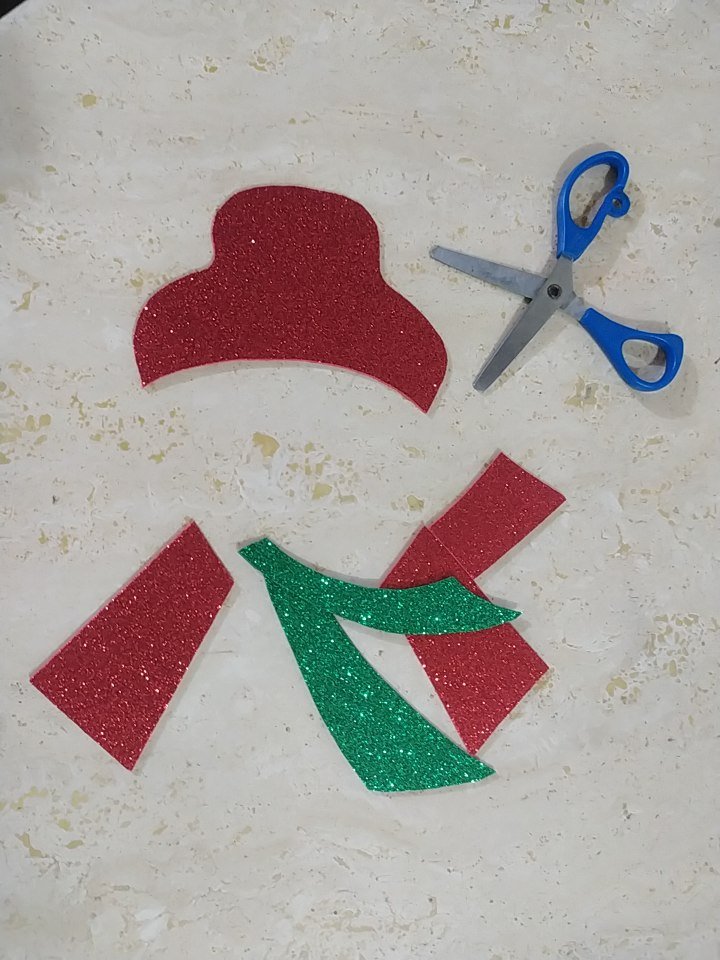
Paso 1: En primer lugar yo dibuje sobre una hoja blanca y corte los patrones de la vestimenta de nuestro muñeco (sombrero, bufanda, suéter). Realizo esto para poder hacer un mejor uso del foami y rendirlo.
Step 1: First I draw on a white sheet and cut out the patterns of our doll's clothing (hat, scarf, sweater). I do this in order to make better use of the foam and render it.
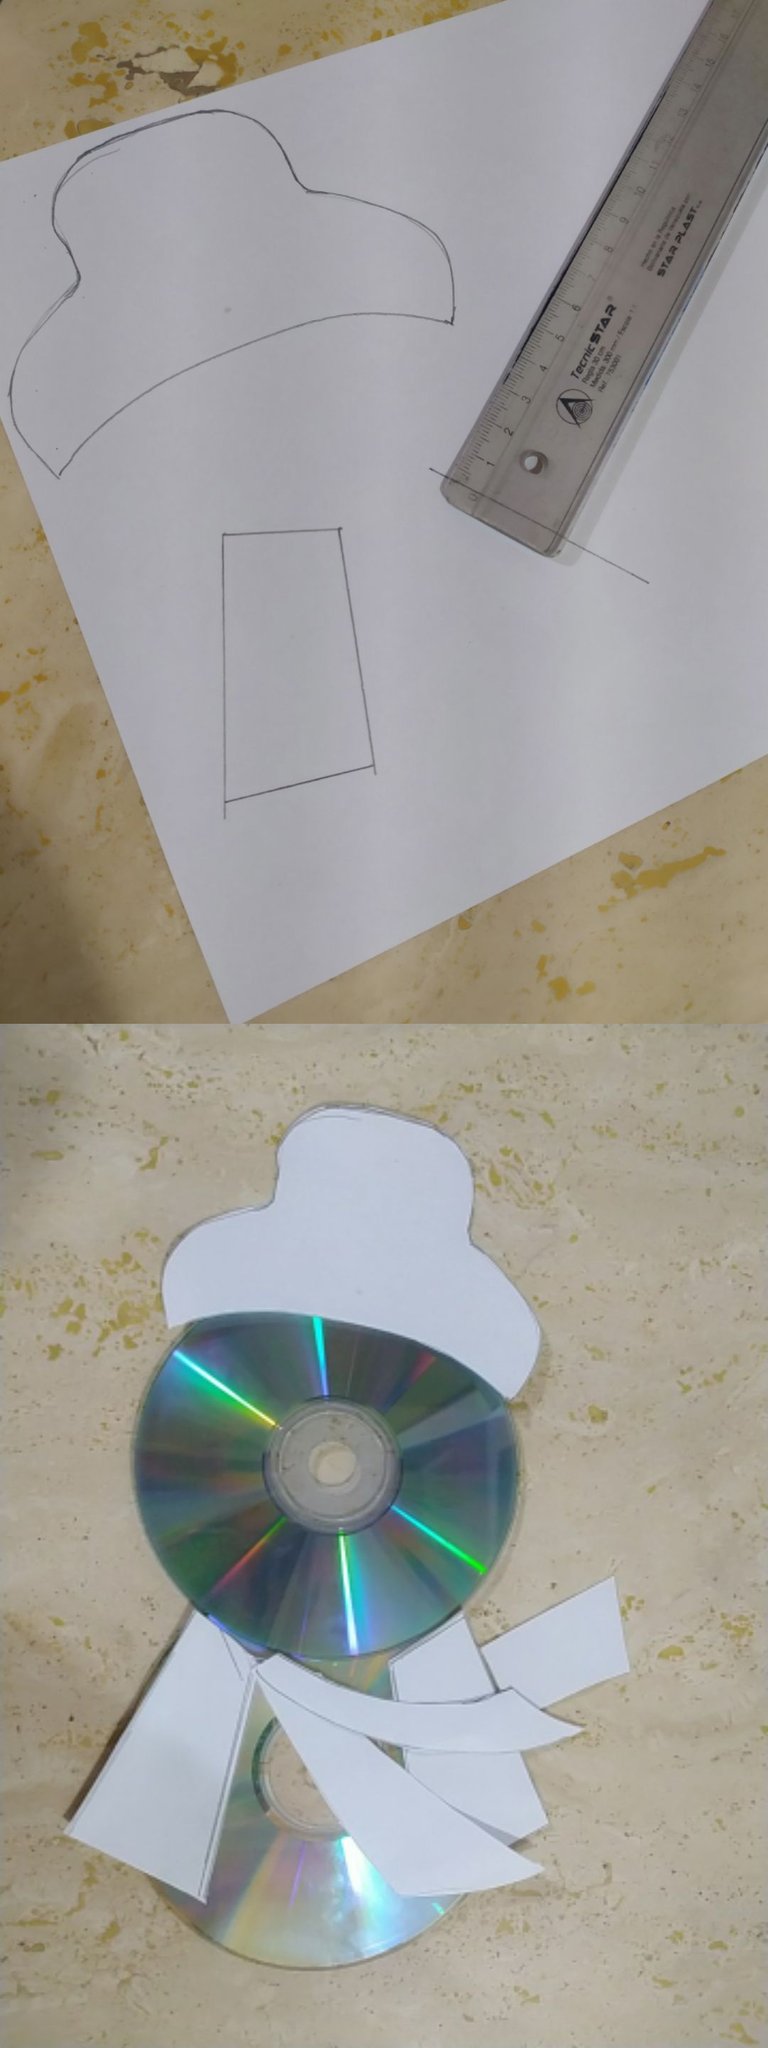
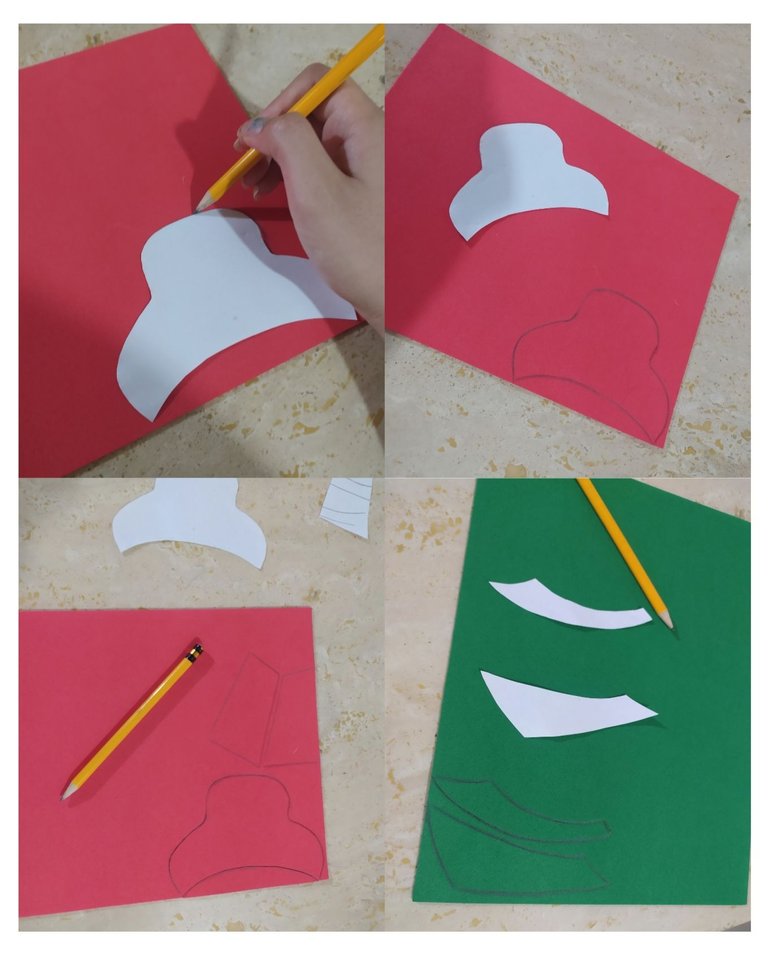
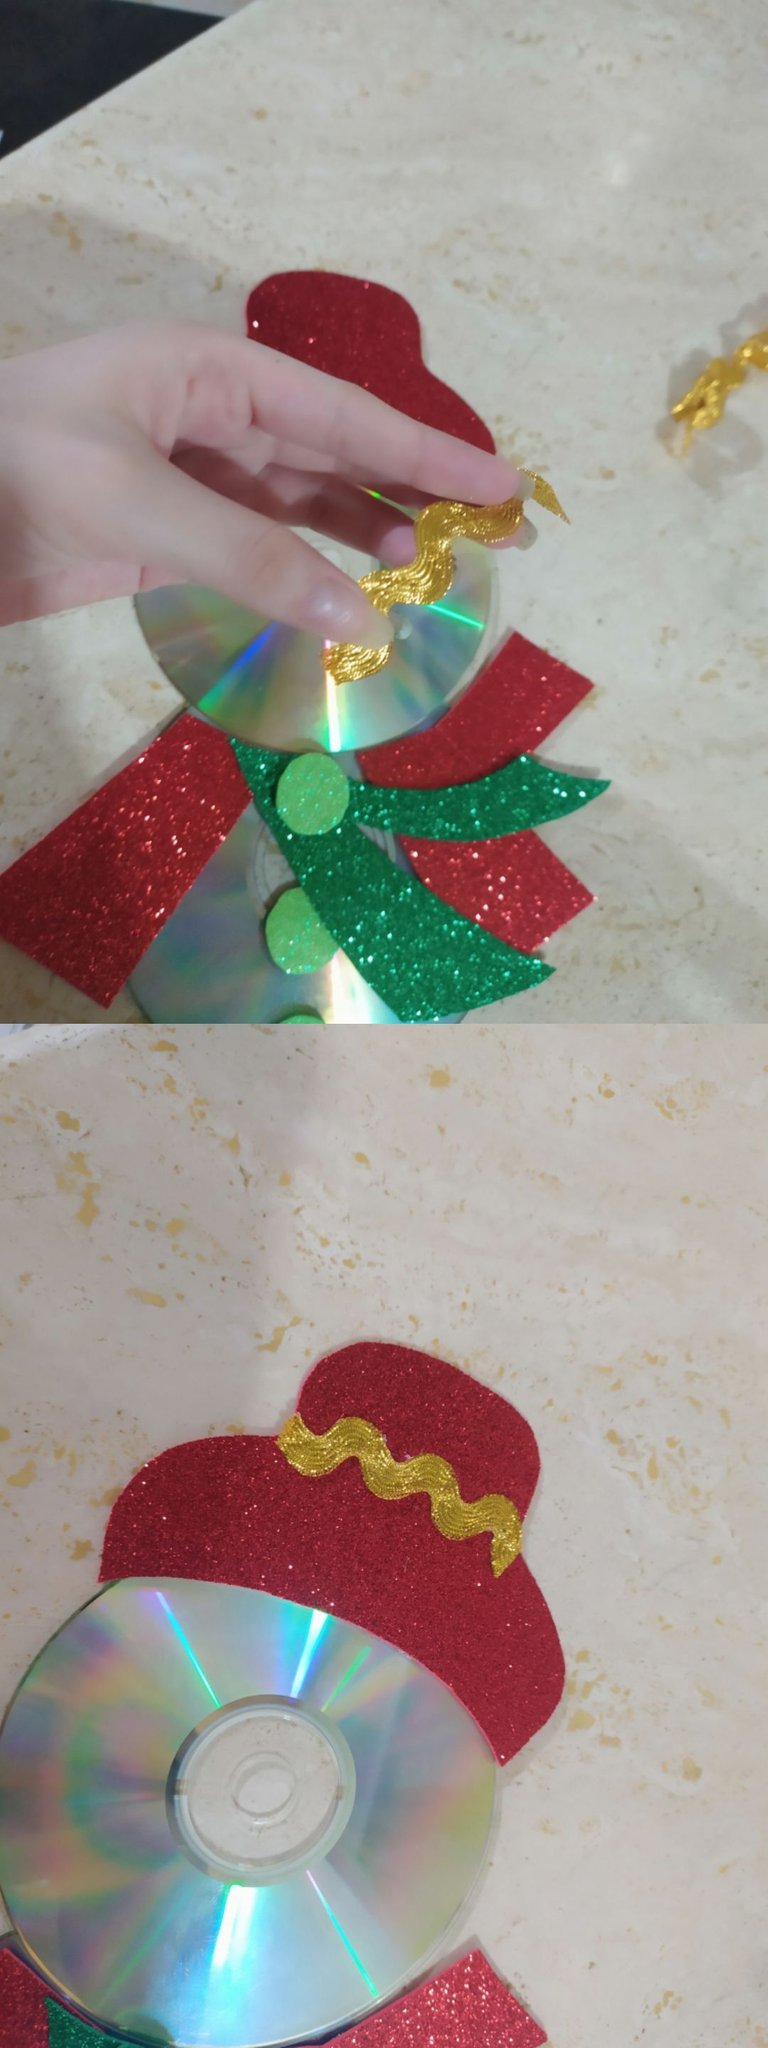
Paso 2: Con ayuda de mis patrones, marqué las figuras sobre la parte de atrás del foami y recorté cuidando el acabado. El sombrero y el suéter lo realice en foami color rojo y la bufanda en foami color verde.
Step 2: With the help of my patterns, I marked the figures on the back of the foami and cut taking care of the finish. The hat and the sweater are made in red foam and the scarf in green foam.
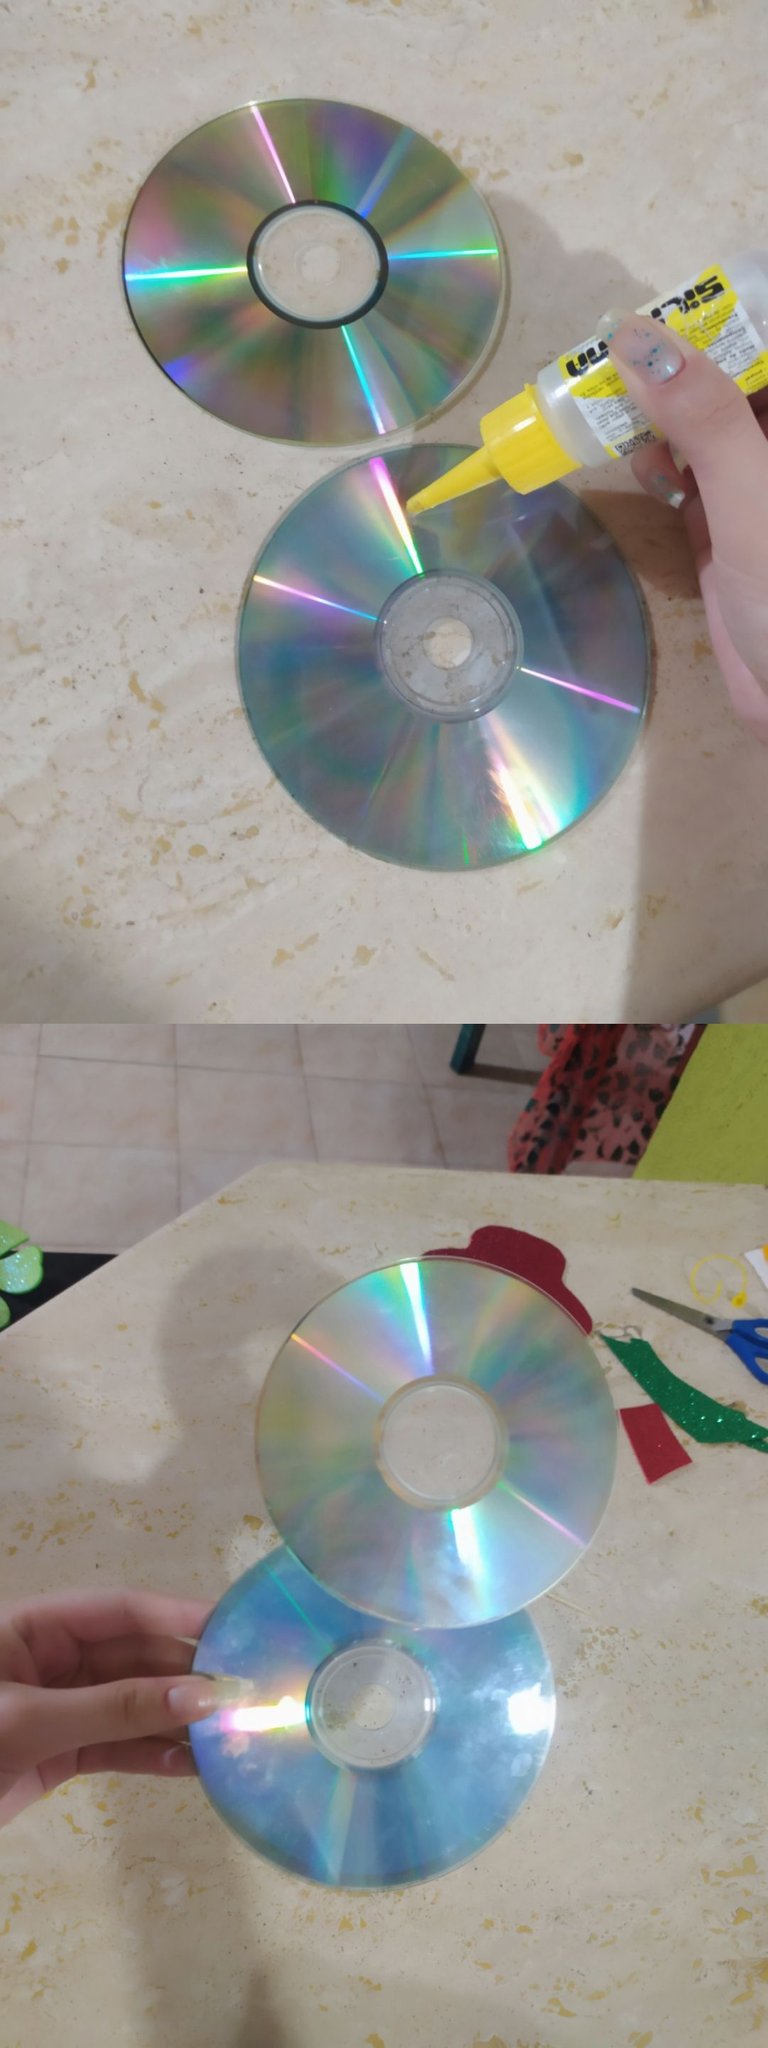
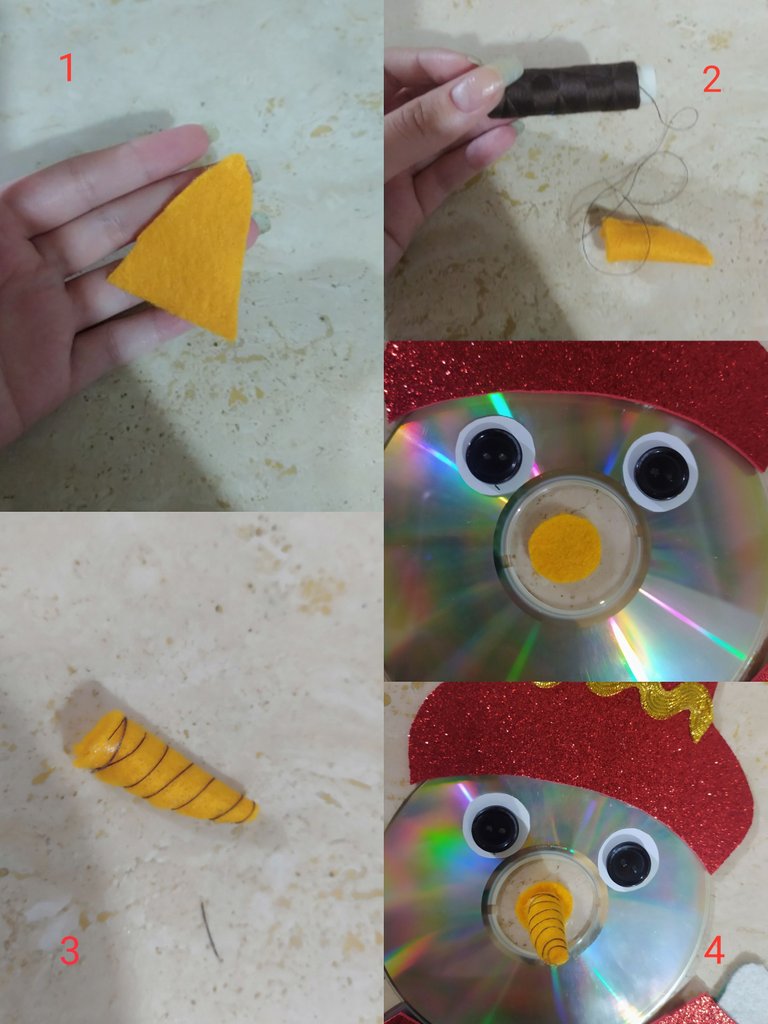
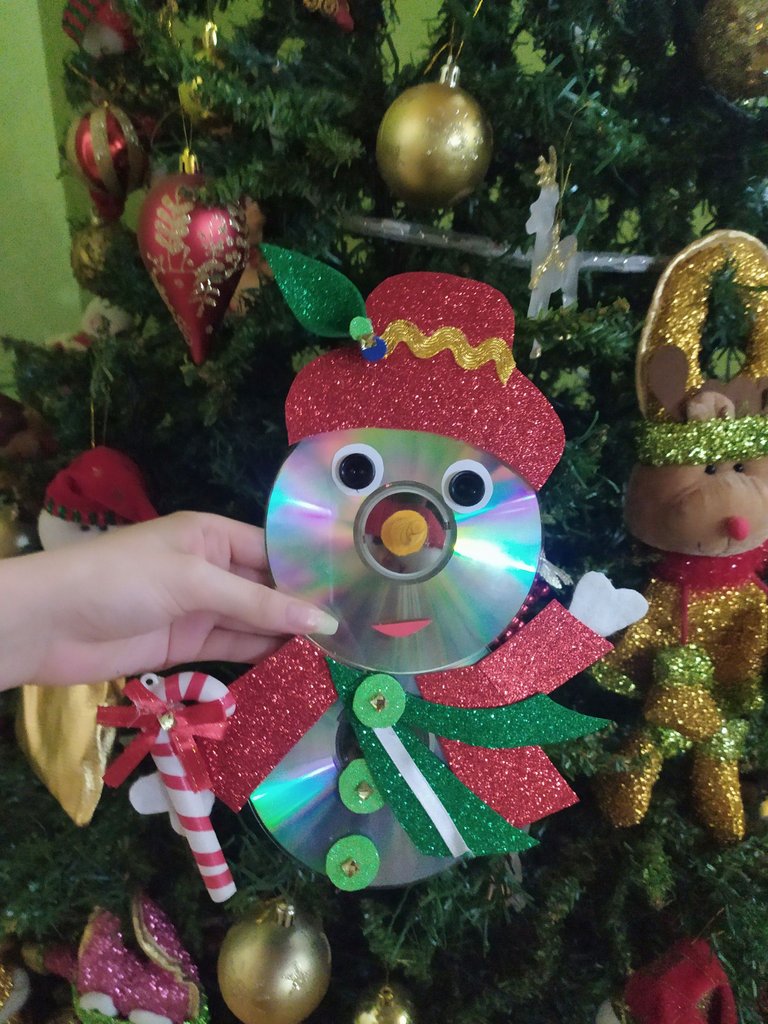
Paso 3: Debes pegar con silicón frío los dos CD en forma vertical, uno sobre otro.
Step 3: You must glue the two CDs vertically with cold silicone, one on top of the other.
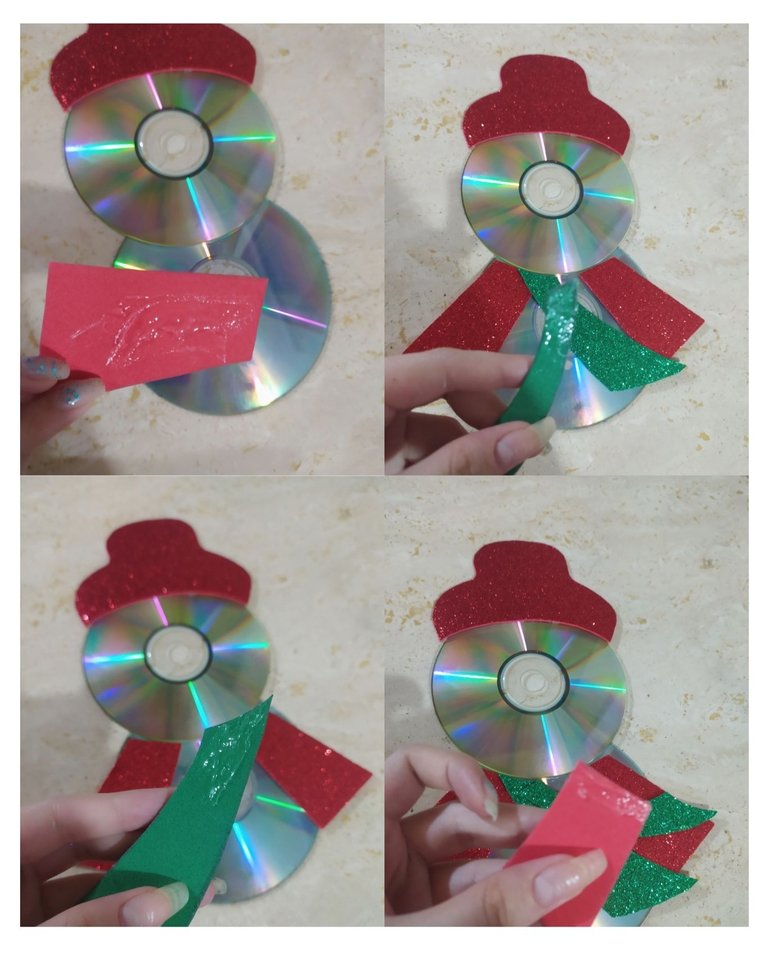
Paso 4: Pega cada una de las figuras recortadas en foami sobre los CD.
Step 4: Glue each of the shapes cut out of foam onto the CDs.
Paso 5: Con recortes de foami de un color distinto a los utilizados (yo usé un color verde manzana) recorta círculos y pégalos como botones en el cuerpo de tu muñeco.
Step 5: With foami cutouts of a different color from the ones used (I used an apple green color) cut out circles and stick them as buttons on the body of your doll.
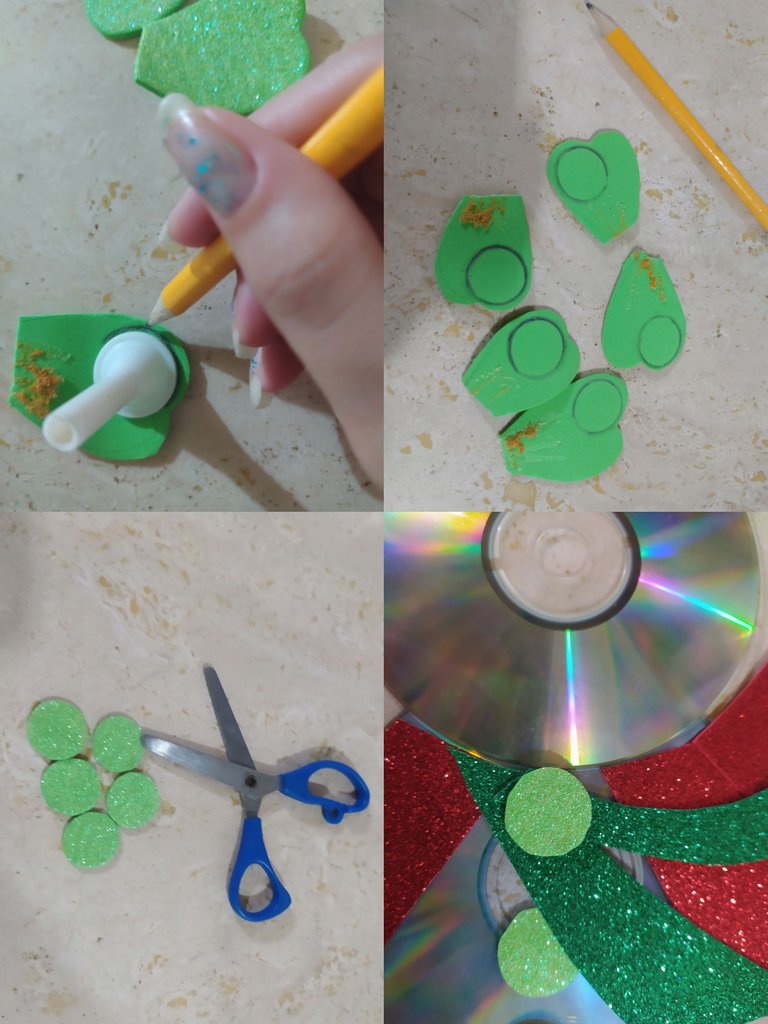
Paso 6: Pégale piedras brillantes a los botones de nuestro muñeco (yo usé pequeñas piedras doradas).
Step 6: Glue shiny stones to the buttons of our doll (I used small gold stones).

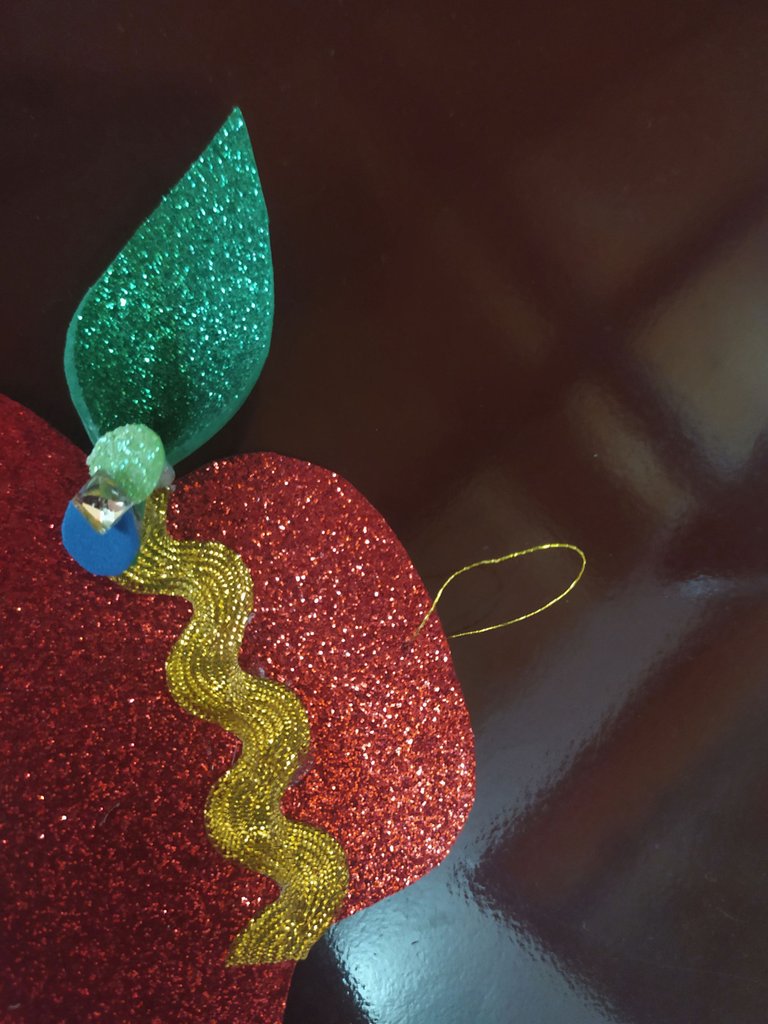
Paso 7: Recorta un pequeño pedazo de cinta dorada y pégala en medio del sombrero como un lindo detalle.
Step 7: Cut out a small piece of gold ribbon and glue it in the middle of the hat as a nice detail.
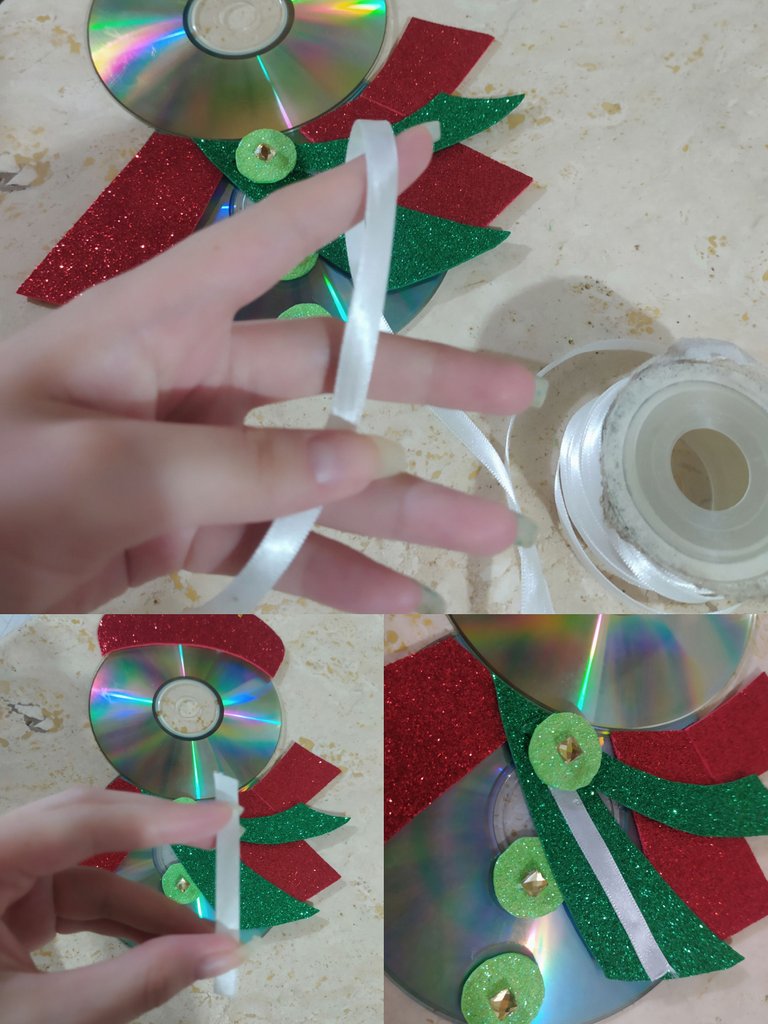
Paso 8: Recorta un pedazo de cinta plateada y pégala debajo del primer botón sobre la bufanda, como un resaltante detalle.
Step 8: Cut out a piece of silver ribbon and glue it under the first button on the scarf, as a highlight detail.
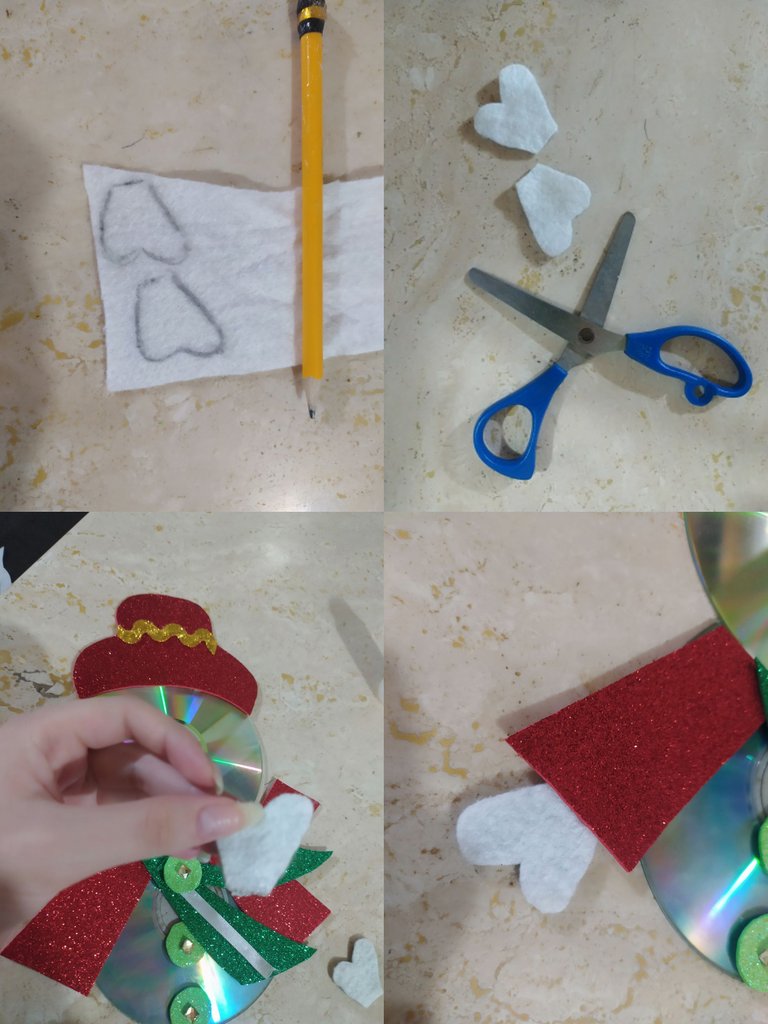
Paso 9: Sobre el fieltro blanco dibuja y recorta los guantes de nuestro muñeco de nieves y pégalas sobre la parte de atrás de cada manga.
Step 9: On the white felt, draw and cut out the gloves of our snowman and glue them on the back of each sleeve.
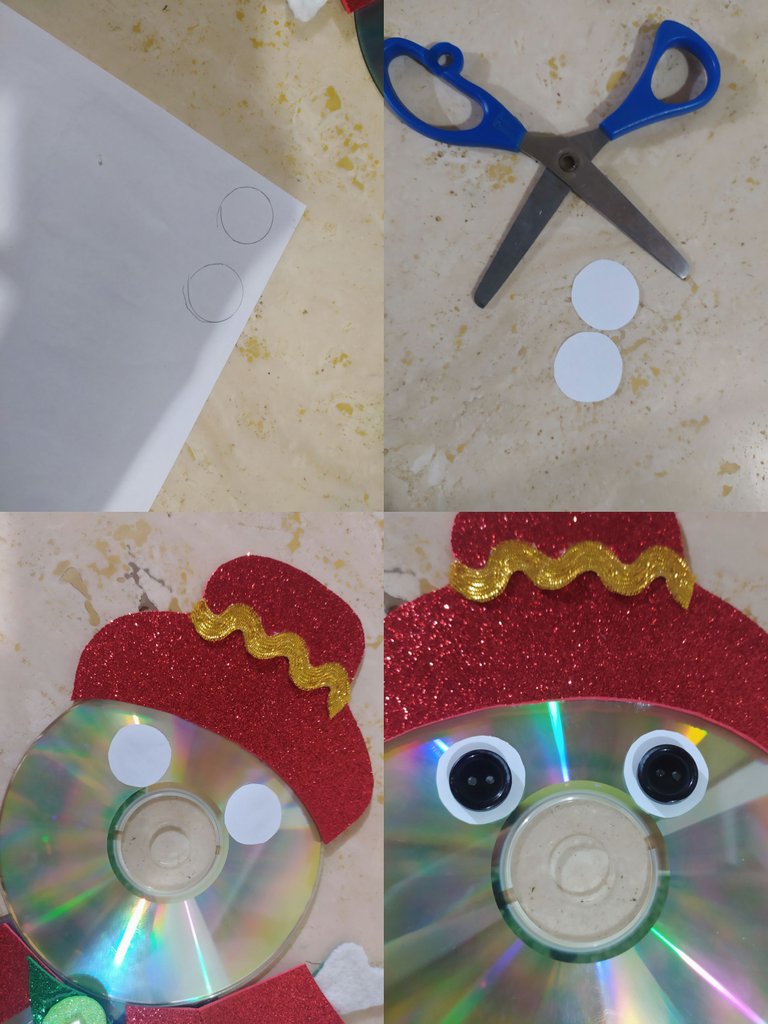
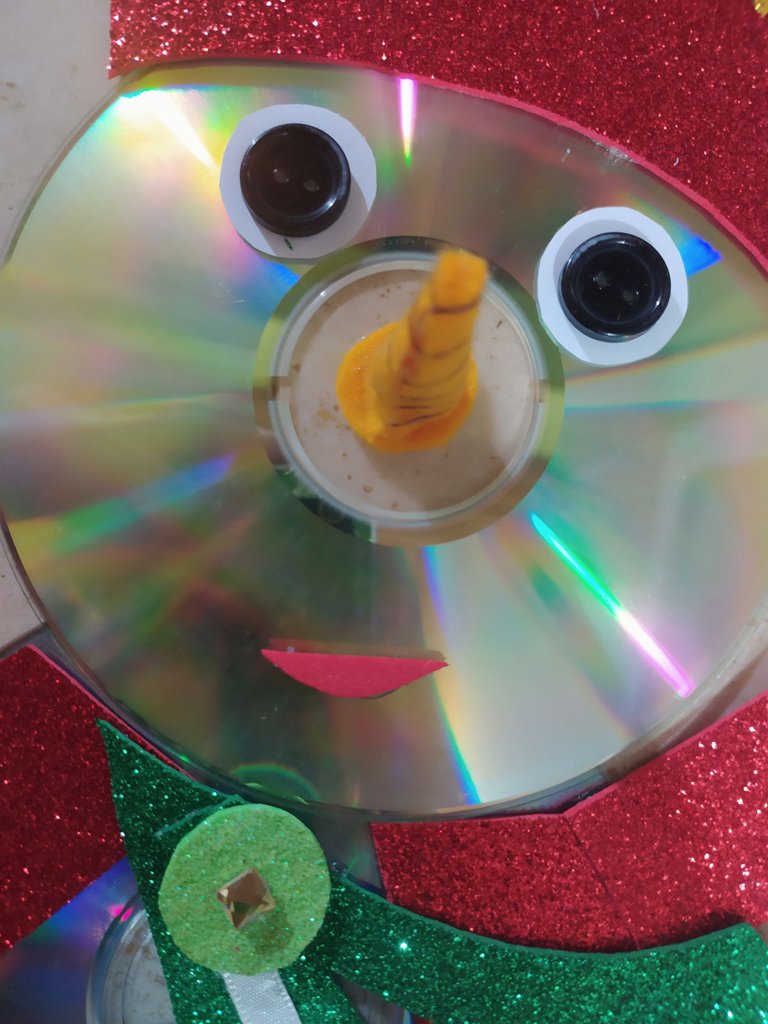
Paso 10: Recorté dos círculos pequeños en hoja de papel blanco y los pegué en cada lado de lo que es la cara de nuestro muñeco de nieves y sobre éstos pegué los botones negros.
Step 10: I cut out two small circles on a white sheet of paper and glued them on each side of what is the face of our snowman and on these I glued the black buttons.
Paso 11: Para realizar la nariz, recorte en fieltro naranja un triángulo ancho que al doblarlo pudiera rellenar y pegar con silicón. Luego tomé hilo marrón y lo enrrollé en toda la nariz, pegué con silicón moderadamente para que no se soltara. Recorte un pequeño círculo del mismo fieltro y pegué en medio de la cara y sobre este pegué la nariz.
Step 11: To make the nose, cut out a wide triangle out of orange felt that, when folded, you could fill and glue with silicone. Then I took brown thread and rolled it all over the nose, I glued it with silicone moderately so that it would not come loose. Cut out a small circle from the same felt and glued in the middle of the face and on this I glued the nose.
Paso 12: Recorte en foami rojo una pequeña boquita y la pegué.
Step 12: Cut a small mouth out of red foami and glue it on.
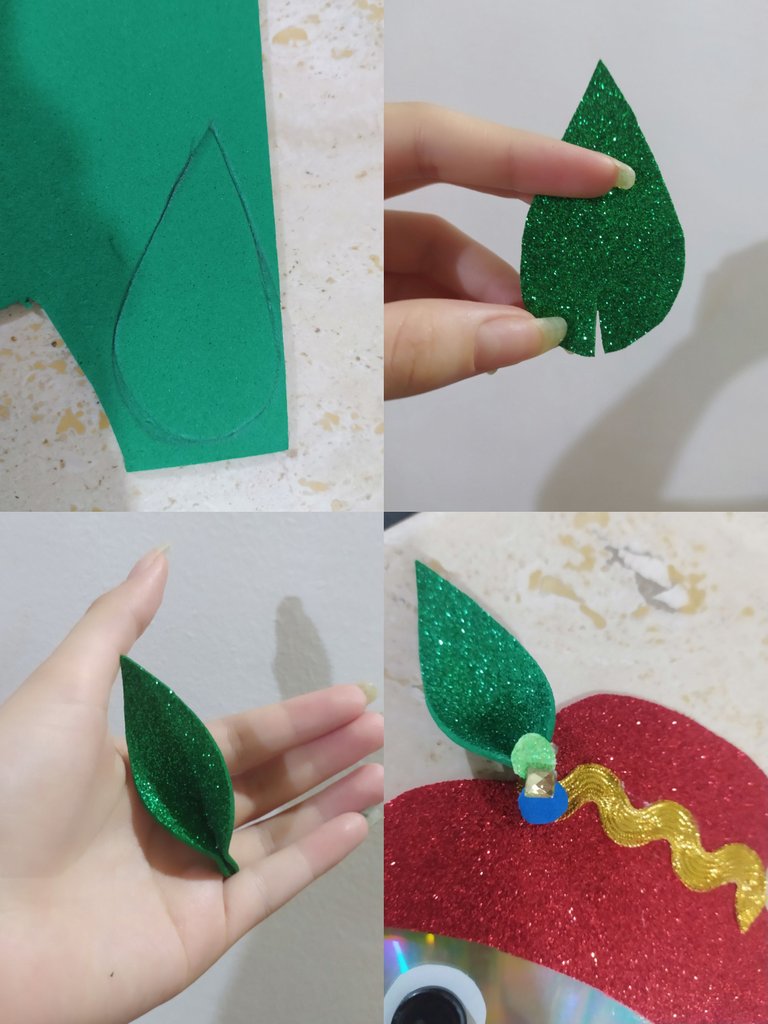
Paso 13: Realicé una hoja para el sombrero. Dibuje sobre foami verde la figura de una hoja; al recortarla le hice un corte vertical en la parte de abajo hacia arriba, le coloqué silicón y doblé para que se pegara. Está hoja la pegué en el lateral del sombrero a la altura de donde coloqué la cinta. La adorne con pequeños detalles de círculos y piedras.
Step 13: I made a sheet for the hat. Draw on green foami the shape of a leaf; When I cut it I made a vertical cut from the bottom up, I put silicone on it and I bent it to stick. I glued this sheet to the side of the hat at the height of where I placed the ribbon. Decorate it with small details of circles and stones.
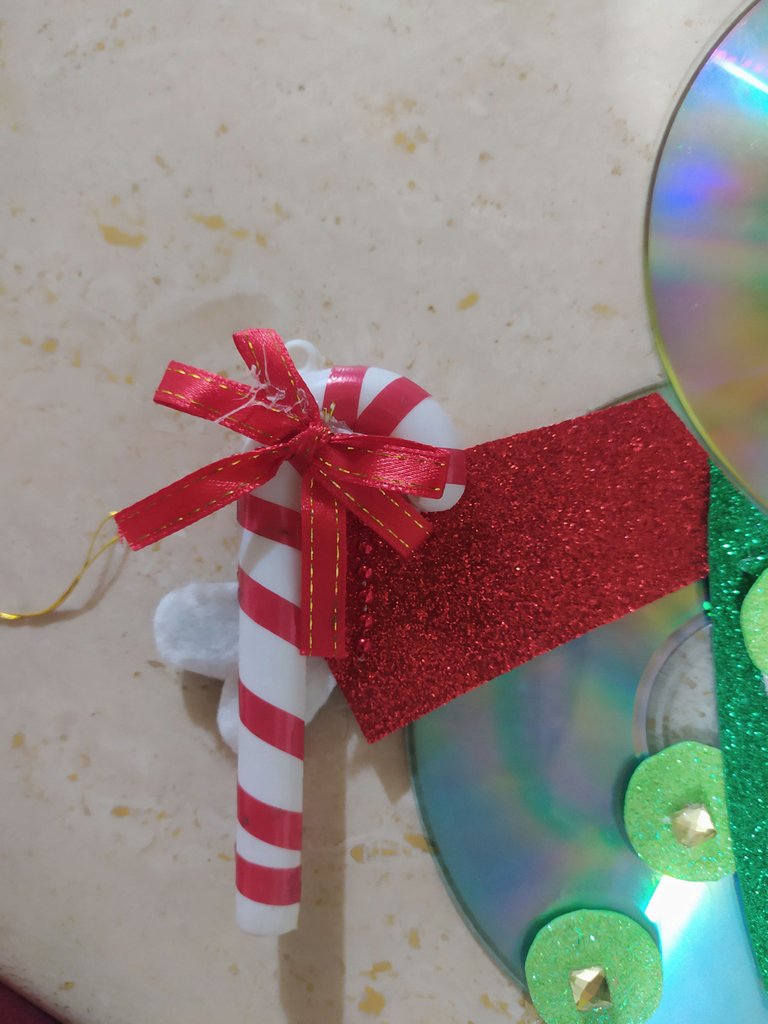
Paso 14: Finiquité los últimos detalles, sobre la mano izquierda le coloqué un bastón navideño con un lazo y piedras doradas.
Step 14: I finished the last details, on the left hand I placed a Christmas cane with a bow and golden stones.
Lo último que realicé fue, colocarle un pequeño hilo dorado al principio del sombrero para poder colgarlo.
The last thing I did was, put a small golden thread at the beginning of the hat to be able to hang it.
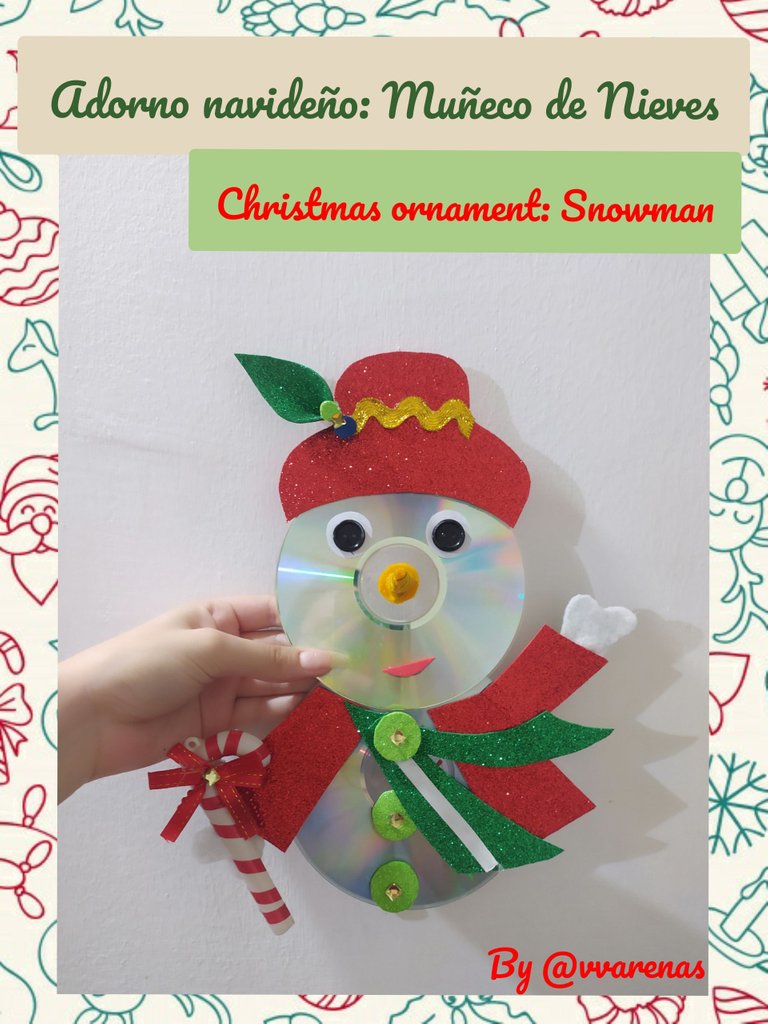
Este fue el resultado que obtuve, quedé realmente complacida y encantada. Me pareció súper lindo y sencillo ¿Qué les parece adornar el árbol de navidad con estos creativos y hermosos muñecos de navidad?.
This was the result I got, I was really pleased and delighted. I found it super cute and simple. How about decorating the Christmas tree with these creative and beautiful Christmas figures?
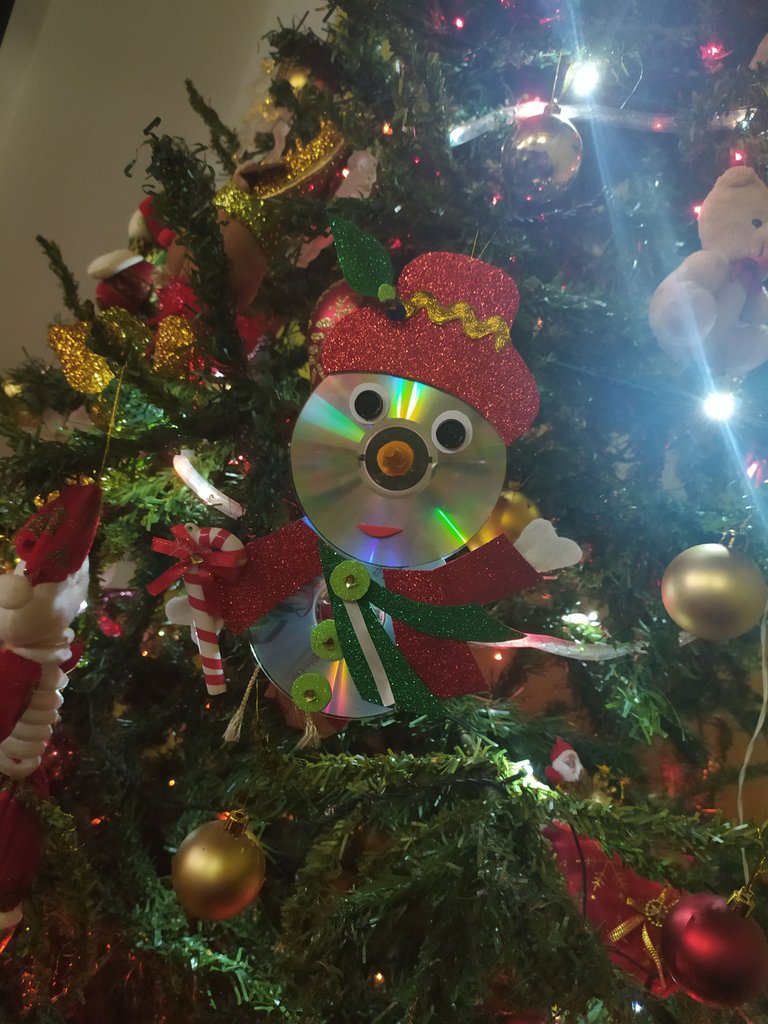
Esto fue todo el tutorial, espero que les haya gustado y lo realicen en casa, y le pongan mucha más creatividad en detalles... Saludos☃️
This was the whole tutorial, I hope you liked it and do it at home, and put much more creativity in details ... Greetings☃️