Hello, hello my creative Hive Diy family! Very good morning, we welcome this month of October, sincerely and from the bottom of my heart I hope we all do great, may it be a greatly blessed month, happy and full of peace, but above all full of productivity and creativity to continue sharing our manual arts in our beloved community.♡
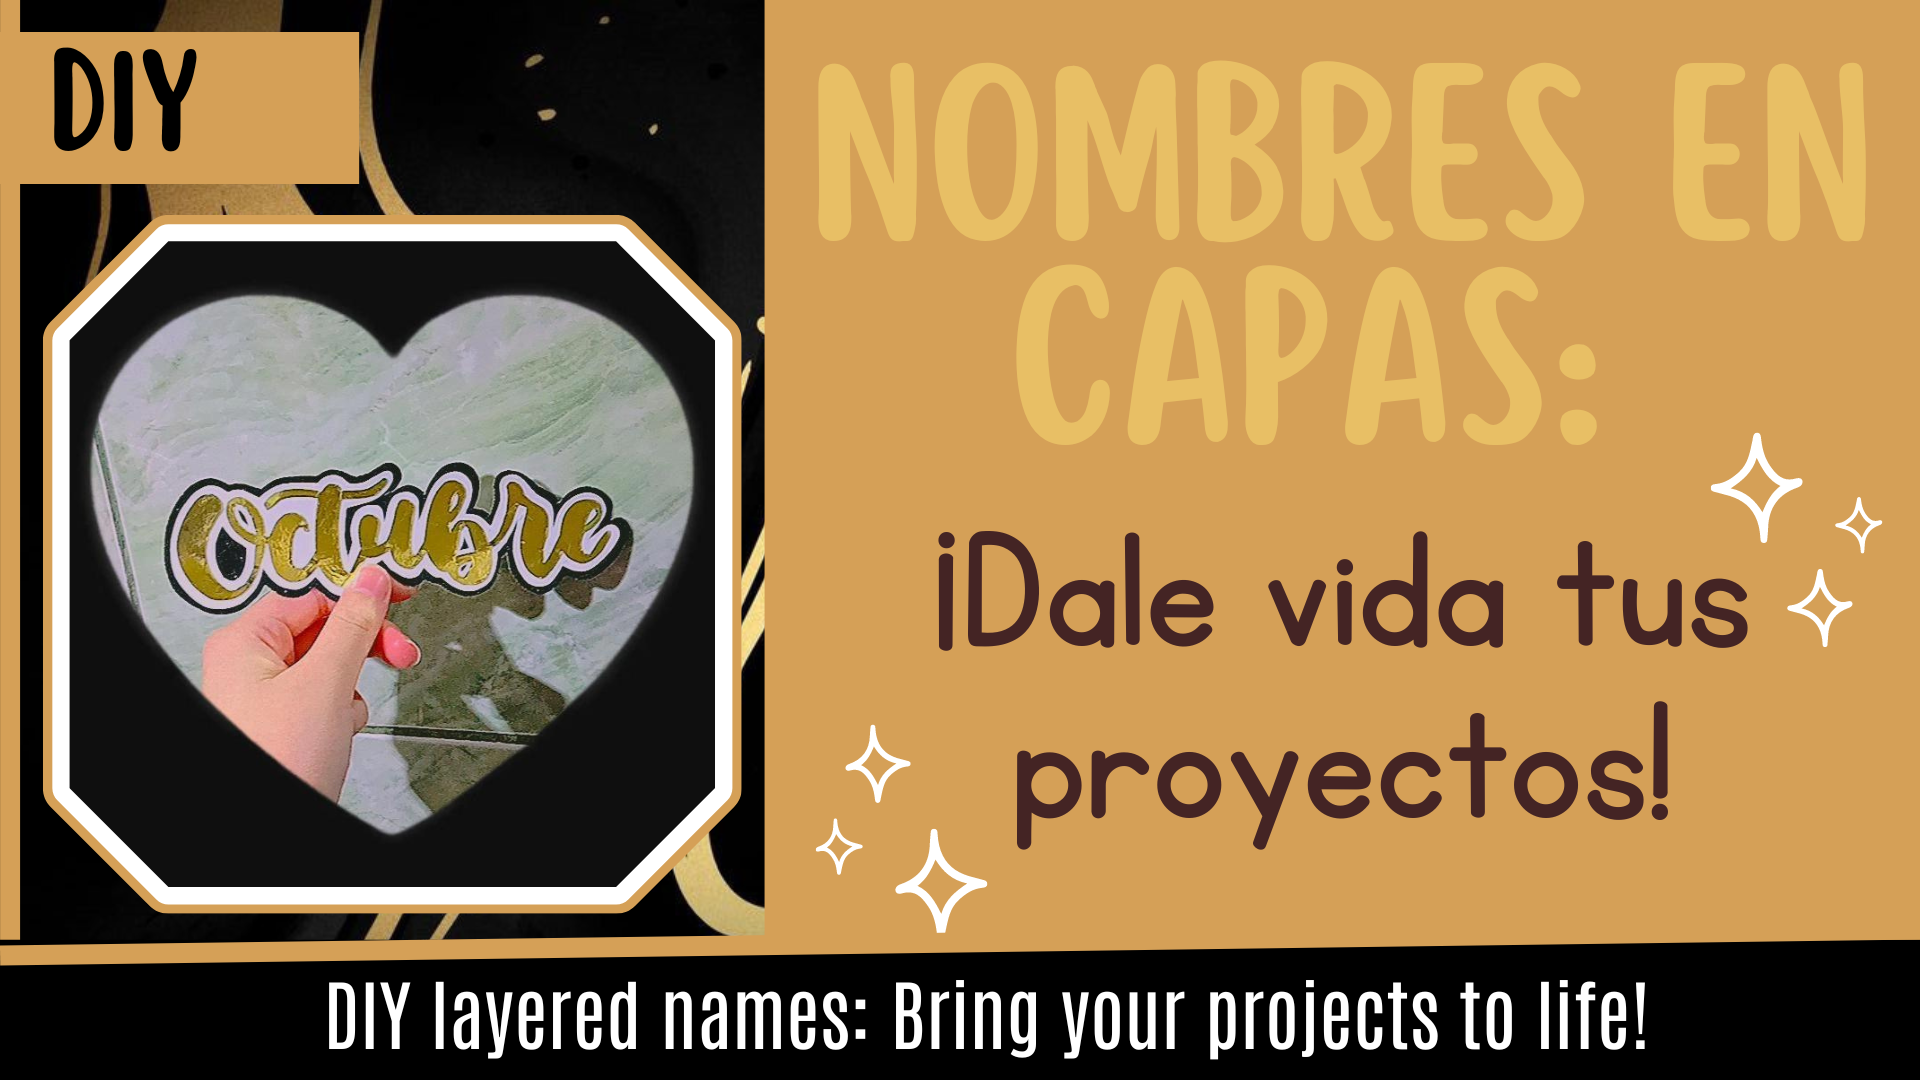
¡Felíz inicio de semana! Bienvenidos, está vez les quise mostrar el proceso de como elaboró paso a paso, las palabras en cursiva y con diferentes capas de cartulina, es un tutorial básico, pero estoy segura de que a varios les serviría para empezar a hacer sus letras desde casa, ya que muchas veces no sabemos cómo comenzar y solo nos hace falta un empujoncito.
Happy start of the week! Welcome, this time I wanted to show you the process of how I made step by step, the words in cursive and with different layers of cardboard, it is a basic tutorial, but I am sure that many of you could use it to start making your own letters at home, because many times we don't know how to start and we just need a little push.
Estás palabras decoradas son como un Cake Topper sencillo, con la diferencia de que no es para una torta y no trae el palito. Estás nos sirven para decorar carpetas, puertas, marcos de fotos, cuadernos, carteleras, entre otras infinidad de usos, ya que es una forma auténtica de personalizar nuestras manualidades y distintas ideas de creación, así que a continuación comenzaré con los materiales que necesitamos.✨
These decorated words are like a simple Cake Topper, with the difference that it is not for a cake and does not come with a stick. These can be used to decorate folders, doors, photo frames, notebooks, billboards, among countless other uses, as it is an authentic way to personalise our crafts and different creative ideas, so I will now begin with the materials we need.✨
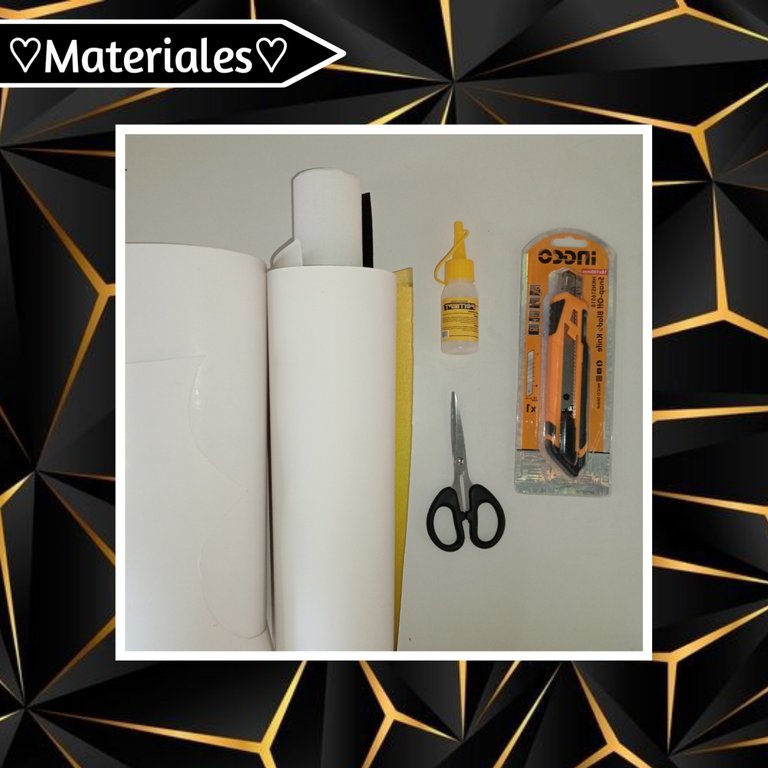
♡💛🖤Materials🖤💛♡
- Cartulinas; de diferentes colores y texturas a nuestro gusto
- Silicón
- Tijeras
- Cutter/Exacto
- Cardboard; different colours and textures to your liking
- Silicone
- Scissors
- Cutter/Exacto
♡🖤✨Step by Step✨🖤♡
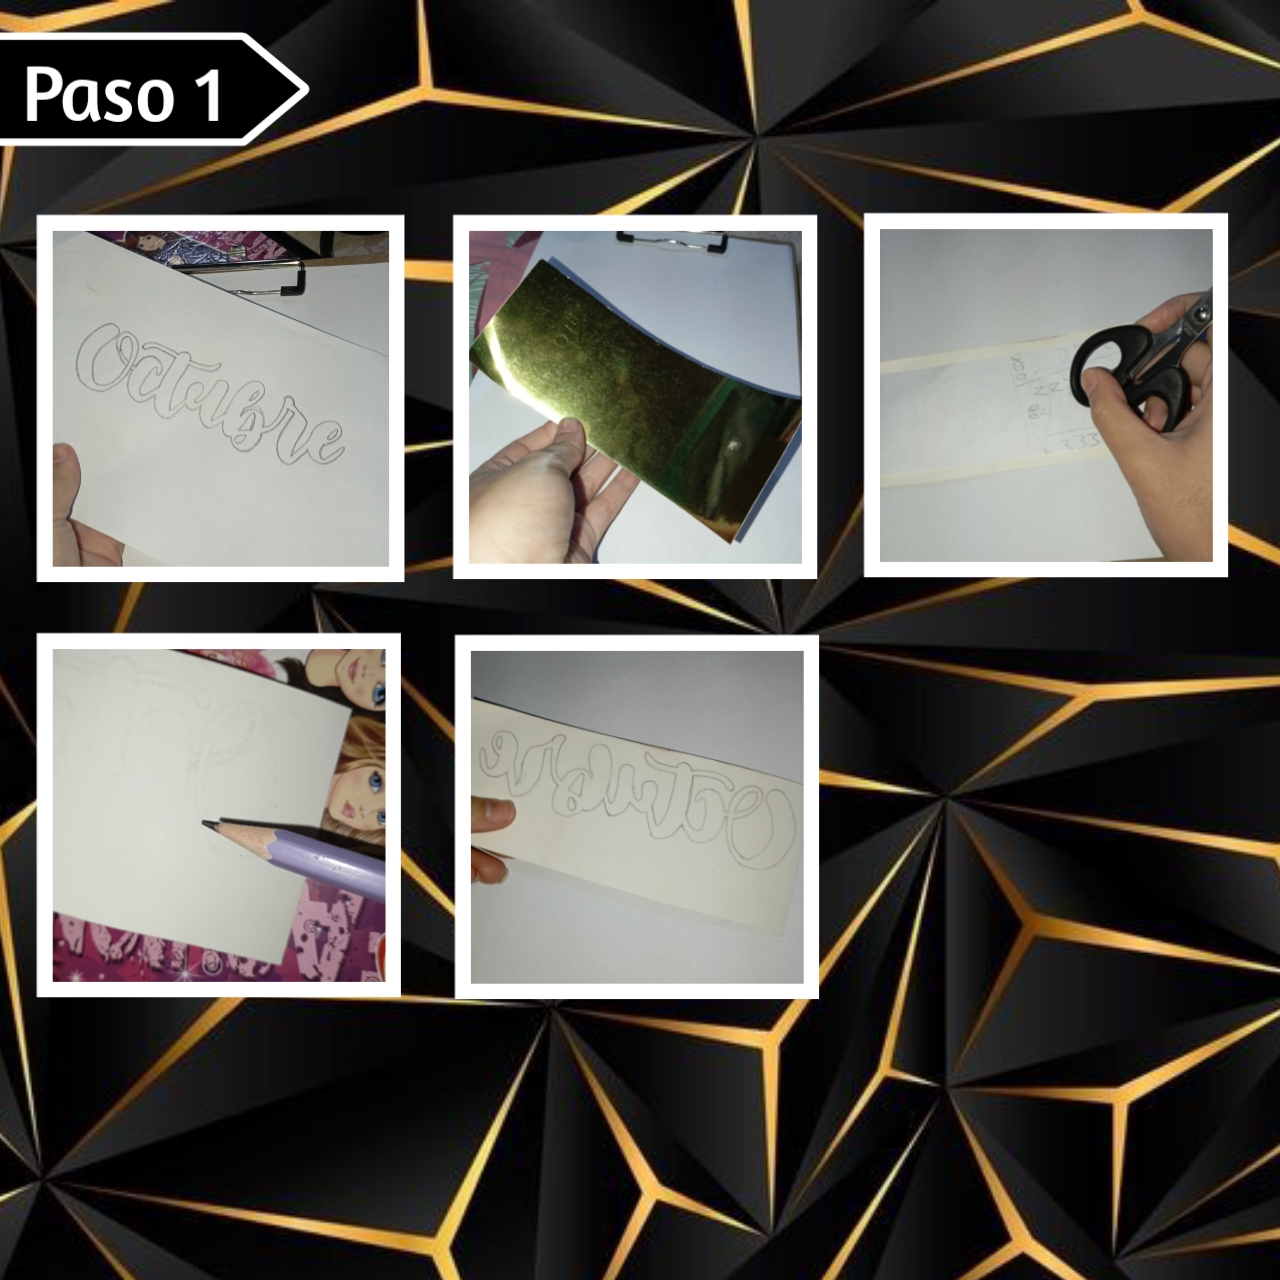
Paso 1:
Step 1:
Lo primero que necesitamos es la plantilla de la palabra o las palabras que usaremos, yo siempre uso la página que les dejó aquí debajo.⤵️
The first thing we need is the template of the word or words we will use, I always use the page below. ⤵️
Dafont.com
Debemos tener nuestra plantilla en una hoja, yo la sacó a mano, pero pueden imprimirla, así la remarcó con lápiz, tomo un rectángulo de cartulina que abarque la palabra y sobre un espacio de cada lado, la palabra se pone al revés en la parte trasera de la cartulina, así iremos pasando la parte de atrás de la tijera, por todo el trazo del lápiz, hasta que se traspase toda la palabra a la cartulina y remarcamos con el lápiz.
We must have our template on a sheet of paper, I drew it by hand, but you can print it out, so I mark it out with pencil, I take a rectangle of cardboard that covers the word and on a space on each side, the word is placed upside down on the back of the cardboard, so we will go passing the back of the scissors, all over the pencil line, until the whole word is transferred to the cardboard and we mark it out with the pencil.
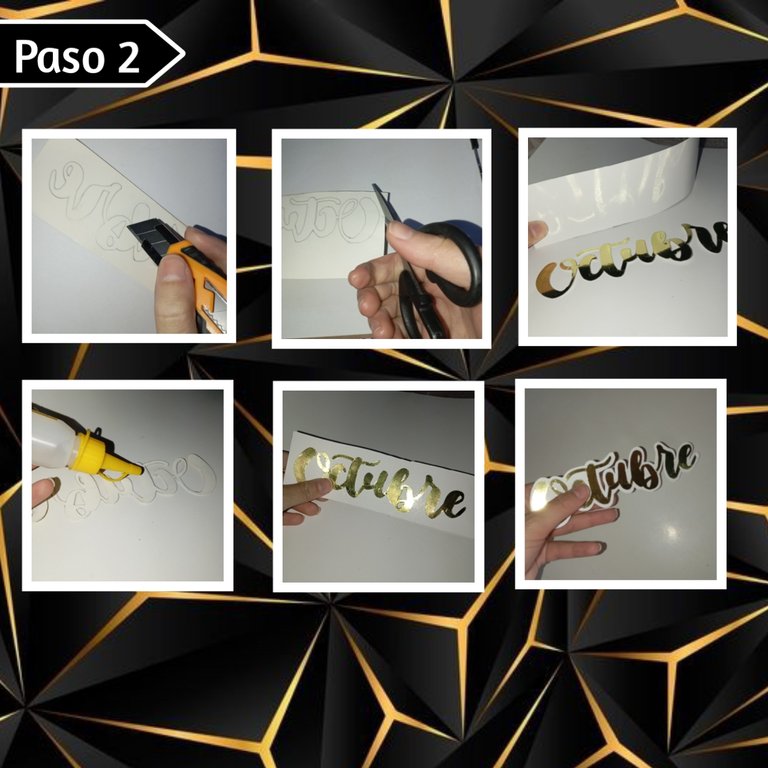
Paso 2:
Step 2:
Ahora vamos a empezar con el recorte, así con ayuda de nuestro cutter/exacto, recortaremos los orificios de las letras que los tengan, con mucho cuidado. Continuamos tomando nuestra tijera y recortando todo el contorno de la palabra, cuidadosamente para que no la doblemos, así hasta recortar toda la palabra, luego agregamos silicón en la parte de atrás de la palabra y pegamos está sobre otro rectángulo de cartulina, igualmente recortamos muy bien.
Now we are going to start with the cutting, so with the help of our cutter/exacto, we will cut out the holes of the letters that have them, very carefully. We continue by taking our scissors and cutting out the whole outline of the word, carefully so that we don't bend it, until we have cut out the whole word, then we add silicone to the back of the word and we stick it onto another rectangle of cardboard, also cutting it out very well.
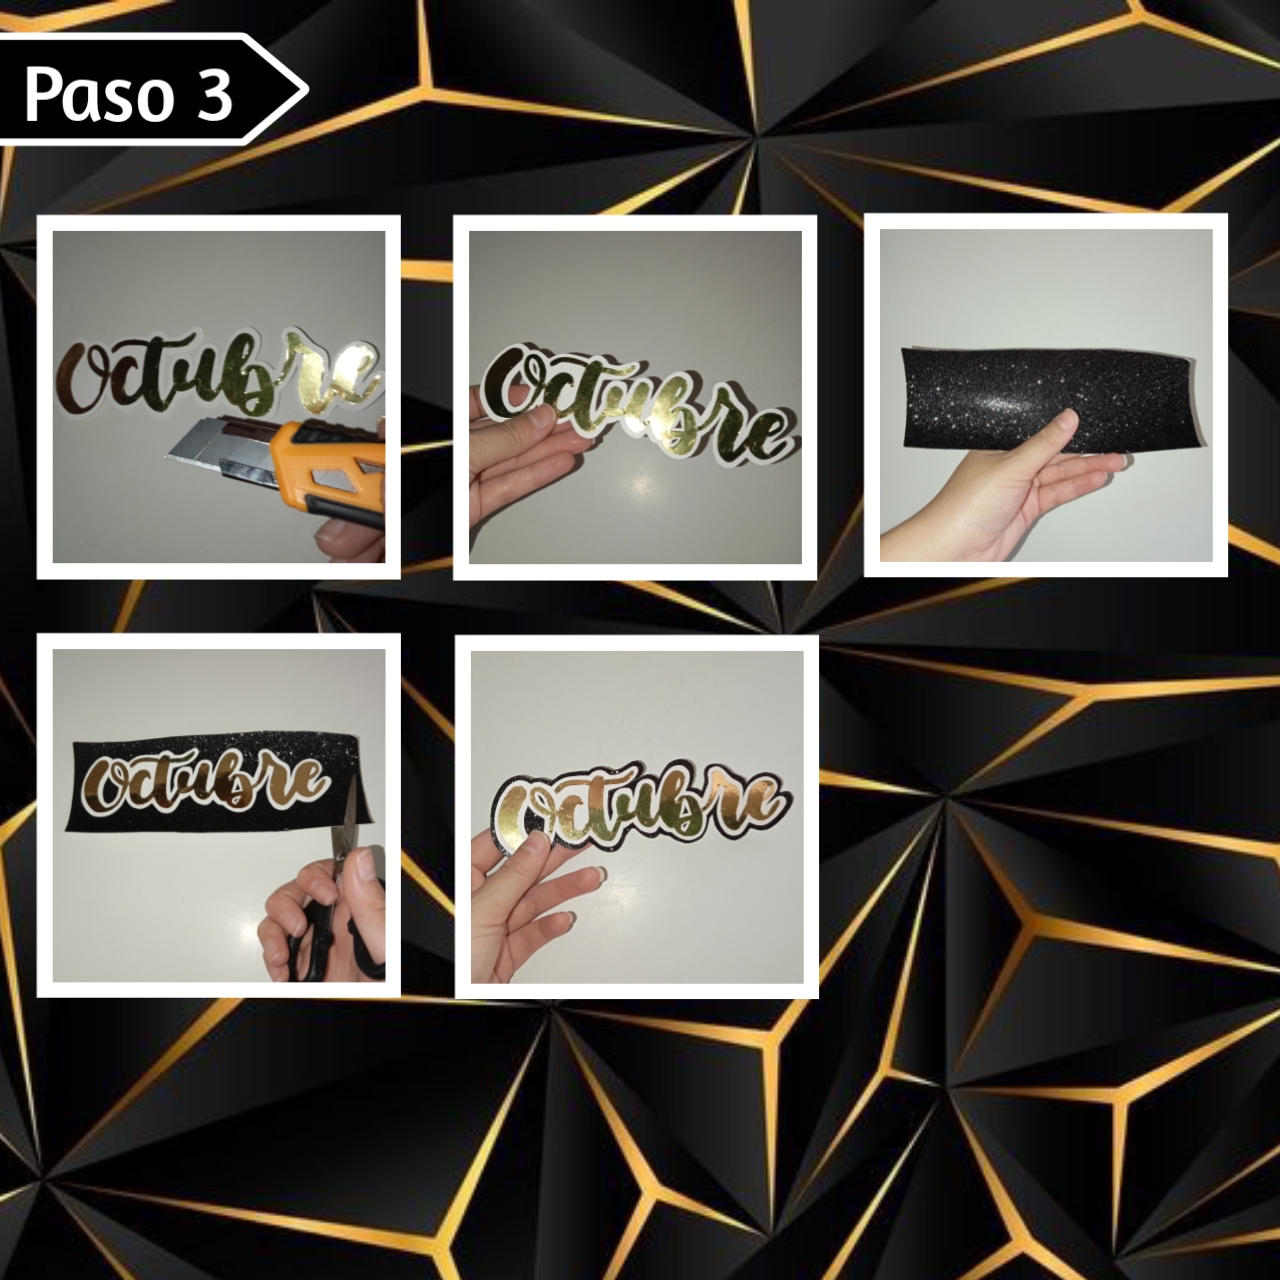
Paso 3:
Step 3:
Seguimos con el cutter, vamos a sacar los orificios que podamos según el tamaño, después volvemos a agregar silicón en la parte trasera, tomamos otro rectángulo de cartulina, yo está vez use cartulina en color negro micro escarchada, luego con la tijera recorte todo el contorno, dejando un pequeño borde, está vez no necesitamos recortar los orificios, para un mejor acabado.
We continue with the cutter, we are going to remove the holes that we can according to the size, then we add silicone on the back, we take another rectangle of cardboard, this time I used cardboard in black colour micro frosted, then with the scissors cut all the contour, leaving a small border, this time we don't need to cut the holes, for a better finish.
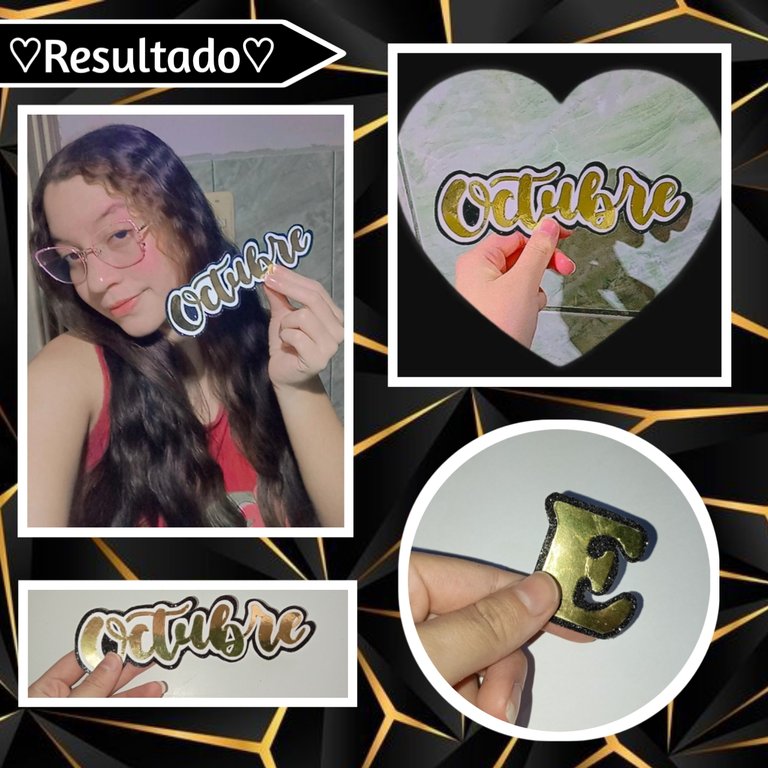
De está forma, en unos sencillos pasos y con pocos materiales podemos hacer las palabras o letras que queramos en cartulina, dándole un toque diferente y único, es algo bastante sencillo, pero que nos sirve para una infinidad de proyectos, lo mejor es que lo podemos personalizar totalmente, haciendo estás de diferentes tamaños y colores, es muy útil. También pueden hacer letras separadas en capas, en vez de corridas me refiero, también les dejó un ejemplo de las que hice está vez.
In this way, in a few simple steps and with few materials we can make the words or letters we want on cardboard, giving it a different and unique touch, it is something quite simple, but it is useful for an infinite number of projects, the best thing is that we can totally personalise it, making them in different sizes and colours, it is very useful. You can also make separate letters in layers, instead of running I mean, I also leave you an example of what I did this time.
Espero les haya gustado este corto tutorial y puedan ponerlo en práctica para llevar sus manualidades a otro nivel, personalizando estás de forma única. Les agradezco por llegar hasta aquí, les pido que sí les gustó comenten y compartan, ha sido un placer compartir con ustedes la mañana de hoy.✨
I hope you liked this short tutorial and that you can put it into practice to take your crafts to another level, personalising them in a unique way. I thank you for making it this far, I ask you to comment and share, it has been a pleasure to share with you this morning ✨.
🖤💛¡Gracias por leer una vez más!💛🖤
🖤💛Thanks for reading once again!💛🖤
Photos of my authorship taken from my Xiaomi Redmi 13C phone, edited in the free version of Canva