Holis mis queridos hivers de @Hivediy, espero se encuentren todos muy bien, yo tengo el corazón con agujeritos ❤️🩹 pero con mucho optimismo y confianza en Dios.🇻🇪🙏🏻
Hello my dear hivers of @Hivediy, I hope you are all very well, I have the heart with holes ❤️🩹 but with much optimism and confidence in God. 🇻🇪🙏🏻
Me alegra mucho estar de vuelta en esta linda comunidad para compartir con ustedes una manualidad que fue todo un reto para mi, no solo porque es primera vez que la hago sino también porque no me sentía muy bien pues estaba surfeando en la ola roja, ya saben a lo que me refiero, y en esos días suelo sentime muy agotada, pero aun así se logro gracias a Dios. 😍
I am very happy to be back in this beautiful community to share with you a craft that was a challenge for me, not only because it is the first time I do it but also because I was not feeling very well because I was surfing in the red wave, you know what I mean, and in those days I usually feel very exhausted, but still it was achieved thanks to God. 😍
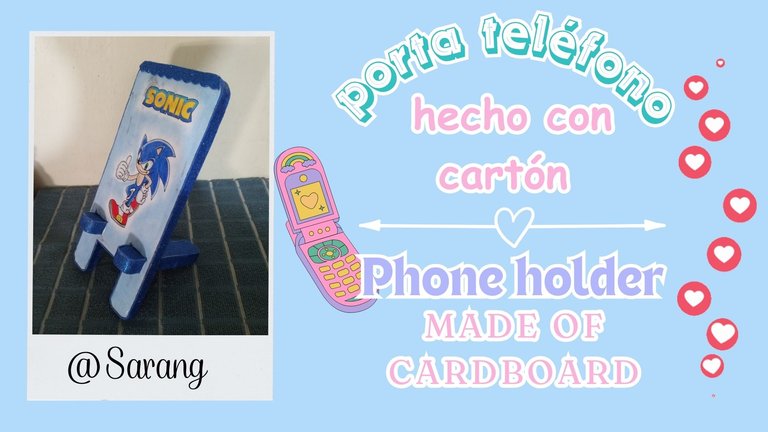
Se trata de un lindo porta teléfono, me encantan este tipo de manualidades que son super útiles y que ademas son a base de cartón reciclado ♻️ yo había hecho uno solo para experimentar, no lo forre con foami ni nada y mi sobrino lo vio y me dijo que se lo regalara, como ese estaba muy feito decidí hacerle uno especialmente para el con un dibujo de algo que le gustará y asi fue como surgio este lindo porta teléfono.
This is a cute phone holder, I love this kind of crafts that are super useful and are also based on recycled cardboard ♻️ I had made one just to experiment, I did not cover it with foami or anything and my nephew saw it and told me to give it to him, as that one was very ugly I decided to make one especially for him with a drawing of something he would like and that's how this cute phone holder came out.
Fue todo un desafío porque tuve que hacer todo, desde las plantillas, el dibujo y todo lo demás, normalmente se pueden descargar en internet plantillas e imprimirlas y también se pueden descargar con varios diseños creo, pero yo decidí hacer todo de cero con mis propias manos sin gastar mucho dinero.
It was quite a challenge because I had to make everything, from the templates, the drawing and everything else, usually you can download templates on the internet and print them and you can also download them with several designs I think, but I decided to make everything from scratch with my own hands without spending a lot of money.
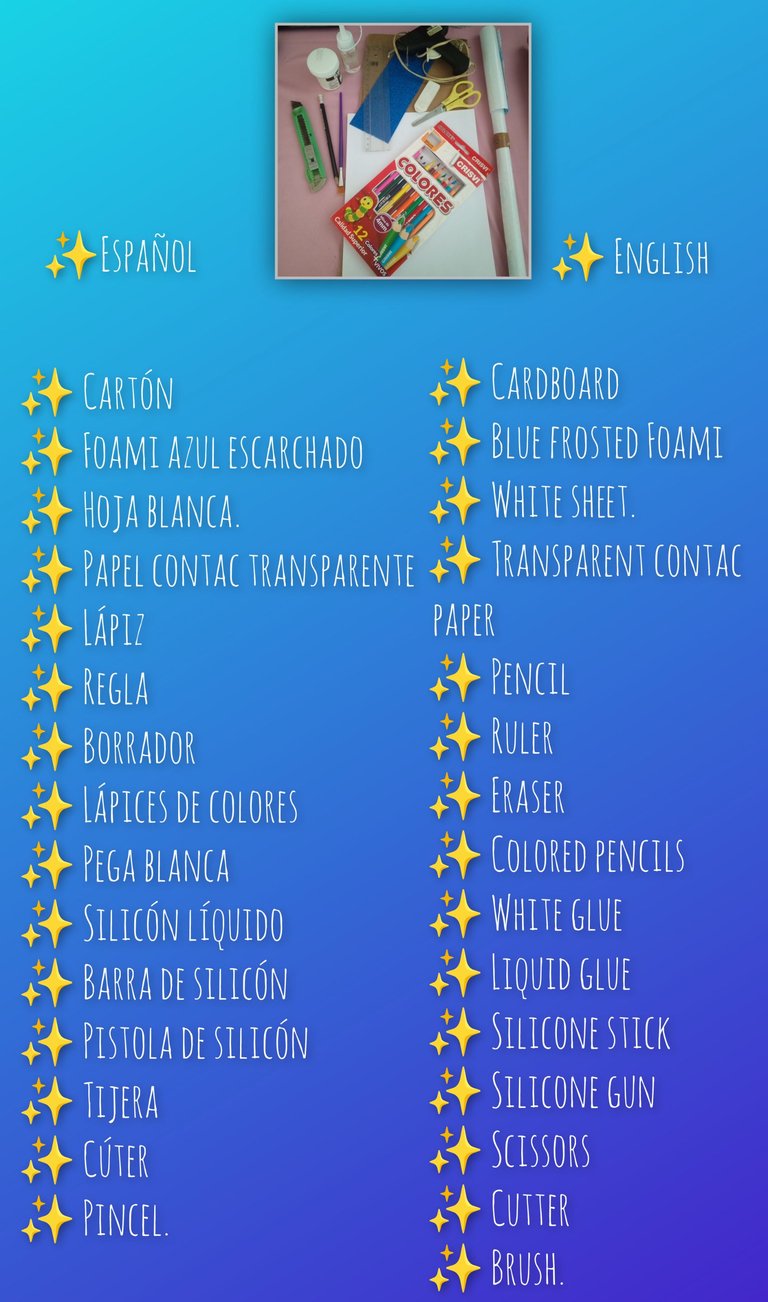
Ya sin mas demora los invito a ver los materiales y el paso a paso, así que comenzamos.
Without further ado, I invite you to see the materials and the step-by-step, so let's get started.


🌟Step-by-step🌟
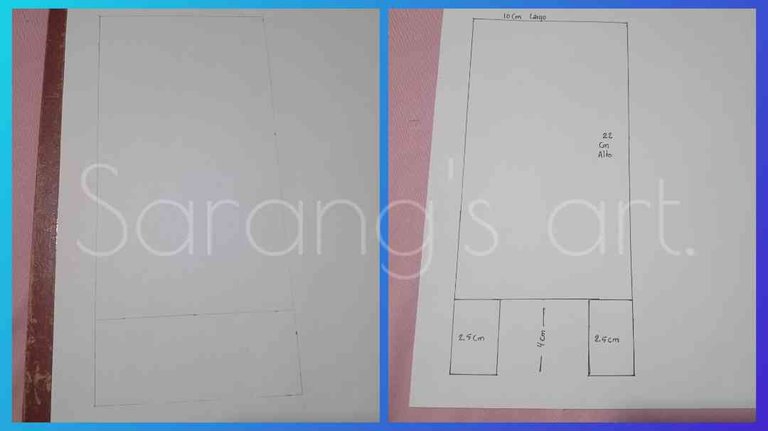
Elaborando plantilla de la base. / Establishing base template.
El primero paso fue hacer las plantillas para el porta teléfono, la base y el soprte.
The first step was to make the templates for the phone holder, the base and the support.
Para la base traze en una hoja blanca un rectángulo de aproximadamente 22 cm de alto y 10 cm de largo, luego medi 4 cm hacian adentro del rectángulo y traze una linea, luego hice las patitas del porta teléfono de 2.50 cm.
For the base I traced on a white sheet a rectangle of approximately 22 cm high and 10 cm long, then I measured 4 cm inside the rectangle and traced a line, then I made the legs of the phone holder of 2.50 cm.
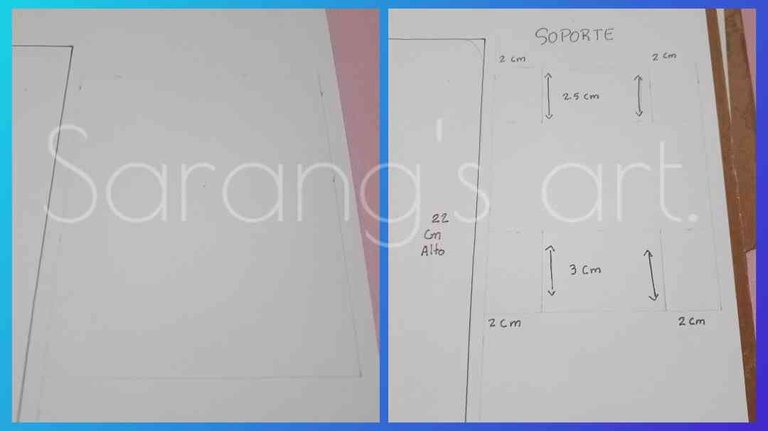
Elaboración de el soporte./ Establishment of the support..
El soporte lo hice de 10cm de alto y 8.5 cm de largo, para hacer las patitas del soporte medi hacia adentro 3cm de un lado y 2.5 del otro lado y a los lados 2 cm queda algo así como una letra H. 😆
I made the support 10cm high and 8.5 cm long, to make the legs of the support I measured inward 3cm on one side and 2.5 on the other side and on the sides 2 cm, it is something like a letter H. 😆.
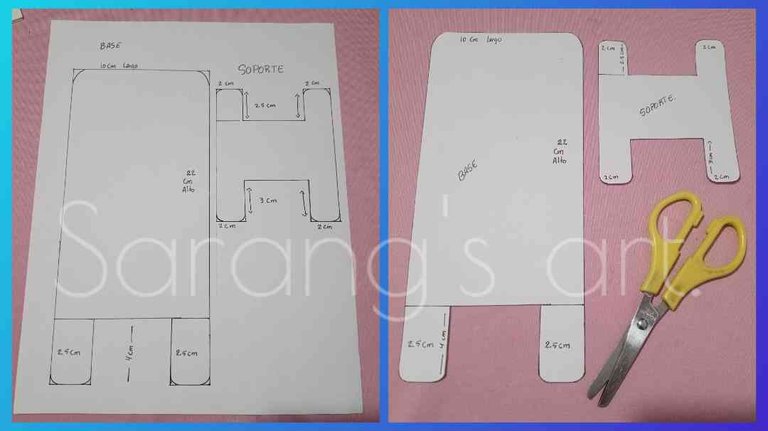
Recortando las plantillas/Cutting the templates.
Una vez listos los recorte con la ayuda de una tijera ✂️ y quedaron listos para usarlos.
Once ready, cut them out with the help of a scissors ✂️ and they are ready to use.
Fue un proceso bastante tedioso tener que hacer yo misma las plantillas, pero lo bueno es que ya las tengo listas, cada vez que tenga que hacer un porta teléfono uso esas mismas plantillas y listo.
It was quite a tedious process having to make the templates myself, but the good thing is that I already have them ready, every time I have to make a phone holder I use those same templates and that's it.

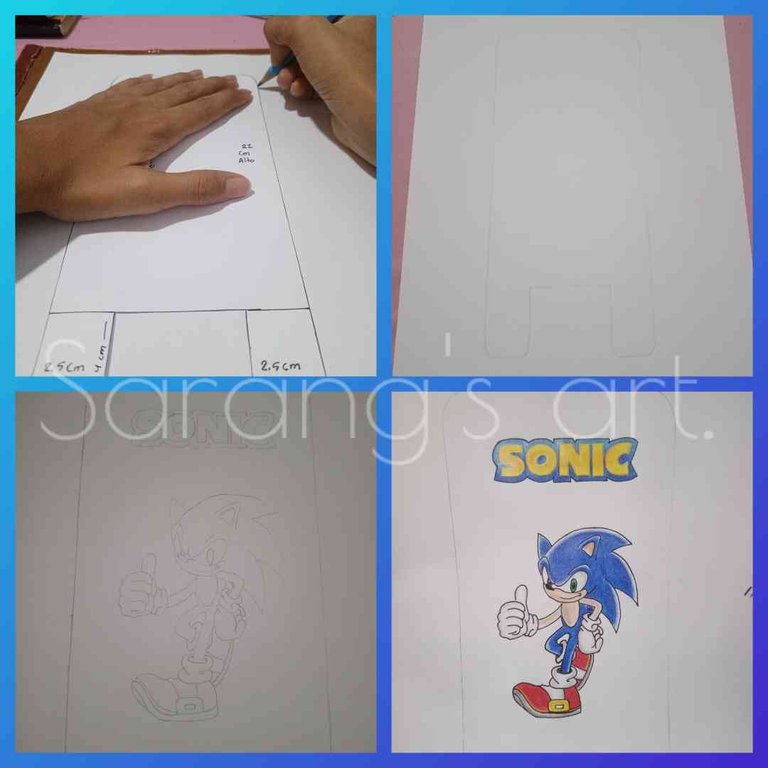
Elaboración del dibujo/Drawing elaboration.
El siguiente paso fue el dibujo que iba a llevar el porta teléfono como decoración, para eso lo que hice fue tomar la plantilla de la base y traspasarla con lapiz a una hoja blanca, hice esto para guiarme y poder hacer el dibujo dentro de la plantilla lo mas centrado posible.
The next step was the drawing that was going to take the phone holder as decoration, for that what I did was to take the template of the base and transfer it with pencil to a white sheet, I did this to guide me and to be able to make the drawing inside the template as centered as possible.
En esta oportunidad no voy a hacer el típico paso a paso del dibujo porque me quiero centrar en la elaboración del porta retrató, lo que si puedo decir es que es primera vez que dibujo esta caricatura y fue todo un desafío dibujarla en un espacio tan pequeño, además de que como todo dibujo llevo su tiempo, como les dije anteriormente en internet hay varias plantillas de porta teléfono con diseños variados, por cierto hay una muy linda de Stitch, pero el hecho de hacer el dibujo a mano le da un toque un poco mas lindo y significativo. 😍
This time I will not do the typical step by step drawing because I want to focus on the development of the portrait holder, what I can say is that it is the first time I draw this cartoon and it was a challenge to draw it in such a small space, plus as all drawing took time, as I said earlier on the internet there are several phone holder templates with various designs, by the way there is a very nice Stitch, but the fact of making the drawing by hand gives it a touch a little more beautiful and meaningful. 😍

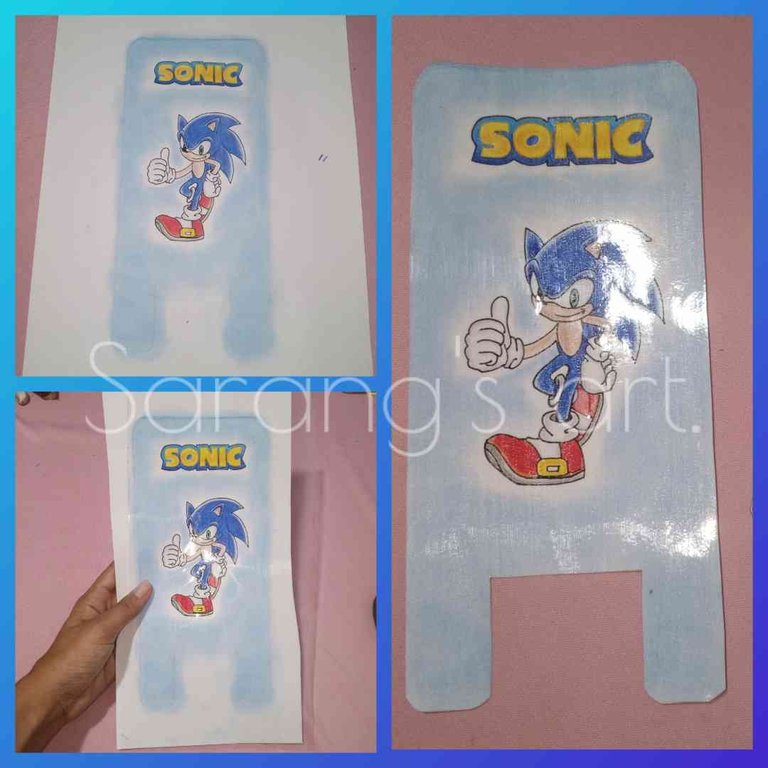
Fondo y planificación/Background and planning.
Terminado el dibujo procedí a ponerle un fondo azul para que quedara mas bonito, decidí hacerlo con una tiza azul porque me parece con con ese material el difuminado queda mucho mejor.
Once the drawing was finished I proceeded to put a blue background to make it more beautiful, I decided to do it with a blue chalk because it seems to me that with this material the blurring is much better.
Luego con papel contac transparente lo plastifique y debo confesar que en este paso tenia miedo arruinar el dibujo porque no me considero muy buena platicando, pero gracias a Dios me salio muy bien. ¡Gracias Dios mío! 🙏🏻😘
Then I laminated it with transparent contact paper and I must confess that in this step I was afraid of ruining the drawing because I don't consider myself a very good talker, but thank God it came out very well. Thank you my God! 🙏🏻😘
Luego de plastificarlo recorte ✂️ la plantilla y quedo lista para el siguiente paso. 🥰
After laminating it I cut out ✂️ the template and it was ready for the next step. 🥰

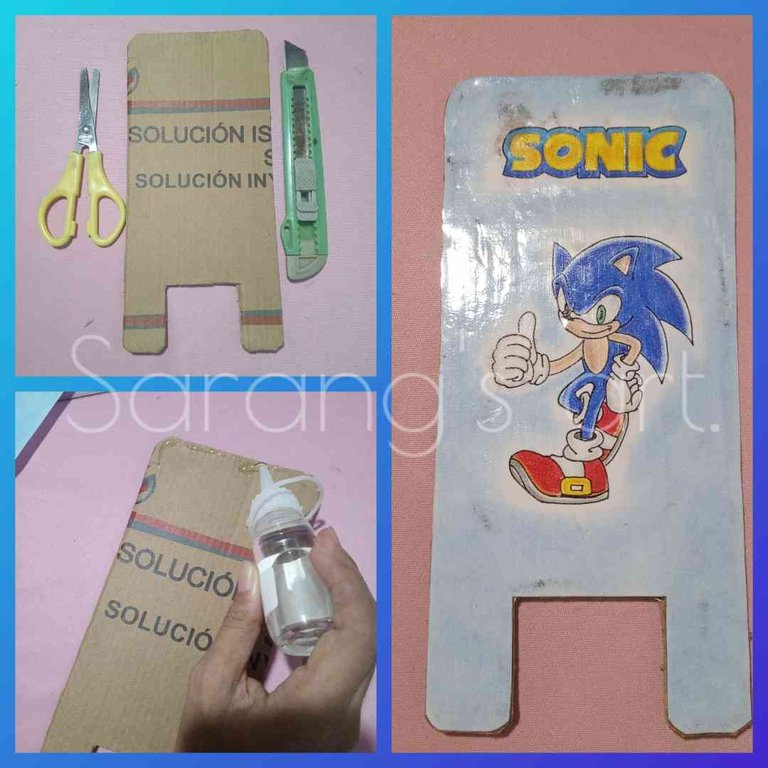
Montando el dibujo en cartón /Mounting the drawing on cardboard.
Para el siguiente paso, utilizando la misma plantilla de la base, saque una pieza de cartón ayudandome con un cuter y la tijera.
For the next step, using the same template as the base, I cut out a piece of cardboard using a cutter and scissors.
En esa base de carton con silicón líquido pegue la plantilla que había hecho antes con el dibujo.
On that cardboard base with liquid silicone I glued the template I had made before with the drawing.
Nota:En esta parte me desanimé por que cuando pegue la plantilla con el dibujo al cartón quedo con si estuviera sucio el dibujo, no entendía porque se veía de esa forma hasta que me dí cuenta de que no era una mancha de sucio sino que al poner el silicón le habia dado como un efecto de transparencia al papel, por así decirlo, y se ve como si estuviera manchado, me arrepentí de haber usado silicón tenía que haber usado pega balnca como siempre hago cuando monto mis dibujos en cartón. 😔
Note: In this part I was discouraged because when I glued the template with the drawing to the cardboard it looked dirty, I did not understand why it looked that way until I realized that it was not a dirty stain but that when I put the silicone it had given a transparency effect to the paper, so to speak, and it looks as if it was stained, I regretted having used silicone I should have used white glue as I always do when I mount my drawings on cardboard. 😔

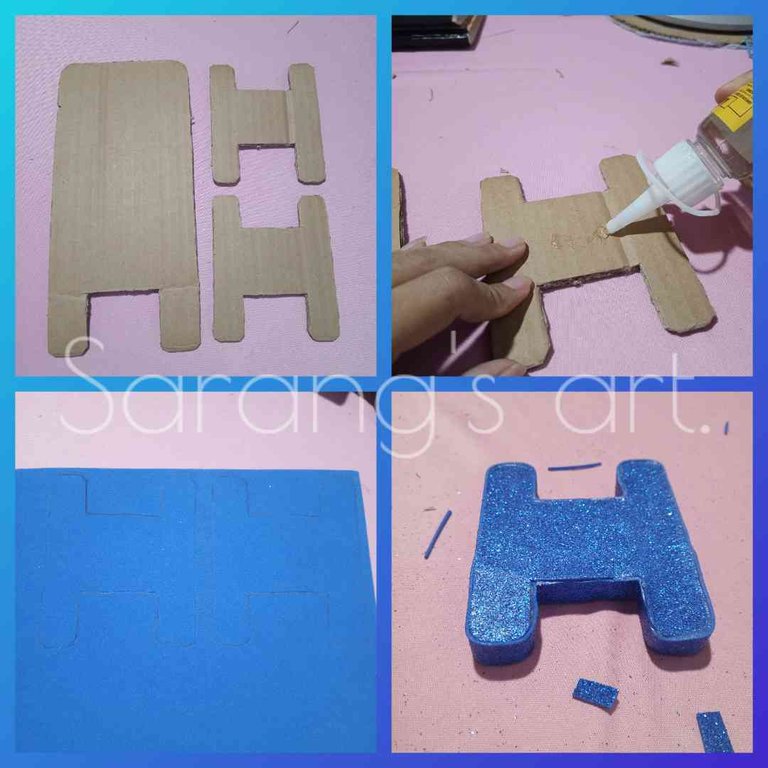
Elaboración de las piezas/Processing of parts
El siguiente paso fue sacar las demas pienzas del porta teléfono en cartón, para que fuese mas resistente decidí sacar dos de cada pieza, por eso saque otra pieza de cartón de la base y dos piezas de cartón del soporte.
The next step was to take out the other pieces of the cardboard phone holder, to make it more resistant I decided to take out two of each piece, so I took out another piece of cardboard from the base and two pieces of cardboard from the support.
Luego tome ambas pienzas del soporte y con silicón líquido pegue una encima de la otra, cuando estuvo bien pegado procedi a forrar la pienza con foami escarchado azul.
Then I took both pieces from the support and with liquid silicone I glued one on top of the other, when it was well glued I proceeded to line the piece with blue frosted foami.
Nota:El foami que use es el típico foami que suelta la escarcha y para manualidades que van a ser manipuladas constantemente no es recomendable así que se me ocurrió ponerle pega blanca a la pieza luego de forrarla y dejo de soltar la escarcha.
***Note: The foami I used is the typical foami that releases the frost and for crafts that are going to be constantly manipulated is not recommended so I decided to put white glue to the piece after lining it and it stopped releasing the frost.

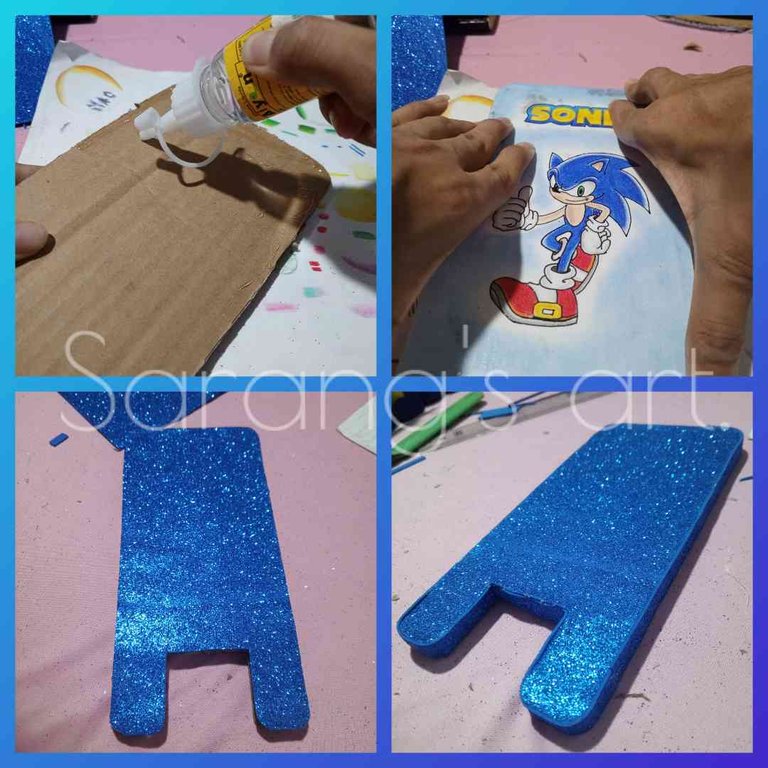
terminando de armar y forrar la base /finishing the assembly and lining of the base.
El siguiente paso fue terminar de armar la base pegando la pienza que contiene el dibujo a la otra pieza de cartón y forrando con foami azul escarchado, al igual que con la pienza anterior, aplique una capa de pega blanca para que dejara de soltar la escarcha.
The next step was to finish assembling the base by gluing the cardboard piece containing the drawing to the other piece of cardboard and lining it with blue frosted foami, as with the previous piece, I applied a layer of white glue to stop the frost from coming off.

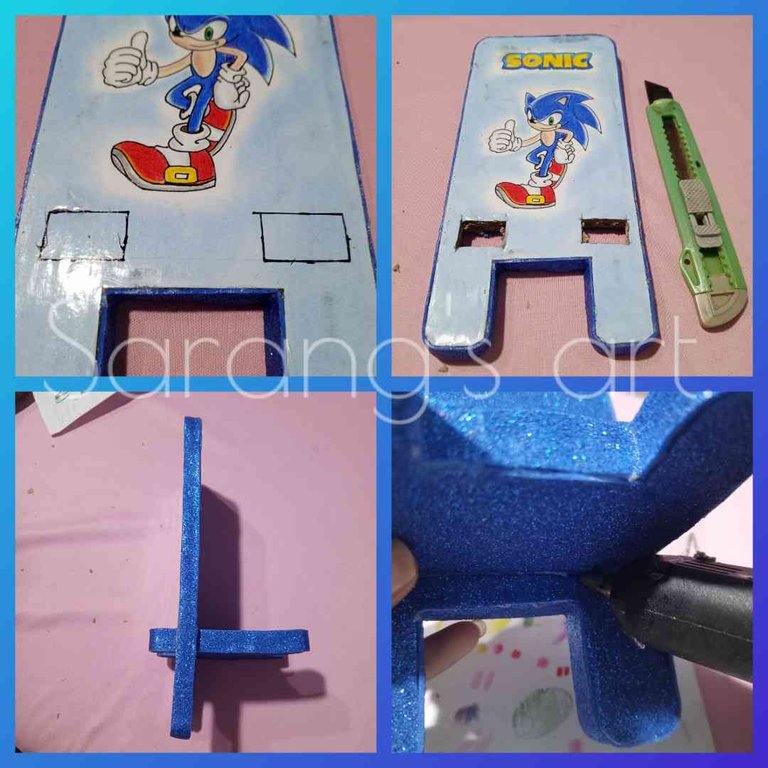
armado final del porta teléfono / Final assembly of the telephone holder.
Por último pero no menos importante, abrí los orificios por donde iba a introducir el soporte a la base, esto lo hice con el cuter y con mucha paciencia y miedo de arruinar todo lo que ya habia logrado. 😆🤭
Last but not least, I opened the holes where I was going to introduce the support to the base, this I did with the cutter and with a lot of patience and fear of ruining everything I had already achieved. 😆🤭
Luego introduje el soporte a la base y con silicón caliente procedí a fijarlo bien.
Then I introduced the support to the base and with hot silicone I proceeded to fix it well.

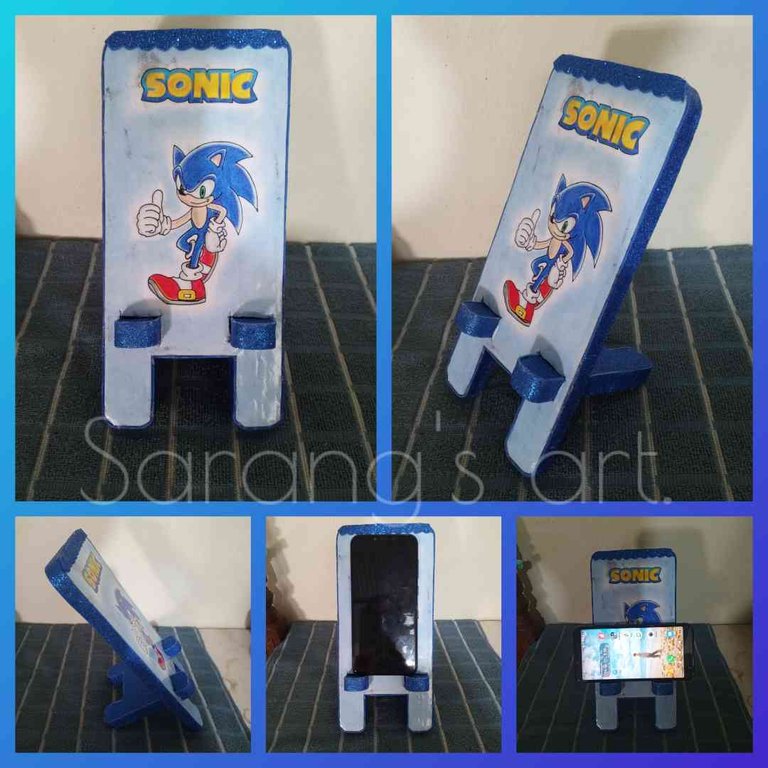
Y listo reto cumplido, porta teléfono terminado 🥹 fue todo un desafío, casi sentí que no lo iba a lograr que iba a perder el material pero gracias a Dios pude solucionar cada cosita y salir adelante con este proyecto que la verdad me encantó y quedé con las ganas de hacer otros y tratar de corregir los errores que cometí con este.
And that's it, challenge accomplished, finished phone holder 🥹 it was a challenge, I almost felt that I was not going to make it, that I was going to lose the material but thank God I was able to solve every little thing and get ahead with this project that I really loved and I wanted to do others and try to correct the mistakes I made with this one.
Espero que les haya gustado este post, quiero aprovechar para agradecerle todo el apoyo que me han dado hasta ahora, muchas gracias a las personitas que se toman el tiempo de leerme y déjarme un lindo comentario, de verdad es algo que significa mucho para mi, porque al estar en etapa de formación a veces es muy fácil desanimarse, pero cada lindo comentario y aooyo me sirve de motivación y me ayuda a seguir adelante, de todo corazón muchas gracias. 🥰 🫂
I hope you liked this post, I want to take this opportunity to thank you for all the support you have given me so far, thank you very much to the little people who take the time to read me and leave me a nice comment, it really means a lot to me, because being in training stage sometimes it is very easy to get discouraged, but every nice comment and aooyo serves as motivation and helps me to move forward, from the bottom of my heart thank you very much. 🥰 🫂

Nos vemos en un próximo post, que estén bien y Dios los bendiga, bye.🥰😘💜🌹🪷
See you in a next post, be well and God bless you, bye.🥰😘💜🌹🪷

Fotografías propias, tomadas con mi Tecno Spark 10 Pro editadas en incollage/ portada creada en Canva. Traducción al inglés con DeepL.
Own photos, taken with my Tecno Spark 10 Pro edited in incollage/ cover created in Canva. Translation to English with DeepL.


