Hola amigos, me complace mucho poder hacer vida en esta linda y creativa comunidad Hive Diy para compartir sobre lo que me gusta hacer en mis tiempos libres; adoro hacer manualidades porque es una manera de distraerme y relajarme, en dónde desarrollo mi lado creativo y mis habilidades.
En esta ocasión les comparto como elabore los dulceros de graduando para el compartir de fin de año escolar de mi niña.! Amablemente me ofrecí a hacerlos y entre todos los representantes compramos el material para darle un detalle a los 15 niños que pasaron de nivel.

Selfie con uno de los dulceros listo, Cantaura - Venezuela
Entre los materiales que utilice están los siguientes:
- Cartulina corrugada azul
- Cinta de regalo dorada
- Foami escarchado dorado, azul, fucsia y negro
- Foami blanco, piel, amarillo, azul oscuro
- Palitos de altura
- Cortina de fiesta (reciclada)
- Envases de plástico (reciclados)
- Papel de seda rosa, fucsia, azul claro, azul oscuro
- Silicón en barra
- Marcadores
Empecemos...
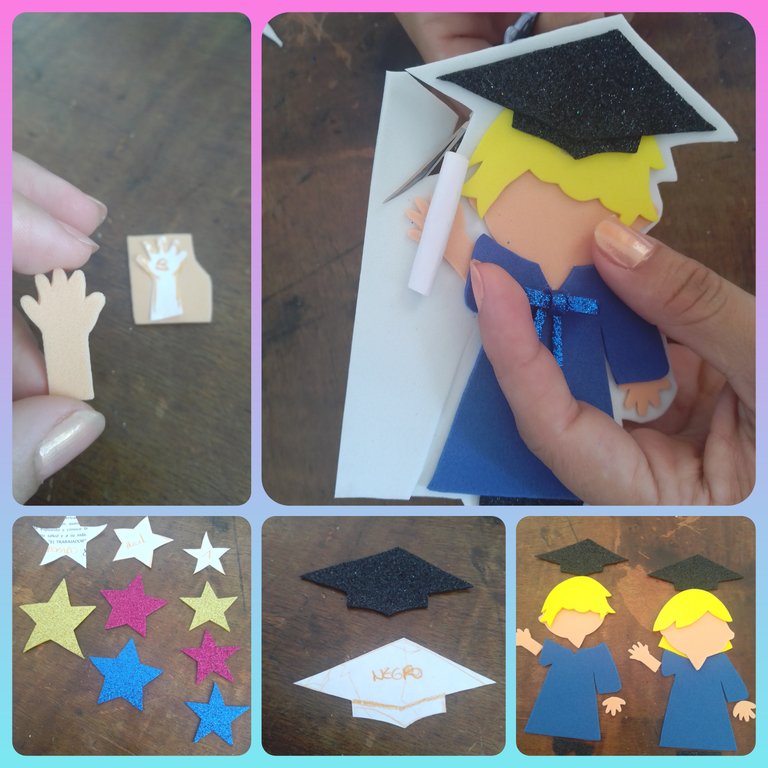
Lo primero que hice fue dibujar a mano alzada una figura de aproximadamente 8 cm de alto de un niño con toga y birrete, luego saque otro molde igual y recorte cada pieza para luego sacar cada parte en el foami del color correspondiente
También saque 3 tamaños de estrellas las cuales recorte en foami de diferentes colores y las reserve. Pegue todas las figuras en el foami blanco haciendo figuras de niña y de niño, luego recorte dejando un borde de 3 mm
Recortando cada figura en foami, Cantaura - Venezuela
Cuando ya tenía las figuras recortadas empecé a hacer los detalles para personalizarlos y que queden muy lindos; (esta parte es la que más disfruto realizar de todo el proceso ) dibuje con marcador su rostro y cabellos y a las niñas les peque una flor y zarcillos

Figuras de Niño y Niña graduando en foami, Cantaura - Venezuela
También recorte rectángulos de papel blanco y enrrolle para simular un diploma que pegue en una de sus manitos. Deje las figuras a un lado tratando de no apilarlos para que no se les fuera a correr el marcador

Forrando el envase de plástico, Cantaura - Venezuela
Seguidamente empecé a forrar los envases de plástico, en esta ocasión utilice envases de mantequilla y con la tijera recorte el borde para que quedara plano.
Forre con una tira de papel corrugado toda la circunferencia del envase, luego aplique silicón en la base y lo pegue sobre el papel corrugado y recorte. Para decorar utilice una cinta de regalo que pegue en todo el centro
haciendo los detalles para adornar el cotillón, Cantaura - Venezuela
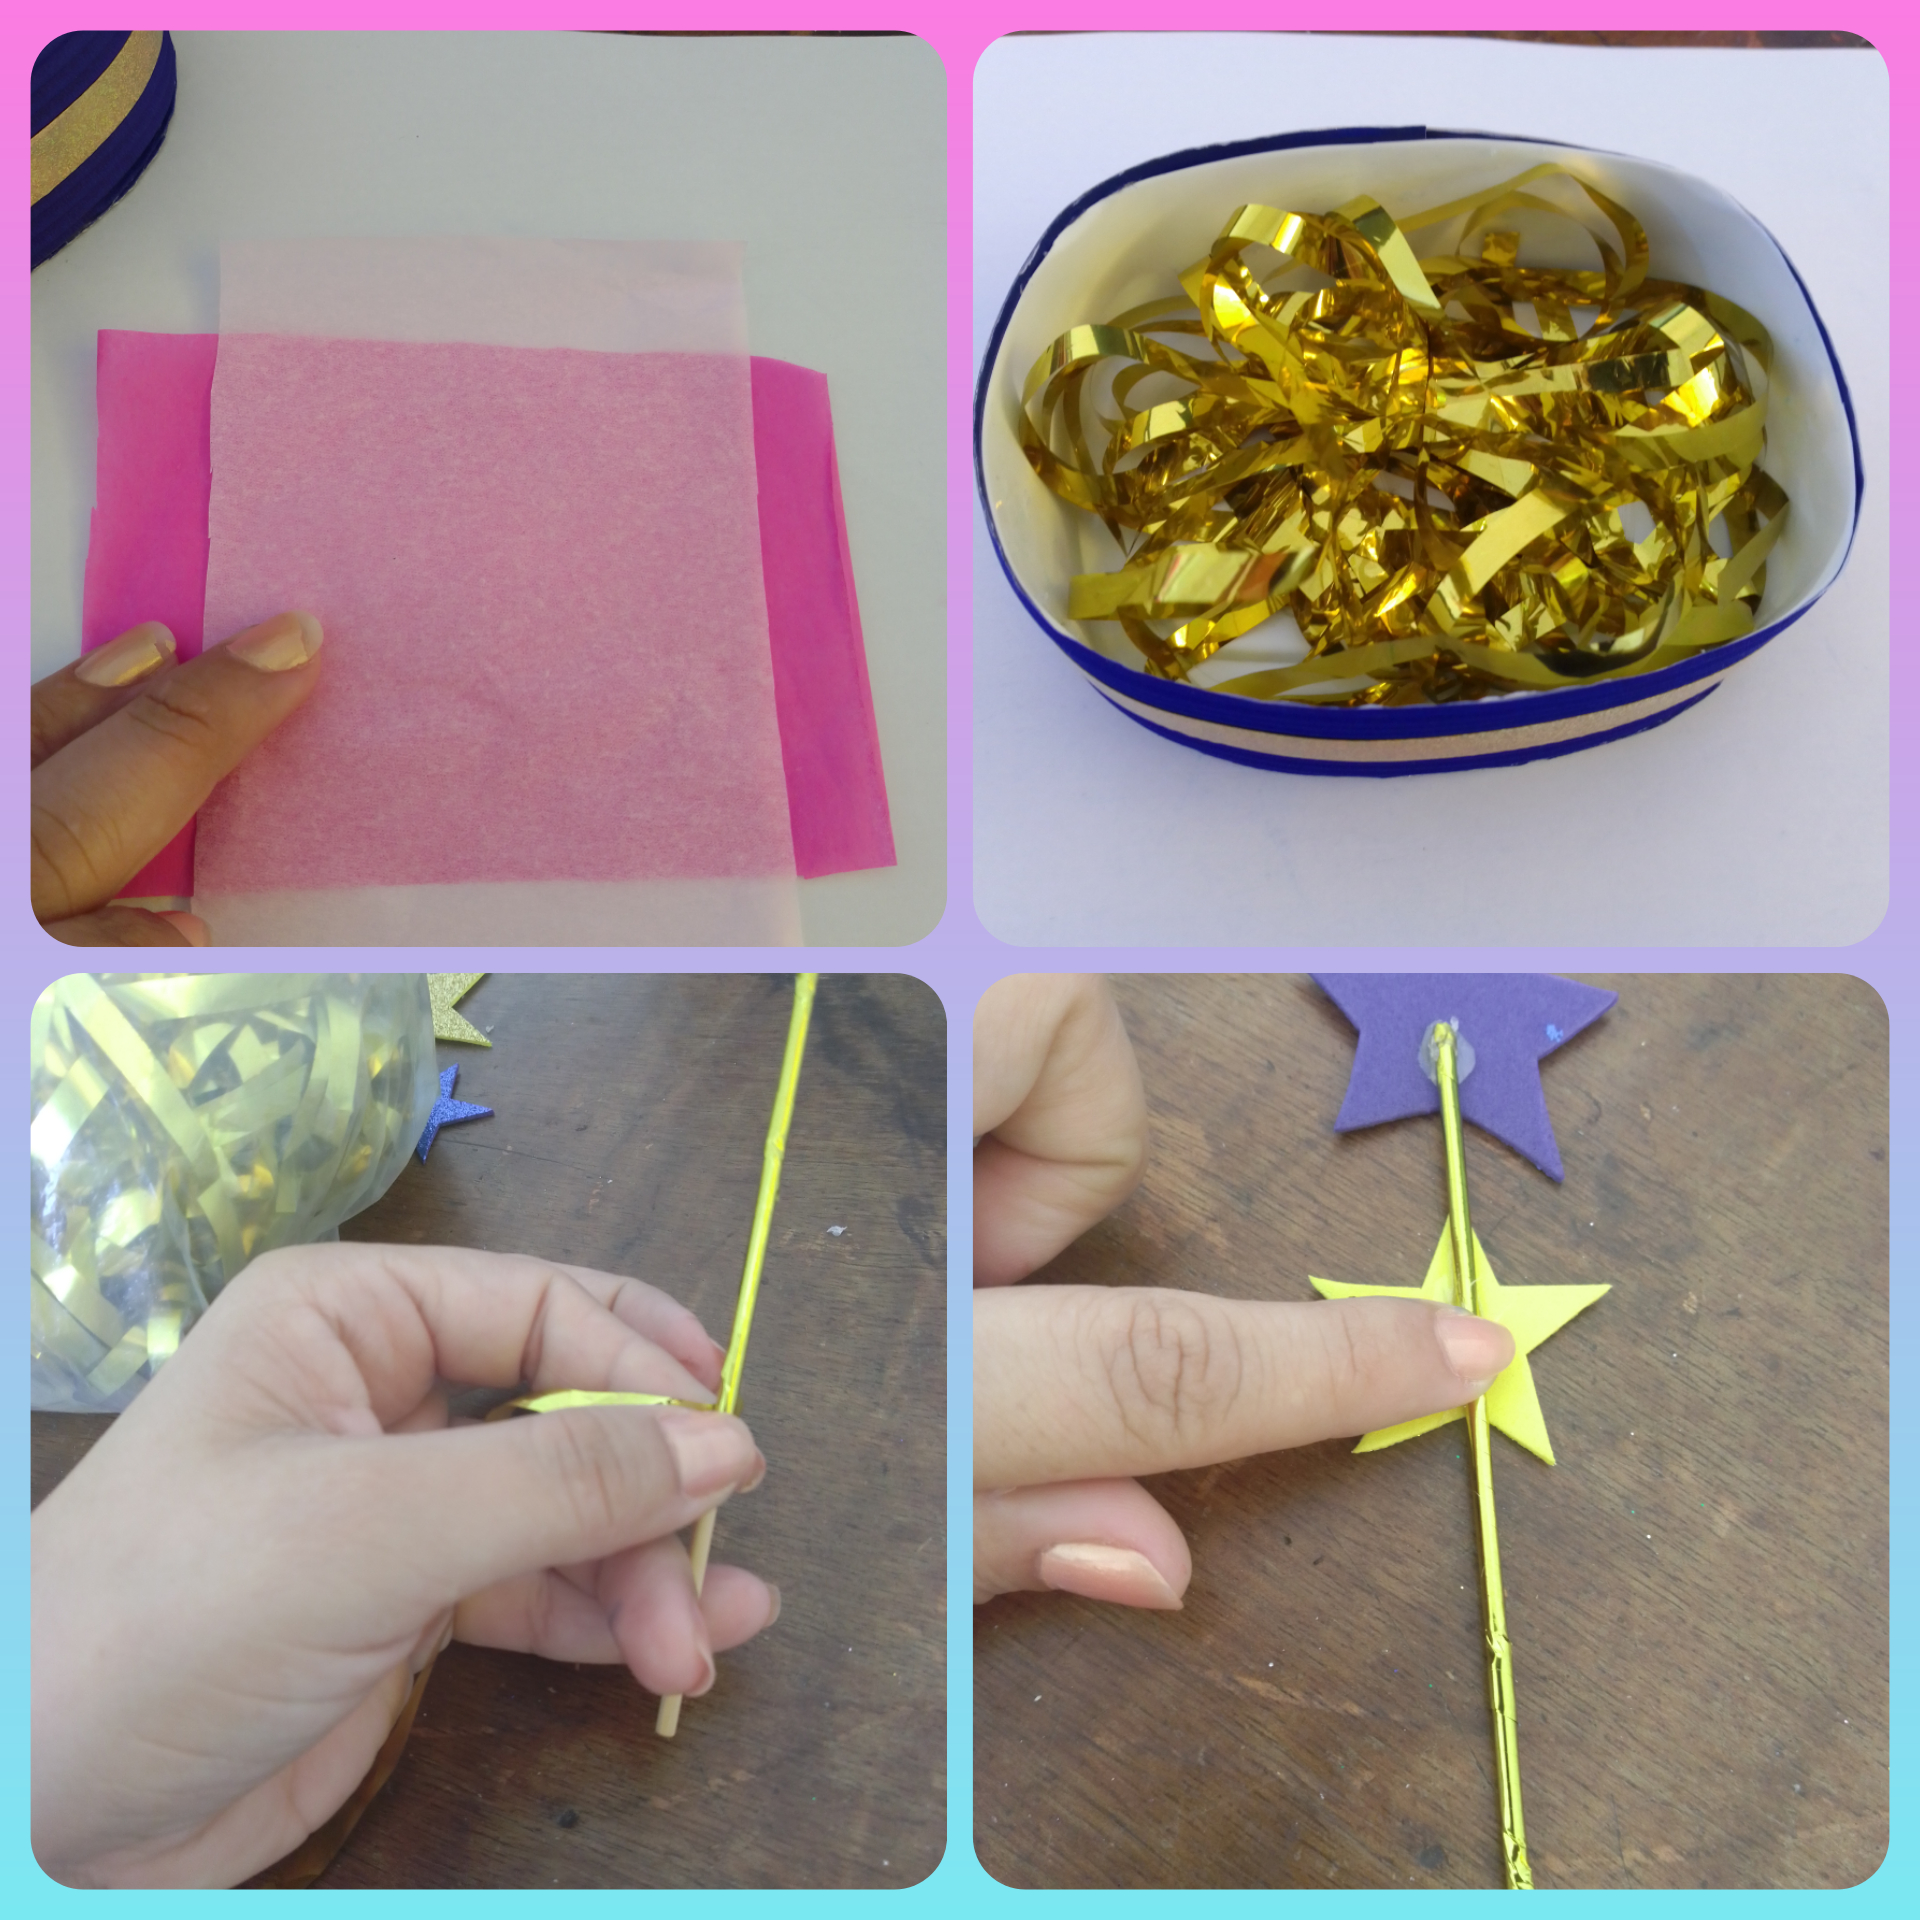
Luego empecé a realizar los otros detalles para adornar el dulcero o cotillón. Reutilice una cortina de fiesta para colocar unas tiras en la base, también forre los palitos de altura, en total utilice 3 por cada cotillón, el mas largo para pegar unas estrellas grandes, uno mediano para pegar las estrellas medianas y uno más corto para pegar la figura del graduando.
Por último decidí colocarle también papel de seda, para ello recorte dos rectángulos en dos tonos y los coloque uno horizontal y uno vertical, doble a la mitad para pegarlos en dos esquinas del envase
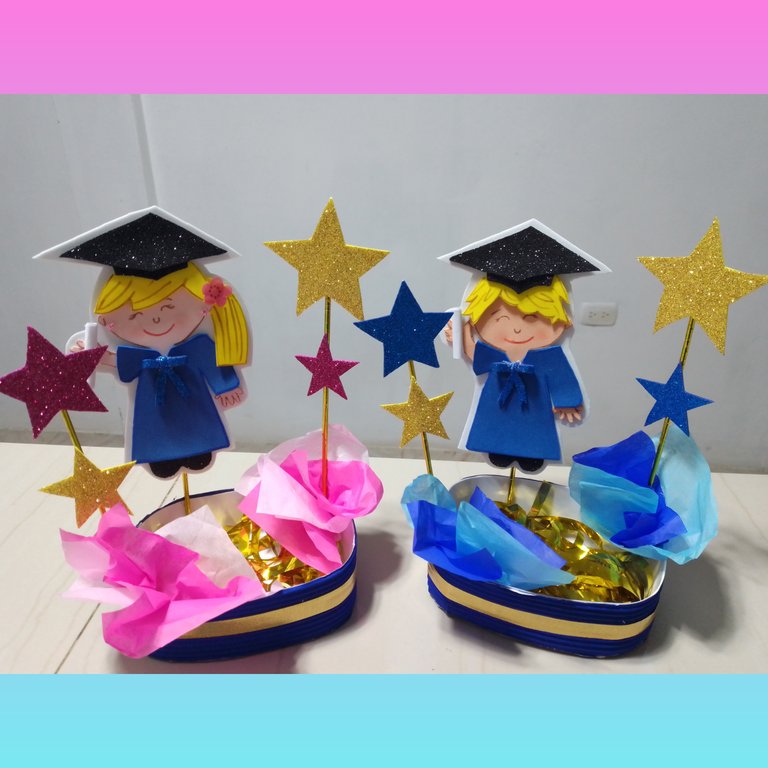
Resultado final: Cotillones de Niña y Niño graduando, Cantaura - Venezuela
El último paso fue pegar los adornos de estrellas, el papel de seda y la figura en foami a la base, usando los detalles en fucsia y rosa para las niñas y los detalles en azul claro y azul oscuro para los niños
Para mí fue muy entretenido realizar estos dulceros, y así solitos se veían hermosos, cómo eran pequeños con pocas chucherías se pudieron rellenar
Espero les haya gustado amigos, que tengan un lindo día
Todas las fotos son de mi autoría, collages realizados con la app inshot, teléfono Blade A7s, banner creado por mi en canva- Venezuela.

ENG
Hello friends, I am very pleased to be able to make life in this nice and creative community Hive Diy to share about what I like to do in my free time; I love to make crafts because it is a way to distract and relax, where I develop my creative side and my skills.
This time I share with you how I made the graduation candy for my little girl's end of the school year party! I kindly offered to make them and among all the representatives we bought the material to give a detail to the 15 children who passed the level.
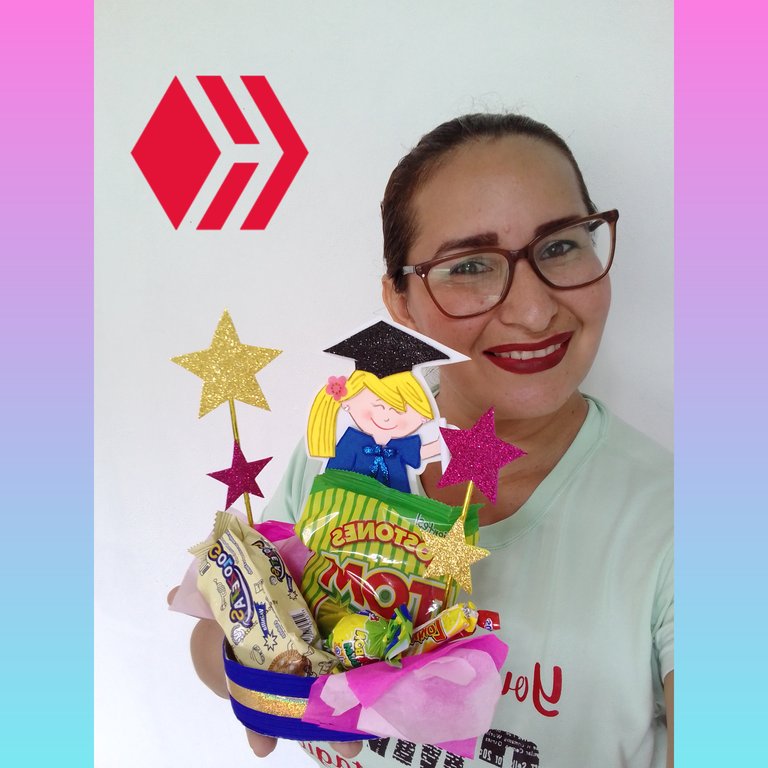
Selfie with one of the dulceros ready, Cantaura - Venezuela
Among the materials I used are the following:
- Blue corrugated cardboard
- Gold gift ribbon
- gold, blue, fuchsia and black frosted foami
- White, leather, yellow, yellow, dark blue foami
- Tall sticks
- Party curtain (recycled)
- Plastic containers (recycled)
- Tissue paper (pink, fuchsia, light blue, dark blue)
- Silicone stick
- Marker pens
Let's get started...
The first thing I did was to draw freehand a figure about 8 cm high of a boy with a cap and gown, then I drew another mold and cut out each piece and then draw each part in the corresponding color foami.
Also cut out 3 sizes of stars, cut them out in different colored foami and set them aside. Glue all the figures on the white foami making girl and boy figures, then cut out leaving a 3 mm border.

Cutting each figure in foami, Cantaura - Venezuela
When I had the figures cut out I started to make the details to personalize them and make them look very cute; (this part is what I enjoy the most of the whole process) I drew with marker their face and hair and the girls had a flower and tendrils.
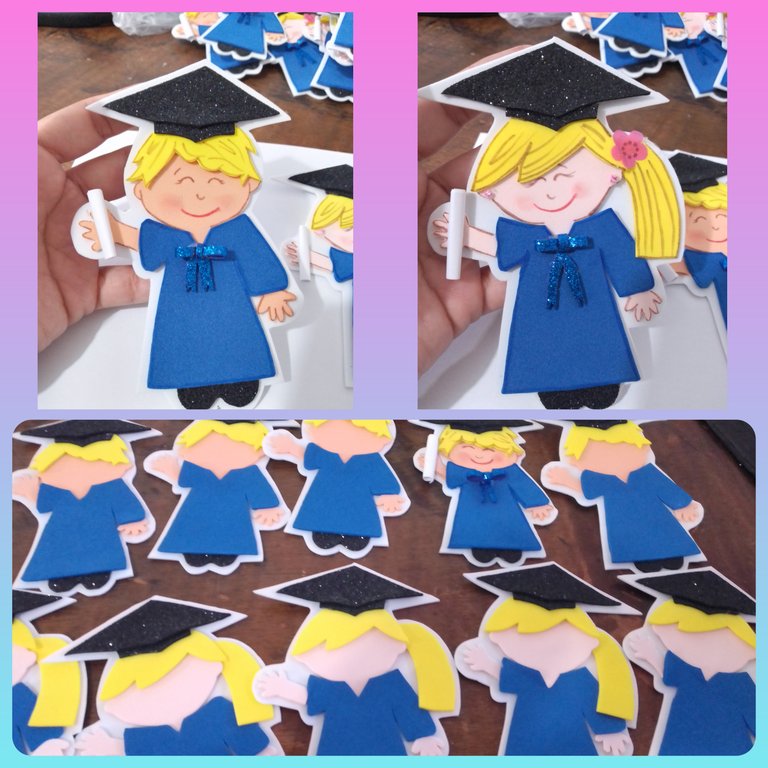
Figures of Boy and Girl graduating in foami, Cantaura - Venezuela
Also cut out rectangles of white paper and roll them up to simulate a diploma that you glue on one of their little hands. Put the figures aside trying not to pile them up so that the marker does not run.
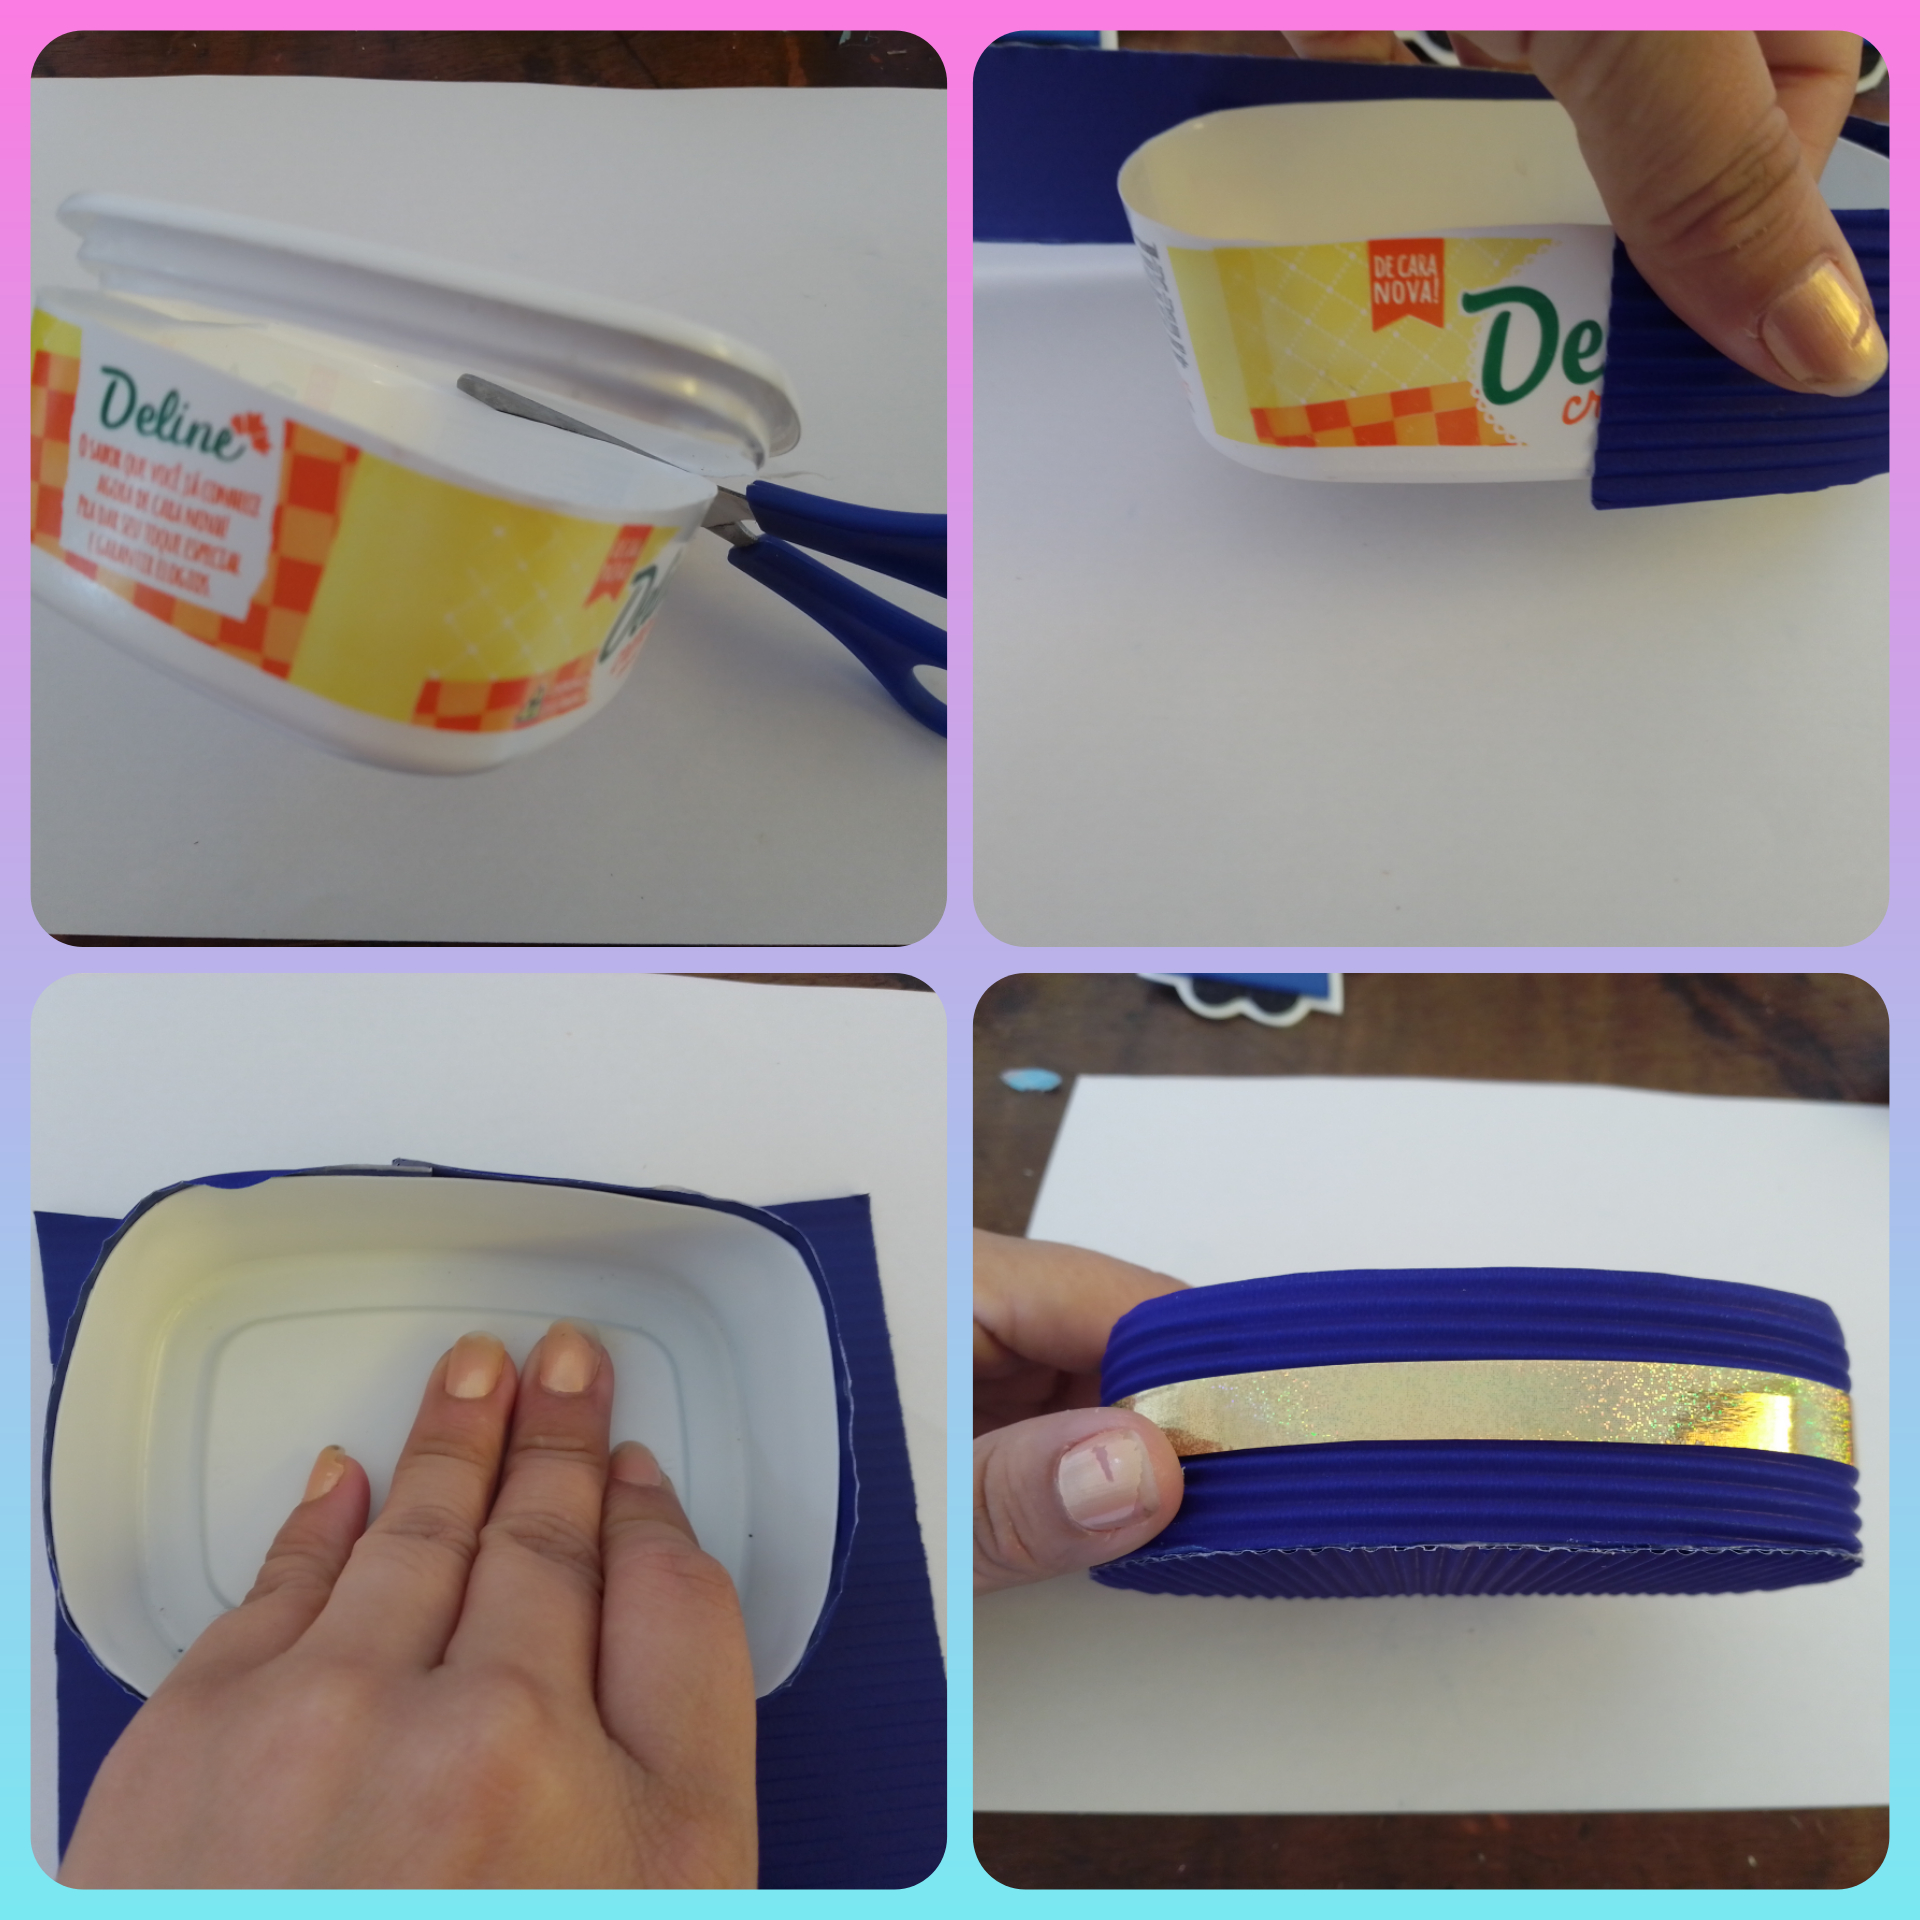
Forging the plastic container, Cantaura - Venezuela
Next I started to line the plastic containers, this time I used butter containers and with the scissors I cut the edge so that it would be flat.
I lined with a strip of corrugated paper the entire circumference of the container, then applied silicone on the base and glued it on the corrugated paper and trimmed. To decorate use a gift ribbon that you glue around the center.

making the details to decorate the cotillion, Cantaura - Venezuela
Then I started making the other details to decorate the candy box or cotillion. I reused a party curtain to place some strips on the base, I also lined the height sticks, in total I used 3 for each cotillion, the longest one to glue some big stars, a medium one to glue the medium stars and a shorter one to glue the figure of the graduating student.
Finally I also decided to put tissue paper, for this I cut out two rectangles in two tones and placed one horizontal and one vertical, folded in half to glue them in two corners of the container.
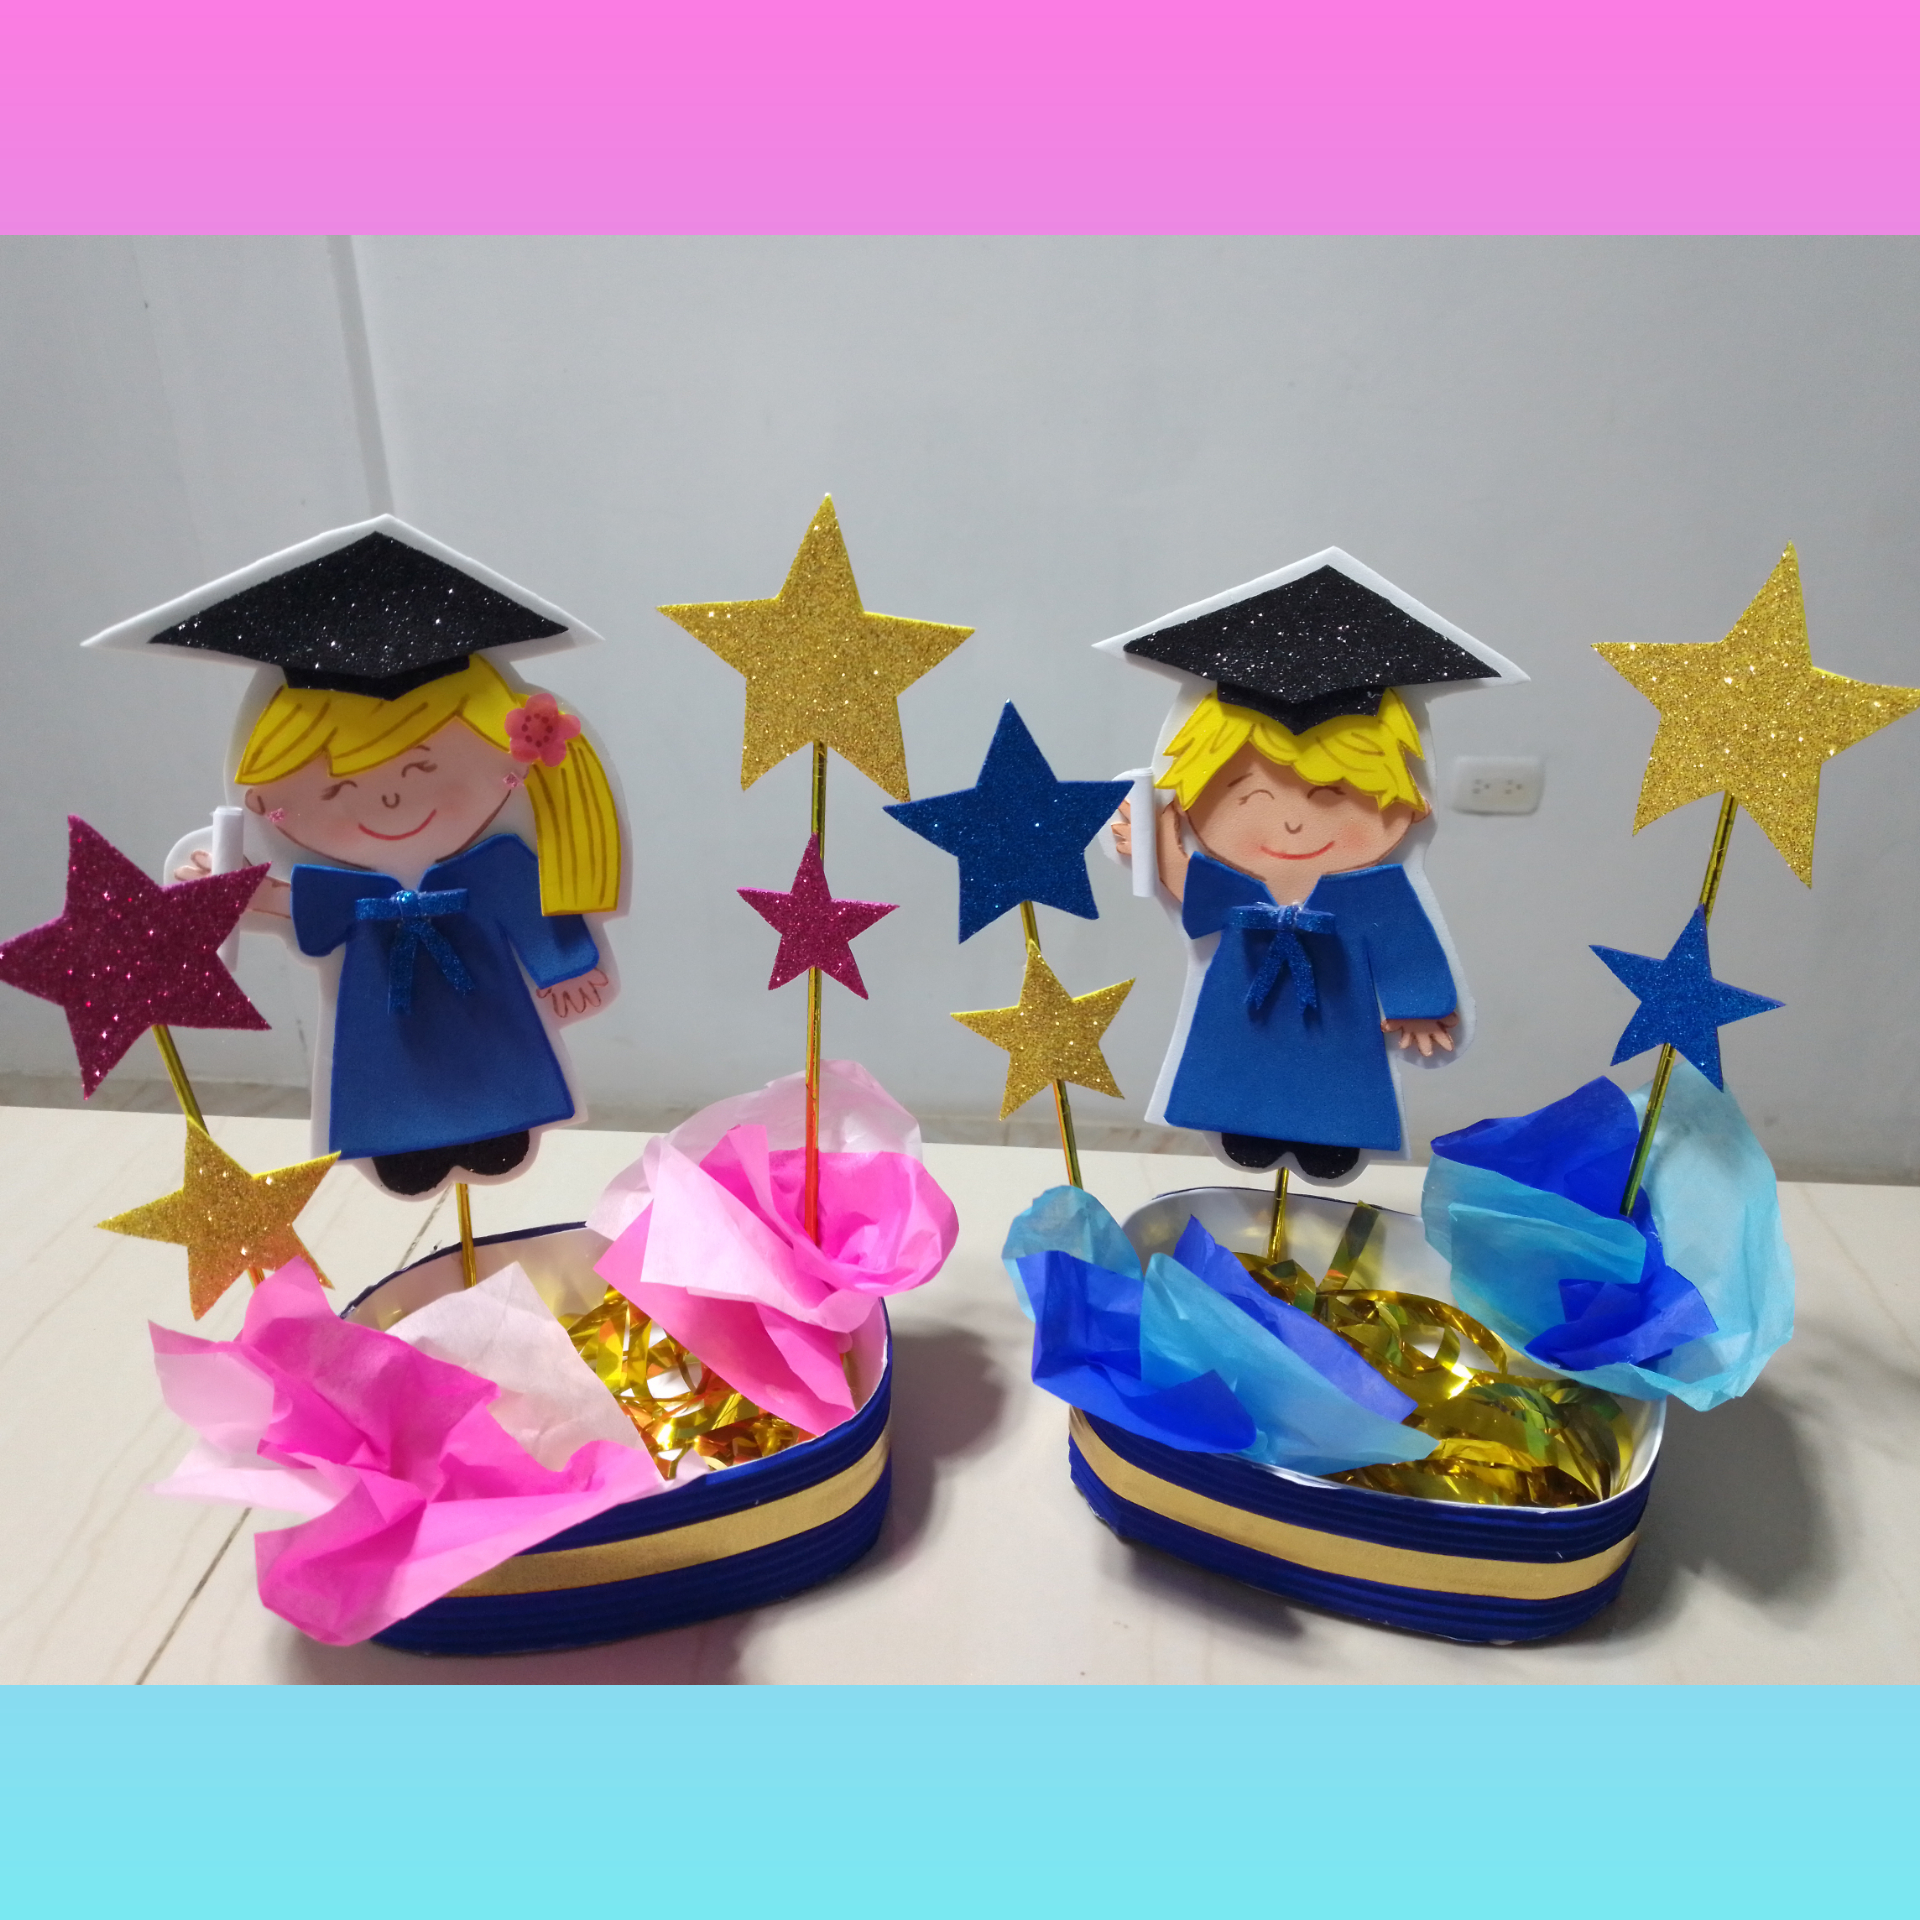
Final result: Cotillions of Girl and Boy graduating, Cantaura - Venezuela
The last step was to glue the star ornaments, the tissue paper and the foami figure to the base, using the details in fuchsia and pink for the girls and the details in light blue and dark blue for the boys.
It was a lot of fun for me to make these candy boxes, and they looked beautiful on their own, as they were small and could be filled with just a few candies.
I hope you liked it friends, have a nice day.
All photos are of my authorship, collages made with the inshot app, Blade A7s phone, banner created by me in canva. Deepl Translator version 1.2.2 - Venezuela