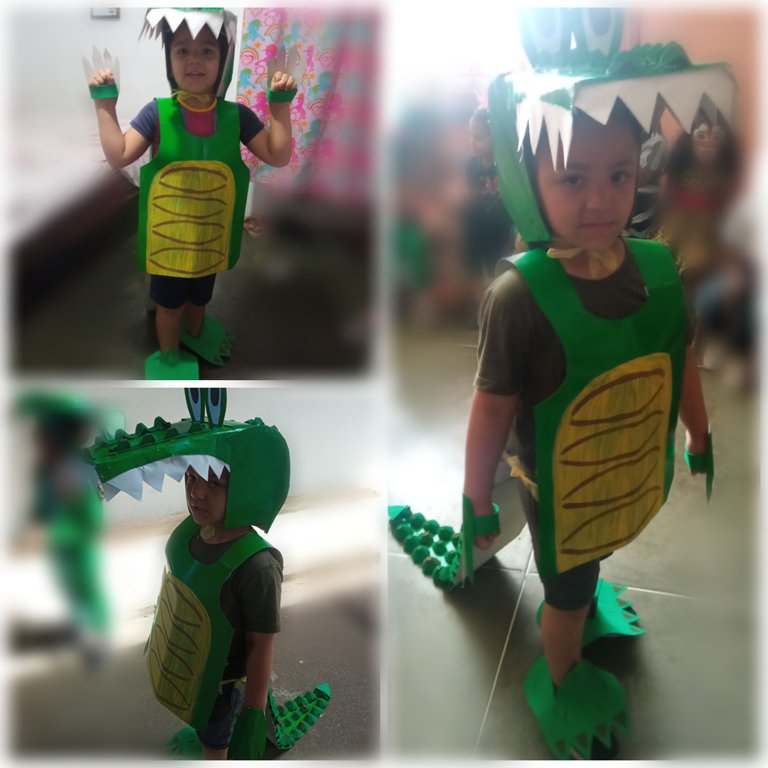
Hola hola amigos☺️ espero todos esten muy bien!! Hoy quiero mostrarles el paso a paso de este lindo Disfraz de cocodrilo con Materiales de Reciclaje que me tocó hacer para el cierre de proyecto de mi niño!!
Hello hello amigos☺️ I hope everyone is doing great!!! Today I want to show you the step by step of this cute Crocodile Costume with Recycling Materials that I got to make for my kid's project closing!!!!

Lo primero que debo decir es que el cierre fue hoy, y me sentí un poco molesta porque la maestra dijo "materiales reciclables" y no todas las mamás cumplieron eso, hubo muchos trajes super elaborados, de tela y demas, nada reciclado, me dio rabia porque yo tambien pude hacer el esfuerzo y tener un traje mas elaborado para mi chiqui, pero bueno despues pense con cabeza fria y me di cuenta que este disfraz a pesar de ser con cartulina y Cartones de huevo, tiene el ingrediente principal para que las cosas salgan bien y es el AMOR🥰 yo le comenté a mi madre este fin de semana lo que tenia que hacerle y no dudo en ponerse a la orden para ayudarme, cosa que agradezco mucho porque lo que parecia sencillo, llevó bastante tiempo y sin duda necesitaba de 2 manos mas jeje pero bueno aca les dejo un breve resumen de como fue que hicimos este disfraz 👇👇
The first thing I must say is that the closing was today, and I felt a little upset because the teacher said "recyclable materials" and not all moms met that, there were many super elaborate costumes, fabric and others, nothing recycled, I was angry because I could also make the effort and have a more elaborate costume for my chiqui, but well then I thought with a cool head and I realized that this costume despite being with cardboard and egg cartons, I told my mother this weekend what I had to do and she did not hesitate to help me, which I am very grateful because what seemed simple, took quite some time and certainly needed 2 more hands hehe but well here is a brief summary of how we did this costume 👇👇👇

MATERIALES:
🐊 4 Cartulinas doble fas Verde
🐊 3 Cartones de Huevo
🐊 Pintura Marron
🐊 Pintura Verde
🐊 Pintura Amarilla
🐊 1 Foami Verde
🐊 1 metro y medio de Cinta Amarilla
🐊 Cartulina Blanca
🐊 Tijeras
🐊 Silicon
🐊 Carton
MATERIALS:
🐊 4 double fas cardstock Green
🐊 3 Egg Cartons
🐊 Brown paint
🐊 Green Paint
🐊 Yellow Paint
🐊 1 Green Foami
🐊 1 meter and a half of Yellow Tape
🐊 White cardboard
🐊 Scissors
🐊 Silicon
🐊 Cardboard

Okey lo primero que hicimos fue tomar las medidas de la cabeza de mi hijo, tanto el ancho como el largo de lo que seria la cabeza de nuestro cocodrilo, que tendria 3 tapas, dos de las lados y una larga en el centro que las uniria, por supuesto hicimos el molde primero en una hoja para luego marcar en la cartulina y ya luego unimos las partes con Silicon
Okey the first thing we did was to take the measurements of my son's head, both the width and length of what would be the head of our crocodile, which would have 3 caps, two of the sides and a long one in the center that would join them, of course we made the mold first on a sheet to then mark on the cardboard and then we joined the parts with Silicon.
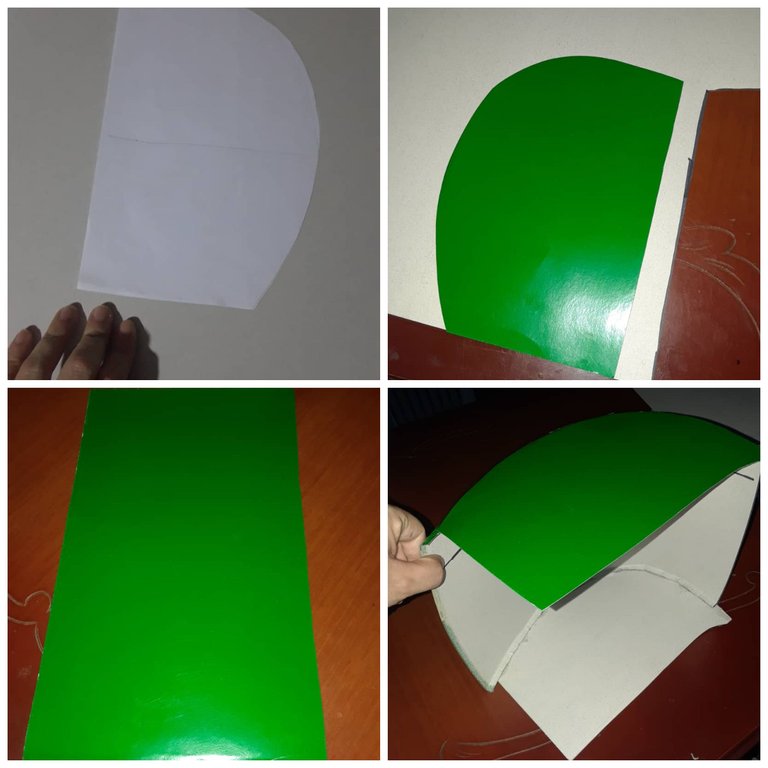

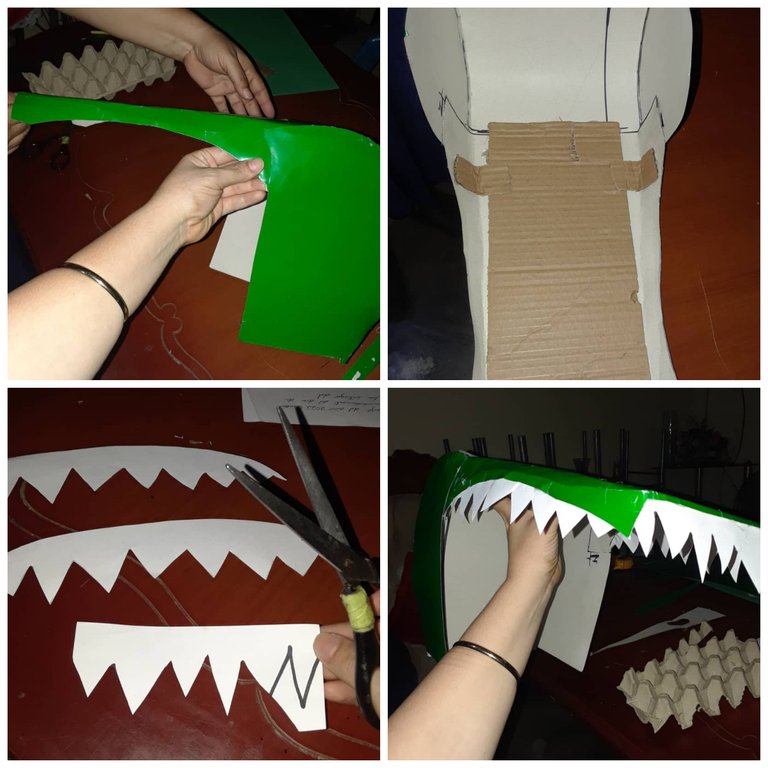
El siguiente paso seria hacer la parte larga de la trompa, en la imagen de la que me guie se veia asi. Solo con una parte, digamos la parte de abajo iba a ser la cara de mi hijo, pero aca nos tardamos muchísimo y en lo magullado de la cartulina se nota jeje porque le dimos muchas formas hasta lograr encajarla de lo que pensamos era la mejor manera, dejando una pequeña curva donde irian los dienten que piqué en la cartulina blanca, y luego la parte larga la fortalecimos con un pedazo de carton porque habia quedado muy fragil
The next step would be to make the long part of the trunk, in the image I used as a guide it looked like this. Only with one part, let's say the bottom part was going to be my son's face, but here it took us a long time and the bruised cardboard shows it hehe because we gave it many shapes until we managed to fit it in what we thought was the best way, leaving a small curve where the teeth would go that I cut in the white cardboard, and then the long part we strengthened it with a piece of cardboard because it was very fragile.

Luego toco hacerle los ojos. Y para esto cortamos la forma en cartulina verde, luego una mas pequeña en hoja blanca y por ultimo hicimos la parte negra con marcador, le hicimos un pequeño doblé para poder pegarlos a la cabeza con ayuda del silicon, y para que fuese tomando la forma fe cocodrilo corte la orilla de los cartones de huevo, la pinte de verde y puse 2 hileras adelante y 3 en la parte trasera de la cabeza 🥰 la cabeza ya casi estaba lista, solo faltaba como aguantarsela y para esto corté la cinta amarilla y le pegué un poco de cada lado para hacerle un nudito debajo de su cuello que ayudara a sostener (ese paso se los debo)
Then it was time to make the eyes. And for this we cut the shape in green cardboard, then a smaller one in white paper and finally we made the black part with marker, we made a small fold to glue them to the head with the help of silicone, and to take the crocodile shape I cut the edge of the egg cartons, I painted it green and put 2 rows at the front and 3 at the back of the head 🥰 the head was almost ready, I just needed how to hold it and for this I cut the yellow tape and glued a little on each side to make a little knot under his neck to help him hold (I owe you that step).
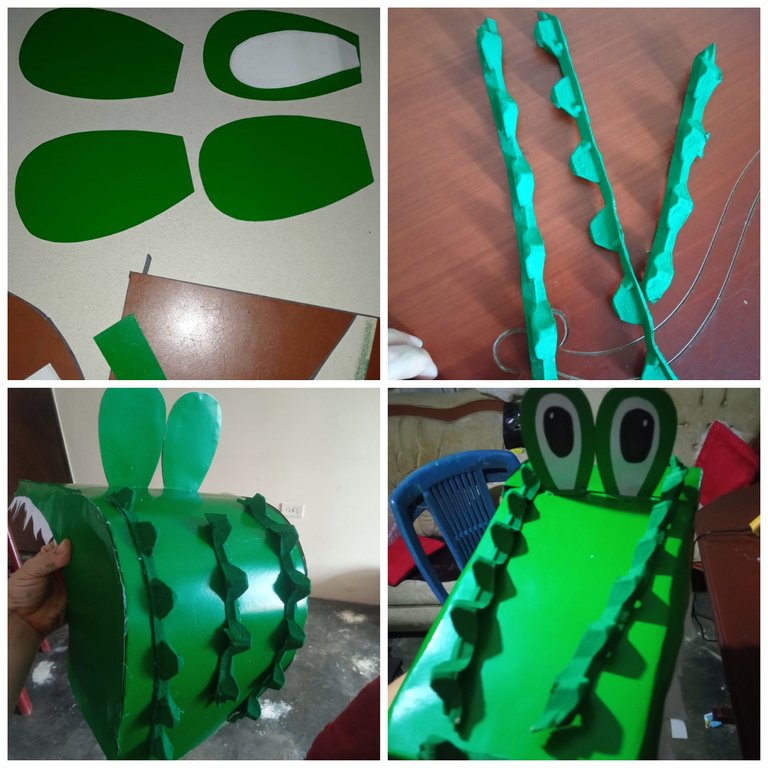

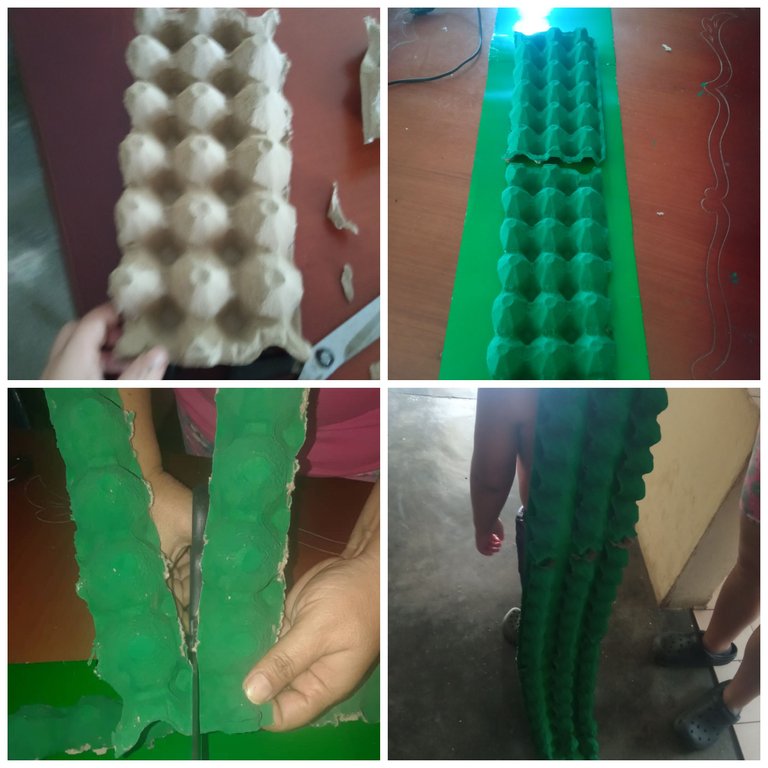
Pero ya lista la cabeza venia el cuerpo asi que cortamos la cartulina en forma de chaleco, pero dividido para unirlo a los lados con cinta, ya que era muy complicado ponerselo haciendolo de otra forma!! Asi que cortamos las dos capas que tambien fortalecimos con carton y en la capa de atras pegamos una larga cola con cartulina verde a la que por encima le pusimos los cartones de huevo pintados de verde, decidimos cortarlo y ponerlo en 3 tiras, visualmente esta mas delicado
But once the head was ready, the body was ready, so we cut the cardboard in the shape of a vest, but divided it to join it to the sides with tape, since it was very complicated to put it on otherwise! So we cut the two layers that we also strengthened with cardboard and in the back layer we glued a long tail with green cardboard to which we put the egg cartons painted in green, we decided to cut it and put it in 3 strips, visually this more delicate.

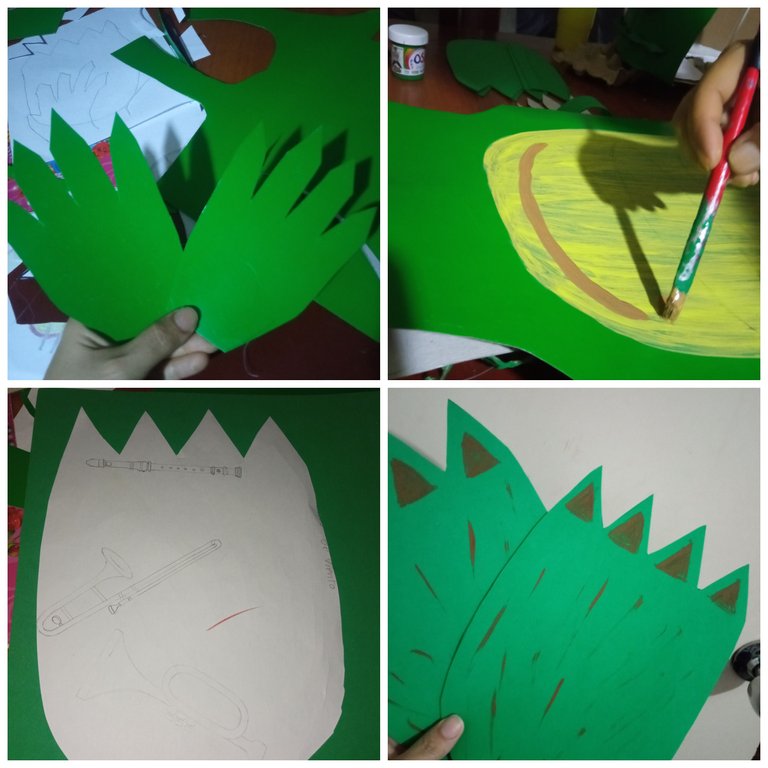
Ya para terminar pintamos de amarillo la parte de adelante del cocodrilo y le hicimos las patas, para lo que usé foami, haciendo con pintura marron las pesuñas, las patas delanteras si las hice con cartulina y por debajo le pegué una tira de foami para que el pudiera ponersela en los puñitos
Finally we painted the front of the crocodile yellow and we made the legs, for which I used foami, making the paws with brown paint, the front legs I made them with cardboard and underneath I stuck a strip of foami so he could put it on the cuffs.
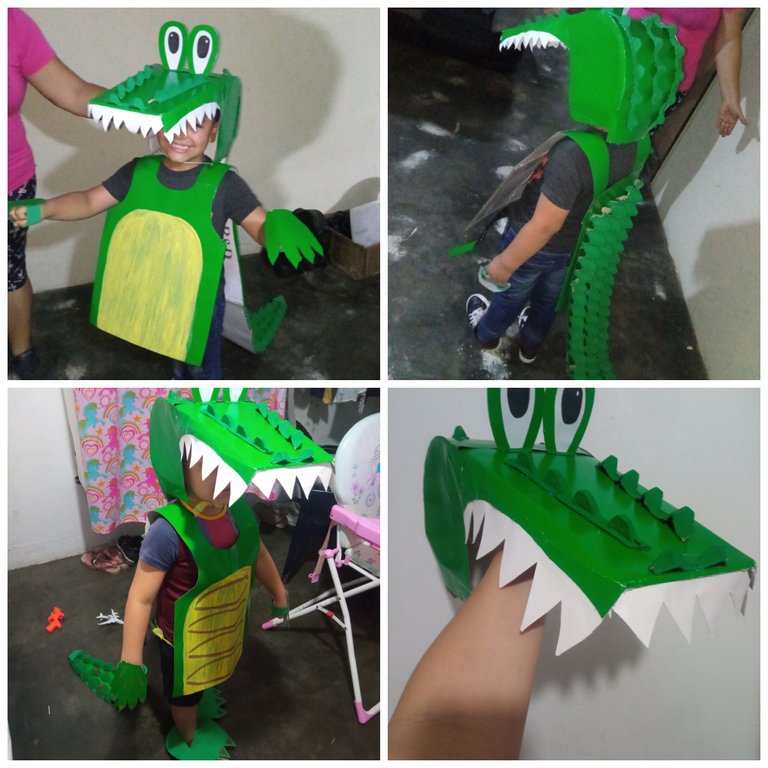
Y finalmente estaba listo nuestro disfraz de cocodrilo ☺️🥰 fue un poco estresante no les miento porque pegar algunas piezas parecia facil en nuestra cabeza pero la realidad era otra jeje pero una vez que tuvo todo puesto, el esfuerzo valio la pena, mi chiquito estaba feliz y hasta se metio en el papel jaja con cara de cocodrilo feroz 😂
And finally our crocodile costume was ready ☺️🥰 it was a little stressful I'm not lying to you because gluing some pieces seemed easy in our head but the reality was different hehe but once he had everything in place, the effort was worth it, my little boy was happy and even got into the role haha with a fierce crocodile face 😂.

Si un dia les tpca hacer uno similar, espero este pequeño tutorial les sirva❣️
If one day you have the chance to make a similar one, I hope this little tutorial will help you sirva❣️

Todas las fotos las tomé con mi Redmi 9
Portada editada en PicsArt
All photos taken with my Redmi 9
Cover edited in PicsArt

