🎨Hoja de color verde y naranja.//Green and orange leaves
 PASO A PASO // STEP BY STEP
🧿🧿🧿🧿🧿🧿🧿🧿🧿🧿
PASO 1 // STEP 1
🧿🧿🧿🧿🧿🧿🧿🧿🧿🧿
PASO A PASO // STEP BY STEP
🧿🧿🧿🧿🧿🧿🧿🧿🧿🧿
PASO 1 // STEP 1
🧿🧿🧿🧿🧿🧿🧿🧿🧿🧿
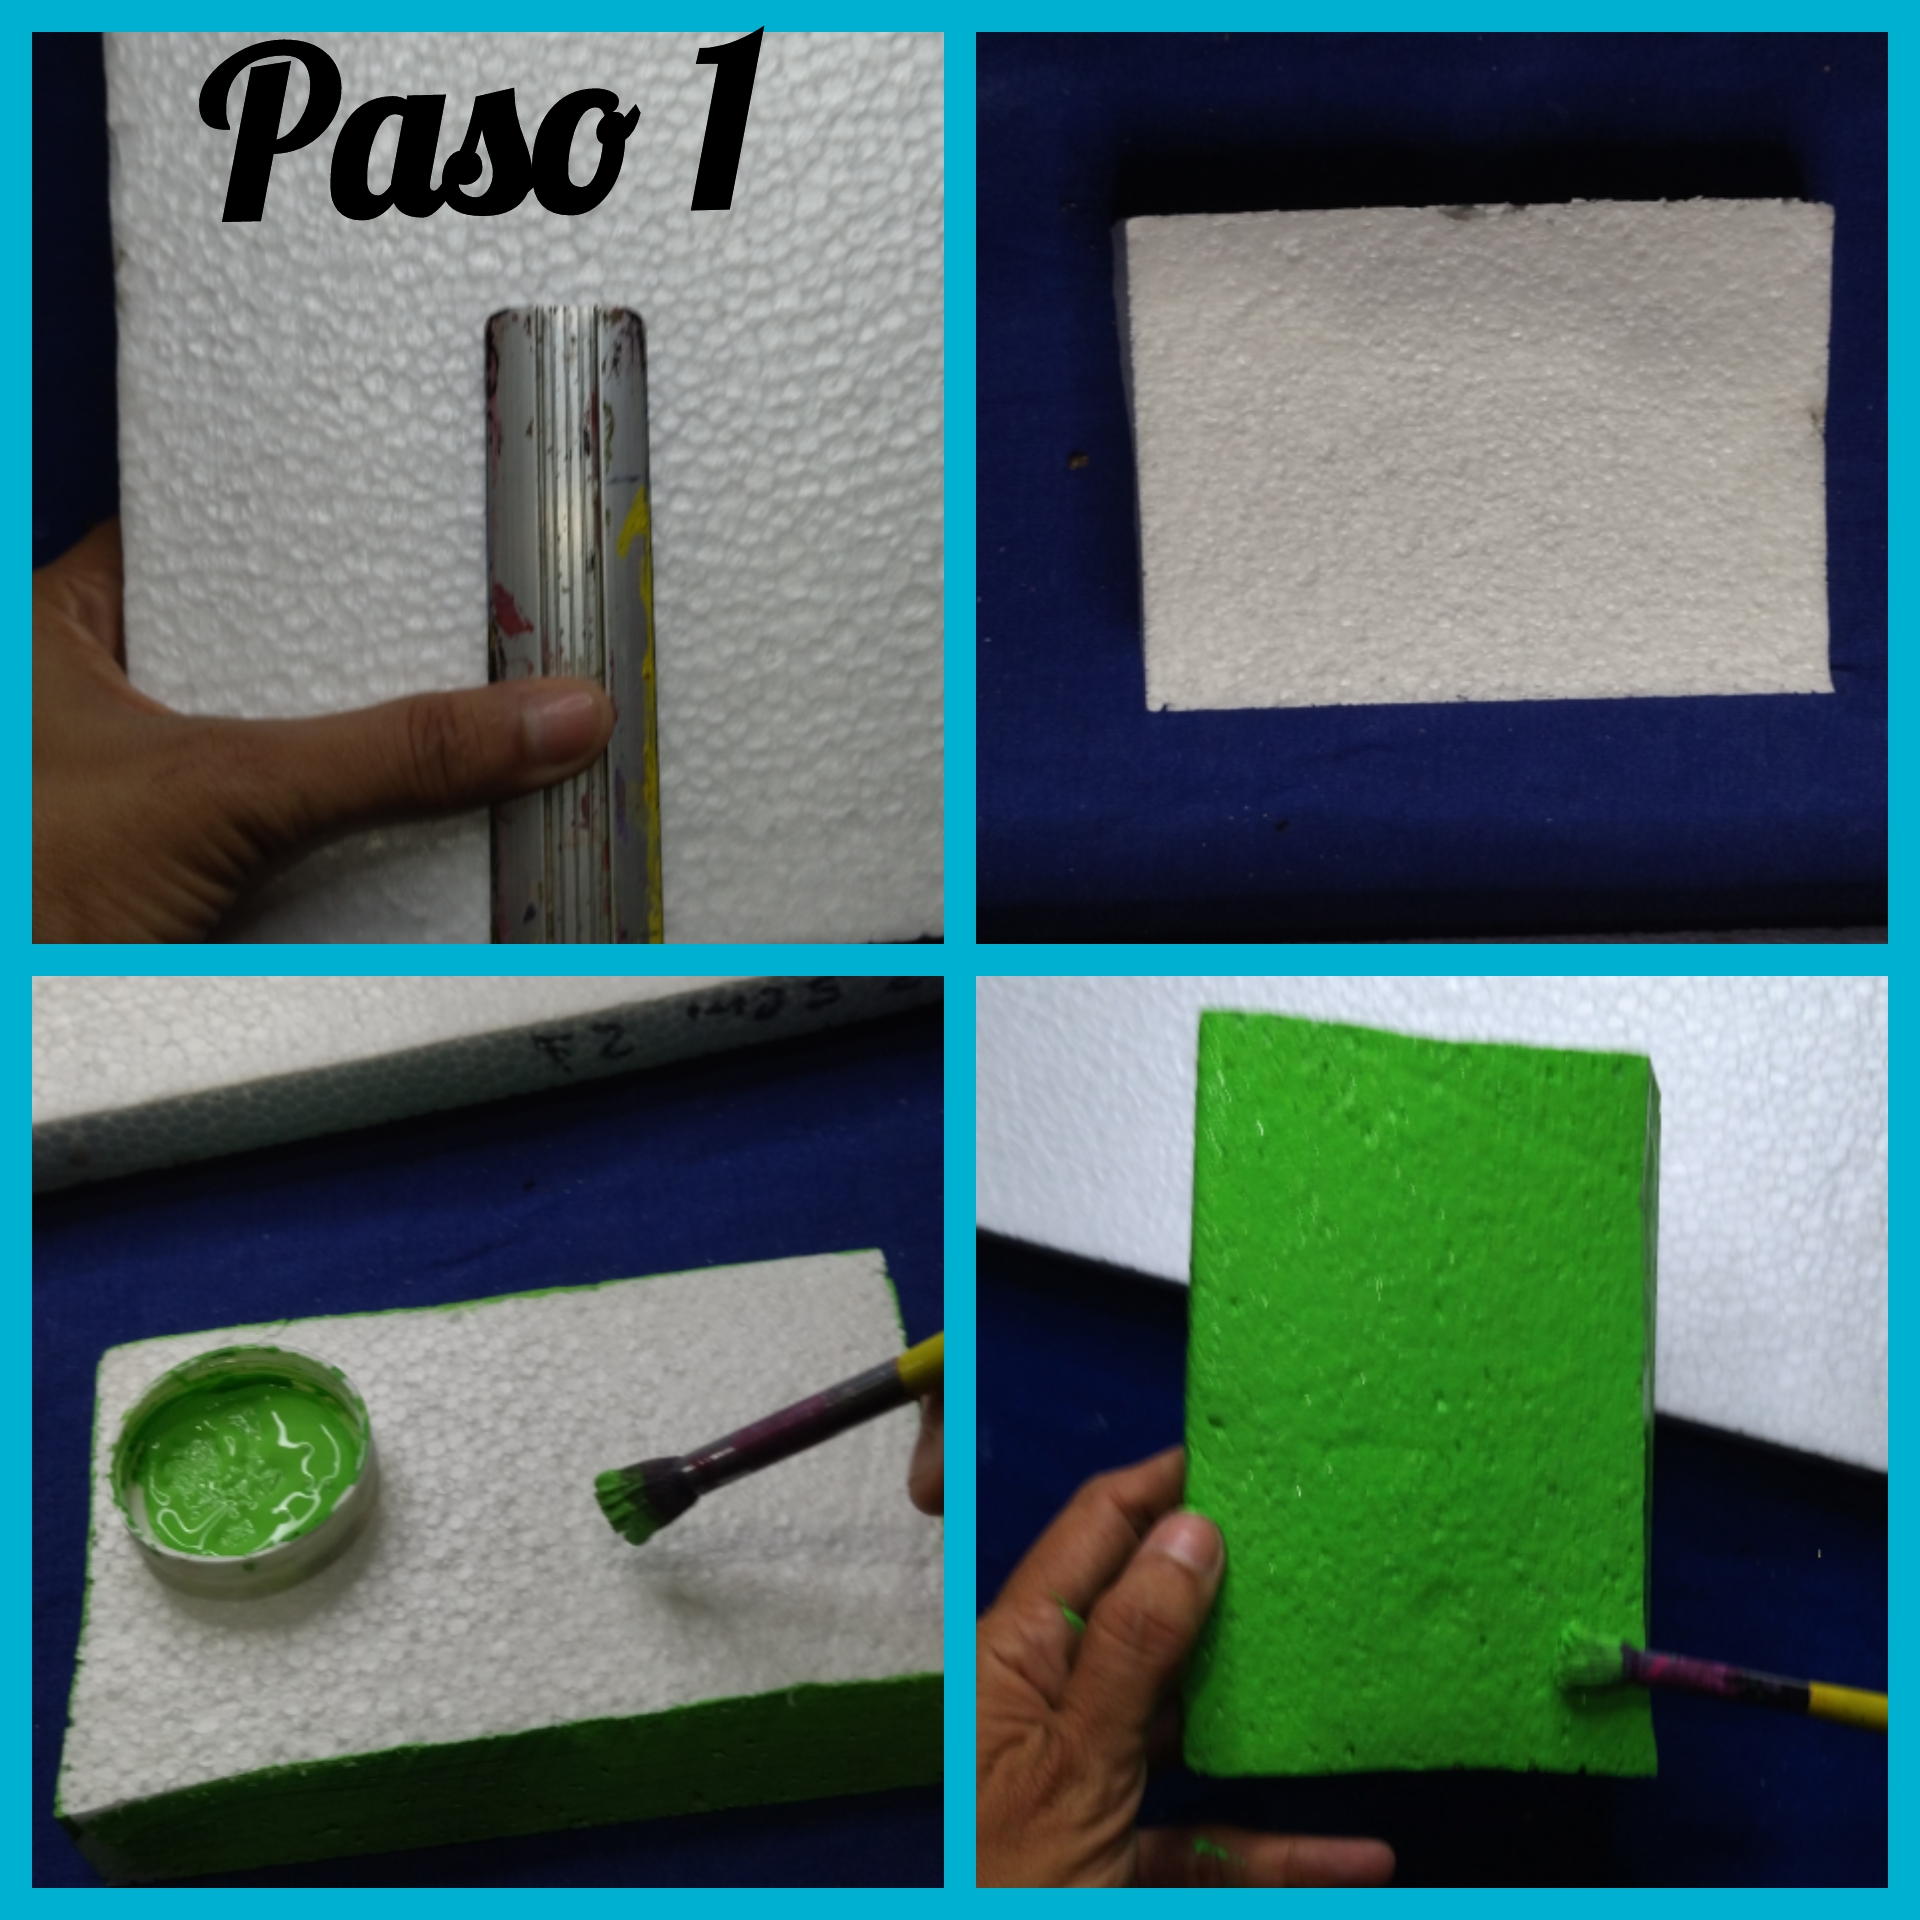
Tome el trozo de anime y marque con una regla y con ayuda de la cuchilla picamos un especie de rectángulo, aunque lo deje con una forma poco uniforme, ya que esto vendrá a ser la grama dónde vamos a recrear nuestra escena.
Take the piece of anime and mark it with a ruler and with the help of the knife we cut a kind of rectangle, although we leave it with a little uniform shape, since this will be the grass where we are going to recreate our scene.
Cuando ya lo tenemos picado tomamos un poco de pintura verde y cubrimos por completo el trocito de anime y lo dejamos secar bien.
When we have it chopped, we take some green paint and cover the anime piece completely and let it dry well.
 PASO 2 // STEP 2
🧿🧿🧿🧿🧿🧿🧿🧿🧿🧿
PASO 2 // STEP 2
🧿🧿🧿🧿🧿🧿🧿🧿🧿🧿
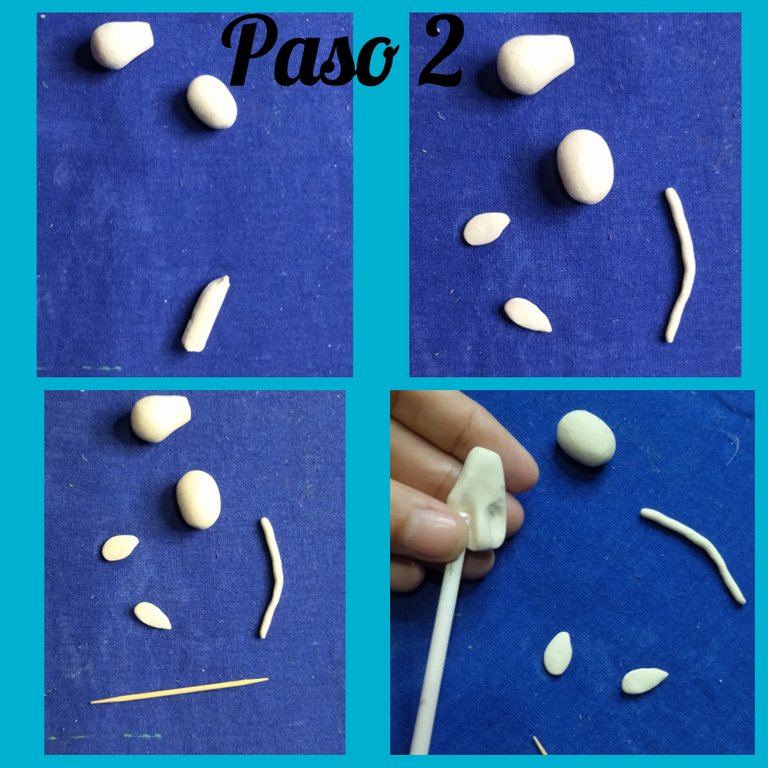
Luego tomamos la plastilina blanca y vamos a comenzar a darle forma a nuestro primer personaje, para esto dividí la plastilina. Primero hice una bolita y luego la hice ovalada, esto será la cabecita, la otra pelotita de plastilina debe ser un poco más grandecita,a esta pieza le vamos a dar la forma de pera para que sea el cuerpo y con ayuda de un pincel fino le hice dos divisiones como se aprecia en la foto para ayudar asi a formar las patitas.
Then we take the white plasticine and we are going to start shaping our first character, for this I divided the plasticine. First I made a little ball and then I made it oval, this will be the little head, the other little ball of plasticine should be a little bigger, to this piece we are going to give the shape of a pear to be the body and with the help of a fine brush I made two divisions as shown in the photo to help form the legs.
Tome dos pedacitos bastante chiquitos y los hacemos en forma de lágrimas para que sean las orejas de mi primer personaje,y finalmente tome un trocito y lo amase hasta formar un rollito largo pero redondo que vendrá a ser la cola del gato.
I took two small pieces and made them in the shape of tears to be the ears of my first character, and finally I took a small piece and kneaded it to form a long but round roll that will become the cat's tail.
 PASO 3 // STEP 3
🧿🧿🧿🧿🧿🧿🧿🧿🧿🧿
PASO 3 // STEP 3
🧿🧿🧿🧿🧿🧿🧿🧿🧿🧿
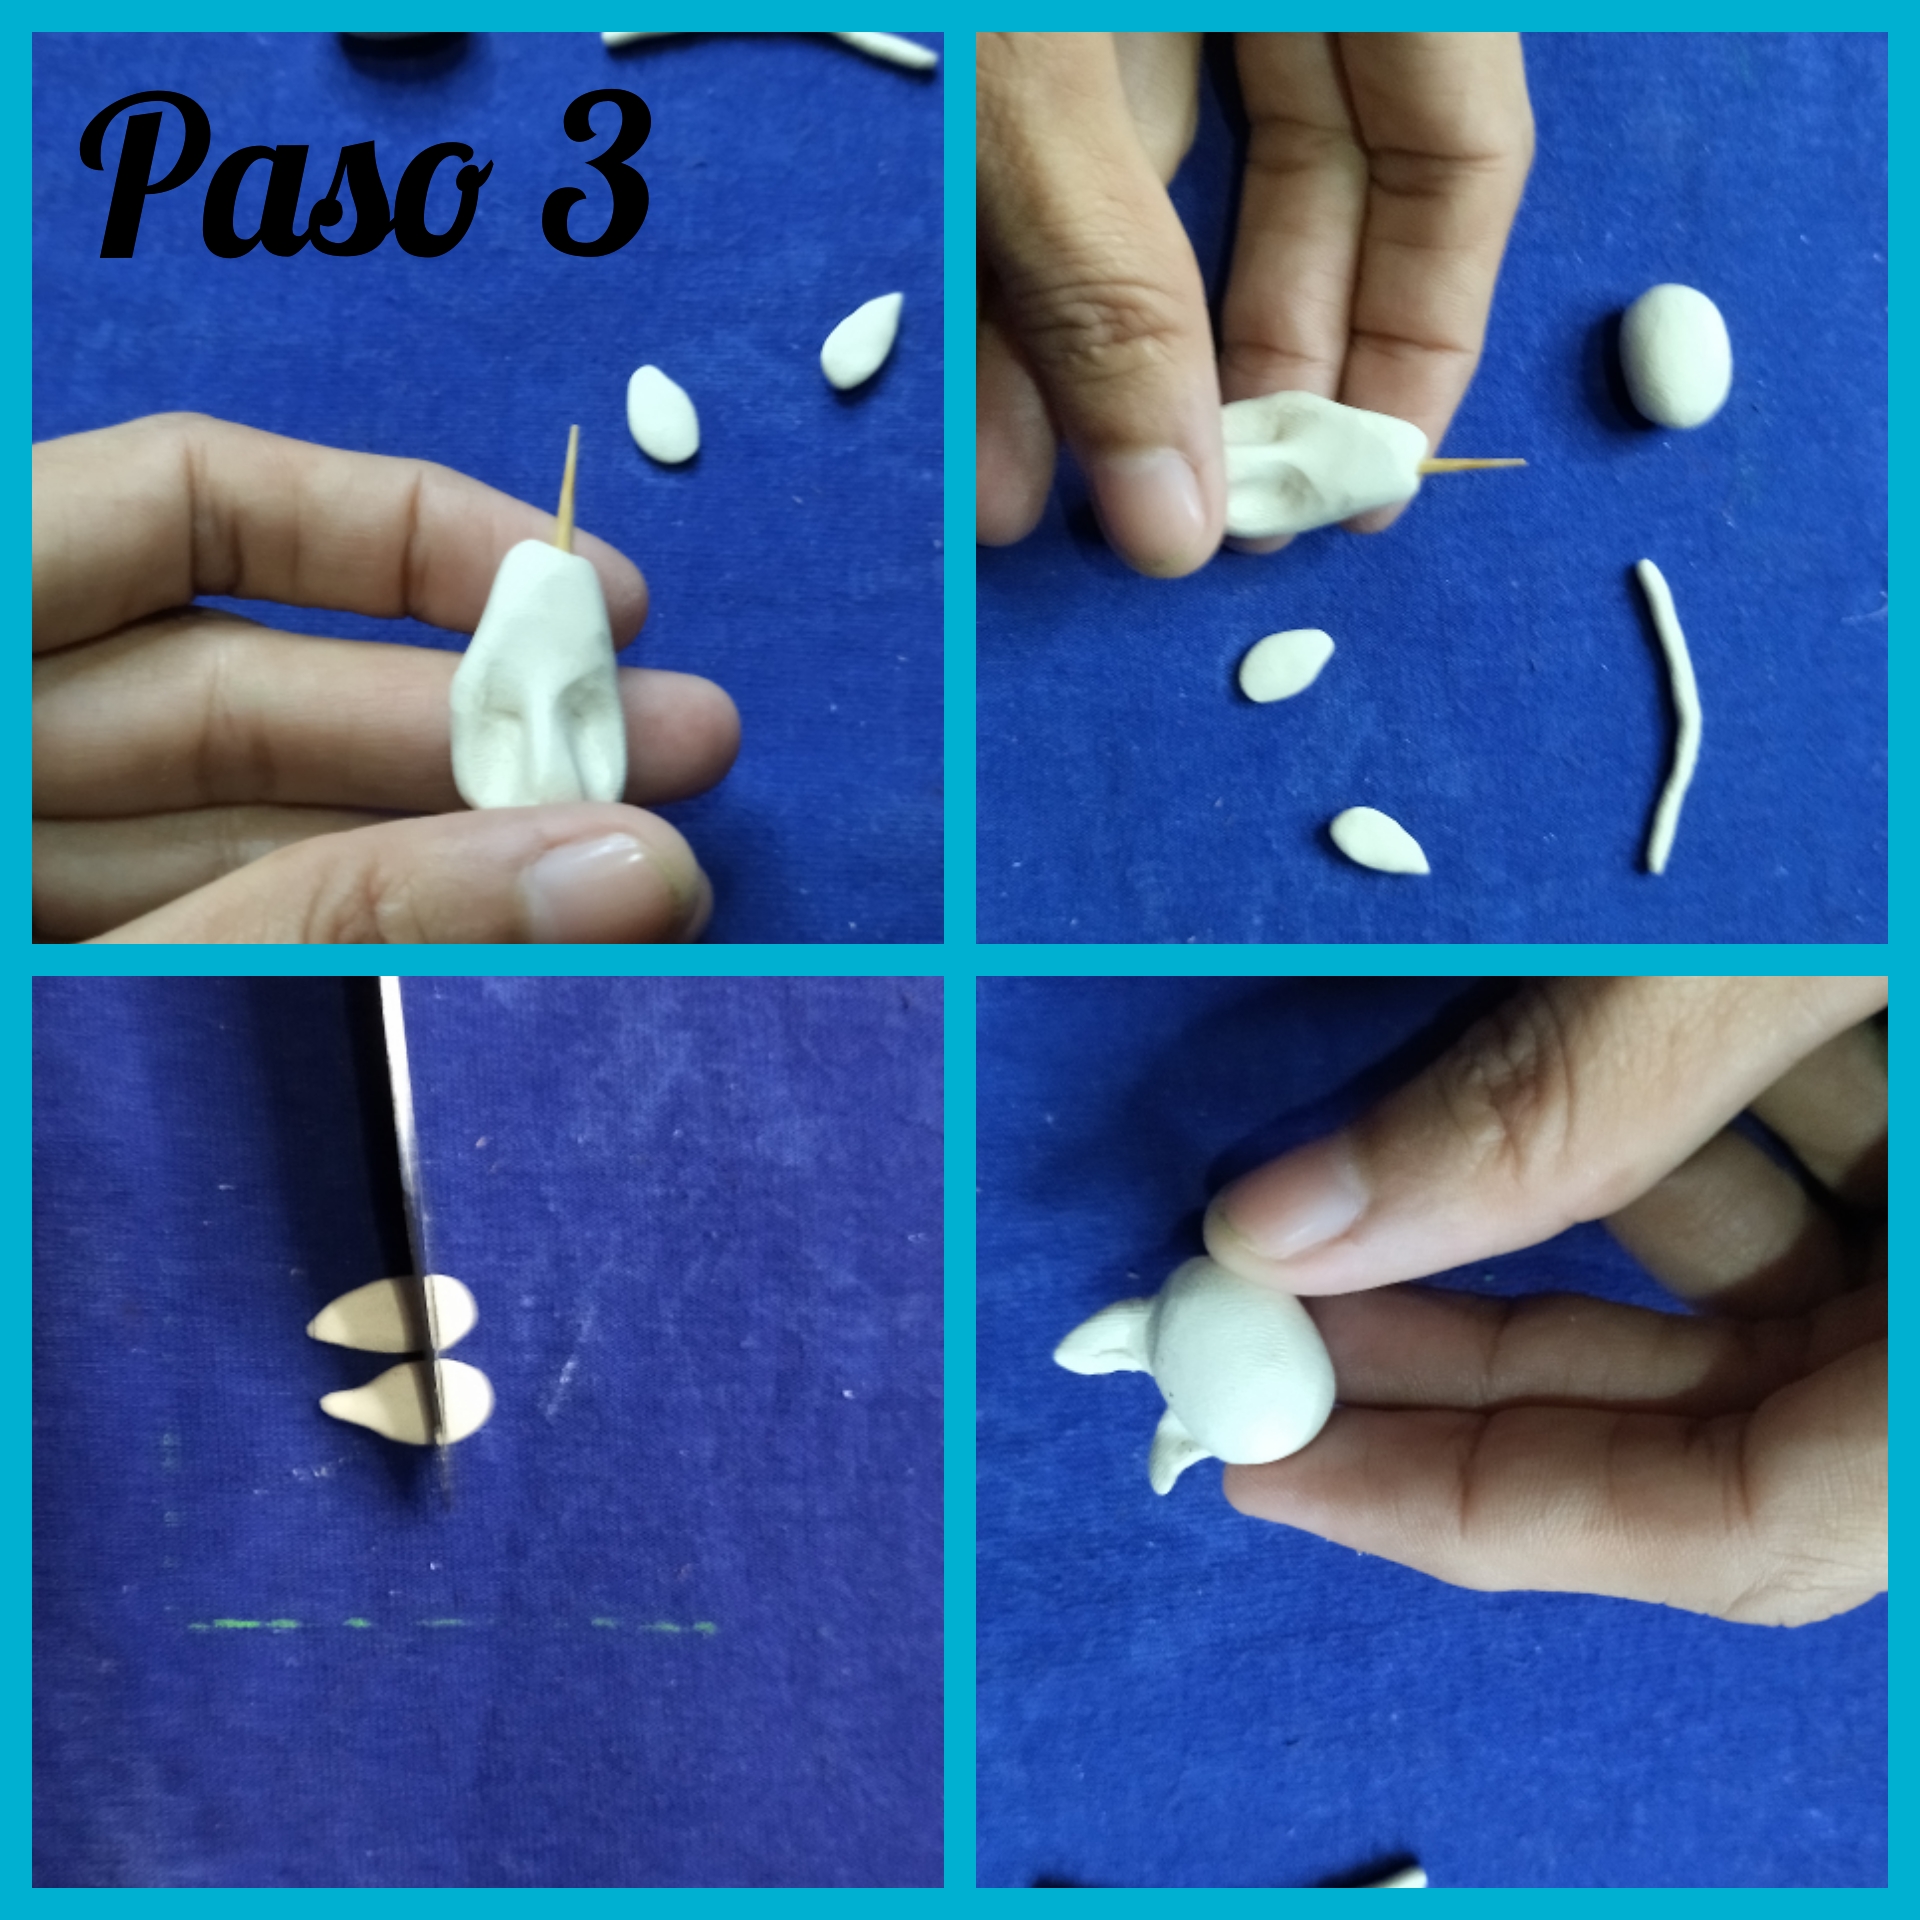
Al cuerpo del gato le metemos medio palillo, allí vamos a colocar la cabeza cuando ya esté lista.
To the body of the cat we put half a toothpick, there we are going to place the head when it is ready.
Las lagrimitas que sacamos le recortamos la parte de abajo y luego pegamos a la cabeza del gato, esto se puede apreciar mucho mejor en la imagen.
We cut out the bottom part of the tears and then glue them to the cat's head, this can be seen much better in the image.
 PASO 4 // STEP 4
🧿🧿🧿🧿🧿🧿🧿🧿🧿🧿
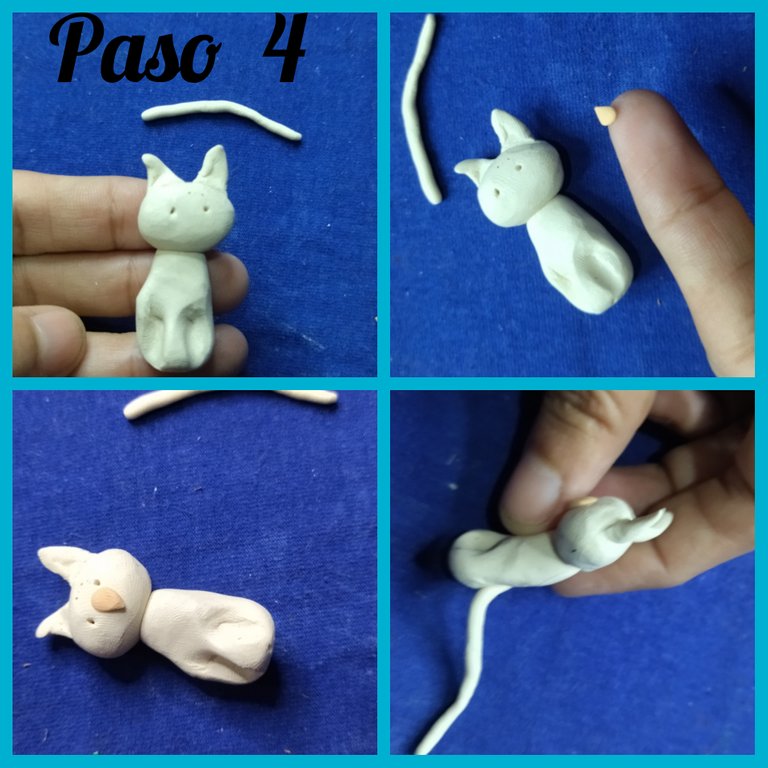
Ya para darle forma a mi personaje tome un trocito bastante diminuto de color piel e hice tres lagrimitas, dos de ellas las colocamos en la orejita y la otra en el centro de la cabeza para formar la nariz, para terminar le pegamos la colita.
To give shape to my character I took a very tiny piece of skin color and made three little tears, two of them we placed in the ear and the other in the center of the head to form the nose, to finish we glued the tail.
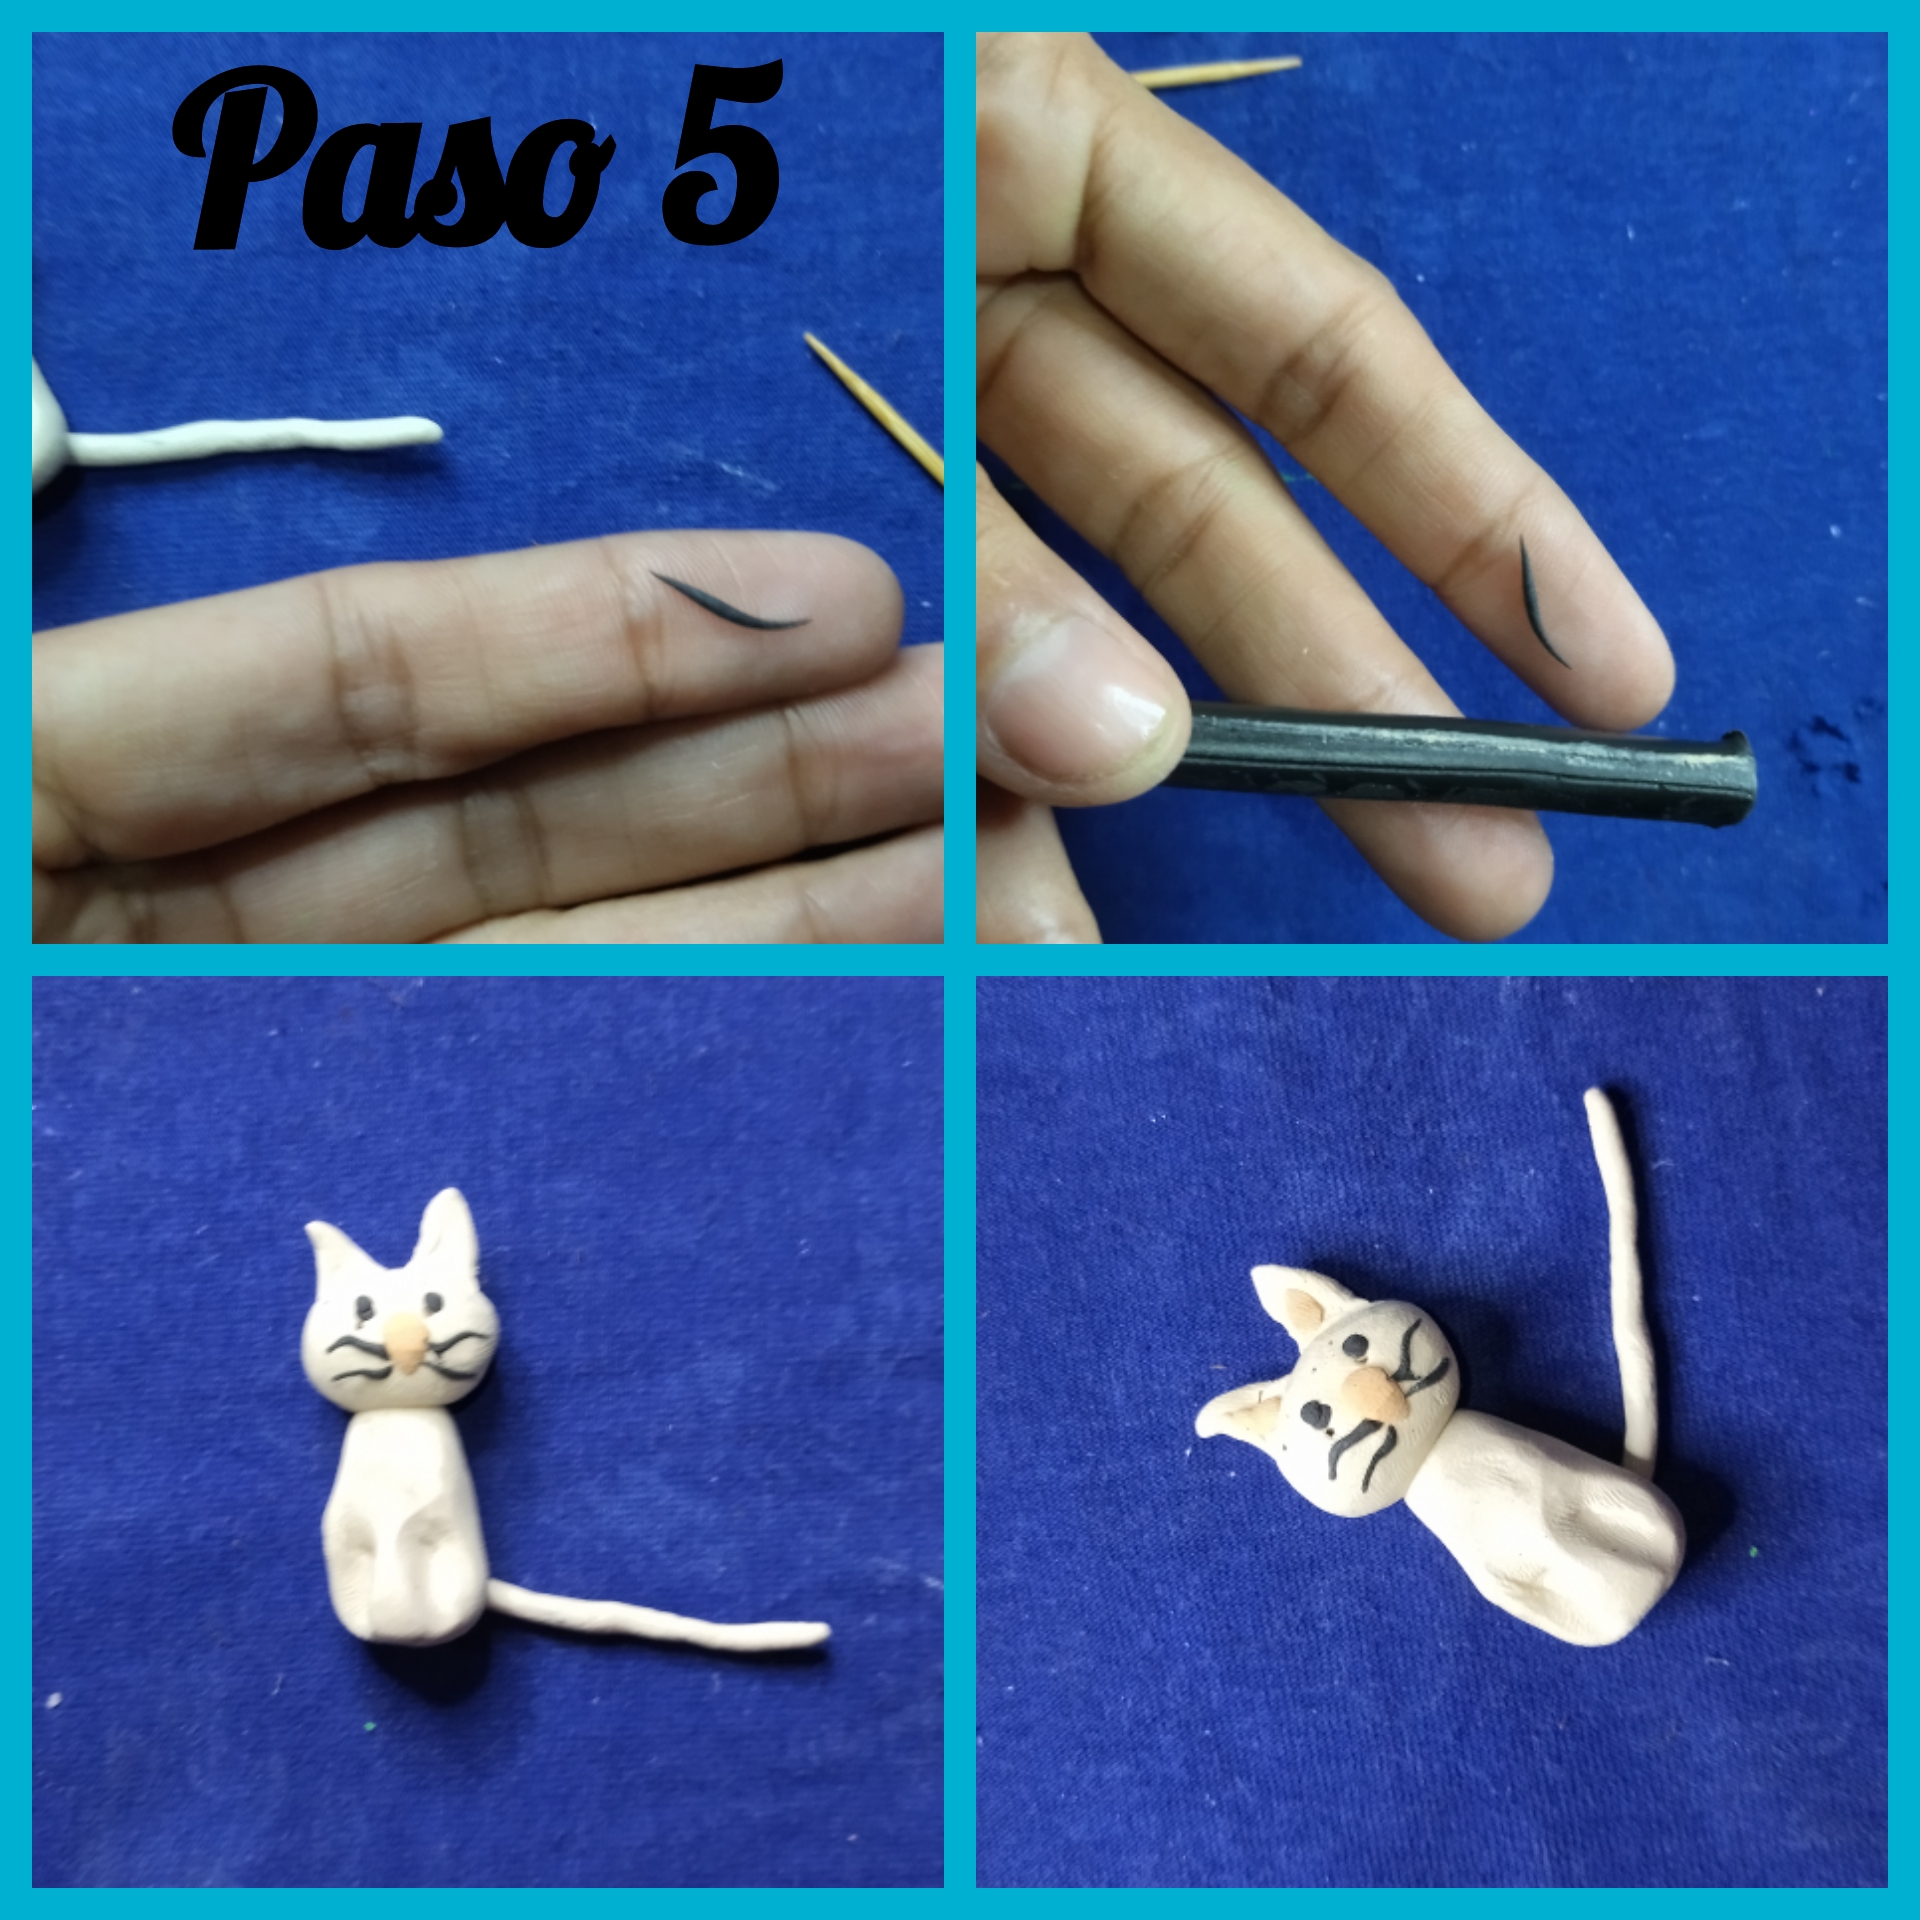
 PASO 5 // STEP 5
🧿🧿🧿🧿🧿🧿🧿🧿🧿🧿
Luego tome una porción de plastilina de color negro y la estiramos hasta que quedó bien finita, luego nos ayudamos con un palillo y picamos trocitos pequeños y los pegamos de la nariz y de esta forma formamos los bigotes, luego hice dos bolitas bien diminutas y las pegué para que sean los ojos del gato, ven ya tiene forma.
Then take a portion of black plasticine and stretch it until it is very thin, then we help us with a toothpick and chop small pieces and stick them to the nose and thus form the whiskers, then I made two tiny balls and stuck them to be the eyes of the cat, you see it already has a shape.
 PASO 6 // STEP 6
🧿🧿🧿🧿🧿🧿🧿🧿🧿🧿
PASO 6 // STEP 6
🧿🧿🧿🧿🧿🧿🧿🧿🧿🧿
En este paso vamos a elaborar el otro personaje pero será de color negro, porque me encantan los gatos negros y también para que haga una especie de el Yin y el Yan, solo que aquí vamos a invertir los colores los ojitos y los serán de color blancos,para que se puedan notar.
In this step we are going to elaborate the other character but it will be black, because I love black cats and also to make a kind of Yin and Yan, only here we are going to invert the colors of the eyes and they will be white, so that they can be noticed.
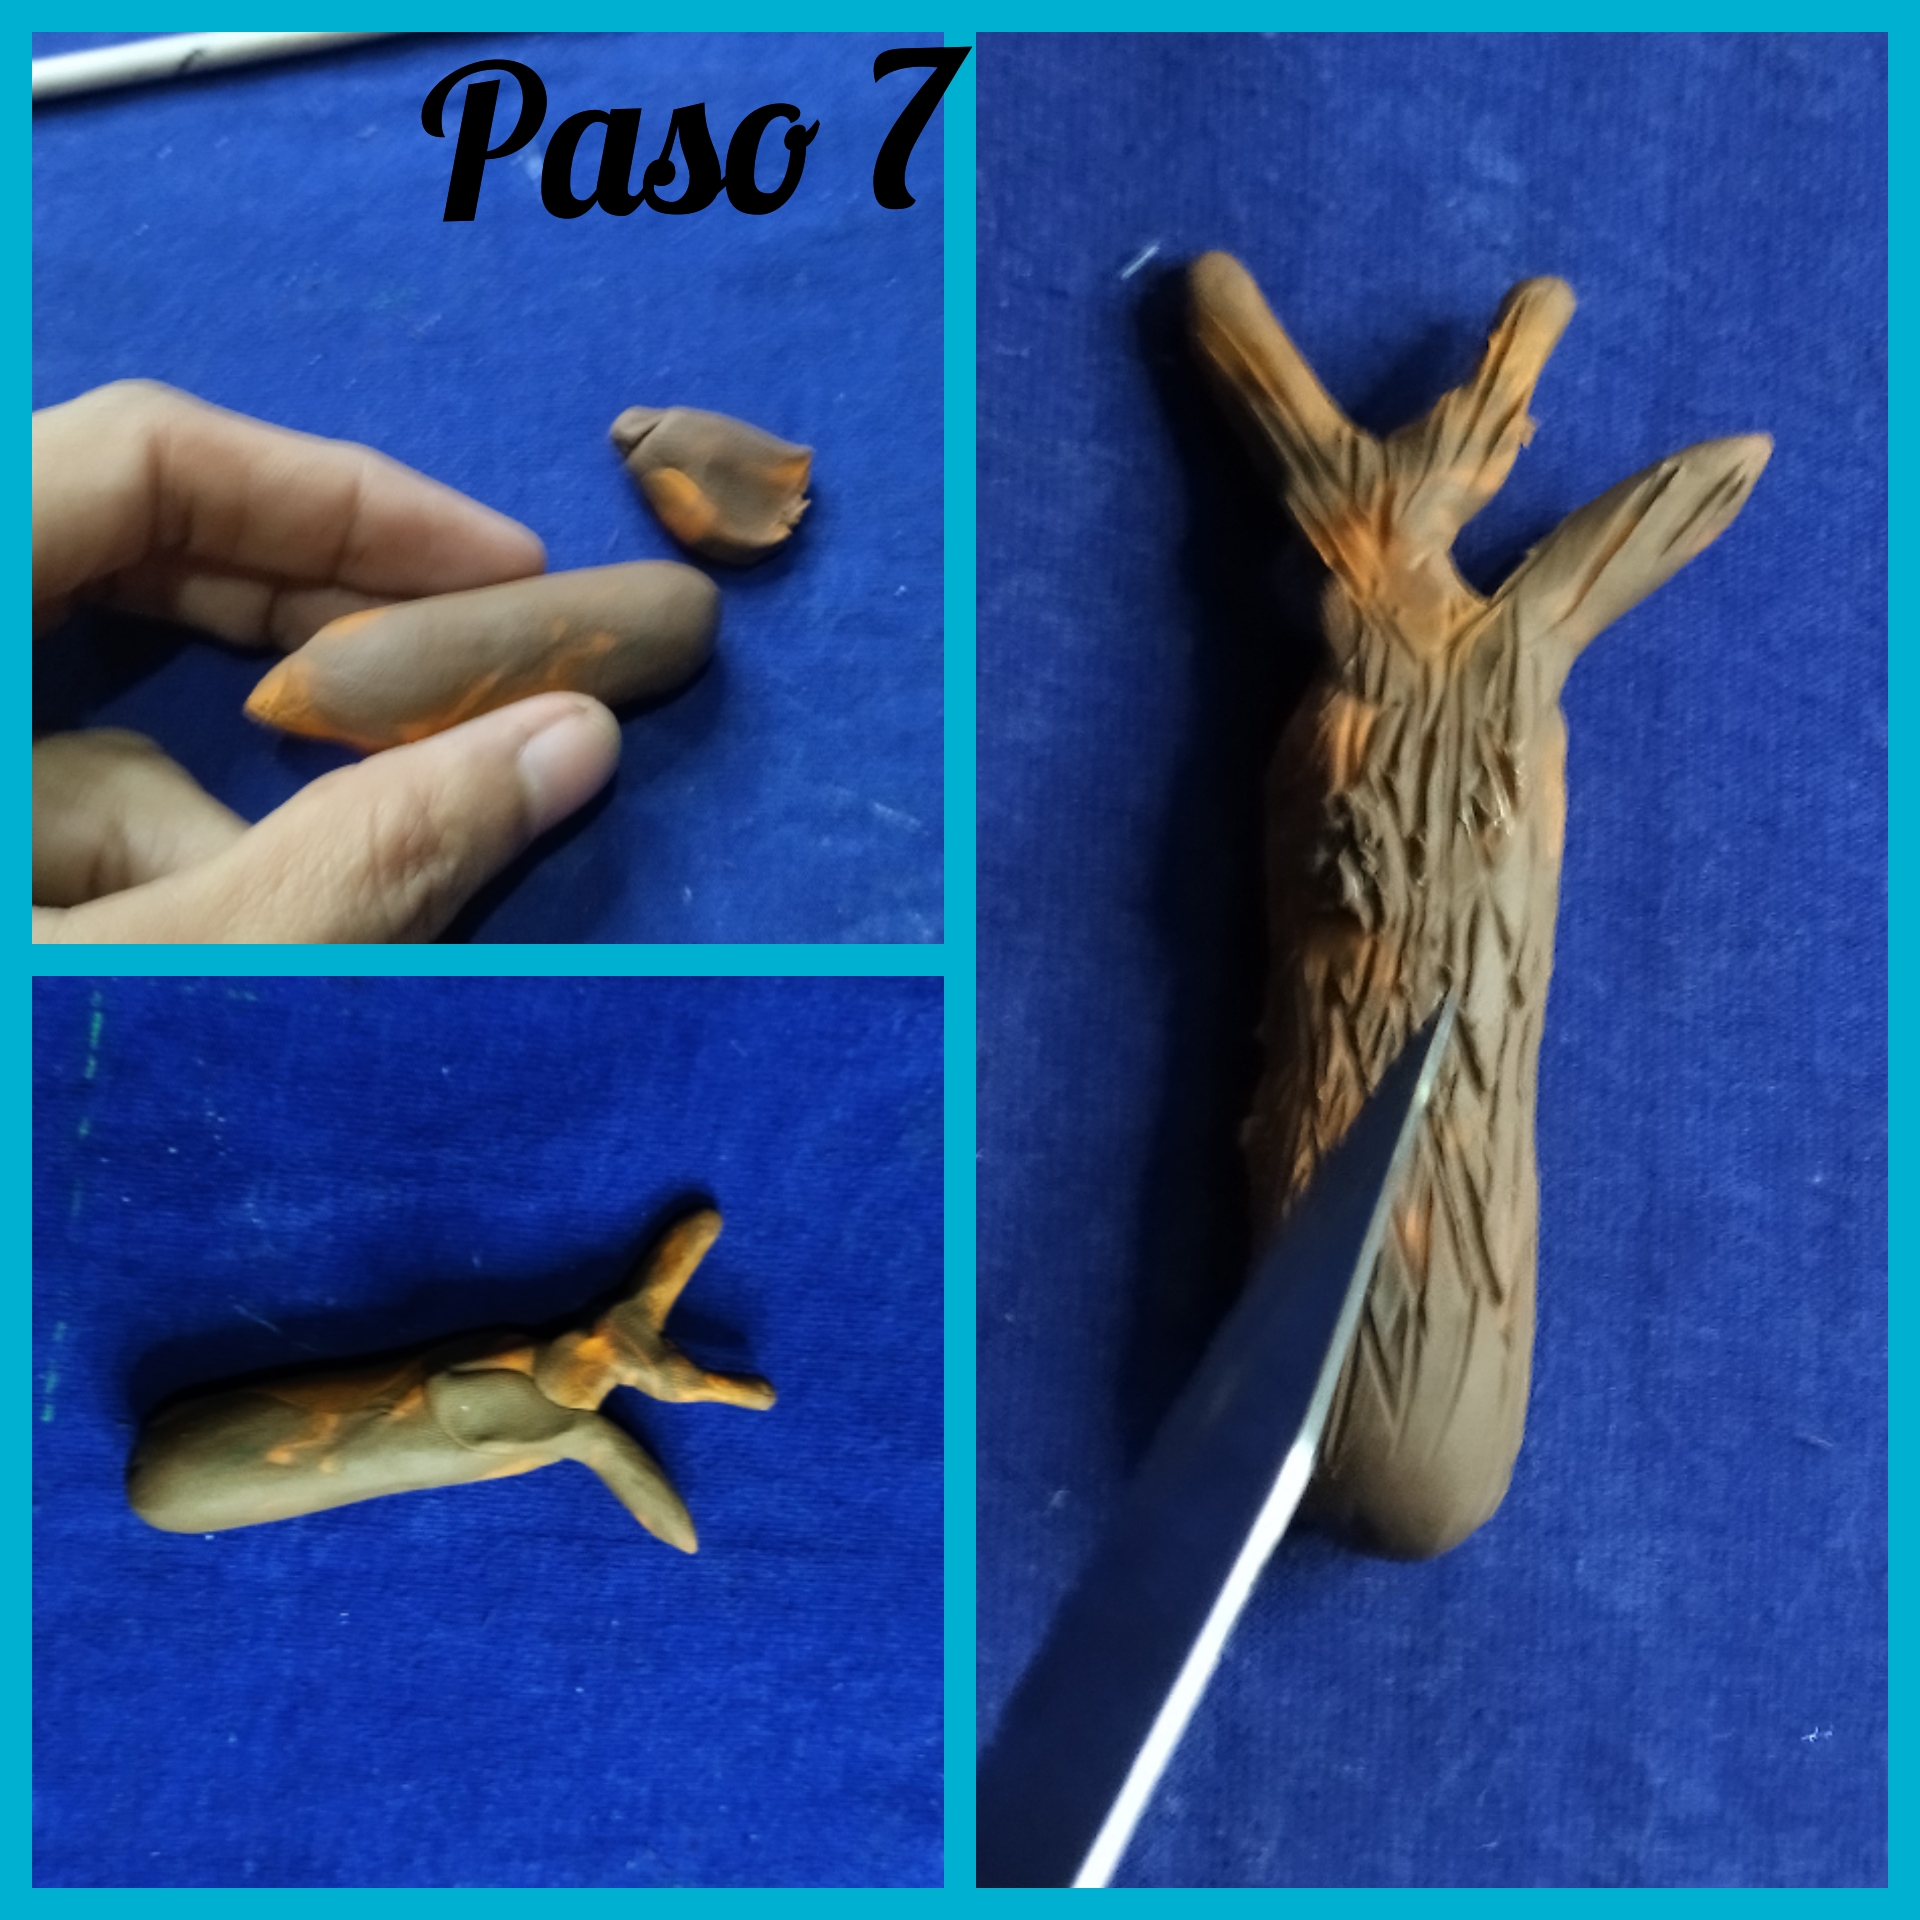
 PASO 7 // STEP 7
🧿🧿🧿🧿🧿🧿🧿🧿🧿🧿
PASO 7 // STEP 7
🧿🧿🧿🧿🧿🧿🧿🧿🧿🧿
Ahora que nuestros dos personajes están listos vamos a trabajar en los elementos del paisaje que vamos a recrear y comencé por el tronco dónde vamos a colocar a los dos gatitos, para hacerlo tome una barra de plastilina de color marrón y la mezcle con otra de color naranja, eso sí no la mezcle por completo para que quedara con betas de ambos colores.
Now that our two characters are ready we are going to work on the elements of the landscape that we are going to recreate and I started with the trunk where we are going to place the two kittens, to do this I took a brown plasticine bar and mixed it with an orange one, do not mix it completely so that it would have betas of both colors.
Luego de darle la forma de tronco, tome la cuchilla y le hice rayas a lo largo de la plastilina, para darle la textura de un tronco, trate de que quedara lo más parecido posible.
After giving it the shape of a trunk, I took the blade and made stripes along the plasticine, to give it the texture of a trunk, I tried to make it as similar as possible.
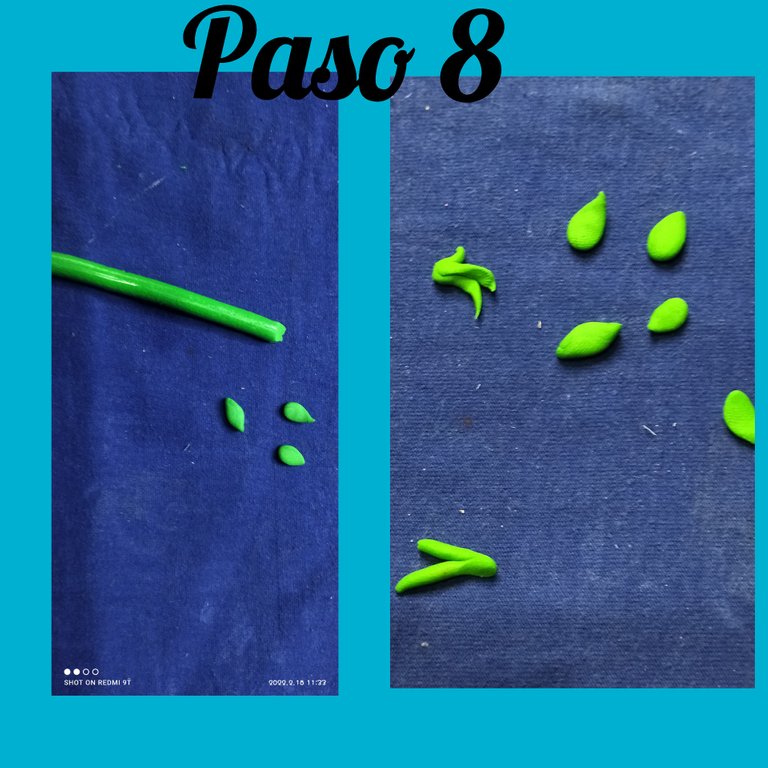
 PASO 8 // STEP 8
🧿🧿🧿🧿🧿🧿🧿🧿🧿🧿
PASO 8 // STEP 8
🧿🧿🧿🧿🧿🧿🧿🧿🧿🧿
Luego tome la barra de color ver claro e hice muchas hojitas, la cantidad va a depender de tu gusto, y también hice algunas gramitas, eso sí hice muchas y de formas diferentes ya que los árboles y la Vegetación nunca son idénticos.
Then I took the light green color bar and made a lot of leaves, the amount will depend on your taste, and I also made some grasses, but I made a lot of them and in different shapes since trees and vegetation are never identical.
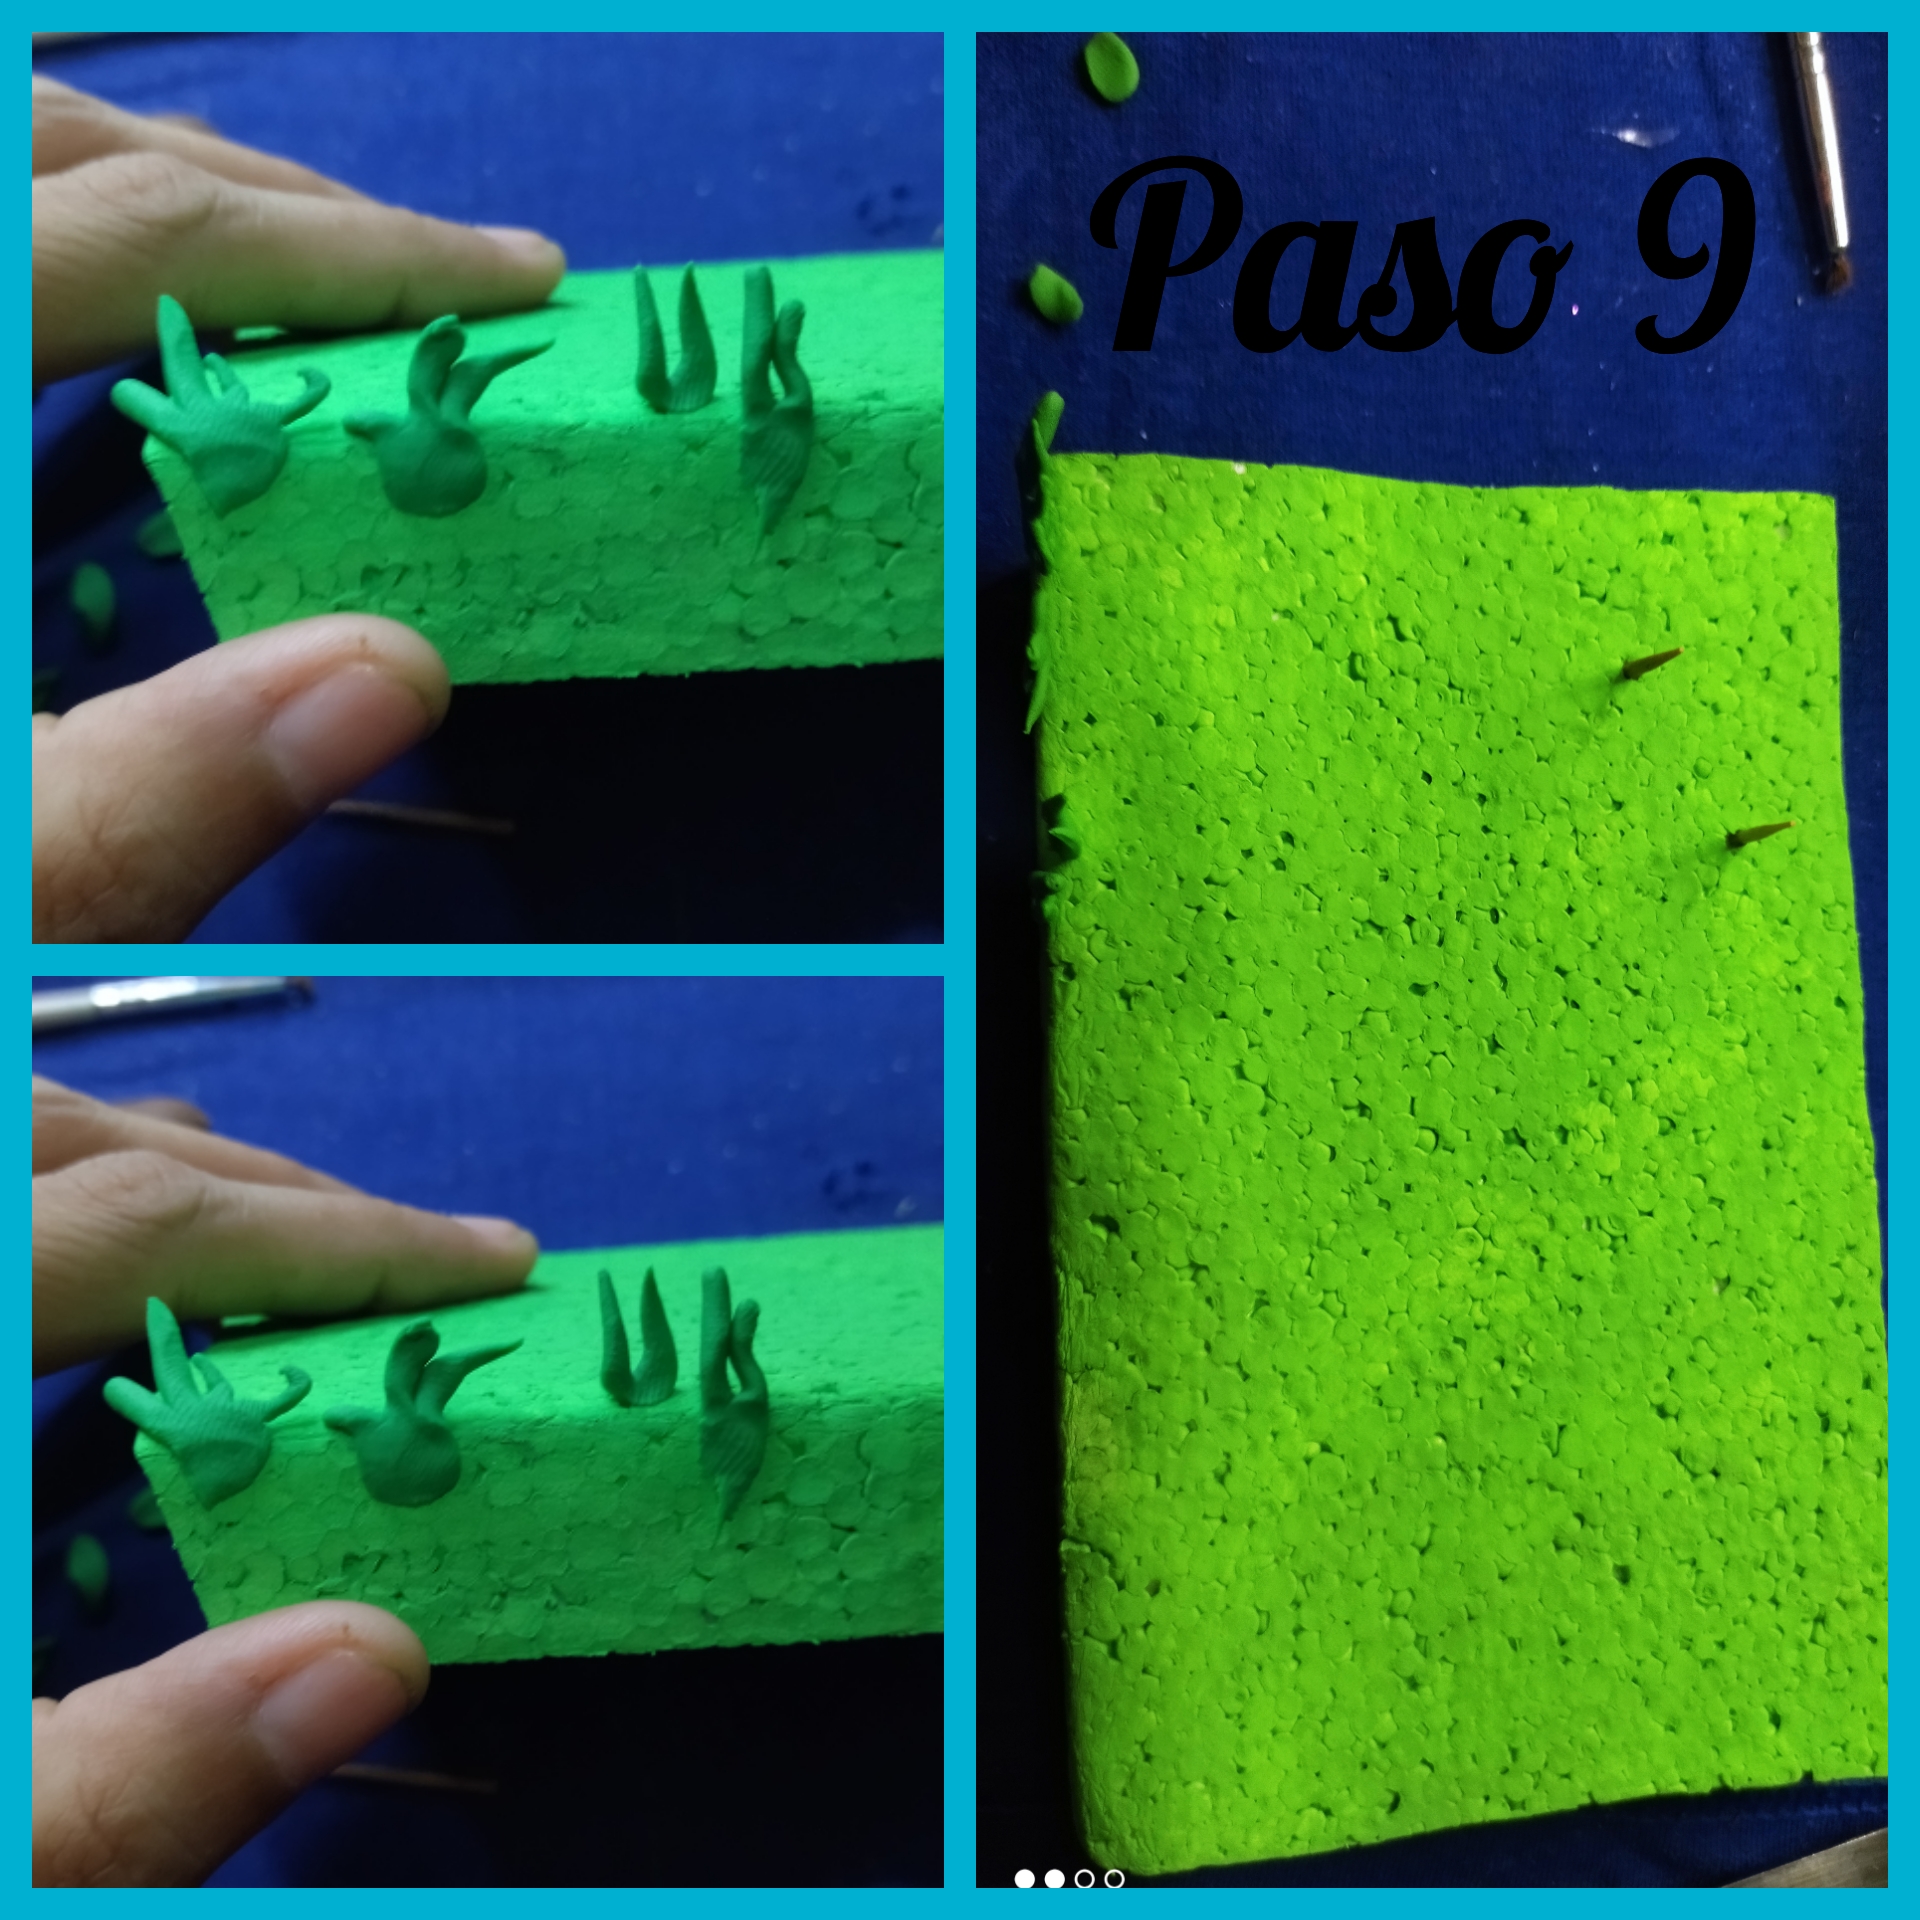
 PASO 9 // STEP 9
🧿🧿🧿🧿🧿🧿🧿🧿🧿🧿
PASO 9 // STEP 9
🧿🧿🧿🧿🧿🧿🧿🧿🧿🧿
Cuando ya hemos terminado de hacer tanto la grama como las hojas, comencé a pegarlas primero los bordes no hizo necesidad de utilizar ningún pegamento, porque la plastilina en si se pega al anime.
When we have finished making both the grass and the leaves, I started to glue the edges first, no need to use any glue, because the plasticine itself sticks to the anime.
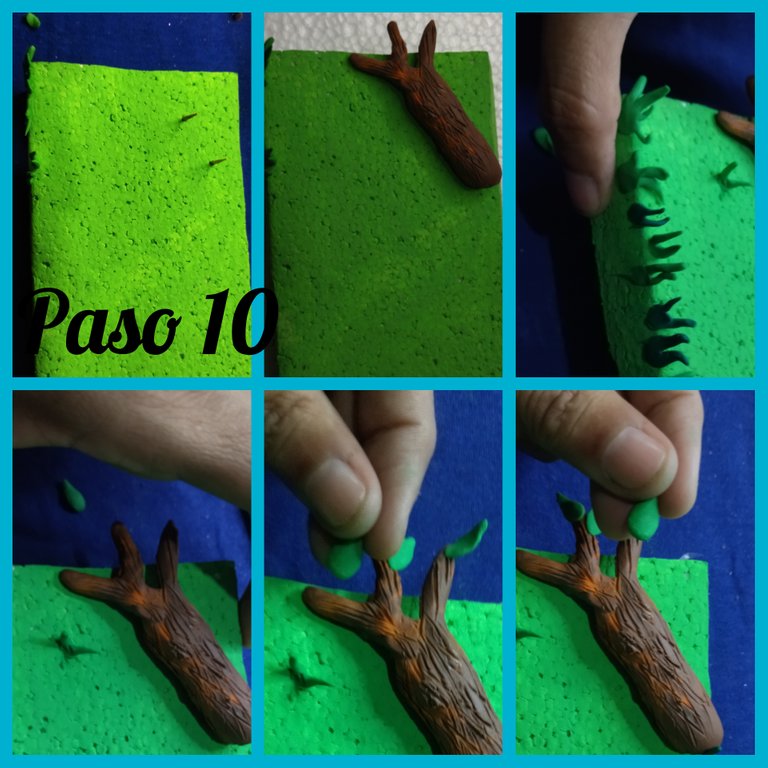
 PASO 10 // STEP 10
🧿🧿🧿🧿🧿🧿🧿🧿🧿🧿
Tome un palillo y lo pique en dos, luego los introduje en el anime allí si le coloque un poquito de silicón por qué se trata de una pieza pesada y luego monte el tronco en los palillos.
I took a toothpick and cut it in two, then I introduced them into the anime and put a little bit of silicone on it because it is a heavy piece and then I mounted the trunk on the toothpicks.
Después agarre las hojitas que elaboré previamente y las pegué en el tronco de manera dispareja pero solo en uno de los extremos, así se puede ver cómo va tomando forma los elementos del paisaje de mi escena.
Then I took the leaves that I had previously made and glued them to the trunk unevenly but only at one end, so you can see how the landscape elements of my scene take shape.
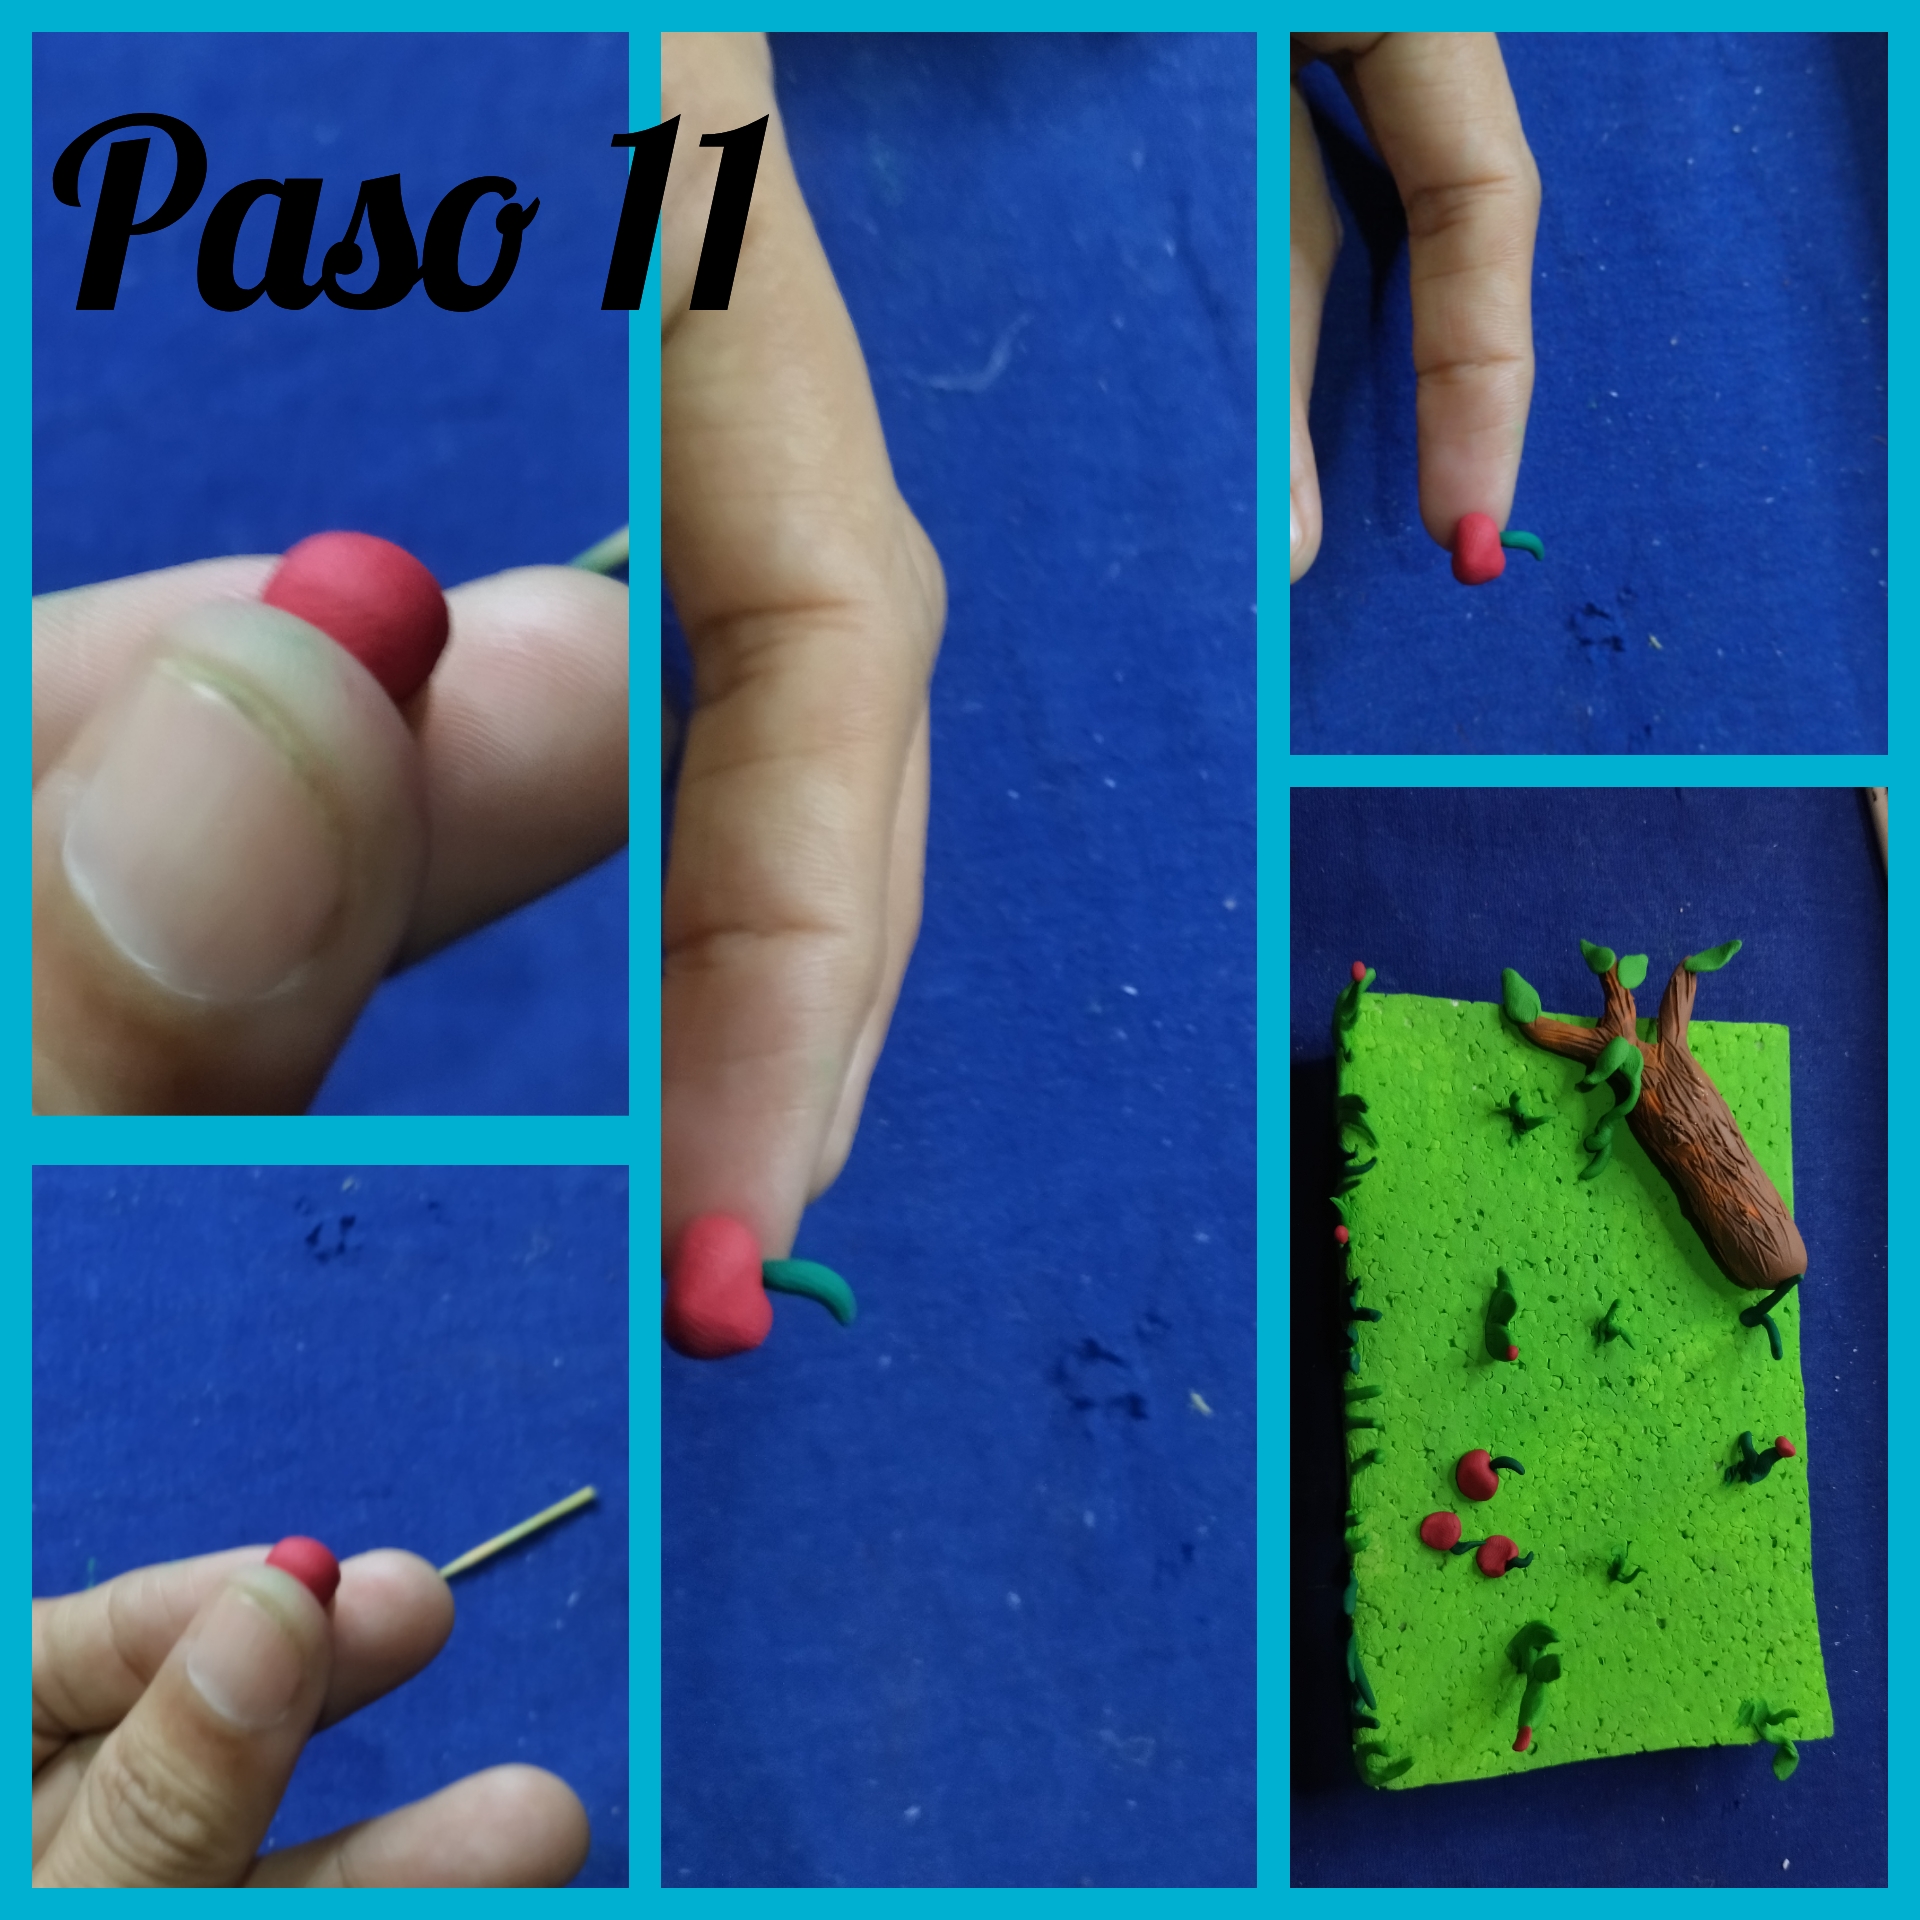
 PASO 11 // STEP 11
🧿🧿🧿🧿🧿🧿🧿🧿🧿🧿
PASO 11 // STEP 11
🧿🧿🧿🧿🧿🧿🧿🧿🧿🧿
Seguidamente tome un poco de plastilina de color rojo e hice unas manzanas bien pequeñitas y con la plastilina de color verde oscuro hice la ramita y la hoja, hice tres y las pegué en el anime.
Then I took some red plasticine and made some tiny apples and with the dark green plasticine I made the twig and the leaf, I made three of them and glued them on the anime.
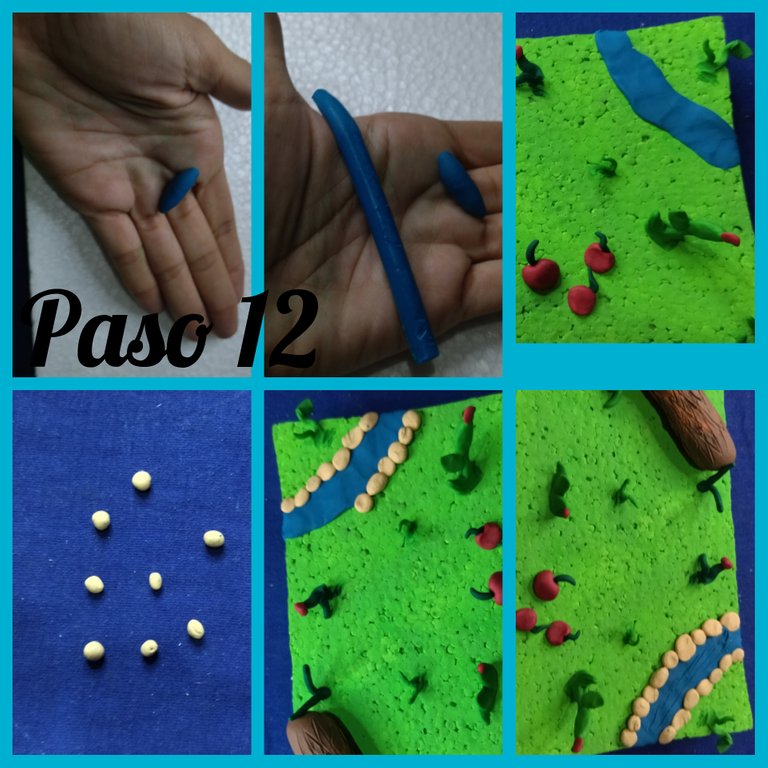
 PASO 12 // STEP 12
🧿🧿🧿🧿🧿🧿🧿🧿🧿🧿
PASO 12 // STEP 12
🧿🧿🧿🧿🧿🧿🧿🧿🧿🧿
Después tomé la barra de plastilina de color azul y la estire, luego la pegue en uno de los extremos del anime para formar así un pequeño riachuelo.
Then I took the blue plasticine bar and stretched it, then glued it to one end of the anime to form a small stream.
Luego tome plastilina de color piel e hice varias bolita sin forma específica y las fui colocando al rededor del riachuelo,pueden ver lo lindo que quedó.
Then I took some skin-colored plasticine and made several little balls with no specific shape and placed them around the stream, you can see how nice it looked.
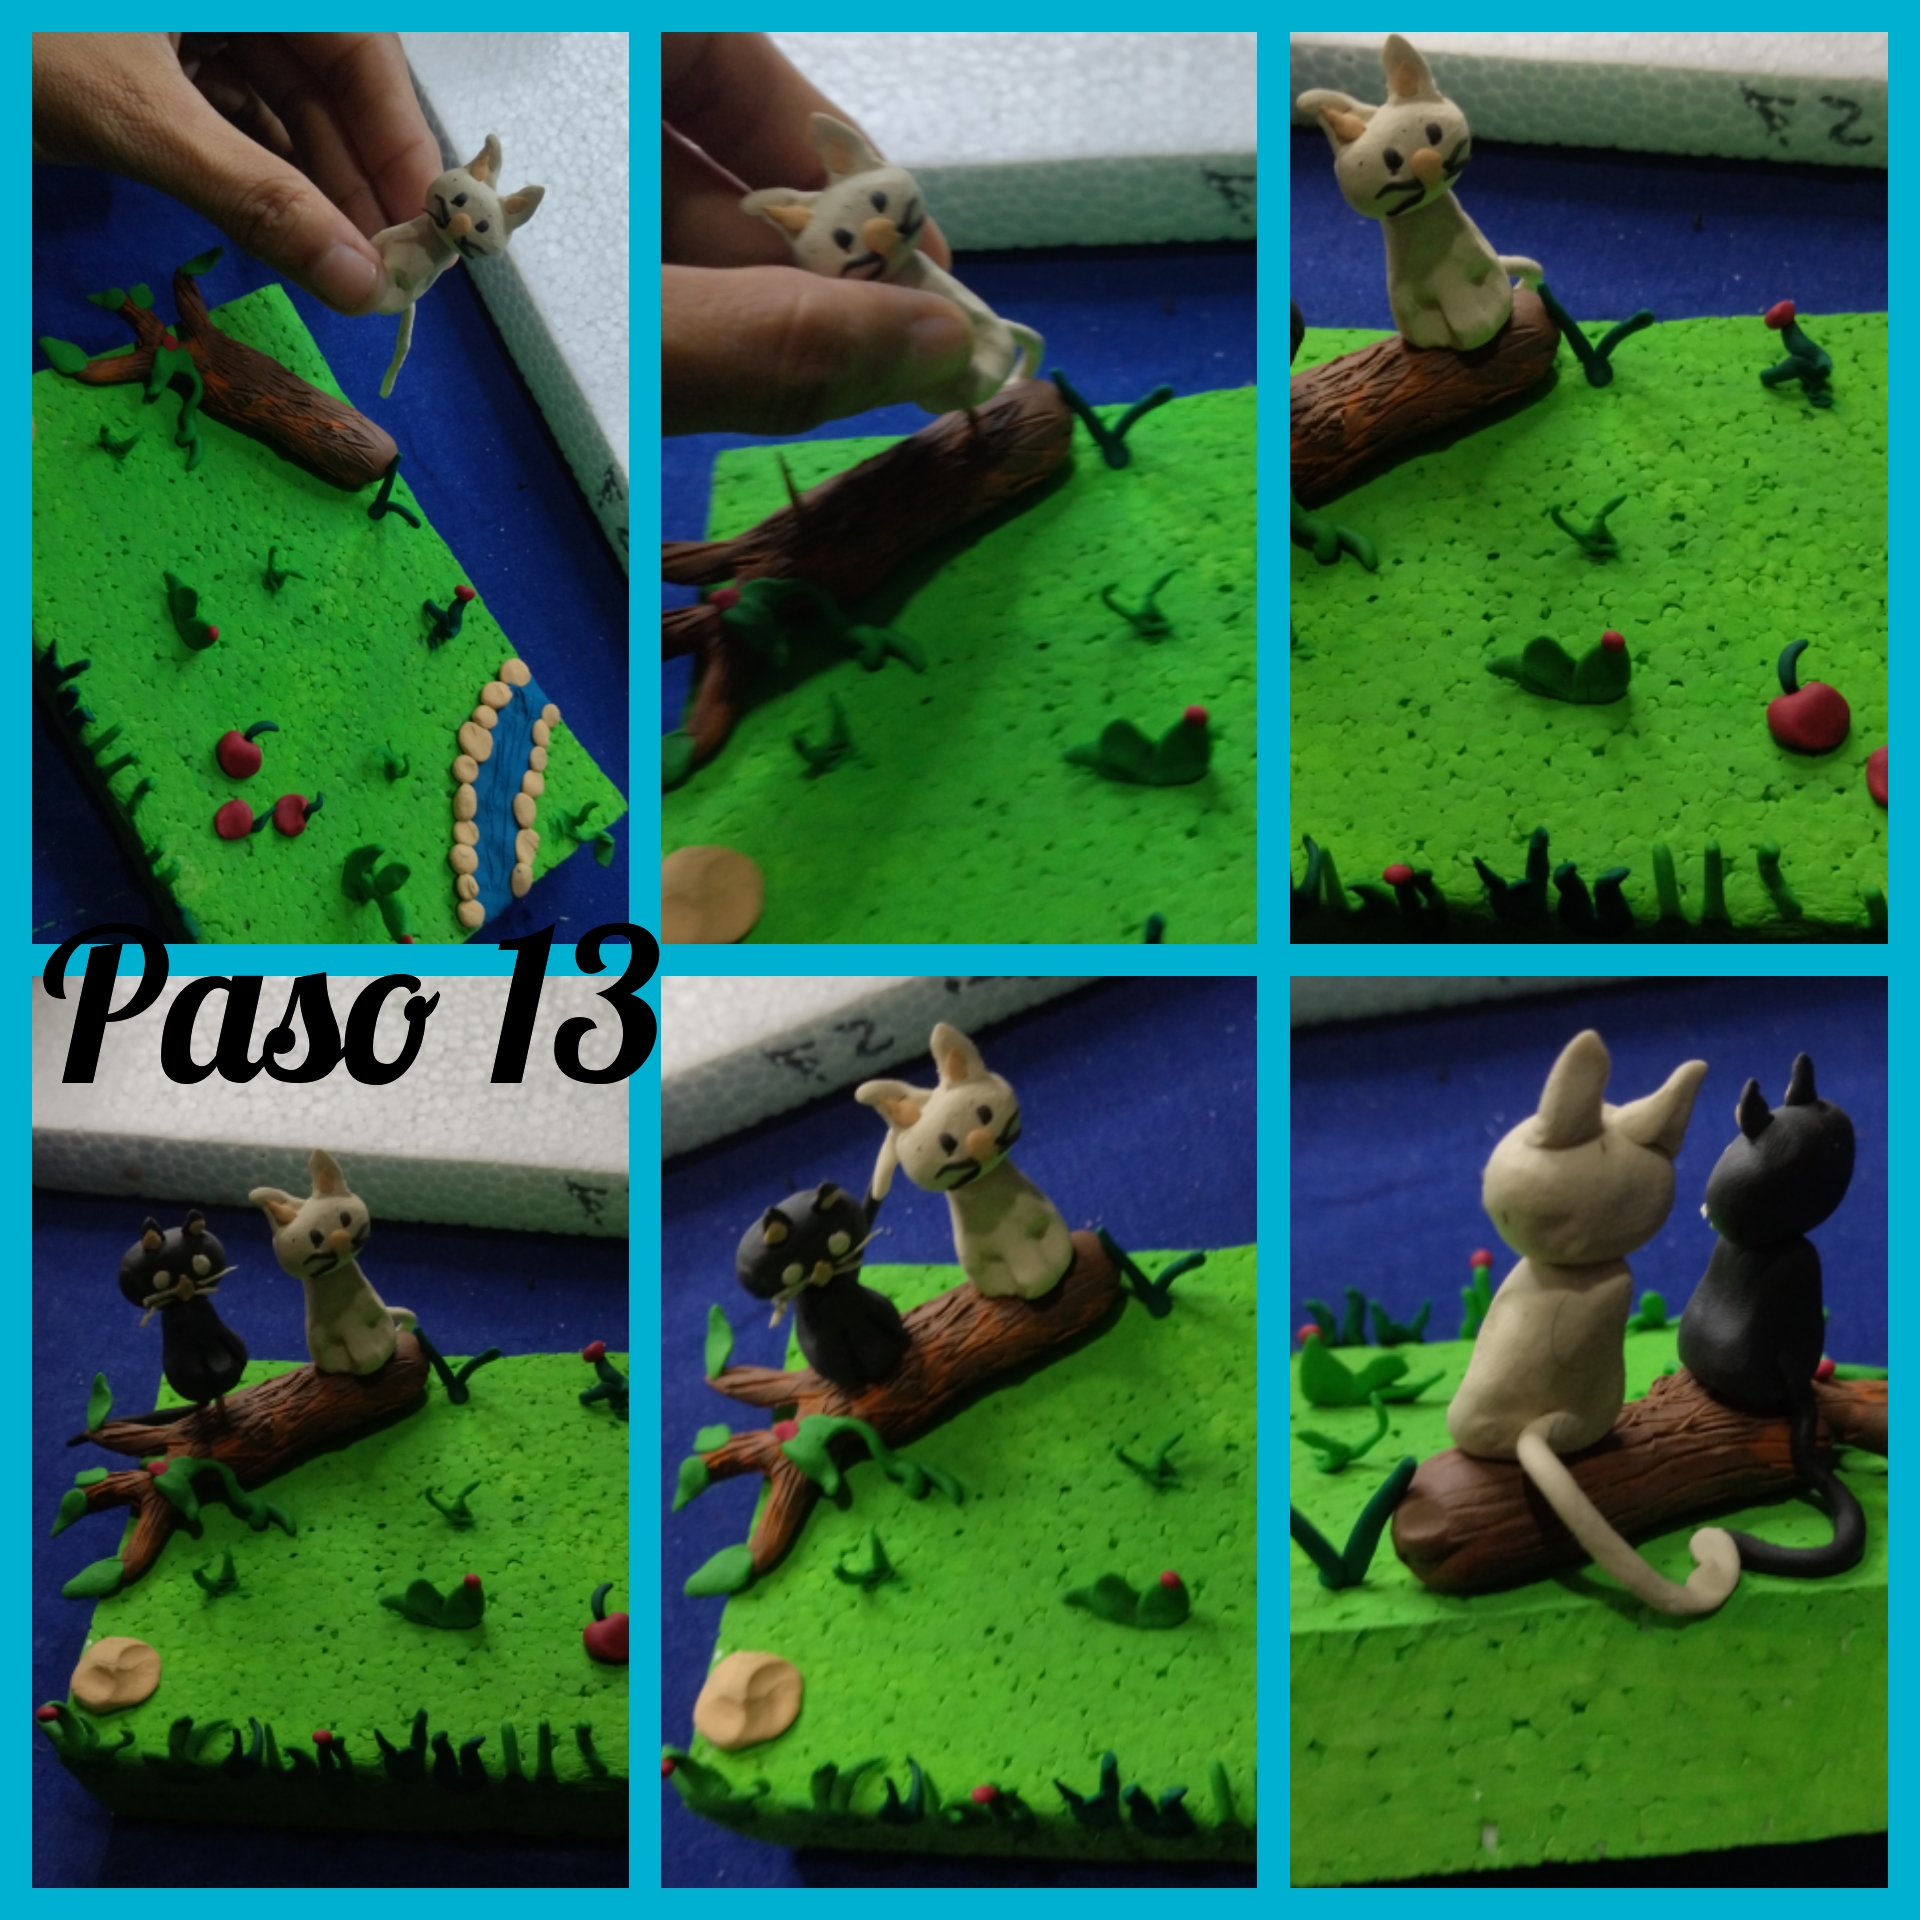
 PASO 13 // STEP 13
🧿🧿🧿🧿🧿🧿🧿🧿🧿🧿
PASO 13 // STEP 13
🧿🧿🧿🧿🧿🧿🧿🧿🧿🧿
Nuevamente tome otro palillo y lo piqué en dos y lo clave en el tronco, encima le monte los dos personajes que hemos creado, estos lindos gatitos enamorados, también en otro extremo le puse una piedra que ya había hecho con plastilina color piel,y le uni los rabitos a los dos gatitos para que se vea el amor que sienten el uno por el otro.
Again I took another toothpick and cut it in two and stuck it in the trunk, on top I mounted the two characters we have created, these cute kittens in love, also at the other end I put a stone that I had already made with skin-colored plasticine, and I joined the tails to the two kittens to show the love they feel for each other.
 PASO 14 // STEP 14
🧿🧿🧿🧿🧿🧿🧿🧿🧿🧿
PASO 14 // STEP 14
🧿🧿🧿🧿🧿🧿🧿🧿🧿🧿
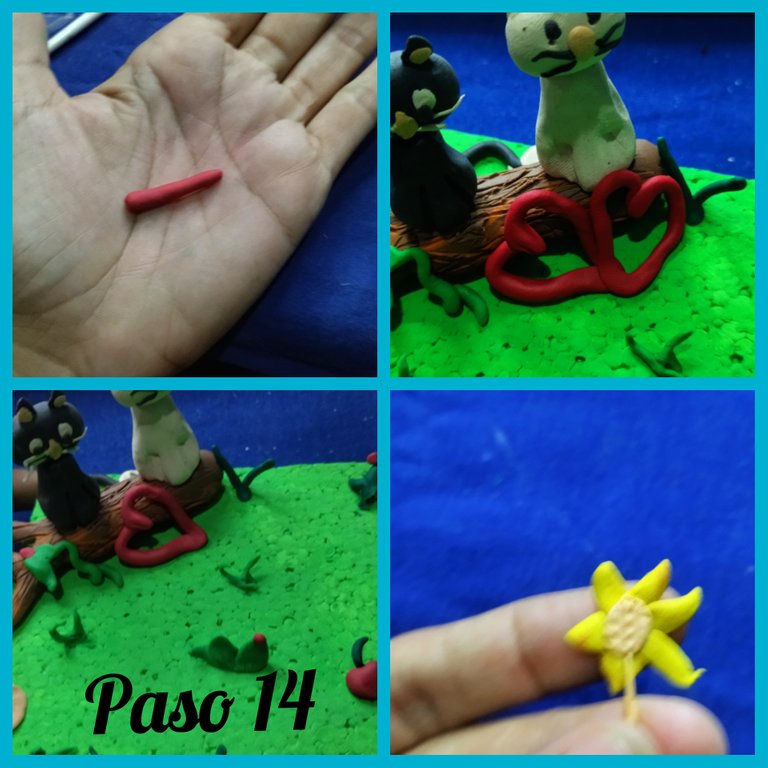
Luego tome la plastilina de color rojo y la estire para formar dos lindos corazones, los cuales pegue al frente del tronco en el medio de los dos gatitos, luego hice una flor y la pegue.
Then I took the red plasticine and stretched it to form two cute hearts, which I glued to the front of the trunk in the middle of the two kittens, then I made a flower and glued it on.
 PASO 15 // STEP 15
🧿🧿🧿🧿🧿🧿🧿🧿🧿🧿
PASO 15 // STEP 15
🧿🧿🧿🧿🧿🧿🧿🧿🧿🧿
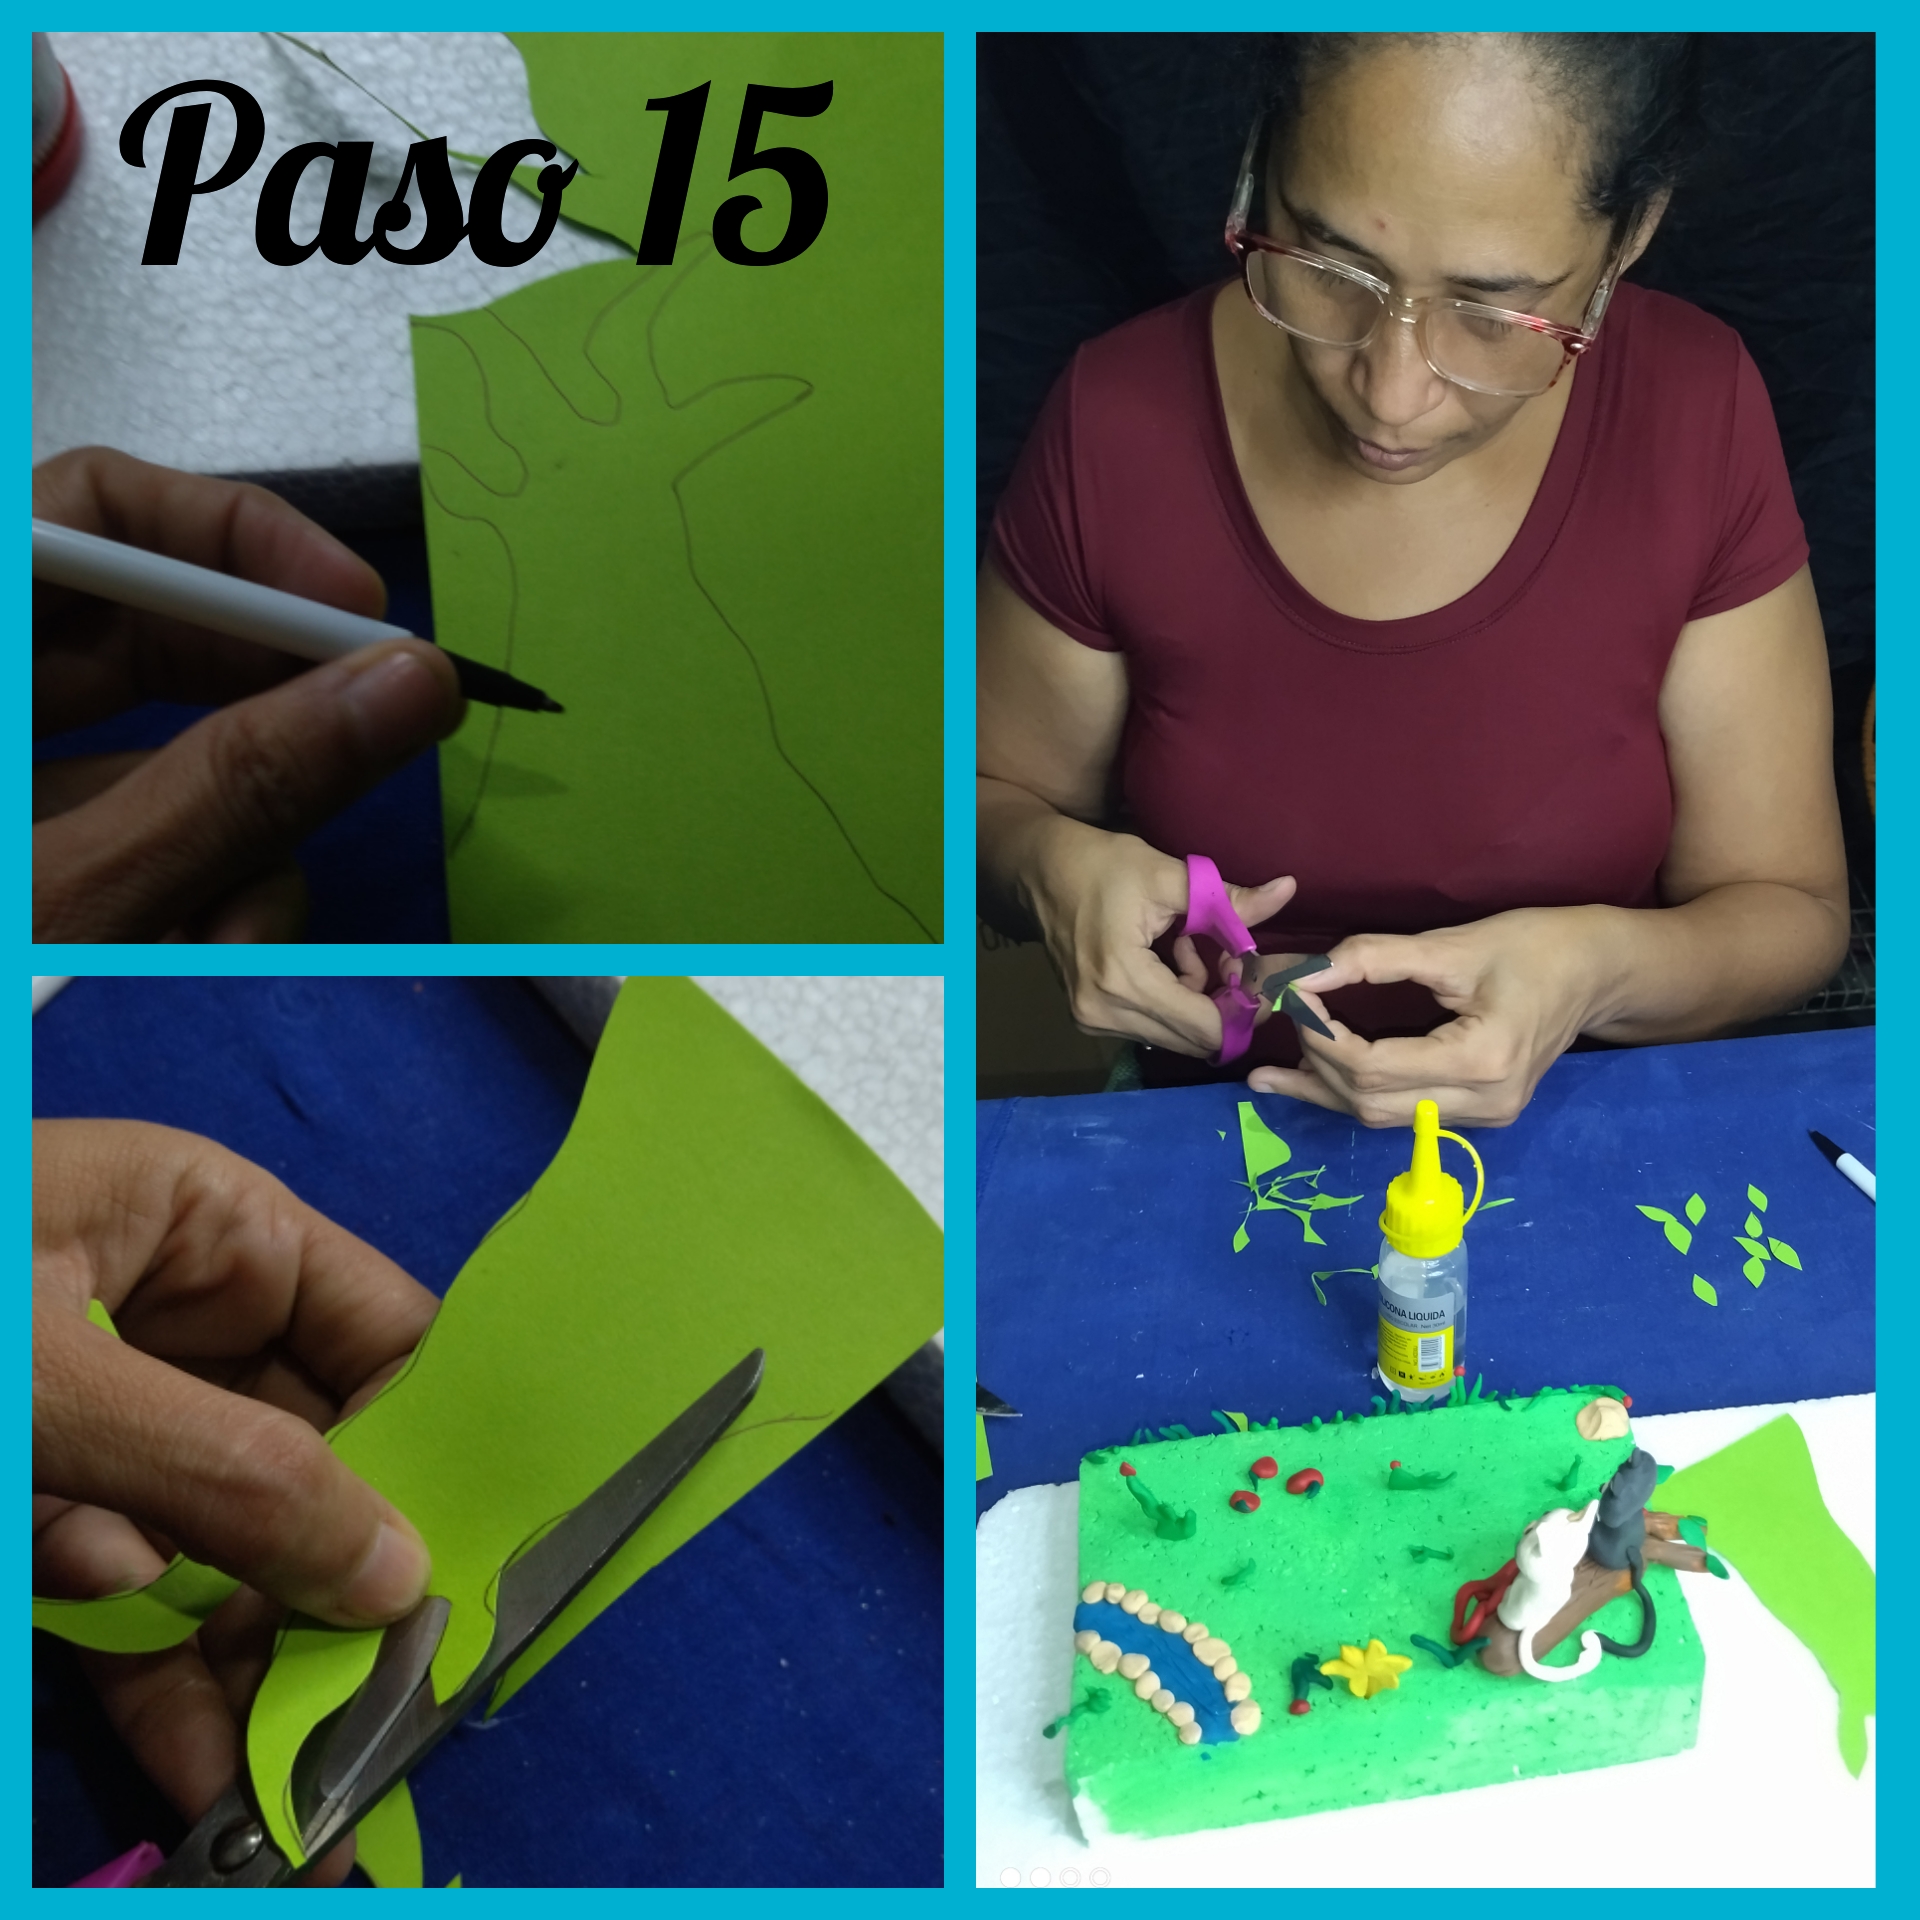
En el papel de color verde dibuje un árbol, bueno la silueta del árbol sin hojas, y después lo recorte.
On the green paper draw a tree, well the silhouette of the tree without leaves, and then cut it out.
 PASO 16 // STEP 16
🧿🧿🧿🧿🧿🧿🧿🧿🧿🧿
PASO 16 // STEP 16
🧿🧿🧿🧿🧿🧿🧿🧿🧿🧿
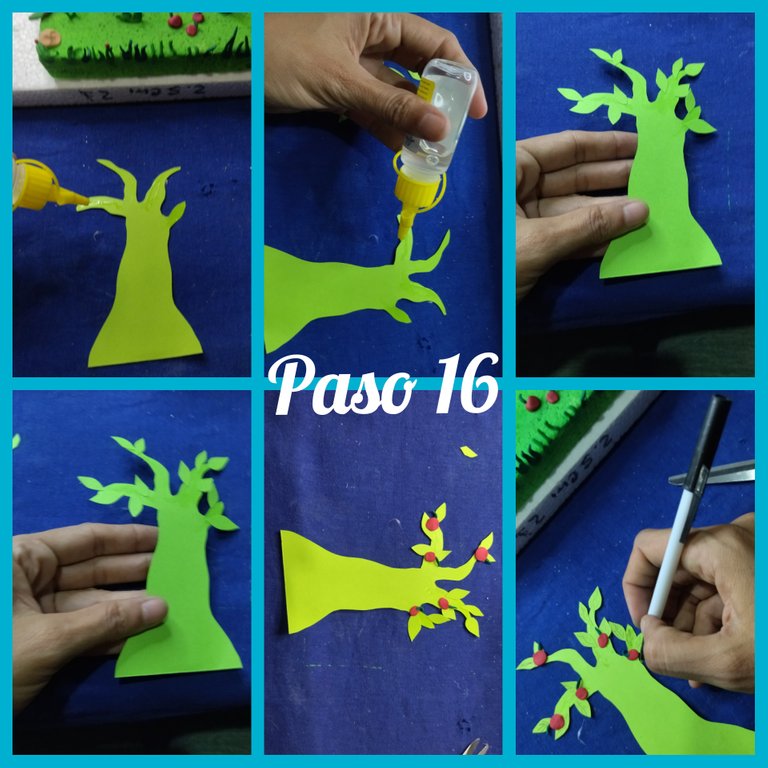
Previamente había elaborado algunas manzanas con la plastilina y con el papel verde unas hojas.
He had previously made some apples with the plasticine and some leaves with the green paper.
Luego le aplique un poco de silicón y pegue primero las hojitas y después las manzanas, y con el lápiz le dibuje líneas carácteristicas de los troncos de los árboles.
Then I applied some silicone and glued first the leaves and then the apples, and with the pencil I drew the characteristic lines of the tree trunks.
 PASO 17 // STEP 17
🧿🧿🧿🧿🧿🧿🧿🧿🧿🧿
PASO 17 // STEP 17
🧿🧿🧿🧿🧿🧿🧿🧿🧿🧿
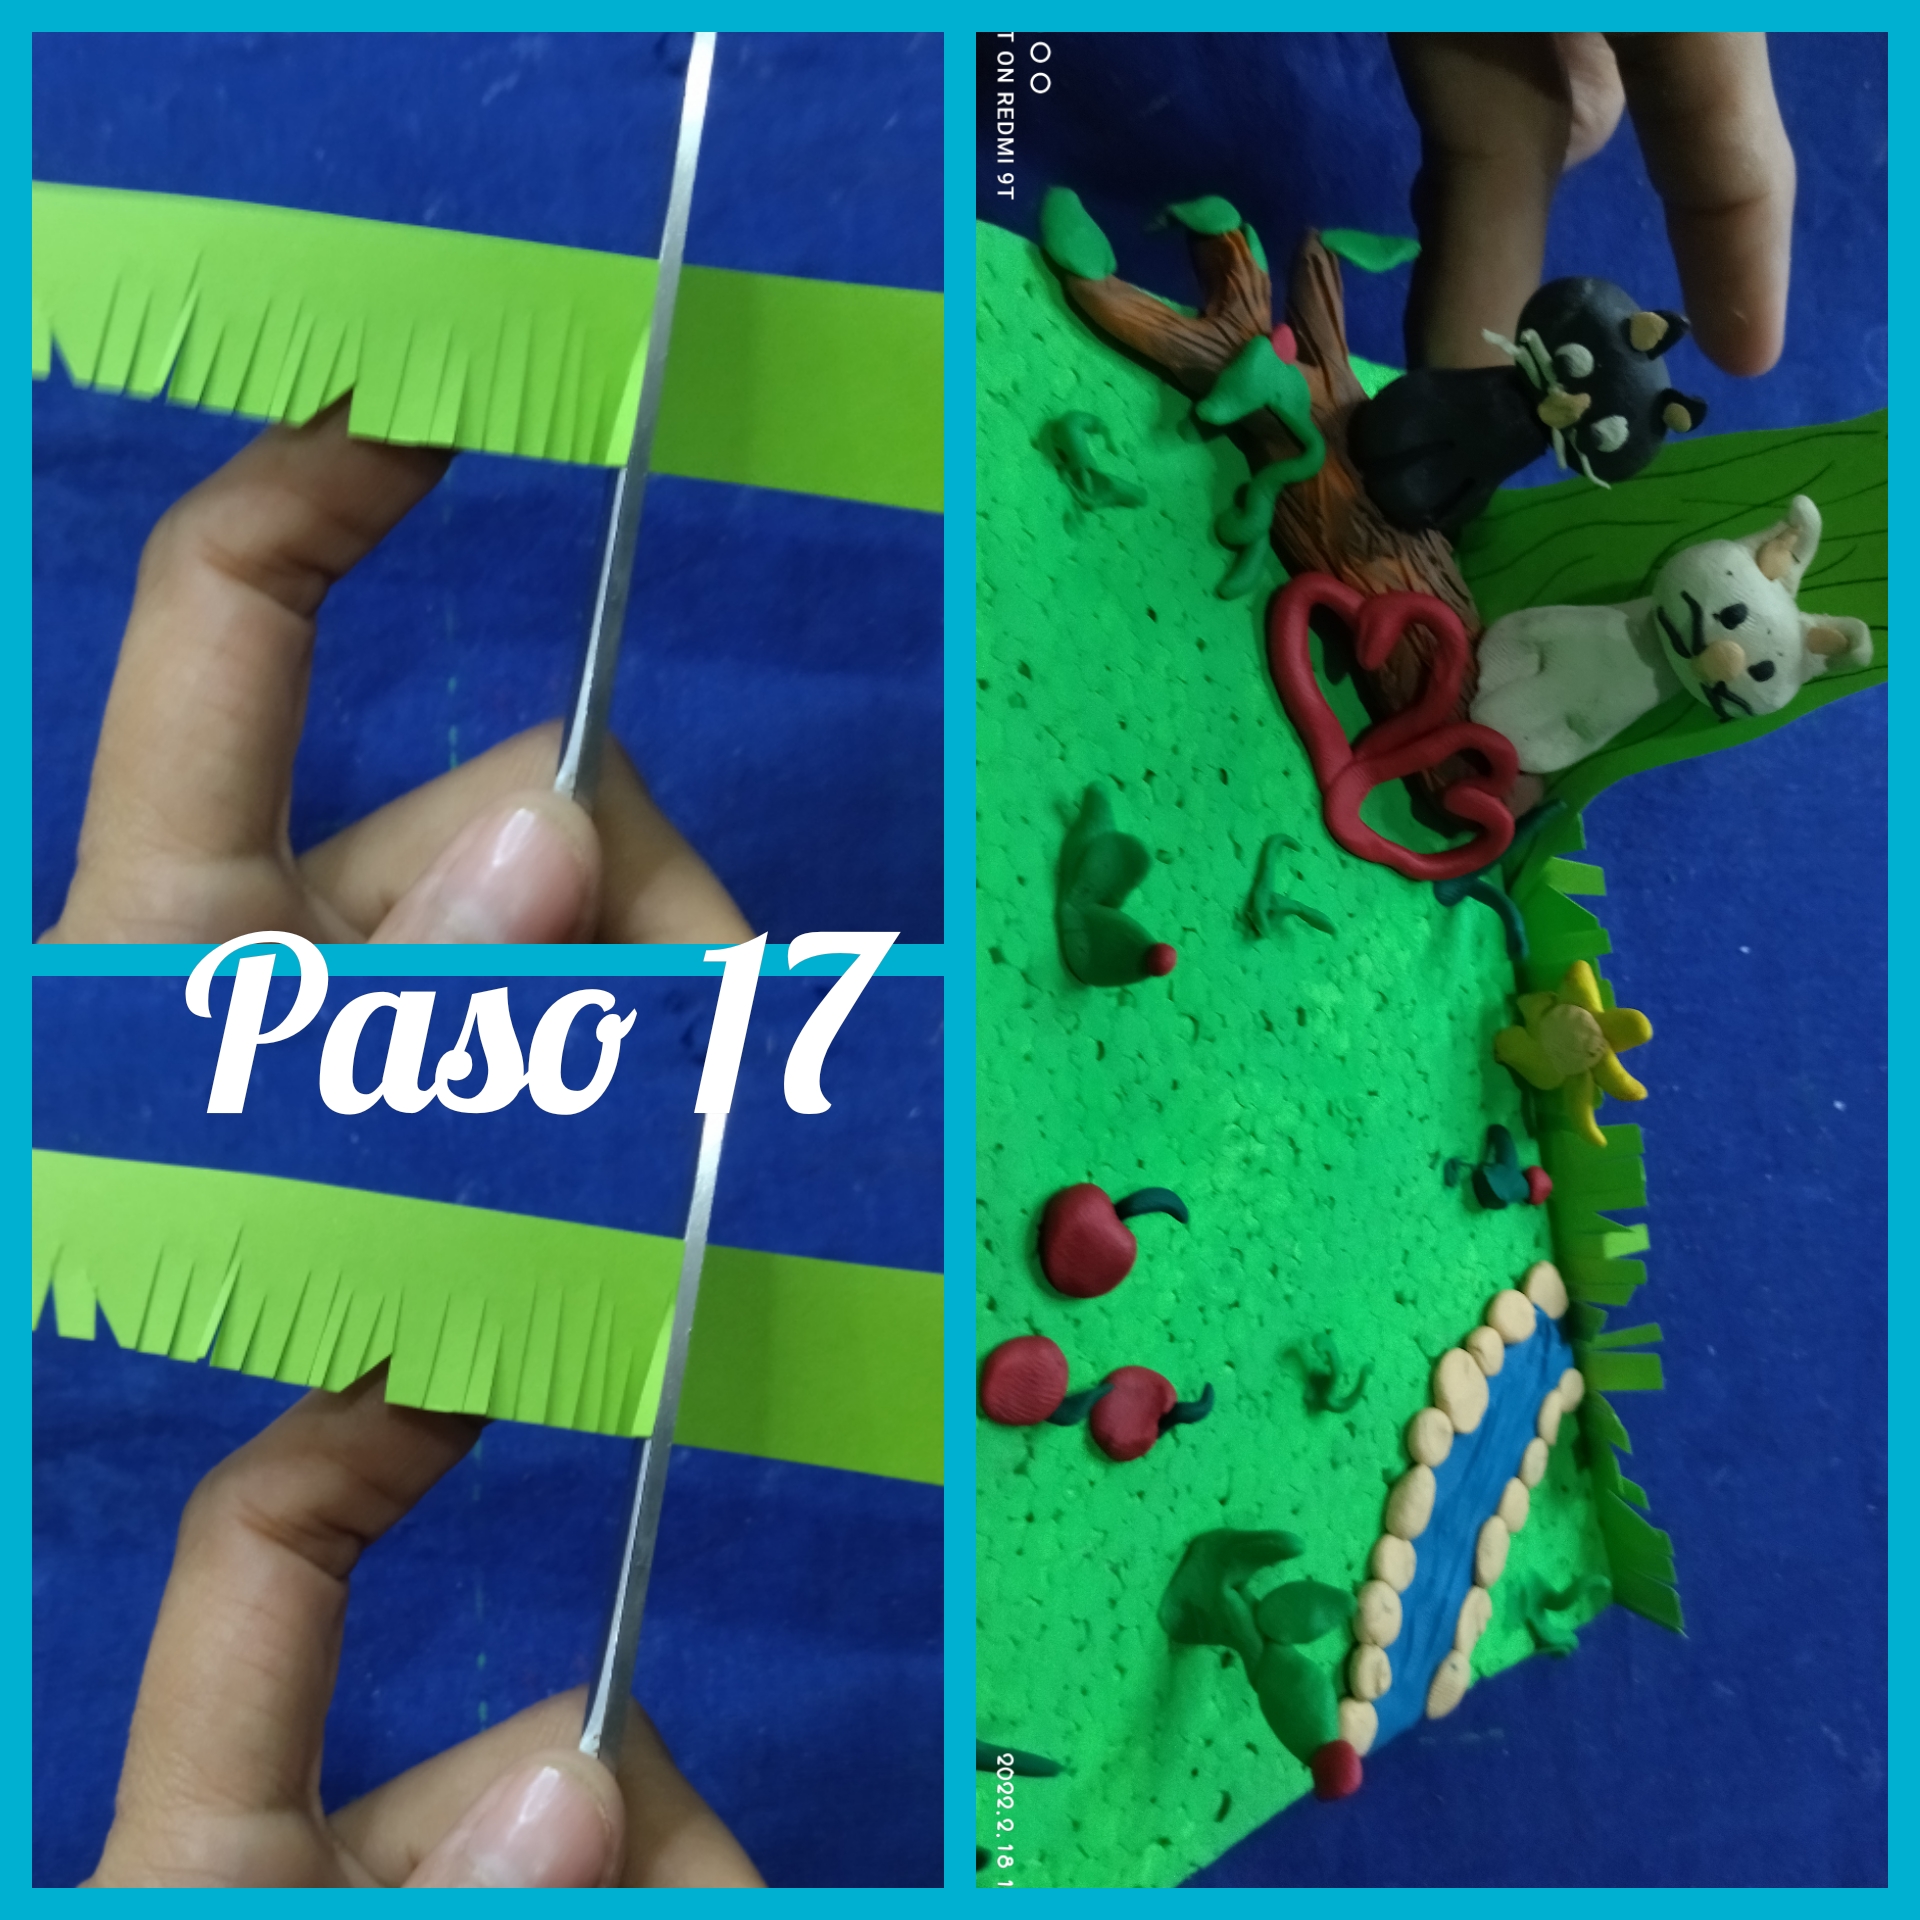
Luego pique una tira del largo del anime y la fui picando de manera desprolija para que se forma una especie de grama,que luego peque por el borde de el anime pero solo por la parte de atrás.
Then I cut a strip the length of the anime and I chopped it in an untidy way so that it forms a kind of grass, which I then cut along the edge of the anime but only on the back side.
 PASO 18 // STEP 18
🧿🧿🧿🧿🧿🧿🧿🧿🧿🧿
PASO 18 // STEP 18
🧿🧿🧿🧿🧿🧿🧿🧿🧿🧿
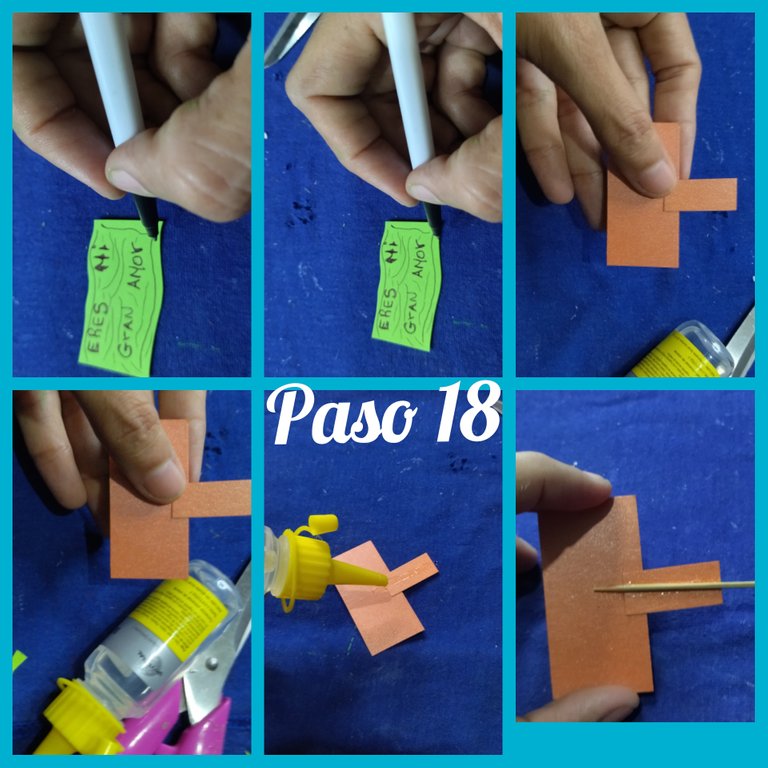
Quise darle algunos toques de decoración entonces tome un trocito de papel verde y uno naranja e hice una especie de letrero, al que luego le pegue con el silicón y le pegue un palillo,que me permita luego fijarlo a la maqueta.
I wanted to give it some decorative touches so I took a piece of green paper and an orange one and made a kind of sign, which I then glued with silicone and stuck a toothpick to it, which would allow me to attach it to the model.
 PASO 19 //STEP 19
🧿🧿🧿🧿🧿🧿🧿🧿🧿🧿
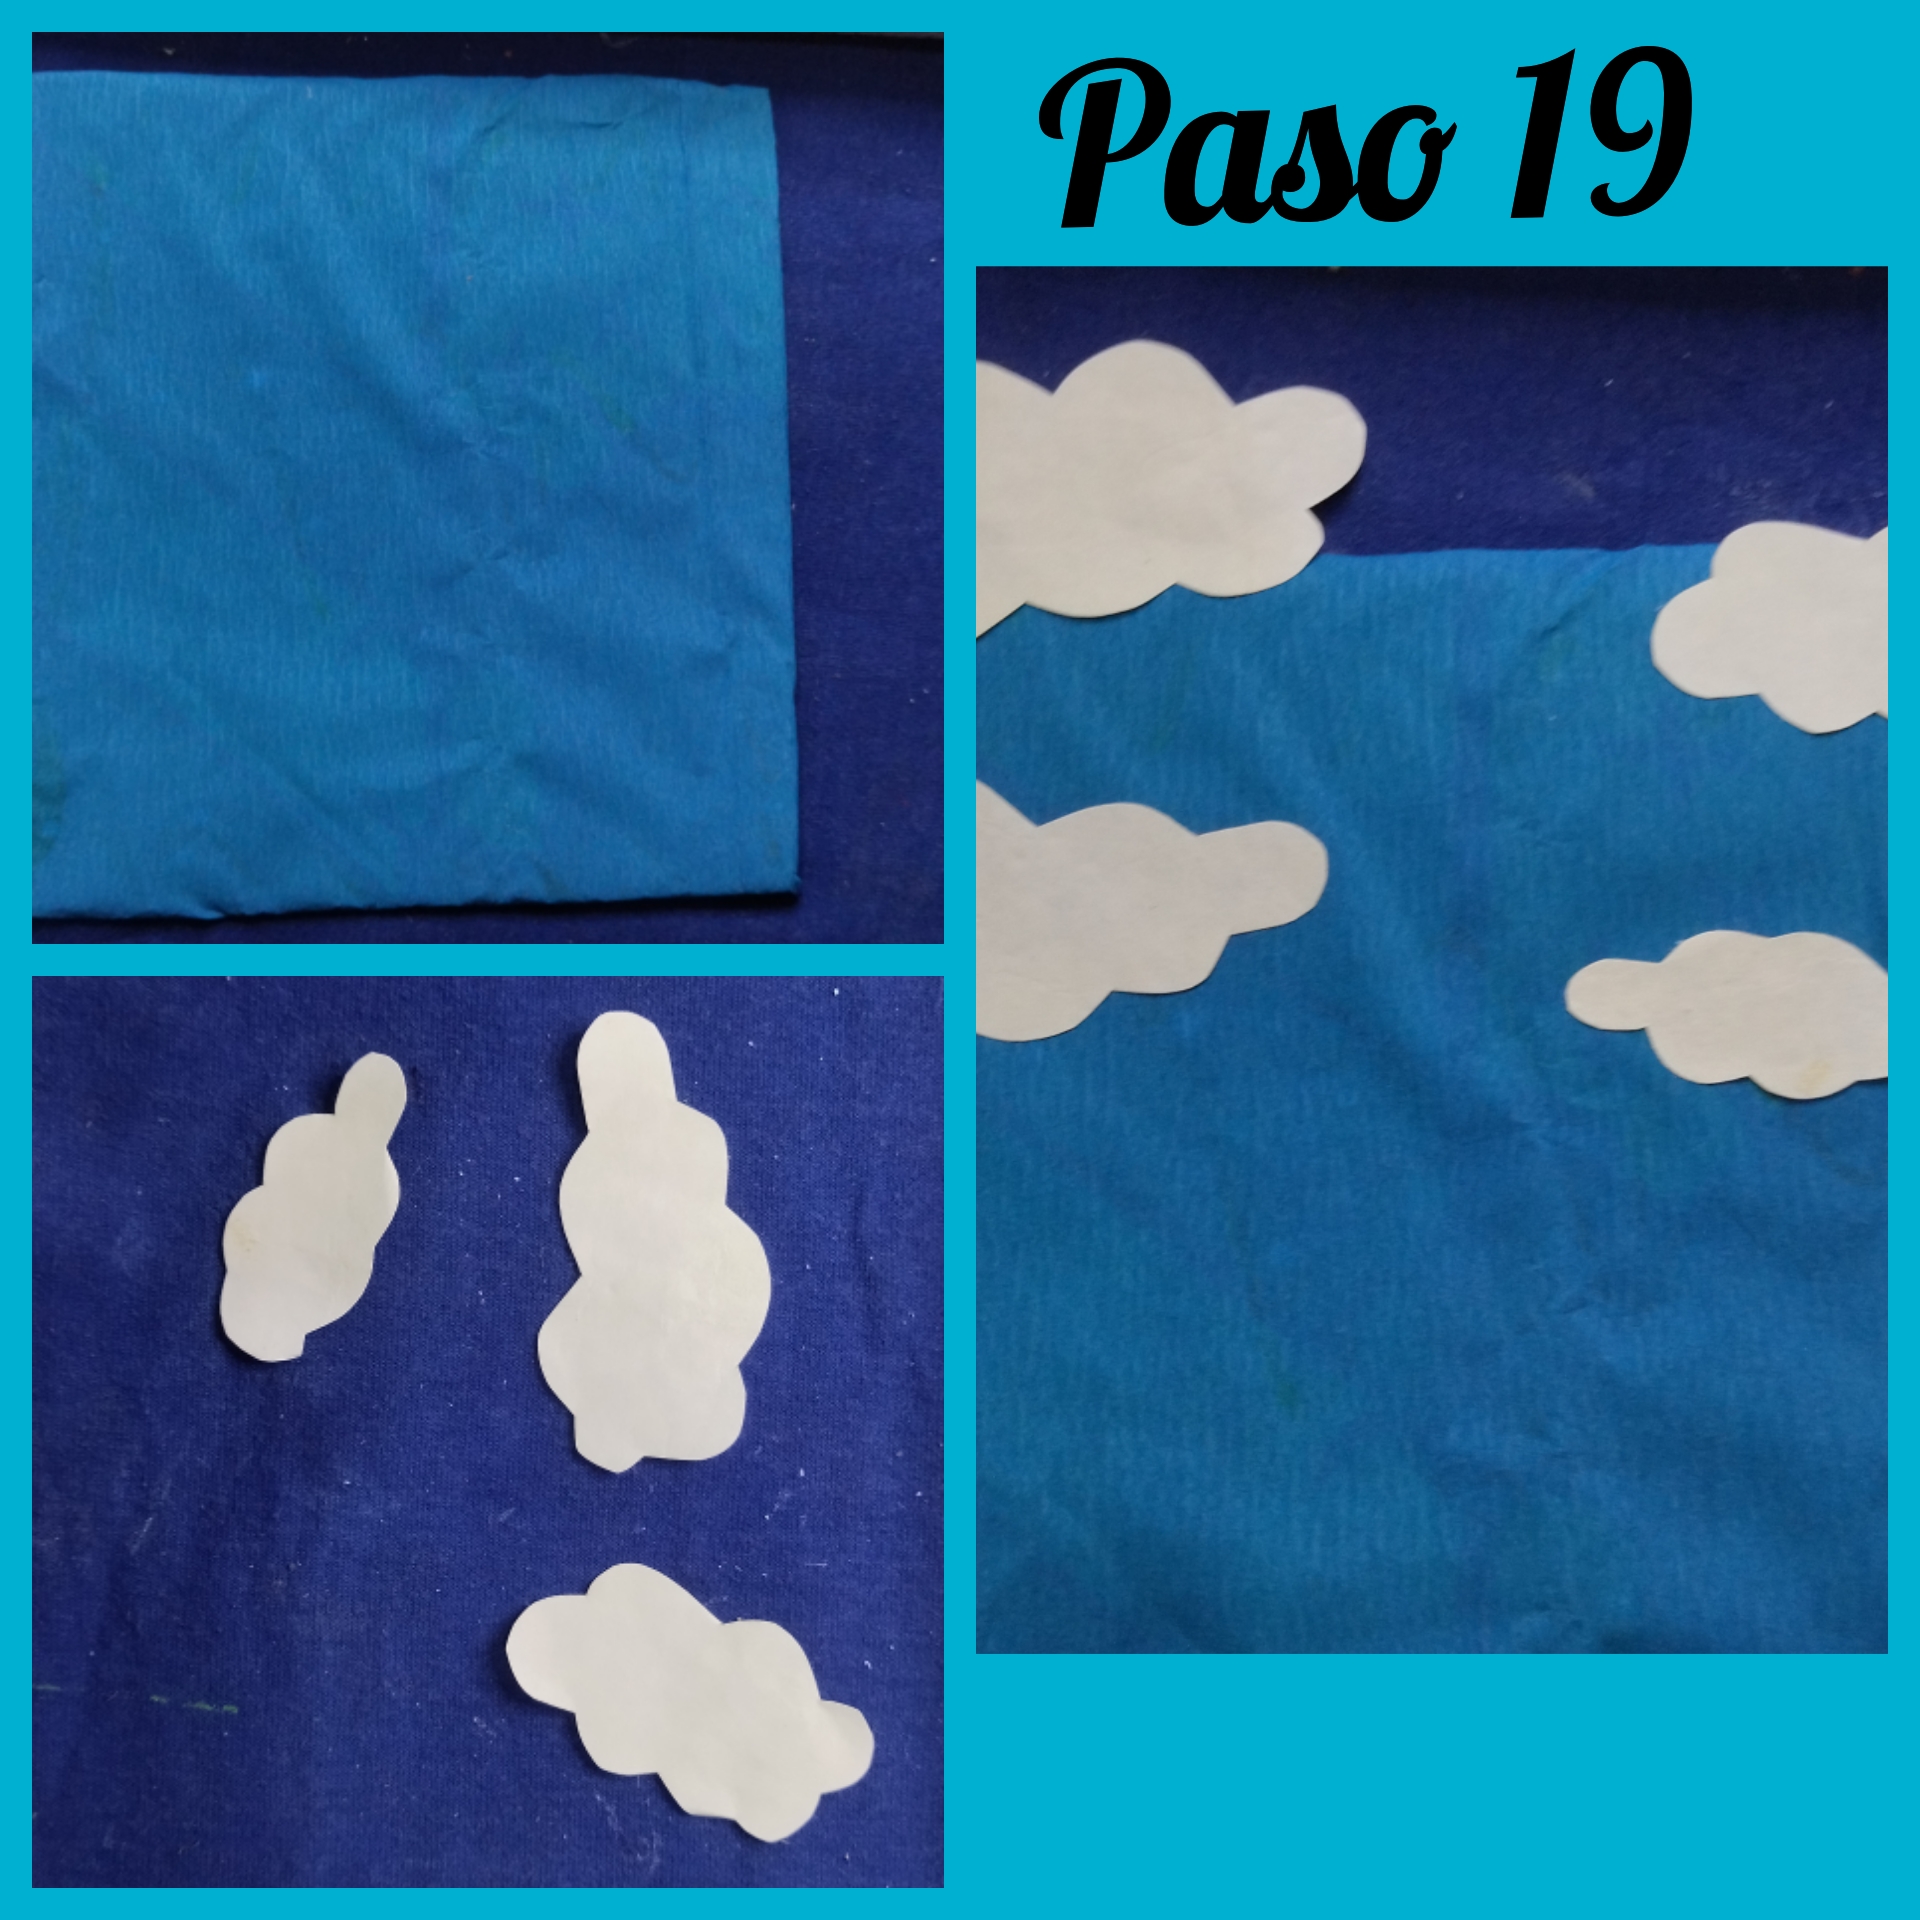
Tome un cuadrado de una caja de cartón y lo forre con papel crepé azul para simular el cielo que será el fondo de mi propuesta.
I took a square of a cardboard box and lined it with blue crepe paper to simulate the sky that will be the background of my proposal.
Tome entonces una hoja blanca pued ser de reciclaje y picamos varias nueves, las cuales pegamos con el silicón en el cartón que forramos de papel crepé y de esta manera formamos el cielo.
Then take a white sheet of recycled paper and cut several walnuts, which we glued with silicone on the cardboard that we lined with crepe paper and in this way we formed the sky.
 PASO 20 // STEP 20
🧿🧿🧿🧿🧿🧿🧿🧿🧿🧿
Como paso final le aplique Silicón frío al cartón dónde formamos el cielo y pegamos al anime, haciendo de esto un elemento que le da profundidad a la escena de amor de estos tiernos y enamorados gatitos.
As a final step I applied cold Silicone to the cardboard where we formed the sky and glued it to the anime, making this an element that gives depth to the love scene of these tender and in love kittens.
 FOTOS DEL RESULTADO FINAL//PHOTOS OF THE FINAL RESULT
🧿🧿🧿🧿🧿🧿🧿🧿🧿🧿
FOTOS DEL RESULTADO FINAL//PHOTOS OF THE FINAL RESULT
🧿🧿🧿🧿🧿🧿🧿🧿🧿🧿
 🧿🧿🧿🧿🧿🧿🧿🧿🧿🧿
 🧿🧿🧿🧿🧿🧿🧿🧿🧿🧿
 🧿🧿🧿🧿🧿🧿🧿🧿🧿🧿
 🧿🧿🧿🧿🧿🧿🧿🧿🧿🧿
 🧿🧿🧿🧿🧿🧿🧿🧿🧿🧿
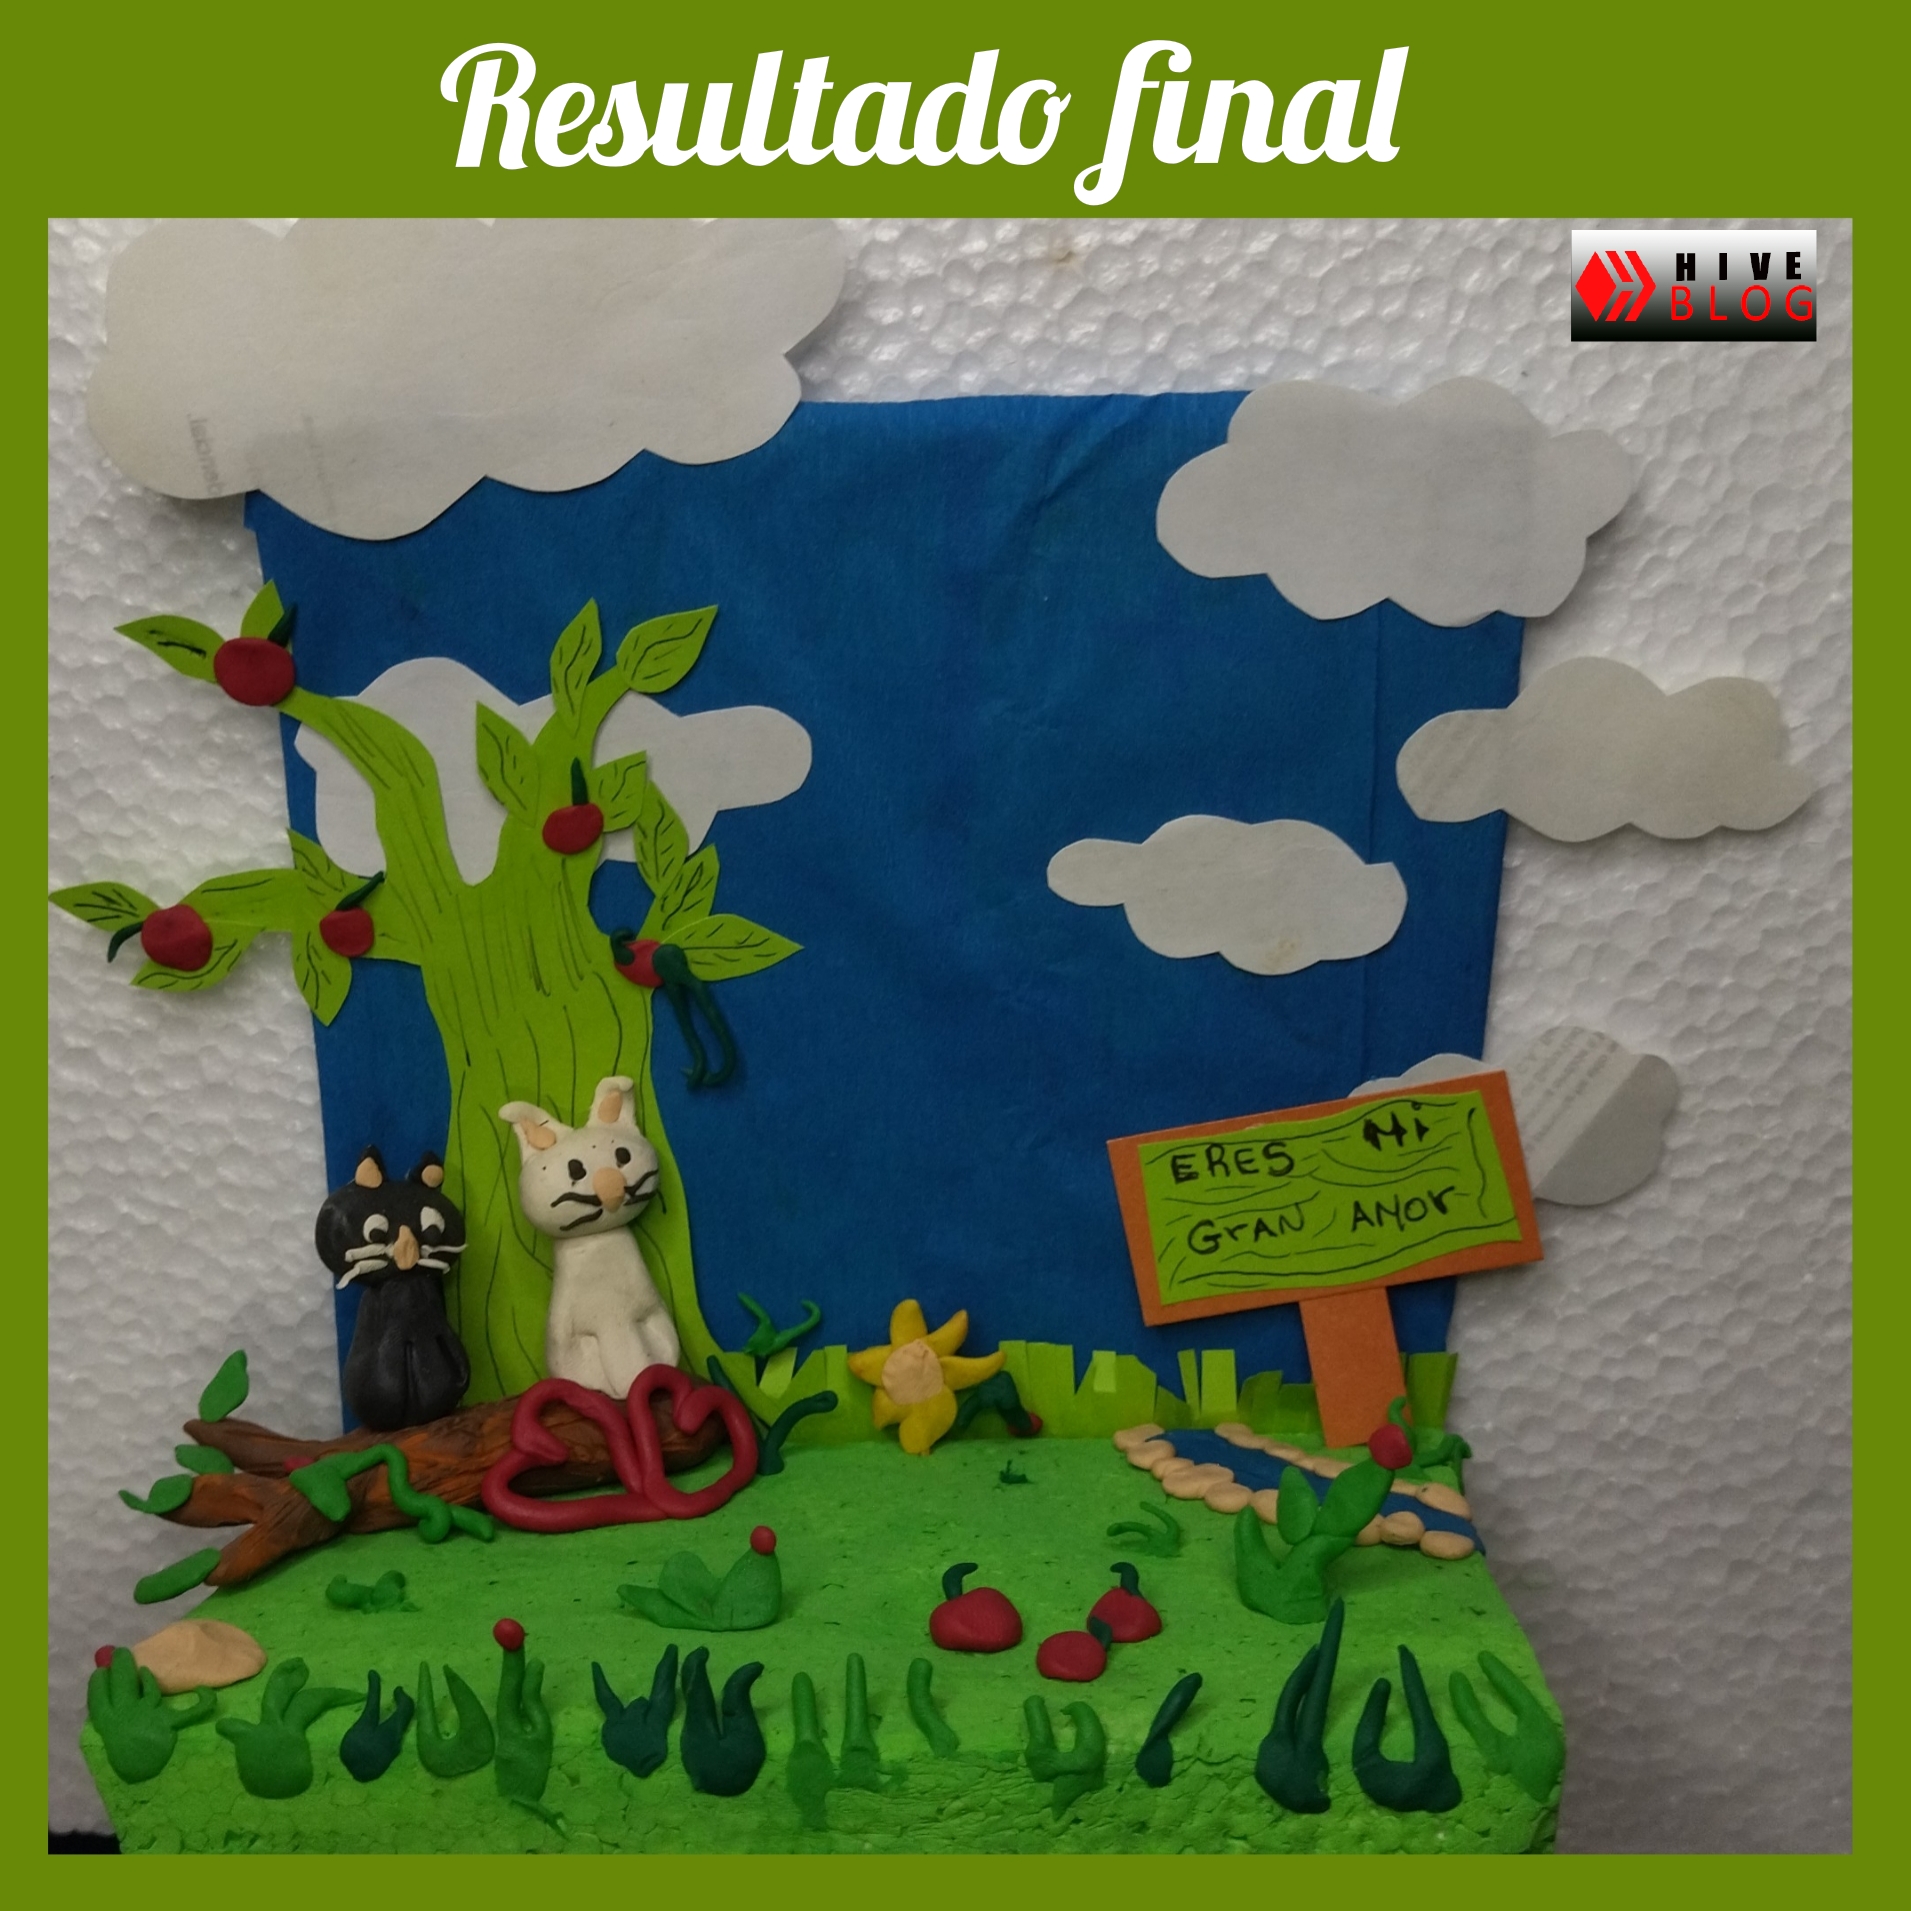
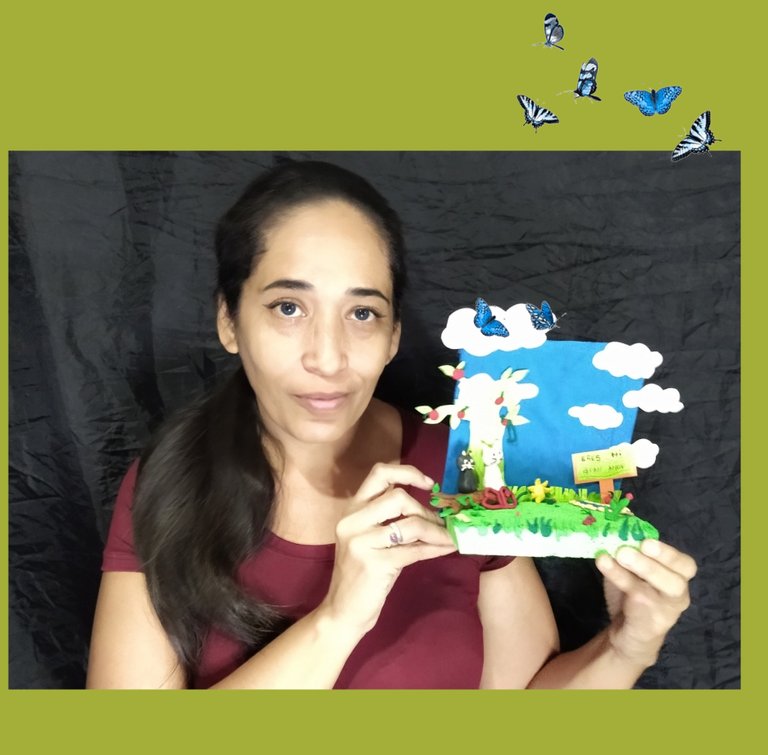
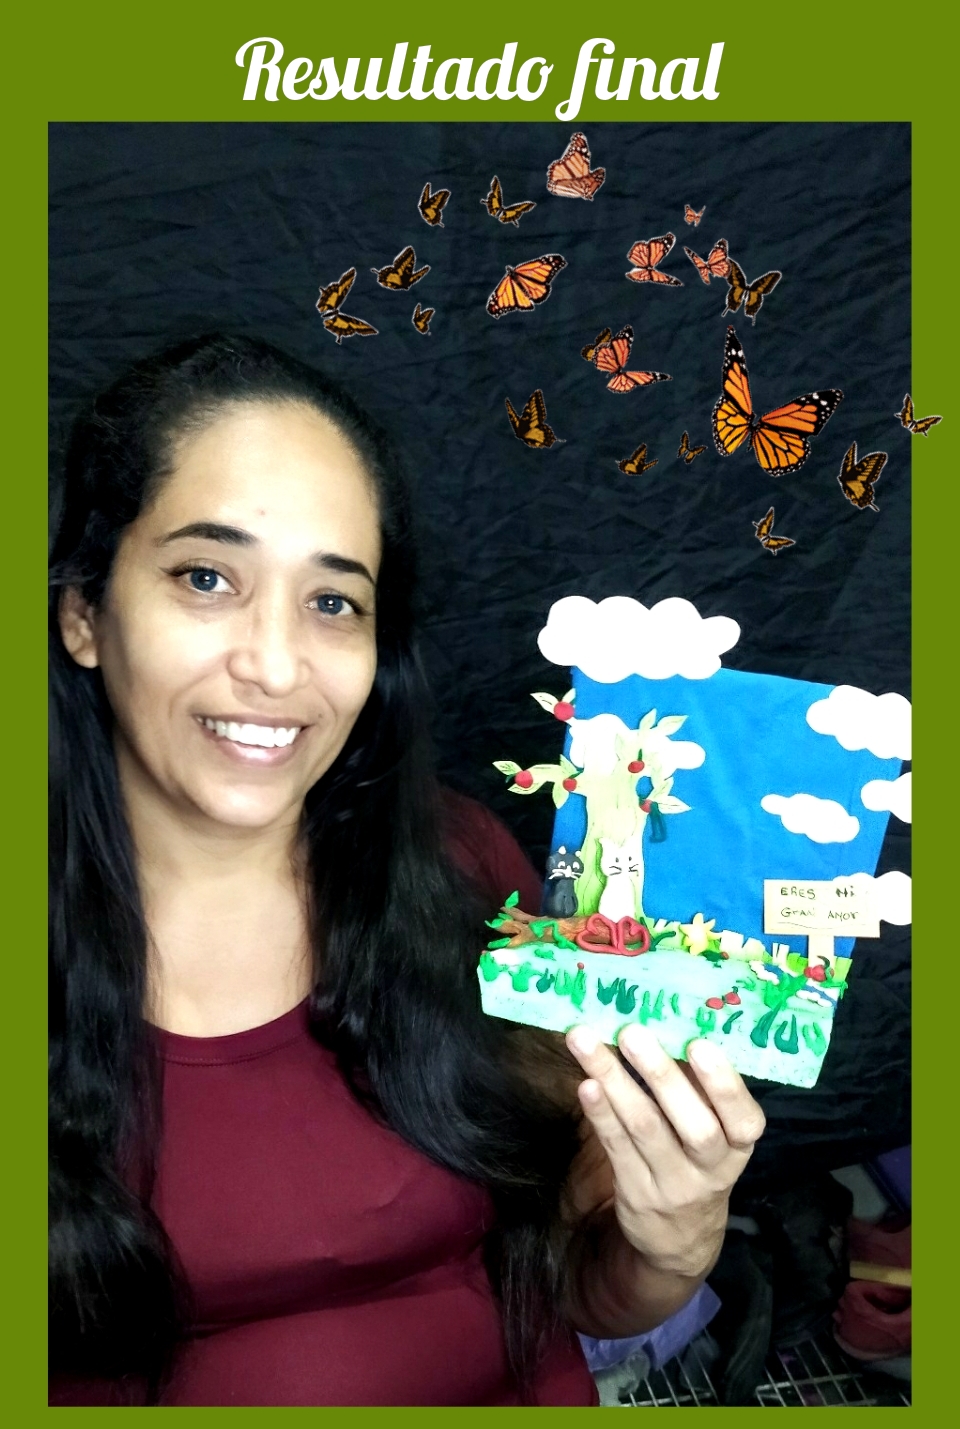
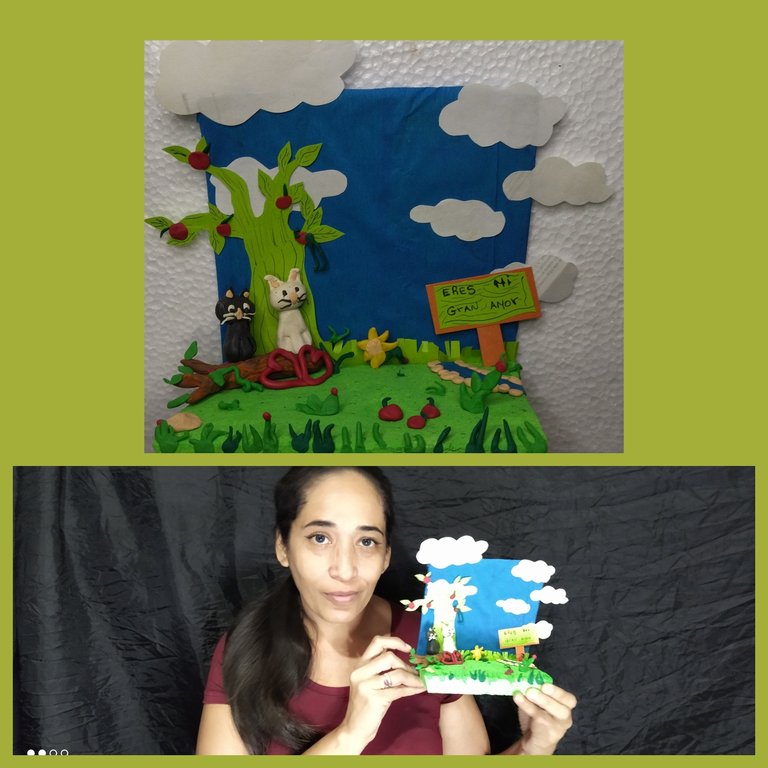
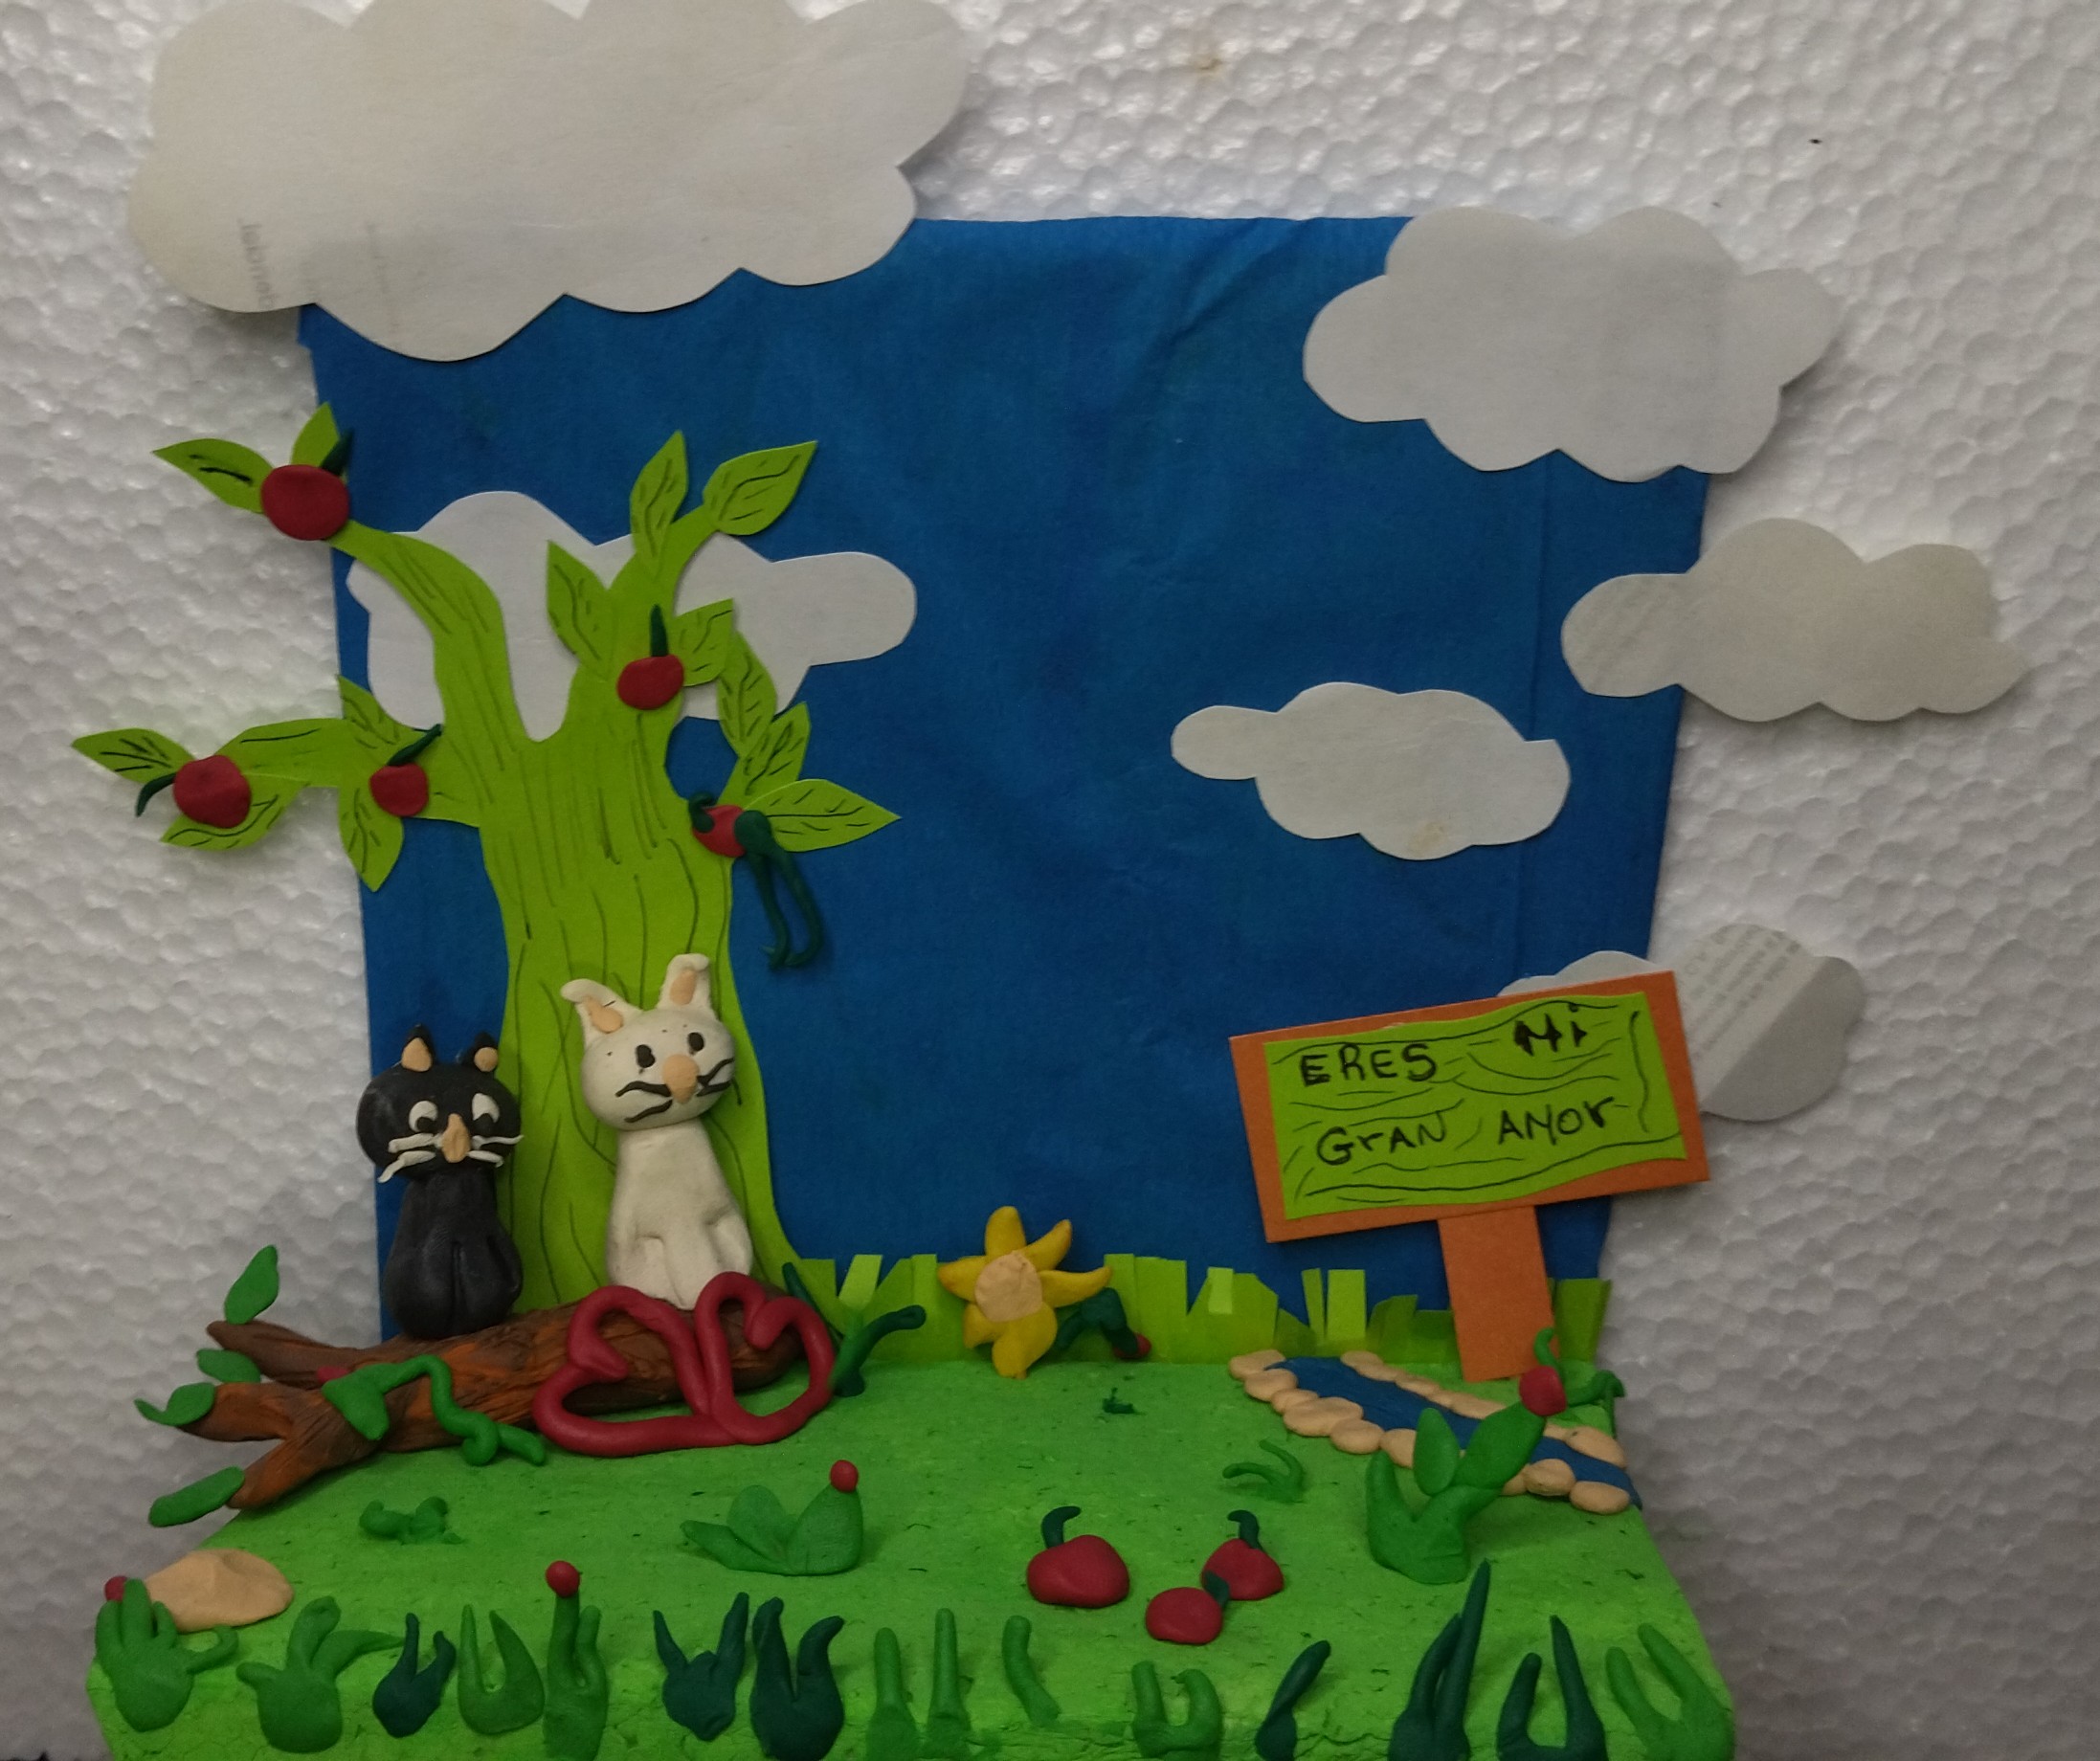
Cómo pueden ver, fue un poco extenso la elaboración de el trabajo del día hoy, porque está lleno de pequeños detalles que nos ayudaron a darle vida y recrear la escena tan linda de este amor gatuno en toda su expresión.
As you can see, it was a bit extensive the elaboration of today's work, because it is full of small details that helped us to give life and recreate the cute scene of this cat love in all its expression.
Espero que les haya gustado mi Diorama créanme fue un trabajo arduo pero el resultado final para mí valió la pena ¿Tu que crees?.
I hope you liked my Diorama, believe me it was hard work but the final result for me was worth it, what do you think?
Le hago la invitación a
@danhyelita24 @alexiscova @mili2801 a que se animen y participen se va divertir, bueno mis amores esto es todo por el día de hoy espero realmente que les haya gustado mi representancion gatuna del amor, si es así te invito a que votes, comentes y rebloguea.
I invite
@danhyelita24 @alexiscova @mili2801 to participate and have fun, well my loves this is all for today I really hope you liked my cat representation of love, if so I invite you to vote, comment and reblog.
🎨 Todas las fotos fueron tomadas con mi teléfono Xiaomi readmi 9T y son de mi propiedad.
🎨 All photos were taken with my Xiaomi readmi 9T phone and are my property.
🎨 Utilice el traductor Deepl y el programa polish para la edición de las fotografías.
🎨 Use the Deepl translator and the polish program for photo editing.
 🧿🧿🧿🧿🧿🧿🧿🧿🧿🧿
🧿🧿🧿🧿🧿🧿