(ENG)
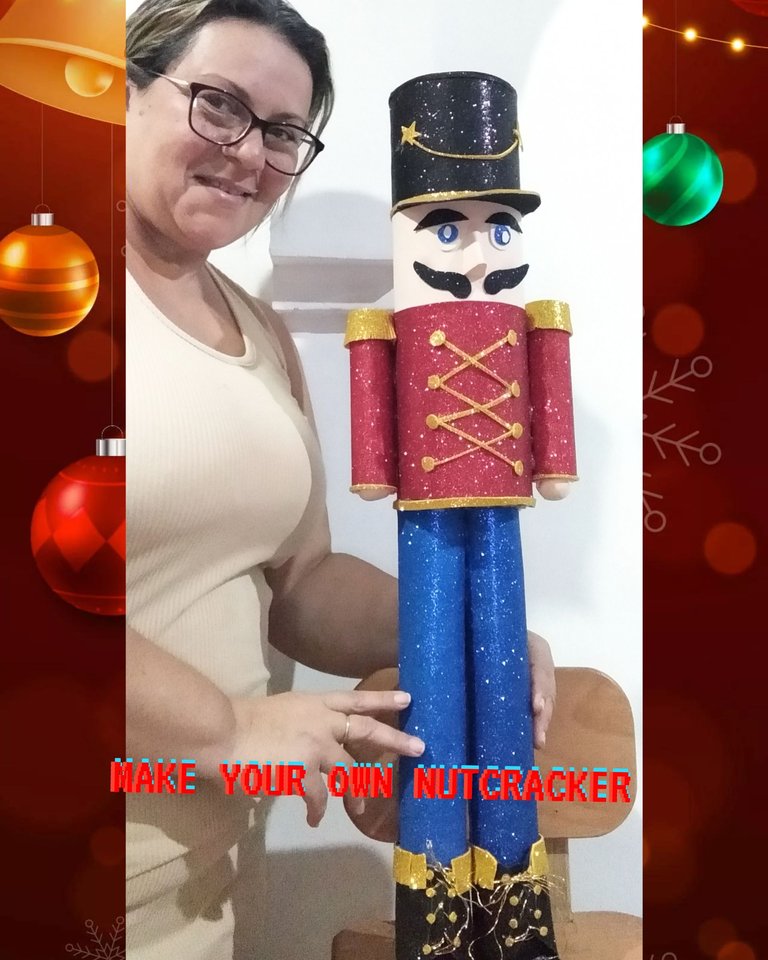
Hello everyone, I hope you are full, full of health and that the joy of this Christmas fills you with a lot of creative inspiration, today I am pleased to join this proposal, Make your own NUTCRACKER, we can now see them in the different decorations of shopping centers, squares and streets, where artists are inspired to give a great Christmas touch, with these Soldiers, there are various stories regarding their origin, some texts speak of a King who would marry a princess, but he was Bewitched by a little mouse, he was enchanted by turning him into a wooden soldier. This king had the ability to crack nuts with his teeth and that's where his name comes from. I made this with great love where he used various useful and recyclable materials. I want to extend the invitation to @linita, @mariaj151305 and @lupasbra21. They will surely bring a great creation. Without further ado, I invite you to follow me. I hope you enjoy it.
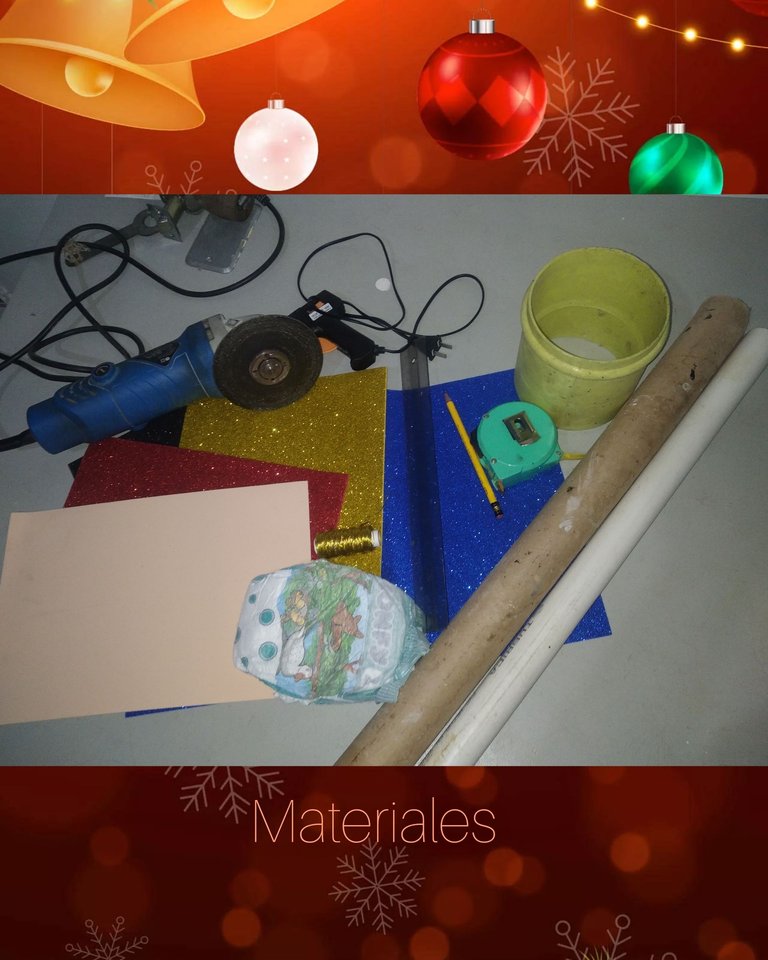
Materials:
. 4 inch black water pipe.
. 2 inch electricity tube.
. 1 inch cardboard tube.
. Hot silicone.
. Foami colors (frosted electric blue, black, frosted red and gold, white, flesh color)
. Cardboard
. Measuring tape.
. Ruler.
Pencil
. Scissors.
. Golden thread.
. Emery, or saw.
. Disposable diaper
STEPS:
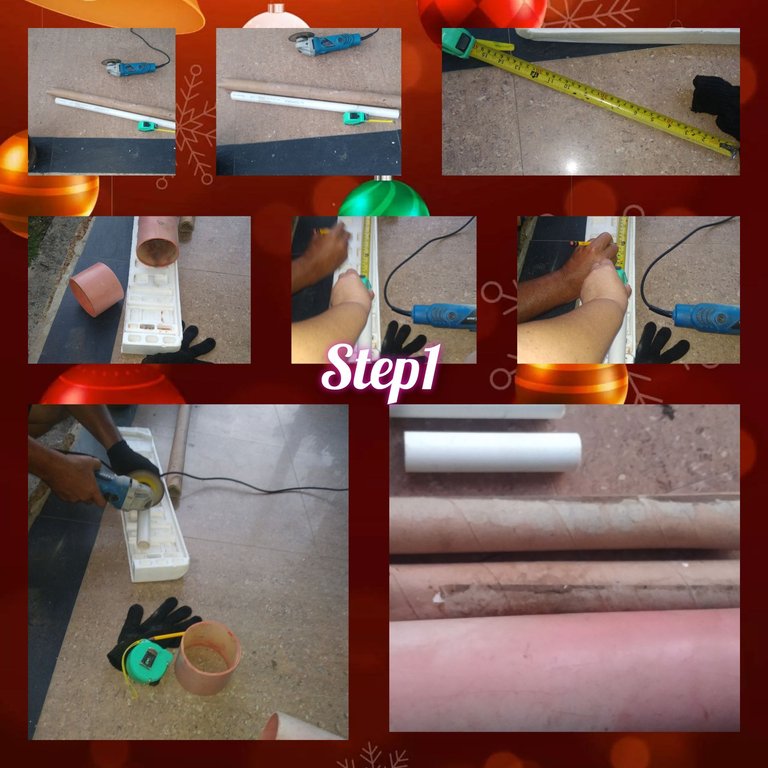
1.) Start by marking the measurements of each of the pieces, I thought it would be easy to use the cutting grinder, but I was frozen with that, it made me very afraid, I was scared, so I asked my husband for help, who helped me with that. Cut the 4" tube, 35 cm, from the 2" cardboard tube, I made cuts to two pieces of 30cm each, and for the arms, cut two 15cm pieces of the 1" electrical tube. The pieces being ready.
2.) From the 35 cm sewage pipe, frame and cut 10cm of black foam, for the face I frame and cut out 8cm of flesh-colored foam and the rest of the pipe. I begin to measure and cut three colors of the foami, frame and short 12cm of black foami, 10cm of flesh-colored foami and 17cm of the frosty red foami.

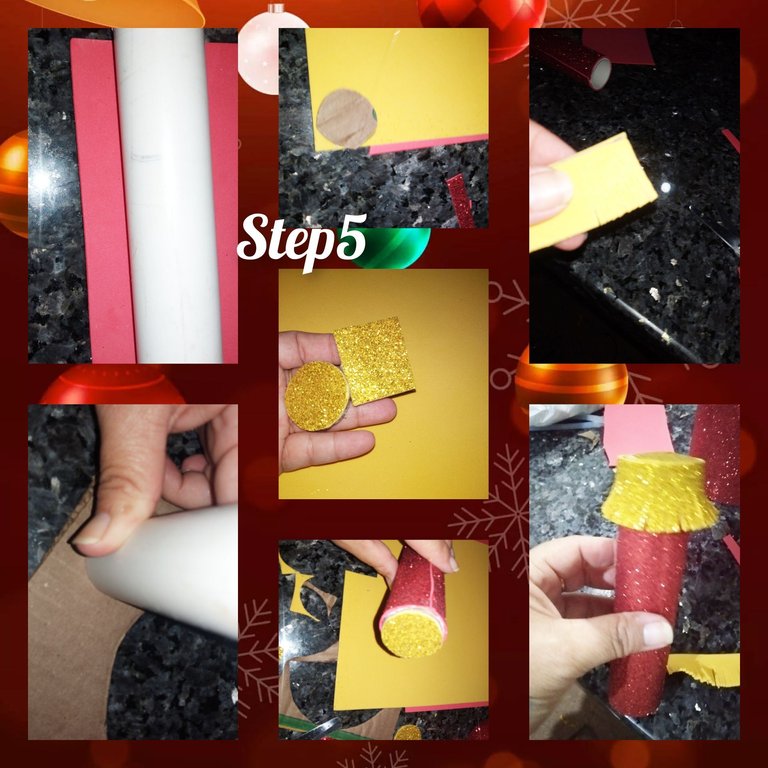
3.) I place the 4" tube, on a cardboard I frame its round shape and cut out the cardboard, cut the cardboard, apply silicone and glue it on the black foam, cut out the residual foam, now I start gluing the black foam , in the initial part, from one of the ends of the 4" tube, and I continue gluing the upper part by gluing the lined circle of the same color. I continue gluing the red foam to the bottom.

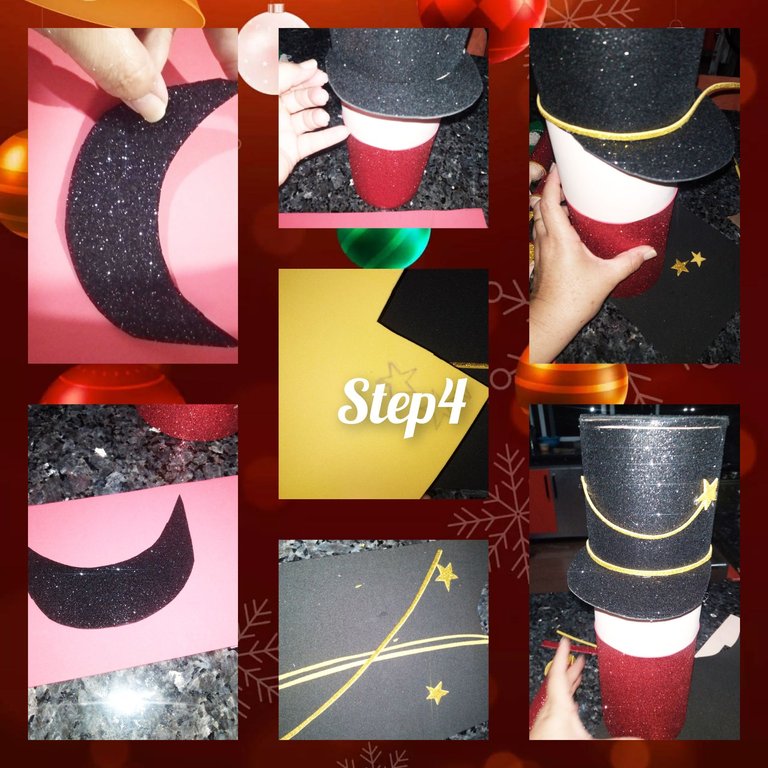
4.) Frame, and cut out an arched shape, from black foam, and glued it on the front part, I say part of the front, since I left, for the back, the cuts that remain when gluing the foam. That's why I take the smoothest and most even foam. He cut very thin strips of gold frosted foam and drawing and cut out two small stars. I go back to the front part, just above the glued tab, and I place a small ribbon and on both sides I glue the star, I also glue a thin ribbon to the crown of his hat.nutcracker.
5.) Lining, the 1" tubes, with the red foam. Frame on the cardboard, the circles at one end of the electricity tube, also frame on the gold foam, cut out the pieces, a total two cardboards and two foam. I glue the foam, on the cardboard, crazy silicone I glue the lined cardboard butt, in one of the loops, I cut a strip of frosted foam, I make bangs at one of the ends with the scissors, I apply silicone and glue on the lined tube.
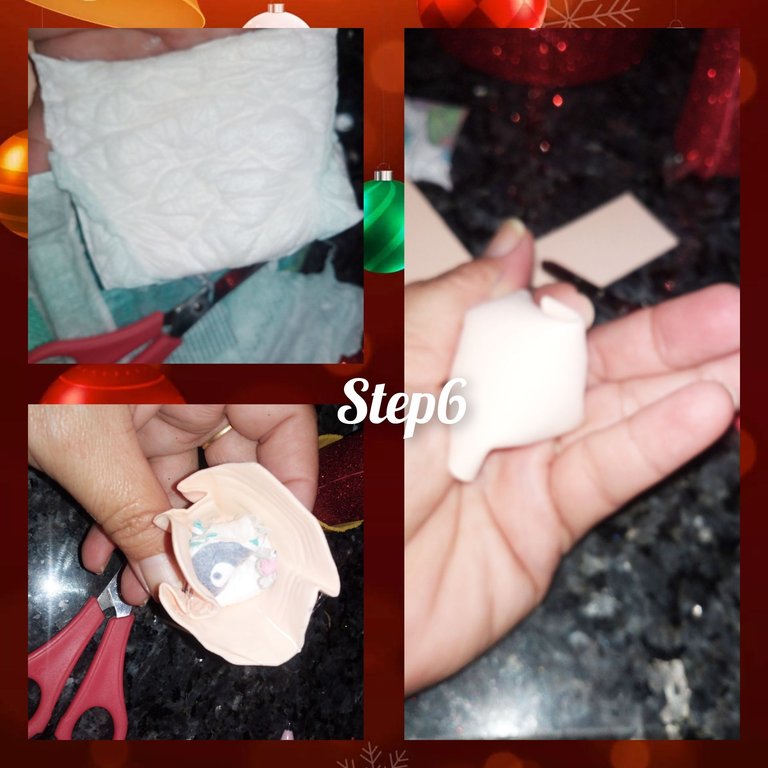
6.) I cut the central part of the disposable diaper, make a cotton ball, then insert it into a small piece of flesh-colored foam. Armanda, I apply silicone to the other side of the piece, glue it to the arms. The next thing will be to glue the arms, right from the red foam. I apply silicone and tidy it up, so it looks as good as possible.
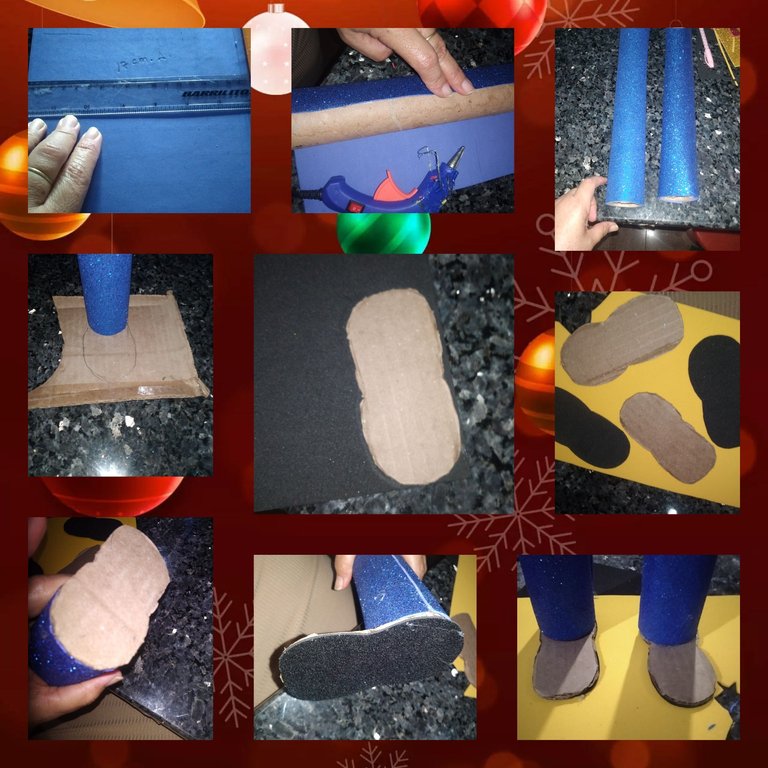
7.) I apply silicone and cover the cardboard tubes, with frosty blue foam, which will be the legs, I mark one of the sides of the tube on a piece of cardboard then I shape the front part, to form the sole of the tube. The calsaso of the enchanted nutcracker, cut out the piece of cardboard, glued it on the black foam, cut out the residue. to the tube, on the unlined part of the cardboard.
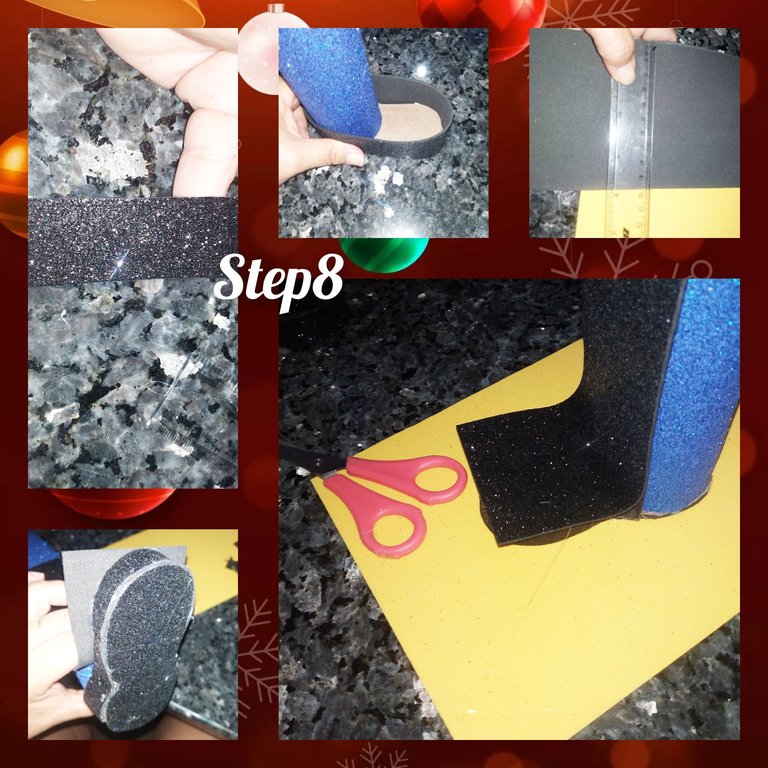
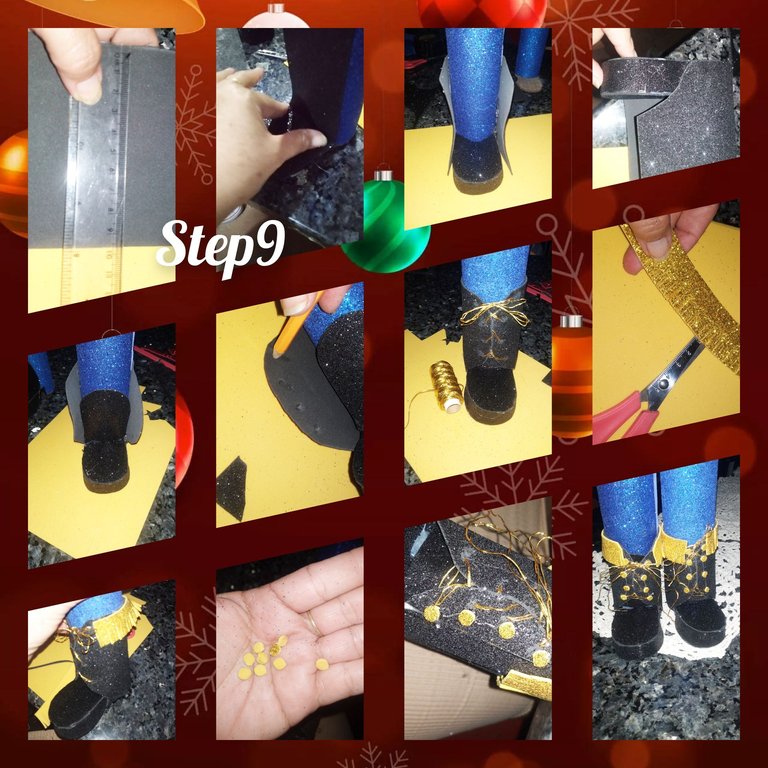
8.) Frame and cut out a 2.5 cm long strip of red foam and glue it with silicone all around the sole and leg on the back side. I cut a piece of foam 5 cm wide and 15 cm long. long, and glued from the tip of the shoe up the leg, glued.
9.) I shape the glued foam by cutting the residue, shaping and guiding myself from the template and rounding at the top of the leg. I glue a sheet, of black foam, from the back, to the center or front of the boot, I also glue the other side, found, both sides in the front, Novelo with the black foam, and cut this, and I make a cut in the template to make the design of the boot. Once this is done, I round each end and make perforations with the pencil point on both sides. I introduce the golden thread, which I will braid the boot and make a side at the top. I cut and make a small fringe, which I will glue around the edge of the upper part of the boot, and I cut out small circles that I will glue in each perforation, made to the boot. Finished the legs including his shoes, glued to the nutcracker body.
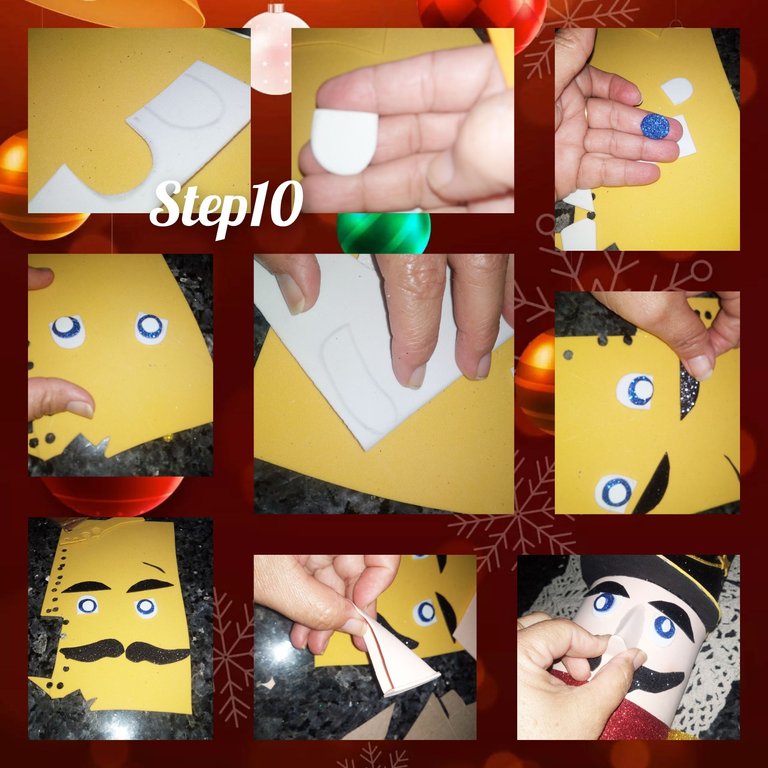
10.), I mark the eyes on the white foam and cut them out, then a circle in blue and a smaller one in white, I mark and cut out the mustaches and eyebrows from the black foam, and I start gluing them. the pieces on the doll's face, he also framed and cut out a triangle of flesh-colored foam to form the nose.
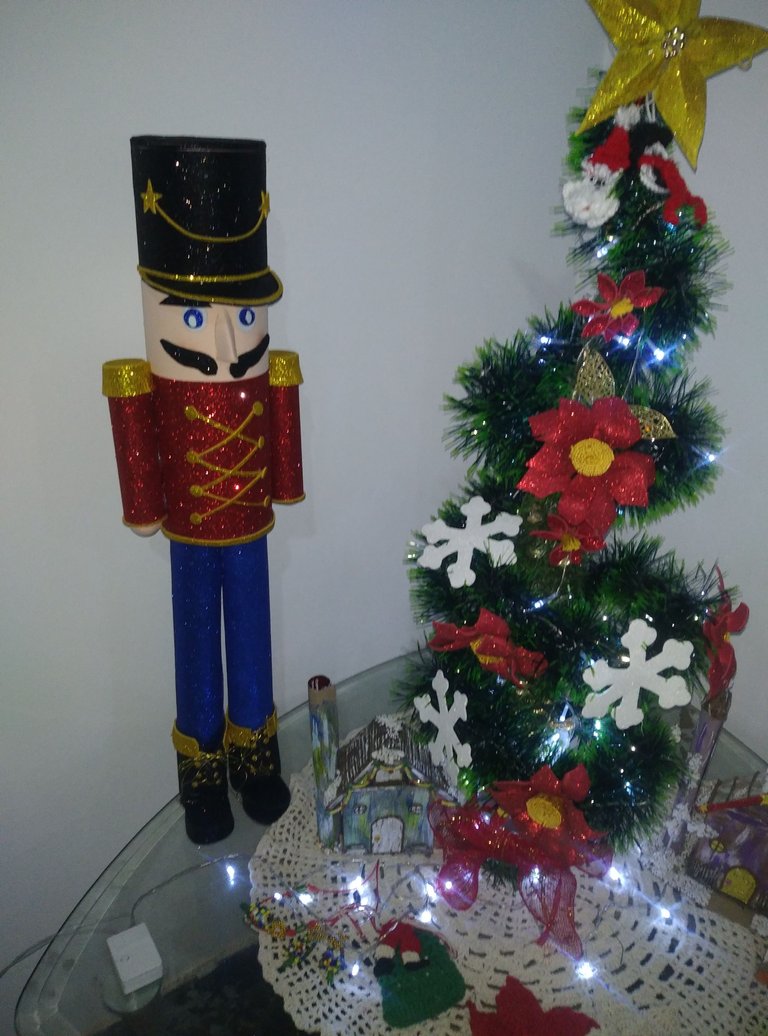
 In this way, the creation of my Enchanted Nutcracker culminated.Very excited with the final result.
.All photos were taken with my smartphone.
. USE Incollage
. Use traductor lenguaje
Thank you for visiting my blog, see you next time.
(ESP)
Hola a todos, espero se encuentren, plenos, llenos de mucha salud y que la alegría de esta navidad, los llenes de mucha inspiración creativa, hoy me complace unirme a esta propuesta, Haz tu propio CASCANUECES, ya podemos verlos en los diferentes adornos de los centros comerciales, plazas y calles, dónde los artistas se inspiran para dar, un gran toque navideño, con estos Soldados, existes diversos relatos en cuanto a su origen, algunos textos, hablan de un Rey que se casaría con una princesa, pero fue embrujado por una ratoncita, lo hechizo convirtiéndolo en un soldado de madera, este rey tenía habilidad para romper nueces con sus dientes y de ahí proviene su nombre.
Yo realice con mucho cariño este dónde utilice diversos materiales de provecho y reciclable. Quiero hacer extensiva la invitación a @linita, @mariaj151305 y @lupasbra21. De seguro traerán una gran creación. Sin más les invito a seguirme. Espero lo disfruten.
Materiales:
. Tubo de aguas negras 4pulgadas.
. Tubo de electricidad 2pulgadas.
. Tubo de cartón 1pulgada.
. Silicón caliente.
. Foami colores ( azul eléctrico escarchado, negro, rojo y dorado escarchado, blanco, color carne )
. Cartón
. Cinta metrica.
. Regla.
Lápiz
. Tijeras.
. Hilo dorado.
. Esmeril, o segueta.
. Pañal desechable
PASOS:
1.) Inicie, marcando las medidas de cada una de las piezas, pensé sería algo fácil usar el esmeril de corte, pero quedé helada con eso, me dio mucho miedo, me espante, entonces, pedí ayuda a mi esposo, quien me ayudó con eso. Corte de el tubo de 4", 35 cm, de el tubo de cartón de 2", hice cortes a dos piezas de 30cm, cada una, y para los brazos, corte dos piezas de 15cm de el tubo de electricidad de 1". Quedando listas las piezas.
2.) De los 35 cm, de el tubo de aguas negras, marco y corto 10cm de foami de color negro, para el rostro marco y recortó 8cm de foamu color carne y el resto de el tubo Comienzo a medir y cortar tres colores de el foami, marco y corto 12cm de foami de color negro, 10 cm de foami de color carne y de el foami color rojo escarchado color rojo 17cm.
3.) Coloco el tubo de 4", sobre un cartón marco su forma redonda y recortó el cartón, cortado el cartón aplico silicón y pego sobre el foami de color negro, recortó, el foami residual, ahora comienzo pegando el foami de color negro, en la parte inicial, de uno de los extremos de el tubo de 4", y sigo pegando en lnaparte superior pegando el círculo forrado de igual color. Sigo pegando en la parte inferior el foami de color rojo.
4.) Marco, y recortó una forma arqueada, de foami de color negro, y pego en la parte de el frente, digo lnaparte de el frente, ya que deje, para la tracera, los cortes que quedan al pegar el foami. Por ello tomo la más lisa y pareja de el foami. Corti tiras muy delgadas de foami escarchado dorado y dibujo y recortó dos pequeñas estrella. Me ubico nuevamente en la parte de el frente, justo sobre la pestaña pegada, y coloco, un pequeño listin y en ambos lados pego la estrella, además pego un delgado listón el la copa de el sombrero de el cascanueces.
5.) Forro, los tubos de 1",con el foami de color rojo. Marco sobre el cartón, el círculos de uno de los extremos de el tubo de electricidad, así mismo marco sobre el foami dorado, recortó las piezas, un total dos cartónes y dos de foami. Pego el foami, sobre el cartón, loco silicón pego e culo de cartón forrado, en uno de los lasos, corto una tira de foami escarchado, hago con las tijeras flequillos en uno de los extremos, aplico silicón y pego sobre el tubo forrado.
6.) Corto la parte central de el pañal desechable, hago una bolita de algodón, Lugo la Introduzco en un pedacito de foami color carne. Armanda, aplico silicón a el otro lado de la pueza, que sea los brazos pego. Lo siguiente será pegar los brazos, justo a partir de el foami de color rojo. Aplico silicón y ordenó, para que se vea lo mejor posible.
7.) Aplico silicón y cubrir los tubos de cartón, con foami de color azul escarchado, que seran las pierna, marco uno de los lados de el tubo sobre un trozo de cartón luego doy forma en la parte delantera, para formar la suela de el calsaso de el cascanueces encantado, recortada l apueza de cartón, pego sobre el foami de color negri, recortó el residuo.a el tubo, por la parte de el cartón sin forrar.
8.) Marco y recortó de el foami color rojo, una tira de 2.5 cm de largo y pego con silicón, por todo el alrededor de la suela y la pierna por su parte tracera, Corto un pedazo de foami de 5cm de ancho y 15 de largo, y pego desde la punta de el calzado hacia arriba de la pierna, pegada.
9.) doy forma al foami pegado cortando el residuo, dando forma y guiandome de la plantilla y en la parte alta de la pierna redondeo. Pego una lámina, de foami de color negro, desde la parte de atras, hasta el centro o frente de la bota, igual pego el otro lado, encontrados, ambos lados en el frente, Novelo con el fomai color negro, y corto este, y en la plantilla hago un corte, para hacer el diseño de la bota. Hecho esto, redondeo cada extremo y hago con l apunta de el lápiz, perforaciones, en ambos lados, Introduzco el hilo dorado, que trenzar la bota y hago un lado en la parte superior. Corto y hago un pequeño flequillo, que pegare en todo el borde de la parte superior de la bota, y recortó pequeño círculos que pegare en cada perforación, hecha a la bota. Terminado las piernas incluído su calzado, pego a el cuerpo de cascanueces.
10.), marco en el foami de color blanco los ojos y recortó, luego un círculo en color azul y uno más pequeño de color blanco, marco y recortó de el foami de color negro, los bigotes y cejas,y comienzo ya a pegar las piezas en el rostro de el muñeco, así mismo marco y recortó un triángulo de foami color carne, para formar la naríz.
De esta forma, culminó la creación de mí Cascanues encantado. Muy emocionada con el resultado final.
Todas las fotos fueron tomadas con mí teléfono inteligente.
Agradecida hayas visistado mí blog, será hasta una próxima oportunidad.