
Buenas noches, cómo están mis queridos creadores y amigos que hoy me visitan?
Hoy quiero desearles un feliz y bendecido comienzo de mes, que venga cargado de muchos y lindos proyectos para compartir.
"Cuando el niño tiene su primer diente, se realiza una comida especial que consiste en siete granos, la cual es preparada siguiendo un ritual. Se cree que esto hará que los dientes crezcan rápido y sin inconvenientes. Solo tras haber cumplido un año, las uñas y cabello del bebé pueden ser cortados."
Como decía mi madre, "cada día aprendemos algo nuevo" y es muy cierto!
Y bueno decidí hacerles este humilde regalo.
Además les decoré unos cintillos que les mostraré en las fotos.
Y para comenzar a realizar este fácil tutorial, vas a necesitar:

Foami escarchado y mate
Pinturas y pinceles
Tijeras, lápiz y tiza
Silicón, molde
Cierre mágico, cinta de raso,
Adornos
Plancha eléctrica.
Paso 1:
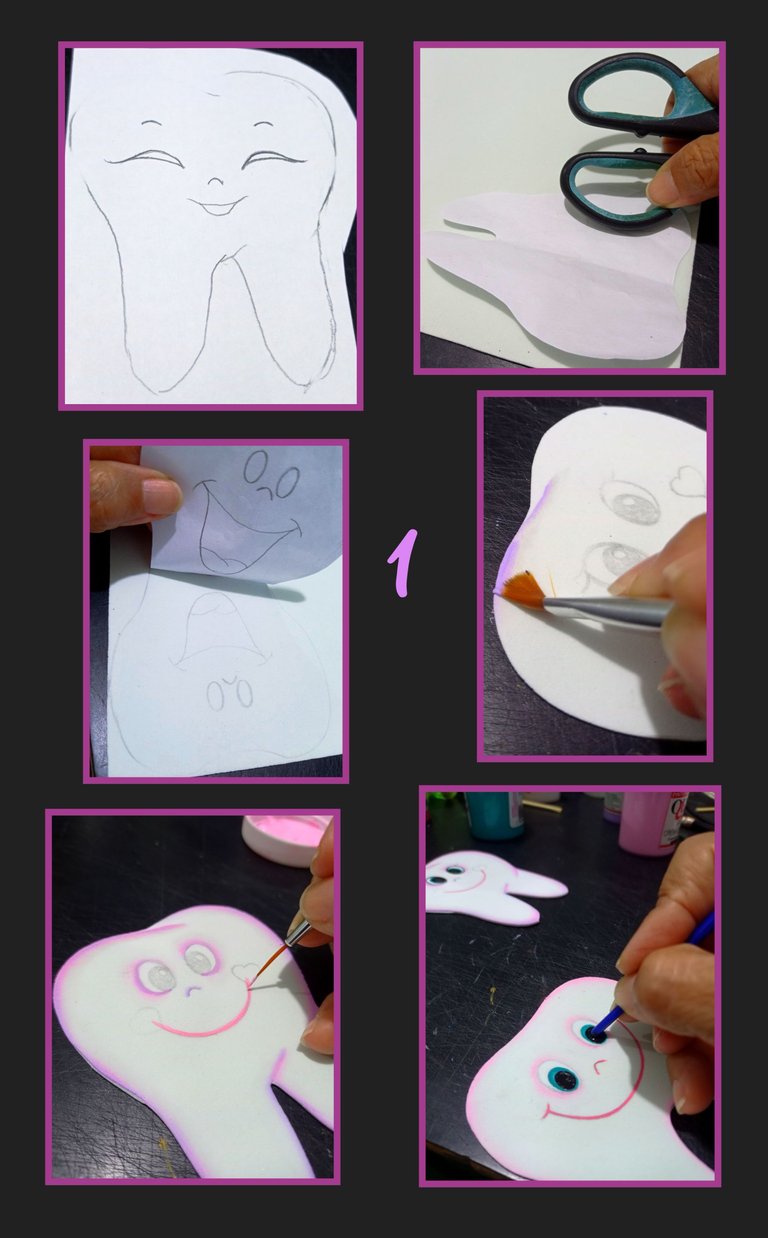
- Remarca el dibujo con lápiz de mina blanda, luego voltea el dibujo sobre el foami y frota con la tijera para transferir el dibujo.
- Recorta por todo el borde y para comenzar a pintar, primero moja el pincel en agua, pasa por un pañito para quitar el exceso, luego moja la punta del pincel en la pintura y comienza a pintar por el borde con el color de tu preferencia, también lo puedes hacer por todo el borde de los ojos.
(Este procedimiento también lo puedes hacer humedeciendo la punta de un pañito de franela, y mojas la puntica con un poquito de pintura y pasa por todo el borde.) - Luego con un pincel delineador o marcador pinta la boca, rellena los ojos haciendo un círculo en azul, deja secar y luego repite con pintura negra. Esto lo puedes hacer con la parte trasera del pincel como se ve en la foto y deja secar.
Paso 2:
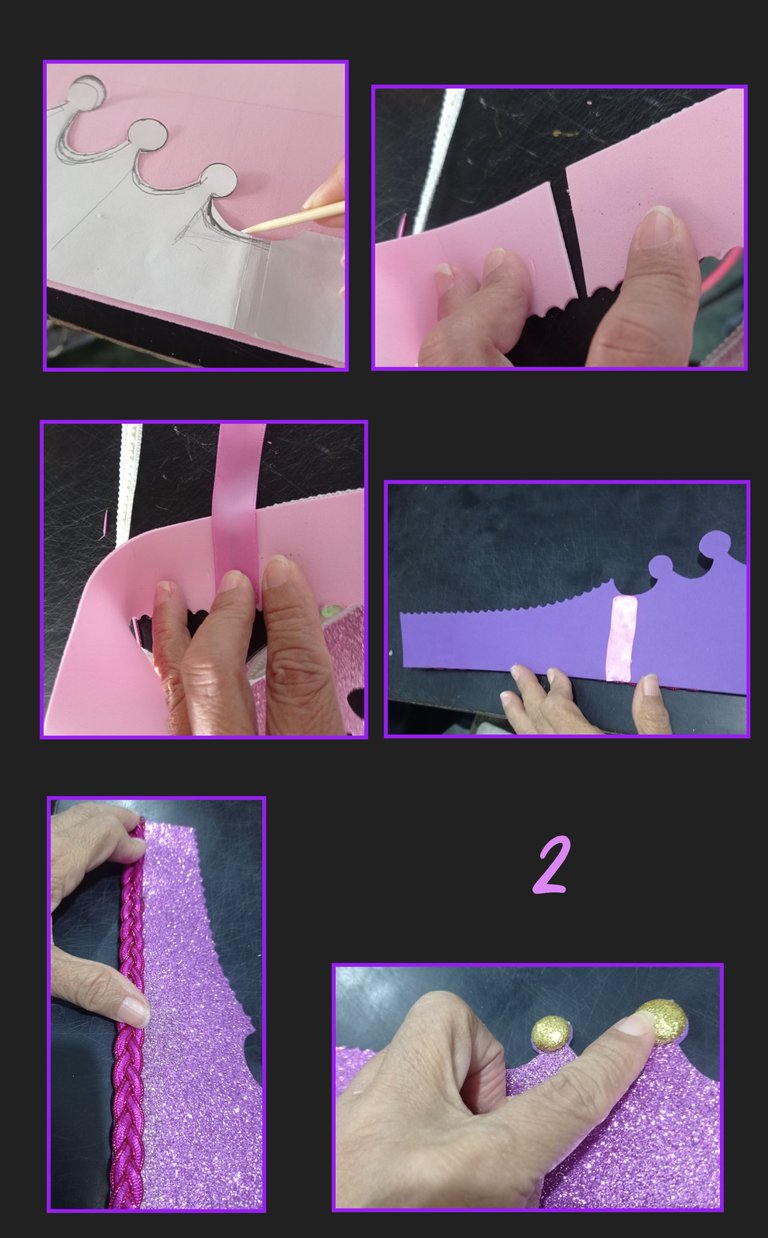
- Toma la medida del contorno de la cabeza
- Calca o imprime la forma de la corona y marca sobre el foami escarchado con un palillo de altura, para los lados corta dos tiras hasta completar la medida que tomaste y con la tijera de pico dale la forma como se observa en la foto.
- Ahora aplica silicón y une los laterales a la pieza del frente y une con un pedazo de cinta de tela.
- Aplica silicón en el borde inferior de la corona y pega el adorno, luego recorta círculos en foami dorado, coloca a termoformar sobre la plancha caliente y luego aplica silicón y pega en todas las puntas de la corona.
Paso 3:
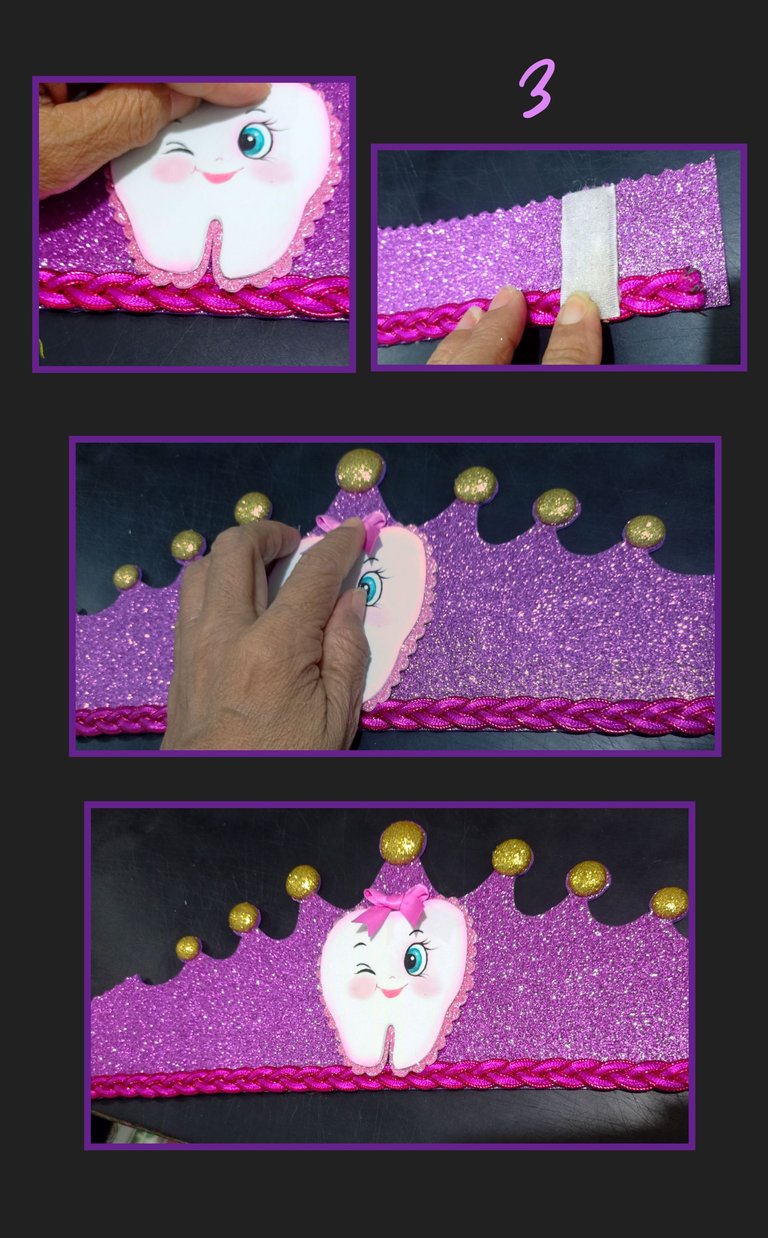
- Delinea los ojos, cejas y pestañas de la muelita con marcador punta fina o pincel fino, aplica luego silicón en la parte trasera y pega sobre el foami escarchado y recorta con tijera de forma.
- Aplica silicón y pega sobre la corona en la parte del frente y haz presión hasta que pegue bien.
- Luego aplica silicón y pega el cierre mágico a cada extremo, recuerda dejar unos centímetro de sobra, espera que seque y luego pega un lacito en la muelita.
- Cuando esté bien pegado y seco todo, cierra la corona.
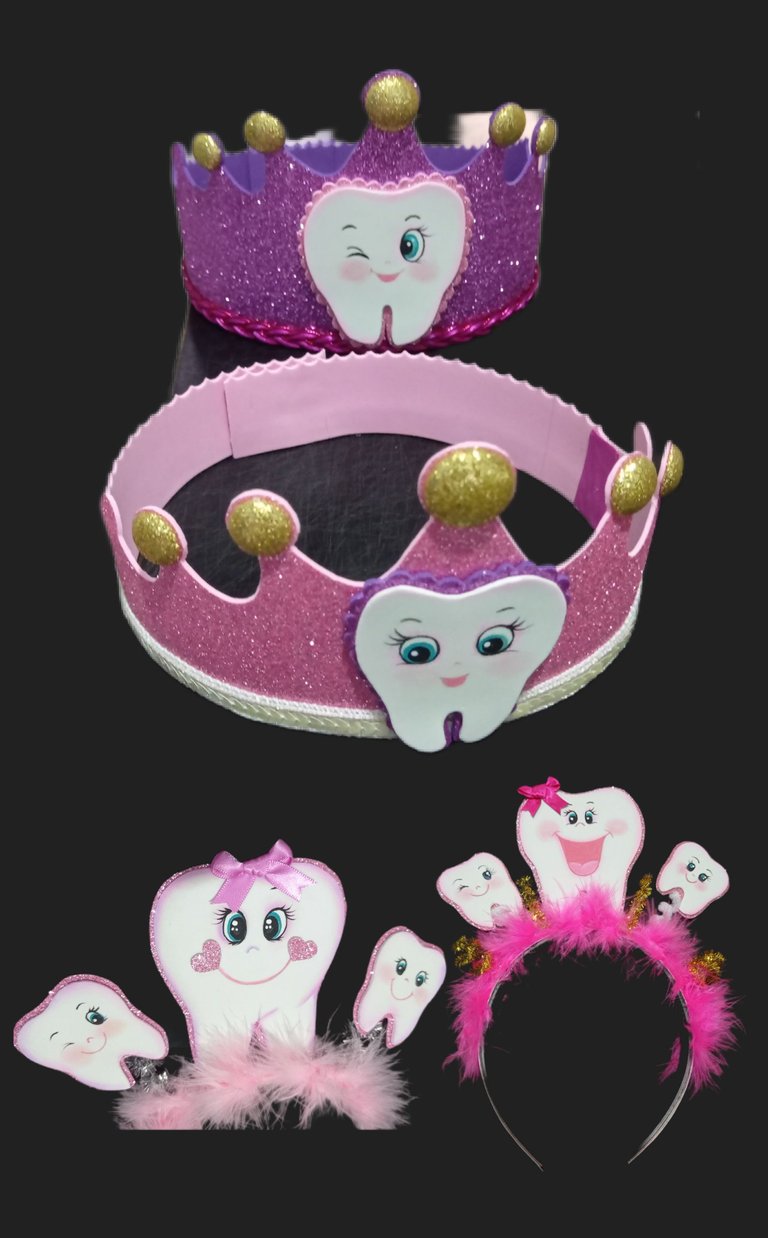
Este será el resultado final!
Realicé dos para que luciera con sus dos vestidos.


Fuente:
https://es.pinterest.com/pin/476255729362461689/
Traducido con DeepL
Las fotos capturadas con mi Redmi Note 9
Editadas con GridArt.
Ahora me despido deseando mi publicación sea de su agrado y útil para cualquier ocasión ya que las pequeñas de la familia siempre son reinas y princesas!
Hasta mi próxima publicación.
Saludos.
Good evening, how are my dear creators and friends who are visiting me today?
Today I want to wish you a happy and blessed beginning of the month, may it be full of many beautiful projects to share.
“When the child has its first tooth, there is a special meal consisting of seven grains, which is prepared following a ritual. It is believed that this will make the teeth grow fast and smoothly. Only after reaching the age of one year, the baby's nails and hair can be cut.”
As my mother used to say, “every day we learn something new” and it is so true!
So I decided to give them this humble gift.
I also decorated some ribbons that I will show you in the pictures.
And to start making this easy tutorial, you will need:
Frosted and matte Foami
Paints and brushes
Scissors pencil and chalk
Silicone, mold
Magic clasp, satin ribbon,
Ornaments
Electric iron.
Step 1:
- Outline the drawing with a soft lead pencil, then flip the drawing over the foami and rub with the scissors to transfer the drawing.
- Cut out all around the edge and to start painting, first dip the brush in water, wipe off the excess with a tissue, then dip the tip of the brush in the paint and start painting around the edge with the color of your choice, you can also do it all around the edge of the eyes.
(This procedure can also be done by wetting the tip of a flannel cloth, and wet the tip with a little bit of paint and go around the edge). - Then with an eyeliner brush or marker paint the mouth, fill in the eyes making a circle in blue, let dry and then repeat with black paint. You can do this with the back of the brush as shown in the picture and let it dry.
Step 2:
- Measure the outline of the head
- Trace or print the shape of the crown and mark on the frosted foami with a toothpick, for the sides cut two strips to complete the measure you took and with the beak scissors give it the shape as shown in the photo.
- Now apply silicone and attach the sides to the front piece and join with a piece of fabric tape.
- Apply silicone on the bottom edge of the wreath and glue the ornament, then cut out circles in gold foami, place to thermoform on the hot plate and then apply silicone and glue on all the ends of the wreath.
Step 3:
- Outline the eyes, eyebrows and eyelashes of the molar with a fine tip marker or fine brush, then apply silicone on the back and glue on the frosted foami and cut out with shape scissors.
- Apply silicone and glue on the front part of the crown and press until it sticks well.
- Then apply silicone and glue the magic clasp at each end, remember to leave a few centimeters left over, wait for it to dry and then glue a little bow on the tooth.
- When everything is well glued and dry, close the crown.
This will be the final result!
I made two for her to wear with her two dresses.
Source:
https://es.pinterest.com/pin/476255729362461689/
Translated with DeepL
Photos captured with my Redmi Note 9.
Edited with GridArt.
Now I say goodbye wishing my publication is to your liking and useful for any occasion since the little ones of the family are always queens and princesses!
Until my next publication.
Greetings.

