🐾🐾🐾
Hola a todos... 🐱🐾💕
Hola a mis queridos Hiver, y a la querida comunidad de artistas #HiveDiy, como siempre muy complacida de encontrarme por acá nuevamente, mostrándole mi trabajo hecho con mucho amor y especialmente para ustedes.
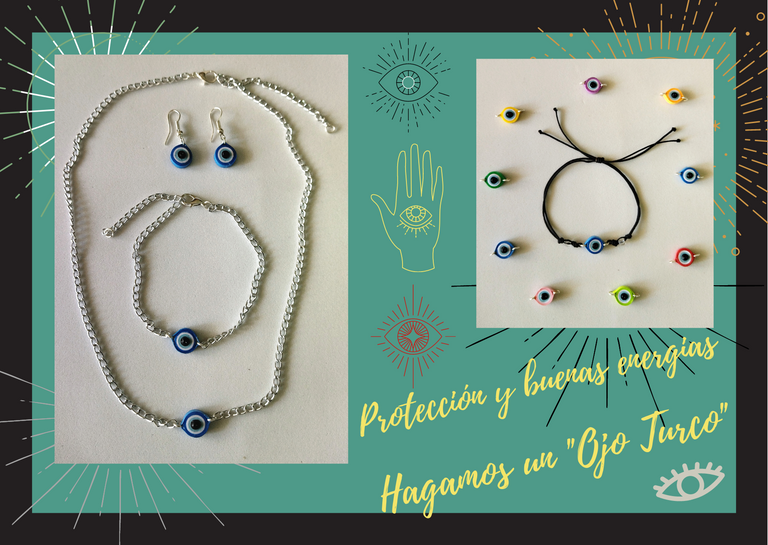
En esta ocasión me enfocare en todas aquellas personas que les gusta usar amuletos,🍀 y que mejor idea que realizar un bonito conjunto de zarcillos y collar con un dije de "Ojo Turco", en este caso escogí el de color azul oscuro el cual brinda día a día, protección y buenas energías.✨ Existen diversas combinaciones en este tipo de dijes, los cuales tienen distintitos significados, en el caso del azul claro 💙 nos da aparte de protección verdad y pureza, el rojo ❤️ poder y fortaleza, el blanco pureza e inocencia, rosado 🌸 amor y delicadeza, negro ☘️ fortaleza y prestigio, amarillo 💛 energía y vitalidad, verde 💚 esperanza y felicidad, en fin, existen aún más combinaciones con muchos significados, pero en esta oportunidad me voy a ir con el más usado y tradicional.
Espero sea de su agrado, pero lo mejor de todo, es que lo van a poder hacer con facilidad ya que este dije se centra en una misma figura que ya he venido usando y que cada uno de los que han seguido mis post anteriores ya deben estar familiarizados, es simplemente un círculo cerrado, pero en combinación con cadenas y argollas. Más adelante iremos con técnicas más complicadas para que observen lo amplio que es este mundo del quilling… 😍

Hello everyone... 🐱🐾💕
Hello to my dear Hiver and the dear community of artists #HiveDiy, as always very pleased to be here again, showing you my work made with love and especially for you.
This time I will focus on all those people who like to wear amulets🍀, and what better idea than to make a nice set of earrings and necklace with a "Turkish Eye" charm, in this case I chose the dark blue color which provides day by day, protection and good energies ✨. There are several combinations in this type of charms, which have different meanings, in the case of light blue 💙 gives us besides protection, truth and purity, red ❤️ power and strength, white purity and innocence, pink 🌸 love and delicacy, black ☘️ strength and prestige, yellow 💛 energy and vitality, green 💚 hope and happiness, in short, there are even more combinations with many meanings, but in this opportunity I will go with the most used and traditional.
I hope you like it, but best of all, is that you will be able to do it easily because this pendant focuses on the same figure that I have been using and that each of those who have followed my previous posts should already be familiar, it is simply a closed circle, but in combination with chains and rings. Later on we will go with more complicated techniques so that you can see how wide is this world of quilling... 😍

🐾🐾🐾
Comencemos:😃
Materiales:📏✏️✂️
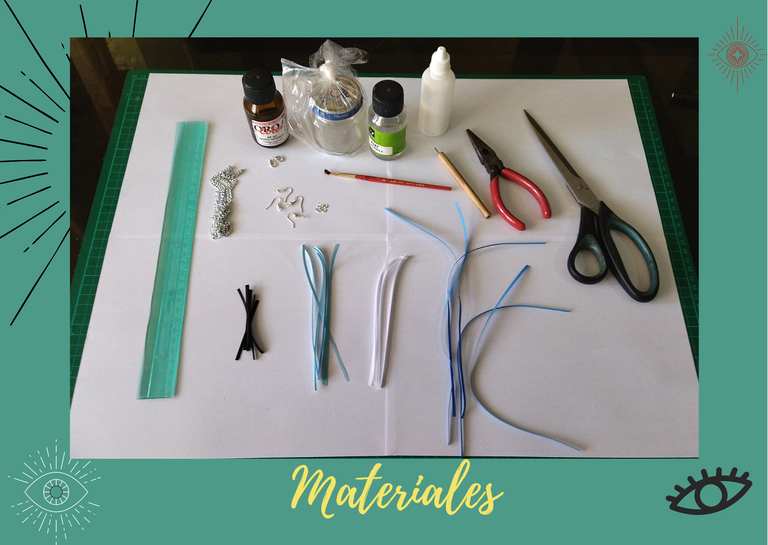
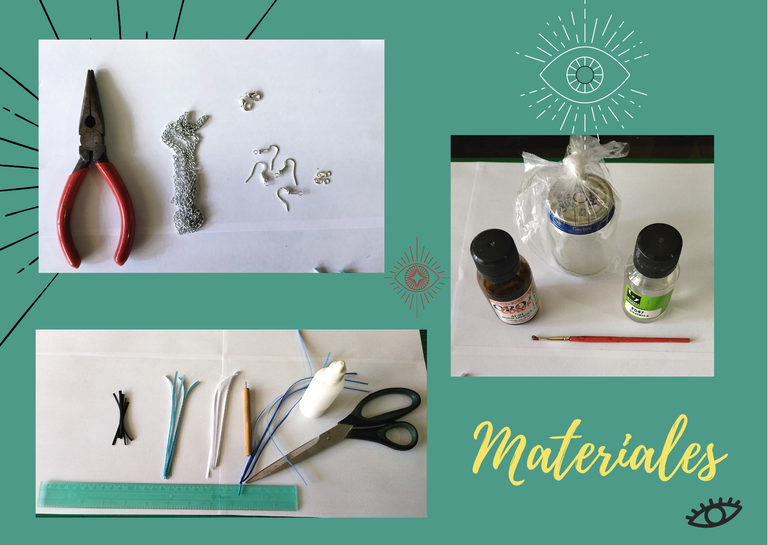
• Quilling de 3mm de ancho color: negro, azul claro, blanco, azul oscuro. (o los colores de tu preferencia).
• Aguja para quilling.
• Pega blanca.
• Tijera.
• Regla.
• Canutillo negro (opcional).
• Pinza punta fina.
• Cadena de bisutería.
• Argollas pequeñas de bisutería.
• Trancadero pico de loro.
• Base para zarcillos colgante (anzuelos).
• Alicate punta fina.
• Resina artística.
• Solvente x.
• Frasco de vidrio.
• Pincel.

Let's get started: 😃
Materials:📏✏️✂️
- Quilling 3mm wide color: black, light blue, white, dark blue. (or the colors of your preference).
- Quilling needle.
- White glue.
- Scissors.
- Ruler.
- Black quilling (optional).
- Fine tip tweezers.
- Costume jewelry chain.
- Small costume jewelry rings.
- Parrot's beak locker.
- Base for hanging tendrils (hooks).
- Fine-nosed pliers.
- Artistic resin.
- Solvent x.
- Glass bottle.
- Brush.
🐾🐾🐾

Paso a paso:💖
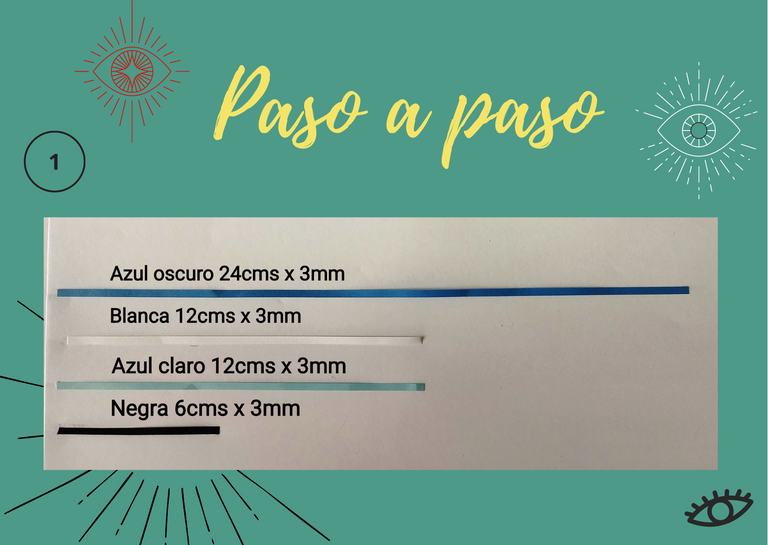
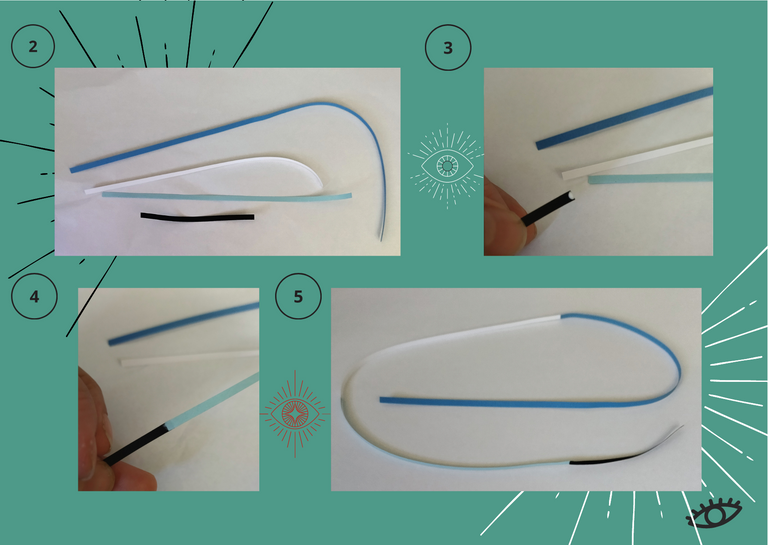
• Comenzamos midiendo las cintas de quilling de 3mm de ancho, Usaremos del color negro 6cms, azul claro 12cms, blanca 12cms, azul oscuro 24cms. Reservamos tal cual el orden en que fueron mencionadas. Una vez cortadas y medidas procedemos a unir con un punto de pega, para crear una cinta completa.

Step by step:💖
- We start measuring the 3mm wide quilling ribbons, we will use black 6cms, light blue 12cms, white 12cms, dark blue 24cms. We reserve as the order in which they were mentioned. Once cut and measured we proceed to join with a glue stitch, to create a complete ribbon.
🐾🐾🐾
🐾🐾🐾
🐾🐾🐾
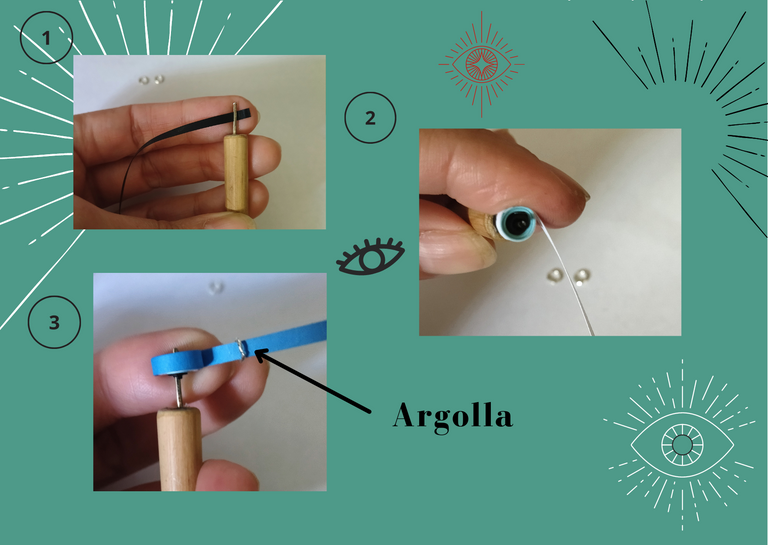
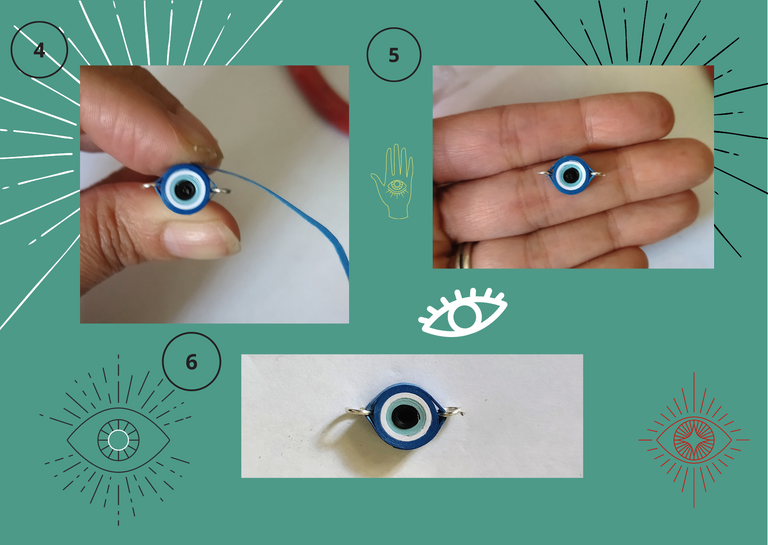
• Una vez tenemos nuestras cintas unidas en el orden establecido, vamos a formar con ellas un sencillo círculo cerrado, (tengamos a la mano las argollas pequeñas de bisutería, ya que las vamos a usar al formar el circulo), tomamos la aguja para quilling y comenzamos colocando la punta de la cinta negra, empezamos a enrollar, al faltar más o menos dos vueltas de la última cinta (el color azul marino), metemos en ella una de las argollas, centramos y procedemos a colocar otra, de manera que ambas argollas queden justo de lado y lado de nuestro círculo cerrado, terminamos de enrollar y sellamos con pega . Para el collar y pulsera necesitaremos 2 piezas es decir que repetiremos los mismos pasos para crear los dos círculos necesarios con sus dos argollas a los lados.

- Once we have our ribbons joined in the established order, we are going to form with them a simple closed circle, (let's have at hand the small costume jewelry rings, since we are going to use them when forming the circle), we take the quilling needle and we begin placing the tip of the black ribbon, we begin to roll, when we are missing more or less two turns of the last ribbon (the navy blue color), we put in it one of the rings, we center and proceed to place another one, so that both rings are right side and side of our closed circle, we finish rolling and seal with glue. For the necklace and bracelet we will need 2 pieces, that is to say that we will repeat the same steps to create the two necessary circles with their two rings on the sides.
🐾🐾🐾
🐾🐾🐾
🐾🐾🐾
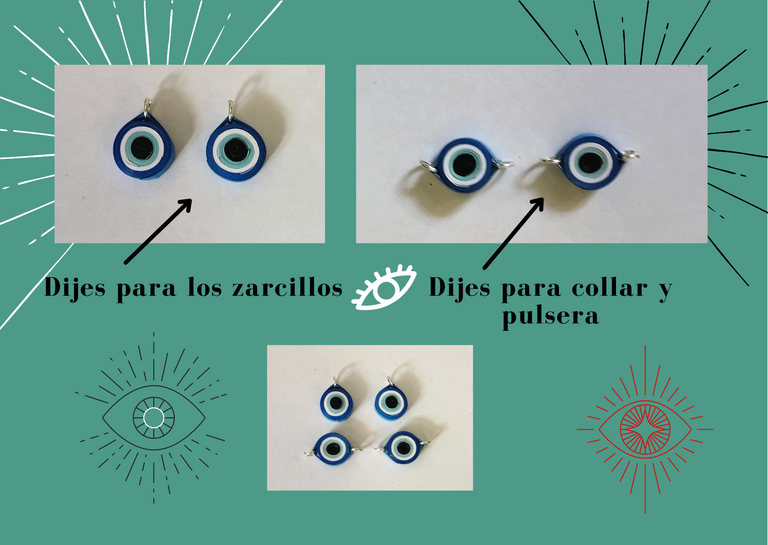
• Para los zarcillos necesitaremos dos piezas, en este caso repetiremos los mismos pasos anteriores con las cintas en el mismo orden y del mismo largo, con la única diferencia que estos círculos los haremos, solo colocándoles una argolla dentro de la cinta.

- For the tendrils we will need two pieces, in this case we will repeat the same steps above with the ribbons in the same order and of the same length, with the only difference that we will make these circles, only placing a ring inside the ribbon.
🐾🐾🐾
🐾🐾🐾
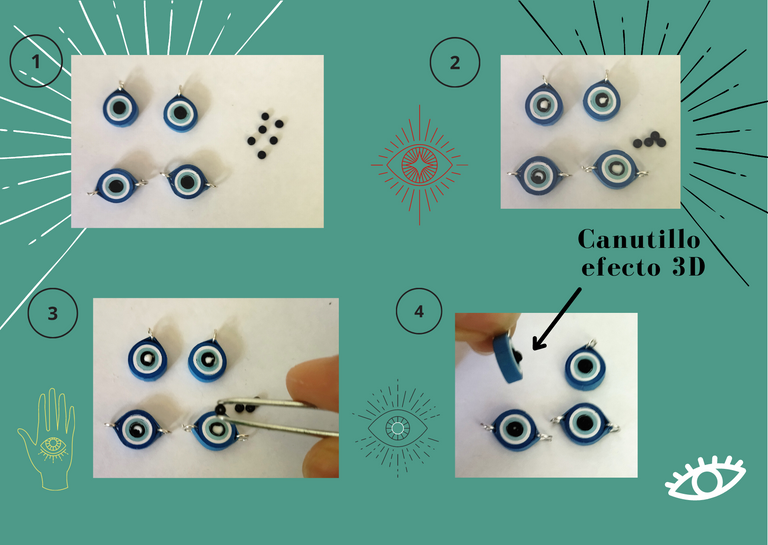
• Vamos con una parte que es opcional, siempre me agrada colocarles a mis piezas algún detalle que le dé delicadez u quizás hasta un toque 3d, en este caso le coloque a cada pieza en el centro un canutillo negro, repentinamente puedan creer que porque el centro es negro el canutillo no sea visible, pero créanme que si le da un toque delicado y un pequeño aspecto 3d el cual es bonito y atractivo. Tome las 4 piezas le coloque un punto de pega en el centro y con ayuda de una pinza punta fina procedí a colocar los canutillos. Como les dije antes es de su entera decisión colocarle este detalle, o no colocarlo.

- Let's go with a part that is optional, I always like to place to my pieces some detail that gives delicacy and maybe even a 3d touch, in this case I placed a black bead in the center of each piece, suddenly you may think that because the center is black the bead is not visible, but believe me it gives a delicate touch and a little 3d aspect which is nice and attractive. I took the 4 pieces and placed a glue dot in the center and with the help of a fine tip tweezers I proceeded to place the beads. As I said before it is up to you to place this detail, or not to place it.
🐾🐾🐾
🐾🐾🐾
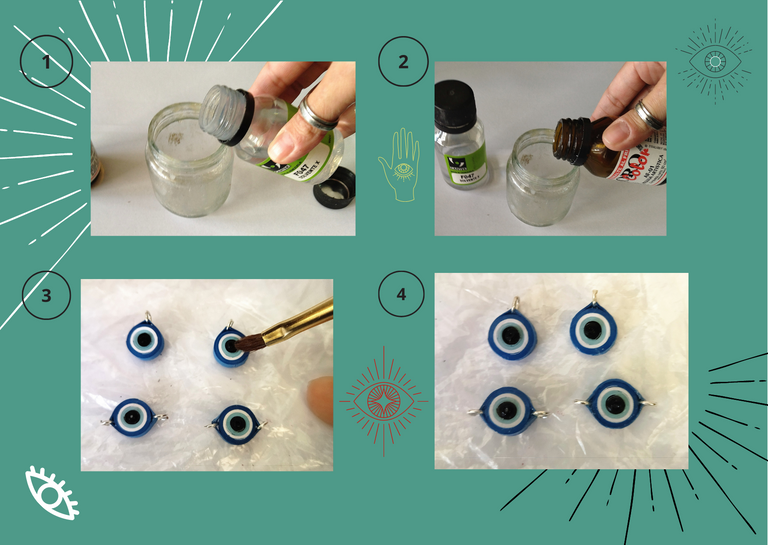
• Ya tenemos nuestras 4 piezas listas, dos para los zarcillos, una para el collar, y una para la pulsera, vamos a colocarle su protección liquida, tomemos una parte de resina, una de solvente x y la añadimos en el frasco de vidrio, revolvemos con la ayuda de un pincel y aplicamos en los dos lados de las piezas, (por delante y por detrás), dejamos secar de un día para el otro.

- Now we have our 4 pieces ready, two for the earrings, one for the necklace, and one for the bracelet, let's put the liquid protection, take one part of resin, one part of solvent x and add it in the glass bottle, stir with the help of a brush and apply on both sides of the pieces, (front and back), let it dry from one day to the other.
🐾🐾🐾
🐾🐾🐾
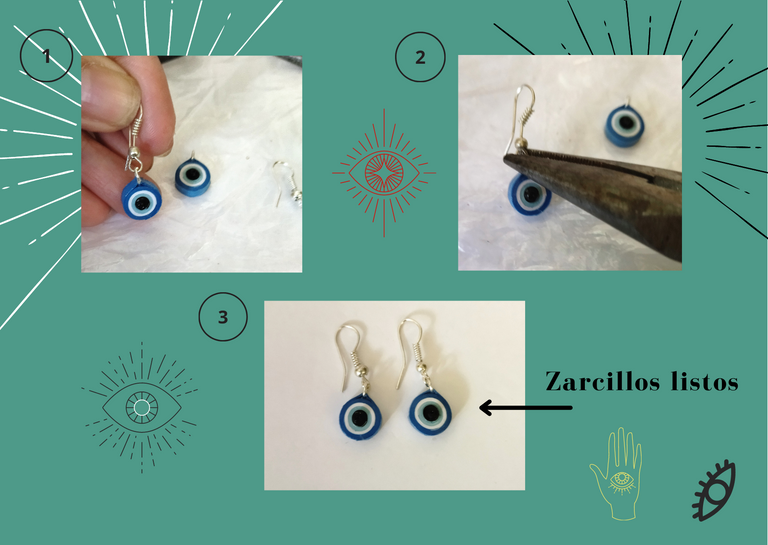
• Ya tenemos nuestras piezas protegidas y secas con su resina, armemos los zarcillos, para ello sencillamente con la ayuda el alicate punta fina abramos un poco la argolla de las piezas a las que solo le colocamos una, le colocamos su base para zarcillo colgante (anzuelo), y cerramos la argolla nuevamente, de esta manera ya tenemos nuestros zarcillos listos.

- We already have our pieces protected and dry with its resin, let's assemble the tendrils, for it simply with the help of the pliers open a little the ring of the pieces to which we only place one, we place its base for hanging tendril (hook), and close the ring again, in this way we already have our tendrils ready.
🐾🐾🐾
🐾🐾🐾
• Ya tenemos nuestras piezas protegidas y secas con su resina, armemos los zarcillos, para ello sencillamente con la ayuda el alicate punta fina abramos un poco la argolla de las piezas a las que solo le colocamos una, le colocamos su base para zarcillo colgante (anzuelo), y cerramos la argolla nuevamente, de esta manera ya tenemos nuestros zarcillos listos.
foto
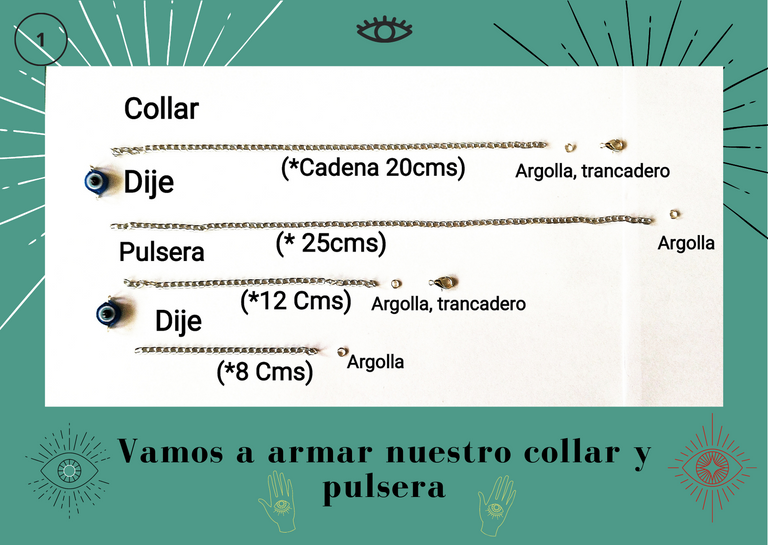
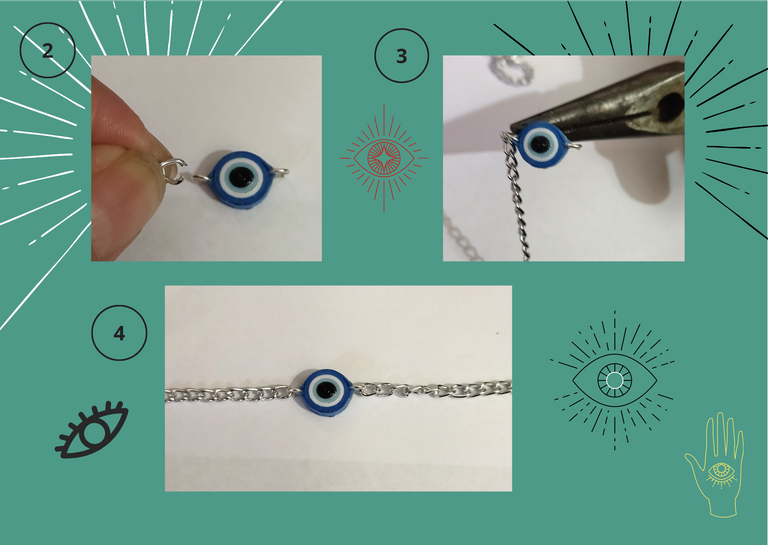
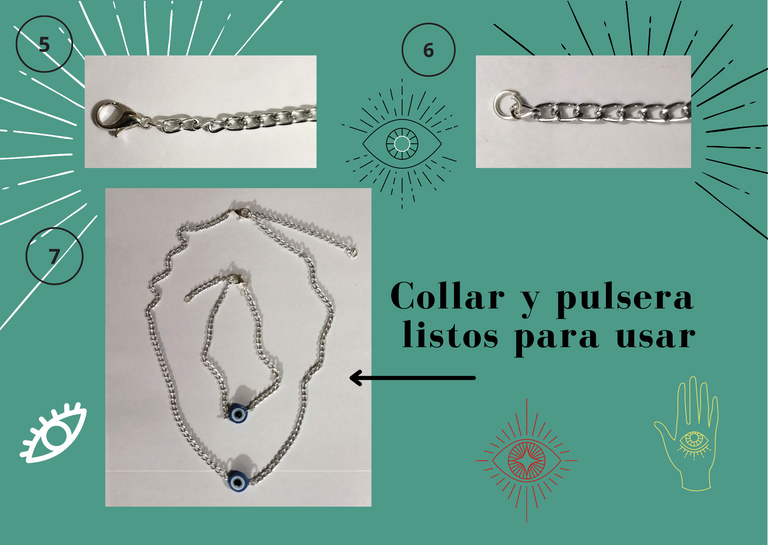
• Procedamos a armar nuestro collar y pulsera, en la foto se especifica la manera en que vamos a unir todas las partes, para el collar tomaremos la cadena de bisutería y mediremos dos pedazos uno de 20cms de largo y otro de 25cms de largo, con la ayuda del alicate punta fina abriremos cuidadosamente los extremos de la cadena, colocamos el dije y cerramos. En el extremo más corto de la cadena, (el de 20cms), colocaremos una argolla y el trancadero pico de loro, y en el extremo más largo (el de 25cms), colocaremos solo una argolla para finalizar.
• Para la pulsera uniremos las partes bajo el mismo procedimiento anterior, las cuales tienen diferentes medidas, tomamos la cadena de bisutería y mediremos dos pedazos uno de 8cms de largo y otro de 12cms de largo, con la ayuda del alicate punta fina abrimos cuidadosamente ambos extremos de la cadena, colocamos el dije y cerramos. En el extremo más corto de la cadena, el de (8cms), colocaremos una argolla y el trancadero pico de loro, y en el extremo más largo (el de 12cms), colocaremos solo una argolla para finalizar. De esta manera ya tenemos listos nuestros zarcillos, collar y pulsera, para ser usados. 😄💙

- Now we have our pieces protected and dry with its resin, let's assemble the tendrils, for this we simply with the help of the pliers open a little the ring of the pieces to which we only place one, we place its base for hanging tendril (hook), and we close the ring again, in this way we already have our tendrils ready.
photo
- Let's proceed to assemble our necklace and bracelet, the photo shows the way we are going to join all the parts, for the necklace we will take the costume jewelry chain and measure two pieces, one of 20cms long and the other of 25cms long, with the help of the fine tip pliers we will carefully open the ends of the chain, place the pendant and close it. On the shorter end of the chain, (the 20cms), we will place a ring and the parrot beak clasp, and on the longer end (the 25cms), we will place only one ring to finish.
- For the bracelet we will join the parts under the same procedure above, which have different measures, we take the costume jewelry chain and measure two pieces one of 8cms long and one of 12cms long, with the help of the fine tip pliers we carefully open both ends of the chain, place the pendant and close. On the shorter end of the chain (8cms), we will place a ring and the parrot beak pendant, and on the longer end (12cms), we will place only one ring to finish. In this way we already have our earrings, necklace and bracelet ready to be used. 😄💙
🐾🐾🐾
🐾🐾🐾
🐾🐾🐾
🐾🐾🐾
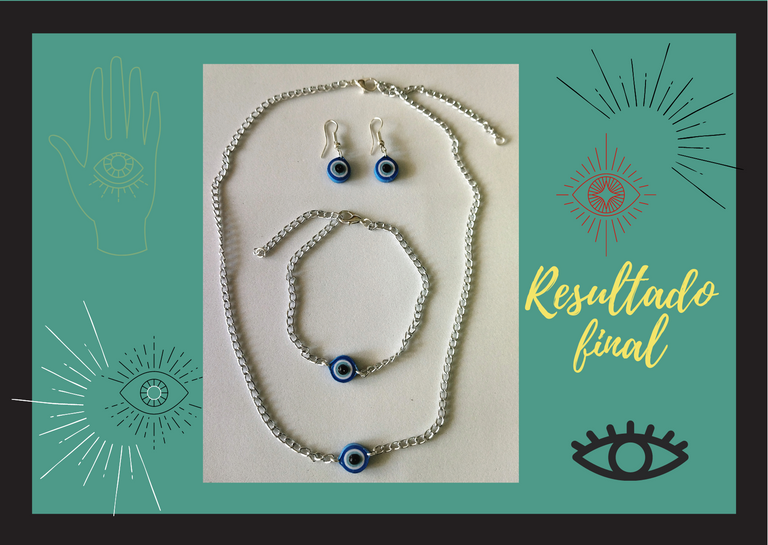
Resultado Final:💕

Final Result:💕
🐾🐾🐾
🐾🐾🐾
Tips 💡
• ¿Porque coloco un lado de la cadena más largo que el otro? Eso lo hago ya que hay momentos en que no tenemos oportunidad de medir el grosor del cuello y muñeca de nuestros clientes, y de esta manera siempre nos va a sobrar un poco, y podemos adaptar nuestra creación a un cuello o muñeca delgada o más gordita, el trancadero lo ajustaremos a esa medida y si sobra un poco de cadena siempre se verá bonita. Si tenemos la oportunidad de tomar medidas lo podemos hacer justo del largo requerido, pero no está nunca demás ese poquito de cadena que sobre.
• Este dije lo elabore con dos argollas porque quería adaptarlo a la cadena y pulsera, pero también lo pueden hacer con una sola argolla como el de los zarcillos, y simplemente lo guindan en el collar de su preferencia, o hacerlo sin ninguna de las argollas y colocarlo una base para zarcillo fija o en una base para anillo.

Tips 💡
- Why do I place one side of the chain longer than the other? I do this because there are times when we do not have the opportunity to measure the thickness of the neck and wrist of our customers, and this way we will always have a little left over, and we can adapt our creation to a thin or chubbier neck or wrist, we will adjust the chain to that measurement and if there is a little bit of chain left over it will always look nice. If we have the opportunity to take measurements we can make it just the right length, but it's never too much to have that little bit of chain left over.
- I made this pendant with two rings because I wanted to adapt it to the chain and bracelet, but you can also make it with only one ring like the one for the earrings, and simply hang it on the necklace of your choice, or make it without any of the rings and place it on a fixed earring base or on a ring base.
🐾🐾🐾
Extra: 📌
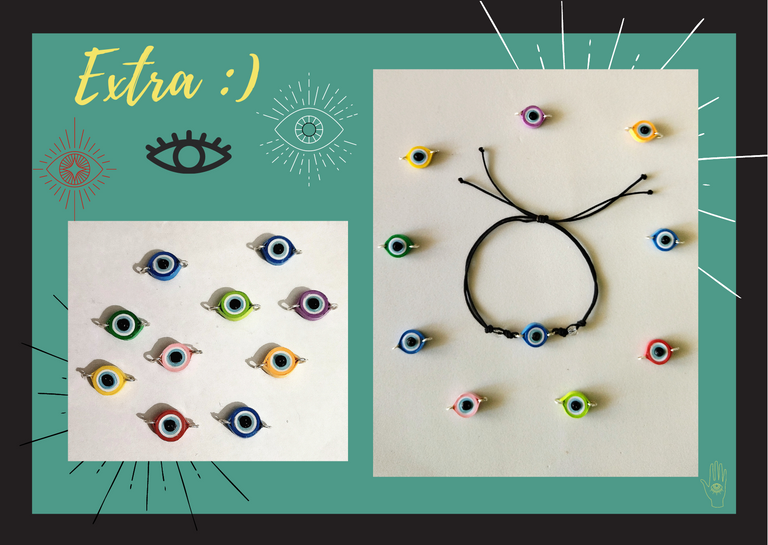
• Como podrán darse cuenta coloqué que iba a elaborar el conjunto con sus colores básicos, pero a veces uno se emociona jajajaja 😄 y quiere ver más, es por ello que empecé a realizar dijes de variados colores y se los quise mostrar para que ustedes también vean como lucen. Esos dijes con dos argollas, para no complicarse mucho, les pueden colocar hilo chino, hilo de piel de serpiente fina, yute, entre otros, y haciéndole dos sencillos nudos a los lados, uno corredizo en el centro, y uno en sus puntas ya tendrán un collar y pulsera muy sencillo de hacer para usar, regalar y para vender. Con estos dijes puedes elaborar cantidad de combinaciones de zarcillos, collares y pulseras, solo como siempre digo, "deja volar tu imaginación"…💖

Extra: 📌
- As you may notice I placed that I was going to elaborate the set with its basic colors, but sometimes you get excited hahahaha 😄 and want to see more, that's why I started to make them in various colors and I wanted to show them to you so you can also see how they look like. These pendants with two rings, to not get too complicated, you can use Chinese thread, fine snakeskin thread, jute, among others, and making two simple knots on the sides, one sliding in the center, and one at the ends and you will have a necklace and bracelet very simple to use, to give away and to sell. With these charms you can make a lot of combinations of earrings, necklaces and bracelets, just as I always say, let your imagination fly... 💖
🐾🐾🐾
🐾🐾🐾
¿Que les pareció, les gustó?
Espero que sí, que les haya gustado mi explicación, procedimiento y fotos, los hice con mucho cariño por y para ustedes.
"Deja salir esa musa que te inspira, y deja volar tu imaginación".
Gracias a todos, nos vemos en la próxima. 🐾🐱💕

What did you think, did you like it?
I hope you did, I hope you liked my explanation, procedure and photos, I made them with love for you.
"Let out that muse that inspires you, and let your imagination fly".
Thank you all, see you next time. 🐾🐱💕
🐾🐾🐾

All photos used in this post are of my authorship and have been taken on my personal cell phone a Redmi 9T and edited in Canva Dividers and banner made by me in Paint Tool Sai Translated with the help of DeepL
🐾🐾🐾

