🐾🐾🐾
Hola a todos... 🐱🐾💕
Hola a mis queridos Hiver y a la querida comunidad de artistas #HiveDiy, como siempre muy complacida y emocionada de encontrarme por acá nuevamente, mostrándole mi trabajo hecho con mucho amor y especialmente para ustedes.
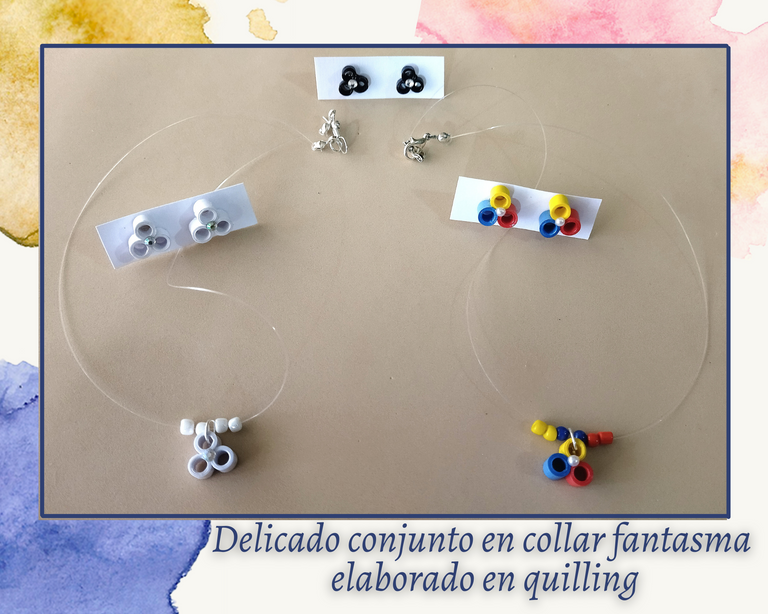
Como nosotras las mujeres somos muy coquetas, y nos gusta lucir muy delicadas con lo que usamos día a día, para está ocasión les traigo un conjunto muy prolijo que podemos usar a diario con el oufit que vayamos a exhibir. Les voy a elaborar unos zarcillos y dije muy sencillos con una técnica que no había mostrado con anterioridad, y esta ves les voy a enseñar cómo elaborar un collar fantasma, acompañado de unas perlitas, para lucir nuestro dije.
Siempre me gusta mostrar piezas con el hermoso tricolor de Venezuela, es por ello que en muchas oportunidades verán recurrentemente en mis creaciones, alguna con esa bella combinación. 💛💙❤️🇻🇪🥰
Hello everyone... 🐱🐾💕
Hello to my dear Hiver and the dear community of artists #HiveDiy, as always very pleased and excited to find me around here again, showing you my work made with a lot of love and especially for you.
As we women are very flirty, and we like to look very delicate with what we wear every day, for this occasion I bring you a very neat set that we can use daily with the oufit that we are going to exhibit. I am going to make some very simple earrings and pendants with a technique that I have not shown before, and this time I am going to show you how to make a ghost necklace, accompanied by some pearls, to show off our pendant.
I always like to show pieces with the beautiful tricolor of Venezuela, that is why in many opportunities you will see recurrently in my creations, some with that beautiful combination. 💛💙❤️🇻🇪🥰
🐾🐾🐾
Comencemos:😃
Let's get started: 😃
🐾🐾🐾
🐾🐾🐾
Materiales:📏✏️✂️
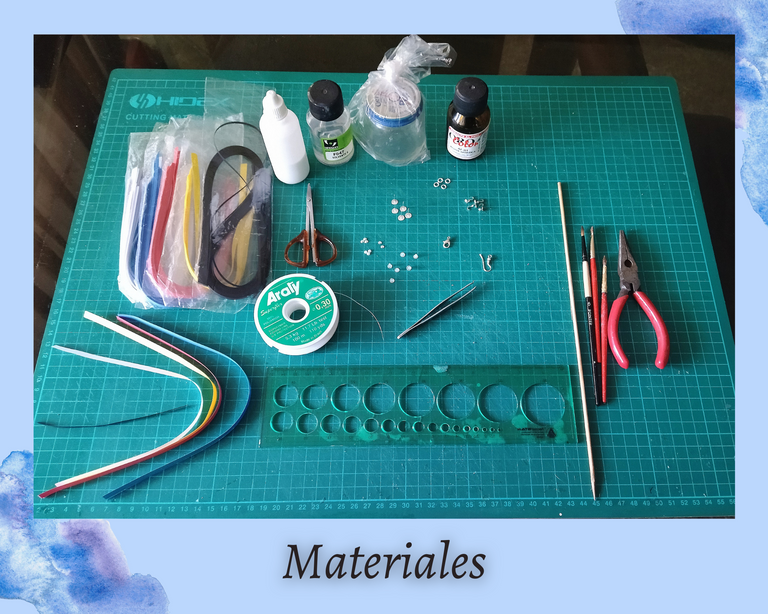
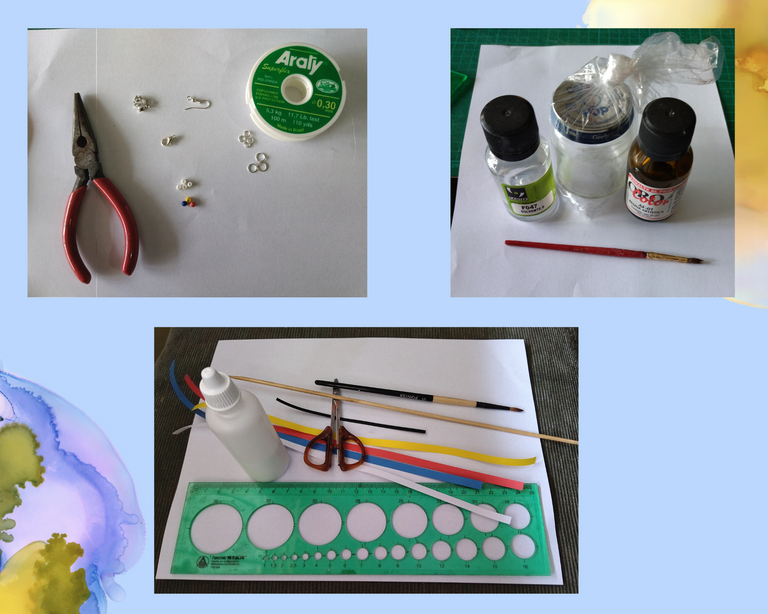
• Quilling de diversos colores de 6mm y 3mm de ancho. (Amarillo, azul, rojo, blanco, de 6mm, negro 3mm). O del color de tu preferencia.
• Pincel fino, cuya punta tenga 3mm de circunferencia.
• Palito de altura de 2mm de circunferencia.
• Tijera.
• Regla de diferentes medidas de circunferencia.
• Pega blanca.
•Bases para zarcillos fijas pequeñas.
• Tapas para zarcillos de silicón.
• Cristales transparentes, tornasol, y perlas.
• Pinza punta fina.
• Resina.
• Solvente X.
• Pincel.
• Frasco de vidrio.
• Nylon de 0.30mm de grosor.
• Perlas de diversos colores. (Amarillo, azul, rojo y blancas). O del color de tu preferencia.
• Argollas pequeñas y medianas.
• Tapa nudos pequeños (para nilón).
• Broche pico de loro.
• Alicate punta fina.
Materials:📏✏️✂️
- Quilling of various colors of 6mm and 3mm wide. (Yellow, blue, red, white, 6mm, black 3mm). Or the color of your preference.
- Fine brush, whose tip is 3mm in circumference.
- Stick with a height of 2mm of circumference.
- Scissors.
- Ruler of different circumference measures.
- White glue.
- Bases for small fixed tendrils.
- Covers for silicone tendrils.
- Transparent crystals, litmus, and pearls.
- Fine tip tweezers.
- Resin.
- Solvent X.
- Brush.
- Glass bottle.
- Nylon 0.30mm thick.
- Pearls of different colors. (Yellow, blue, red and white). Or the color of your preference.
- Small and medium size rings.
- Small knot covers (for nylon).
- Parrot beak brooch.
- Fine nose pliers.
🐾🐾🐾
🐾🐾🐾
Paso a paso:💖
Vamos con los zarcillos y dijes:
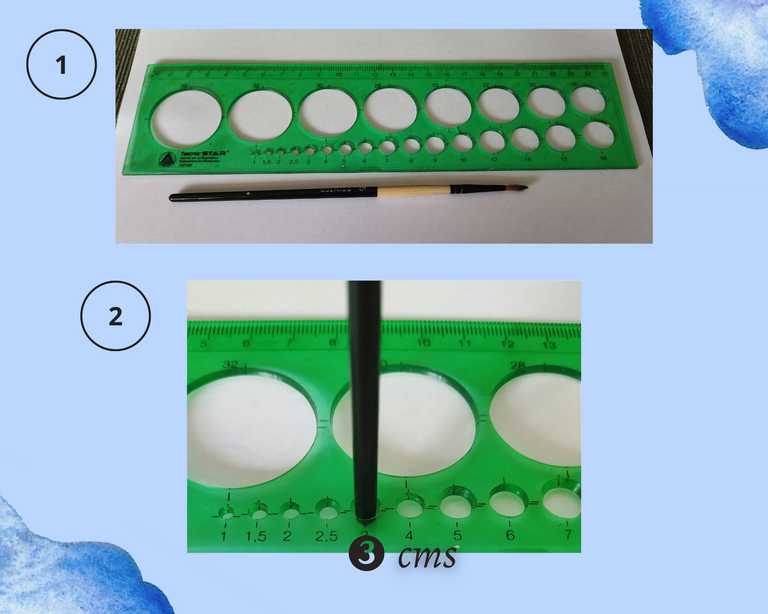
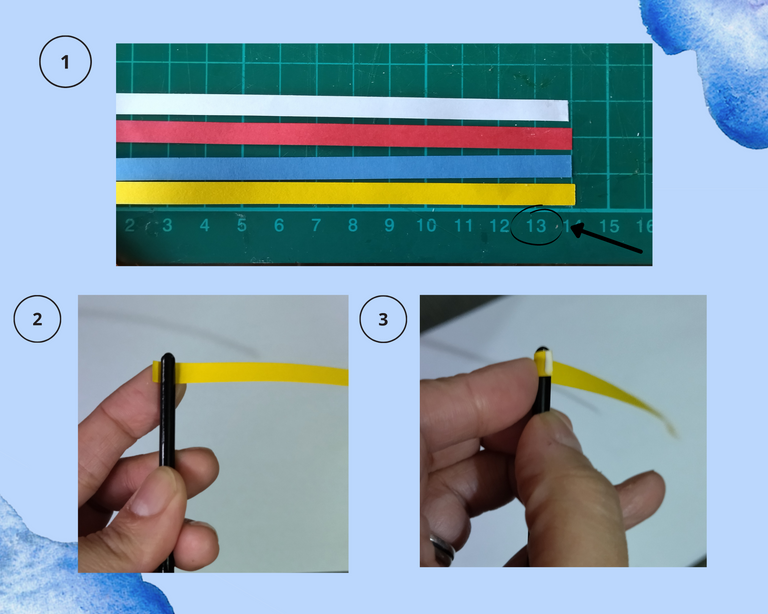
• Tomamos la regla de circunferencia y medimos la punta del pincel, en mi caso escogí uno con la punta de 3mm de circunferencia, ya que es la medida ideal para el modelo que voy a elaborar.
Step by step:💖
Let's go with the tendrils and charms:
- We take the circumference ruler and measure the tip of the brush, in my case I chose one with a 3mm circumference tip, as it is the ideal size for the model I am going to elaborate.
🐾🐾🐾
🐾🐾🐾
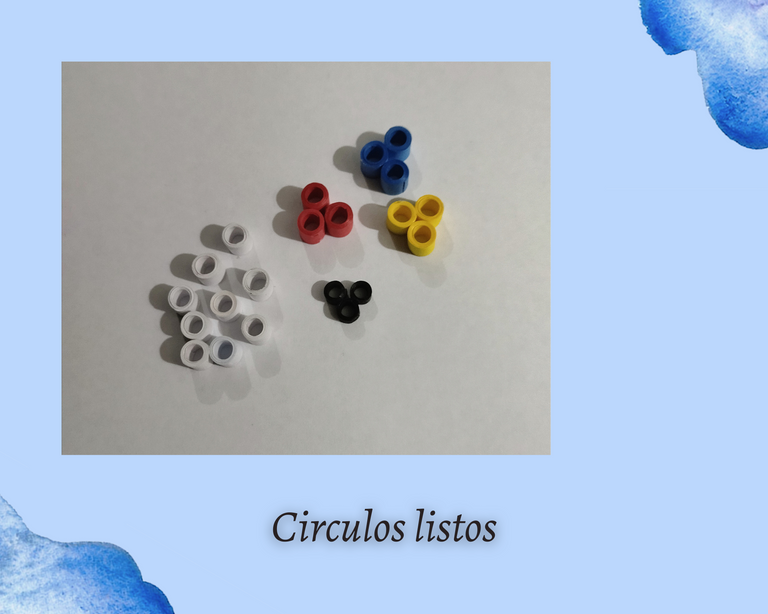
• Procedo a medir mis cintas de quilling de 6mm de ancho, del cual corte 14 centímetros de largo, vamos a usar 3 de cada una, 3 amarillas, 3 azules y 3 rojas y 9 blancas con esta misma medida. Primordialmente vamos a usar la amarilla, azul y rojo ya que estas son la base de mi primer conjunto, el color blanco de 6mm se utilizará para hacer otro conjunto igual, pero unicolor, y la negra de 3mm para hacer unos zarcillos mas pequeños. Quise hacerlos de otros colores para que vean como lucen. 😉
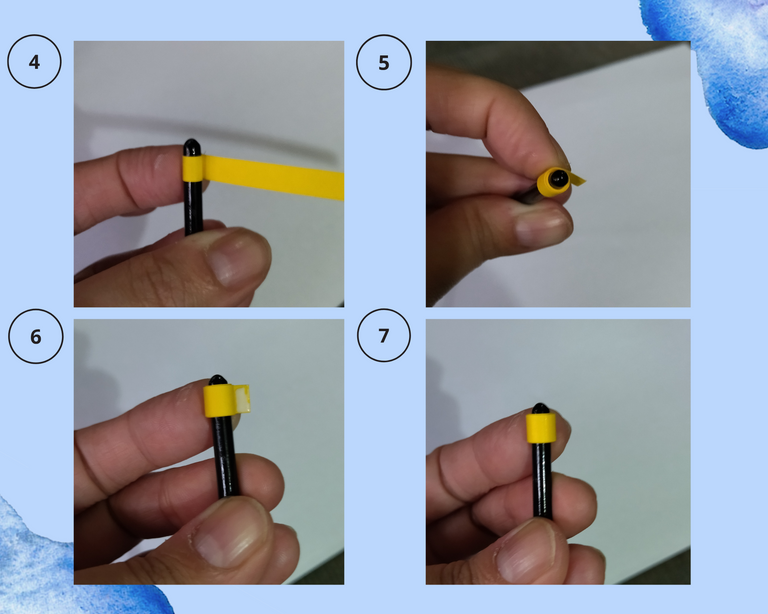
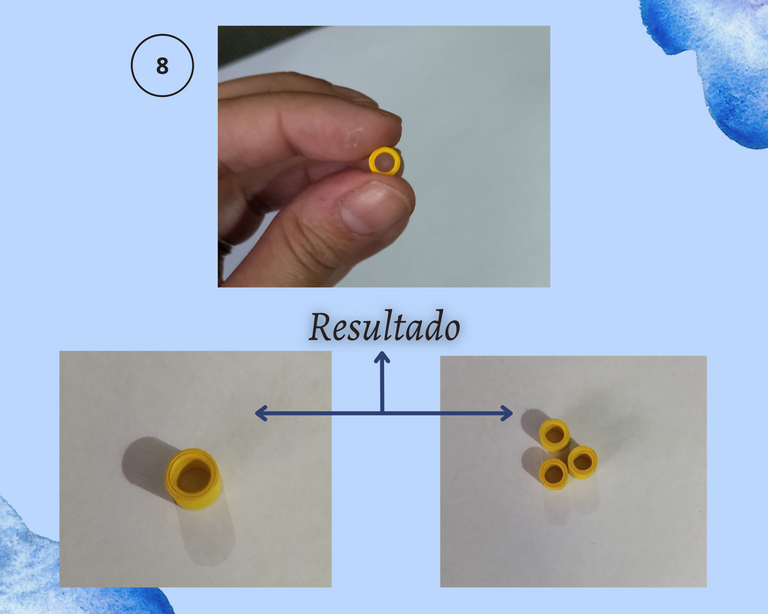
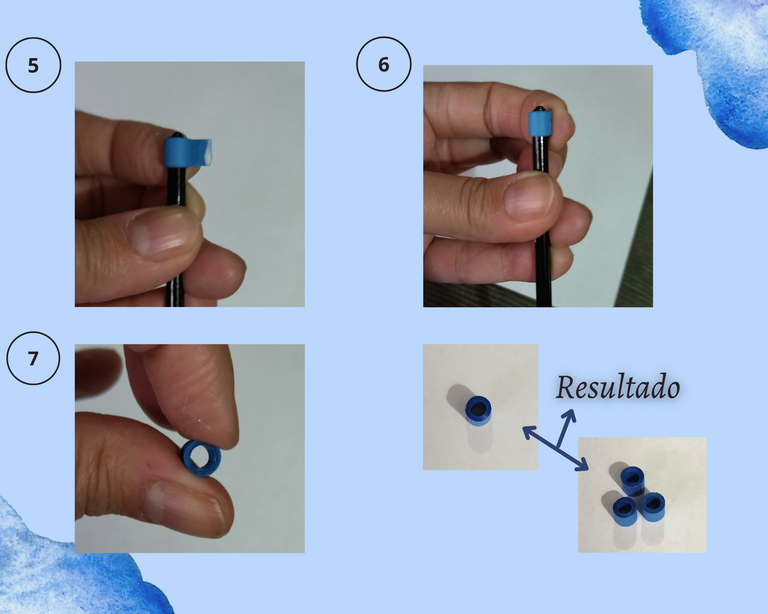
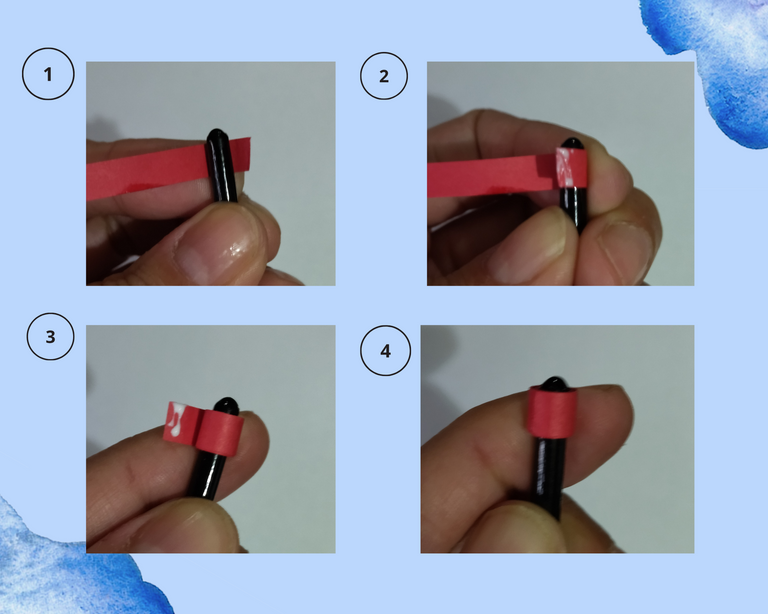
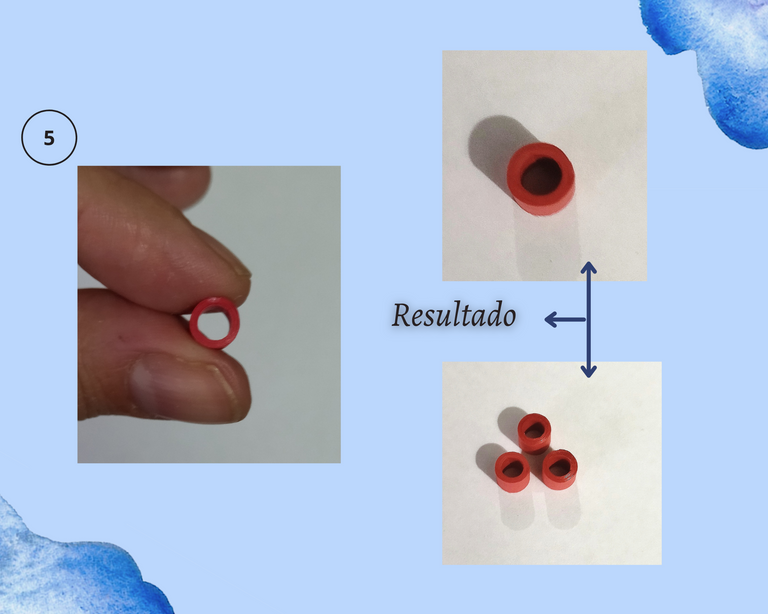
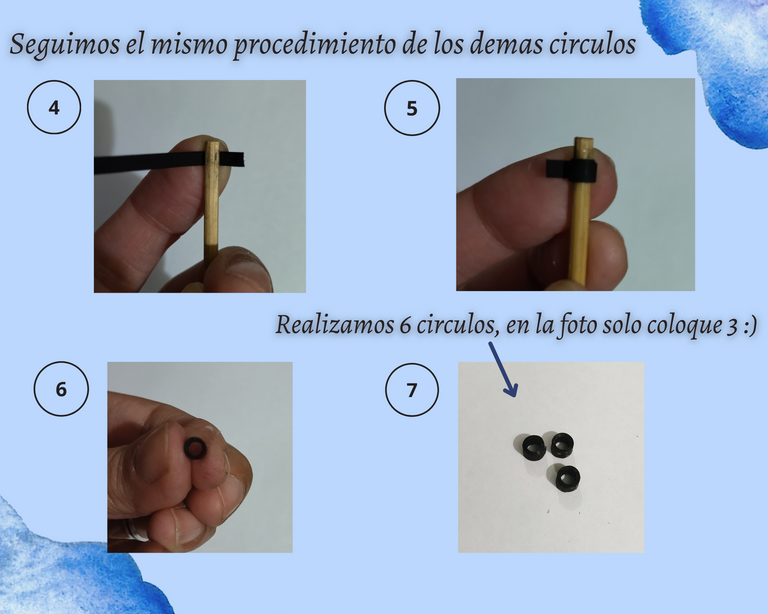
• Tomamos el pincel por la parte de abajo, que como dije antes mide 3mm de circunferencia, con el vamos a realizar nuestra pieza. Procedemos a tomar nuestra cinta amarilla de 6mm de ancho x 14 centímetros de largo y colocamos su extremo inicial en la punta del pincel, a partir de allí colocamos un punto de pega en la cinta y procedemos a enrollar, sostenemos unos segundos hasta que selle y continuamos enrollando, antes de finalizar toda la cinta, colocamos otro punto de pega, terminamos de enrollar y sostenemos unos segundos hasta que selle. De esta misma manera hacemos 3 círculos amarillos.
- I proceed to measure my quilling ribbons 6mm wide and cut 14 centimeters long, we will use 3 of each, 3 yellow, 3 blue and 3 red and 9 white with this same measurement. Primarily we are going to use the yellow, blue and red as these are the base of my first set, the 6mm white color will be used to make another set of the same, but unicolor, and the 3mm black to make some smaller tendrils. I wanted to make them in other colors so you can see how they look 😉.
- We take the brush from the bottom, which as I said before measures 3mm in circumference, with it we are going to make our piece. We proceed to take our yellow ribbon 6mm wide x 14 centimeters long and place its initial end on the tip of the brush, from there we place a point of glue on the tape and proceed to roll, we hold a few seconds until it seals and continue rolling, before finishing all the tape, we place another point of glue, we finish rolling and hold a few seconds until it seals. In the same way we make 3 yellow circles.
🐾🐾🐾
🐾🐾🐾
🐾🐾🐾
🐾🐾🐾
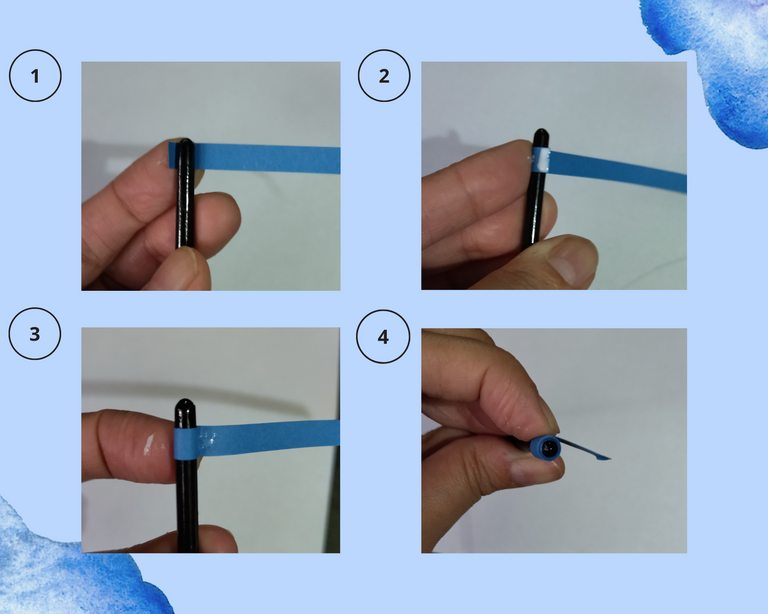
• Con la cinta azul y roja realizamos el mismo procedimiento anterior, haciendo 3 círculos de cada color.
- With the blue and red ribbon we do the same procedure as above, making 3 circles of each color.
🐾🐾🐾
🐾🐾🐾
🐾🐾🐾
🐾🐾🐾
🐾🐾🐾
🌸OPCIONAL⬇️
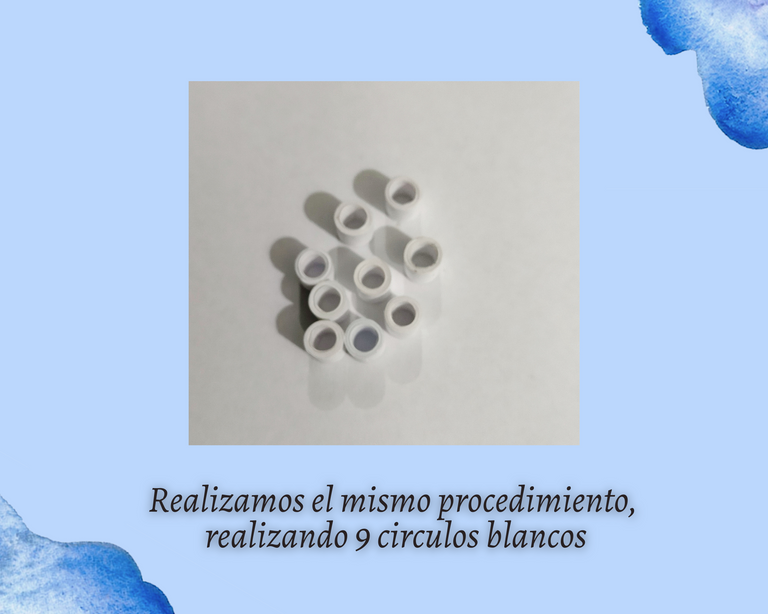
• Con la blanca realizamos el mismo procedimiento, con la diferencia que haremos 9 círculos. Tomemos en cuenta que está blanca es opcional, es para elaborar otro conjunto 😉
🌸OPTIONAL⬇️
- With the white one we perform the same procedure, with the difference that we will make 9 circles. Let's take into account that this white is optional, it is to elaborate another set 😉.
🐾🐾🐾
🐾🐾🐾
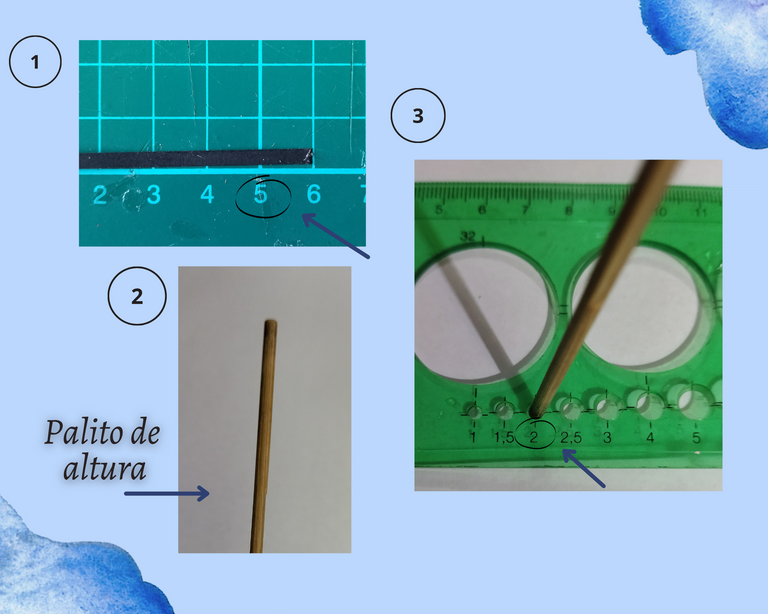
• Igual voy a darles de una vez las indicaciones de lo que vamos a realizar con el quilling negro de 3mm, para aprovechar que todo lleva el mismo procedimiento, con la diferencia que de esta vamos a usar un ancho y largo diferente.
•Medimos 6 centímetros de largo x 3mm de ancho. Tomamos un palito de altura que tenga un grosor de 2mm de circunferencia. De este vamos a realizar 6 círculos, es para hacer solo un par de zarcillos, le muestro solo 3, porque previamente arme un zarcillo. 😁 Ya tenemos todos nuestros círculos listos.
I am going to give you at once the indications of what we are going to do with the 3mm black quilling, to take advantage that everything has the same procedure, with the difference that in this one we are going to use a different width and length.
We measure 6 centimeters long x 3mm wide. We take a stick of height that has a thickness of 2mm of circumference. From this we are going to make 6 circles, it is to make only a pair of tendrils, I show you only 3, because I previously put together a tendril. 😁 Now we have all our circles ready.
🐾🐾🐾
🐾🐾🐾
🐾🐾🐾
🐾🐾🐾
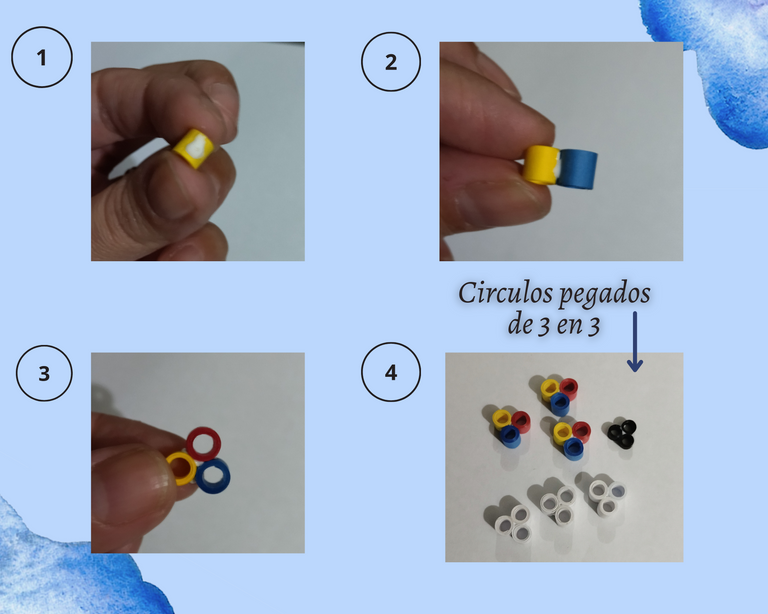
• Ahora procedemos a pegar nuestros círculos en grupos de 3, uno amarillo, uno azul y uno rojo. Con los blancos y negros procedemos de igual manera. Ya tenemos nuestros círculos unidos.
- Now we proceed to glue our circles in groups of 3, one yellow, one blue and one red. With the black and white ones we proceed in the same way. Now we have our circles together.
🐾🐾🐾
🐾🐾🐾
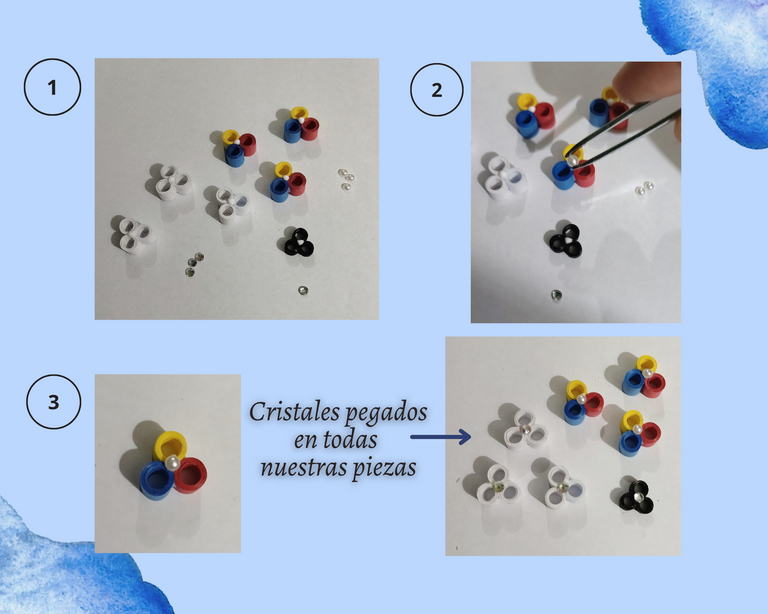
• Vamos a colocarles sus perlas y cristales, a los tricolor le colocaré una perla blanca como señal de la estrella de mi país Venezuela, a los blancos y negros le colocaré cristales.
• Tomamos la pega blanca y le colocamos un punto a cada pieza, con la ayuda de nuestra pinza punta fina tomamos las perlas y cristales y las colocaremos en las piezas.
We are going to place their pearls and crystals, to the tricolor I will place a white pearl as a sign of the star of my country Venezuela, to the black and white I will place crystals.
We take the white glue and place a dot on each piece, with the help of our fine tip tweezers we take the pearls and crystals and we will place them on the pieces.
🐾🐾🐾
🐾🐾🐾
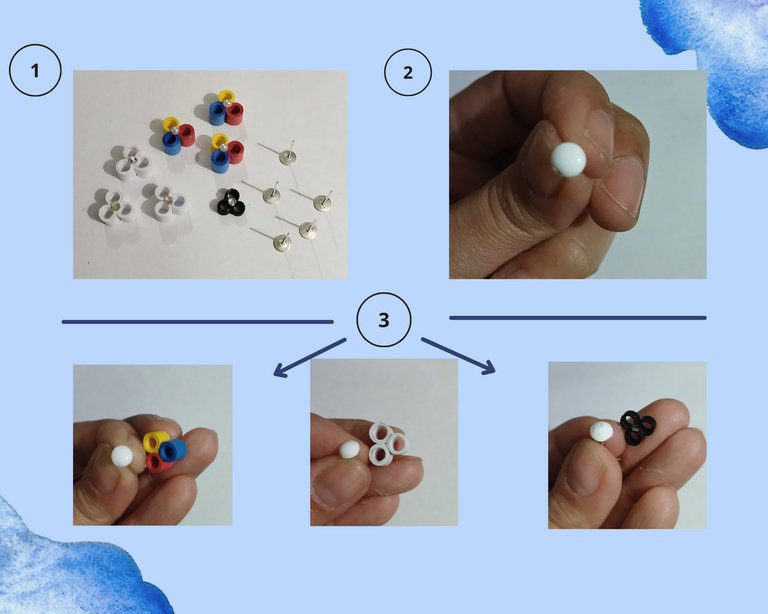
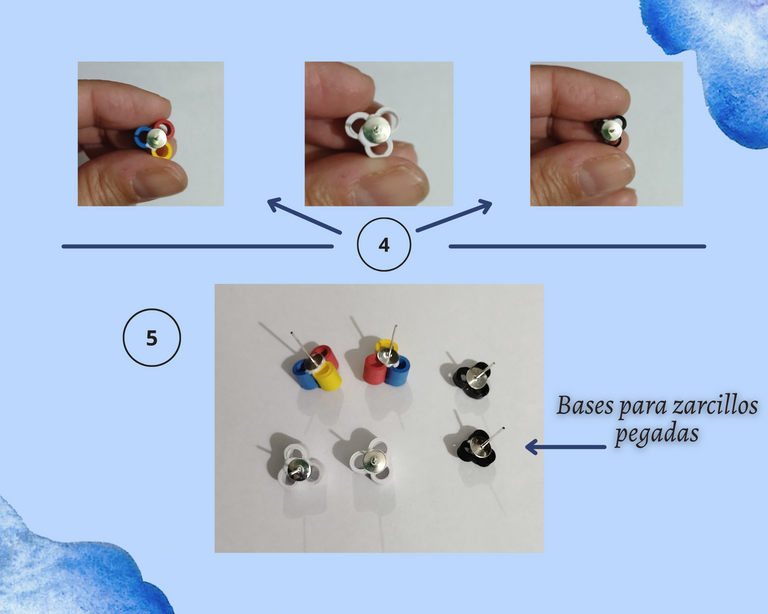
• Ahora le colocaremos la base fija al zarcillo, tomamos nuestra base pequeña, le colocamos pega y procedemos a pegar de la pieza, dejamos secar unos minutos.
- Now we will place the fixed base to the tendril, we take our small base, we place glue on it and proceed to glue the piece, let it dry for a few minutes.
🐾🐾🐾
🐾🐾🐾
🐾🐾🐾
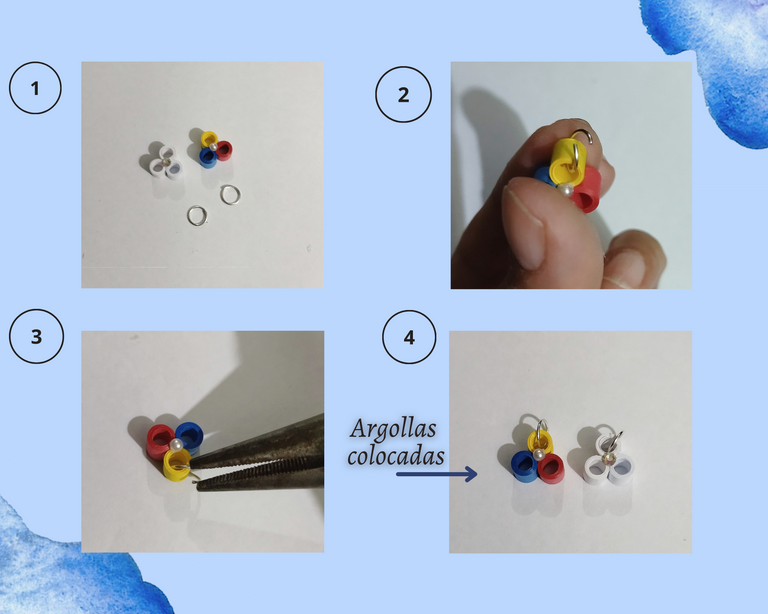
• A los dijes le colocaremos su argolla, en la pieza tricolor la incorporamos la argolla en el círculo amarillo, y cerramos la misma con la ayuda del alicate punta fina. Para el blanco colocamos la argolla en cualquiera de los círculos.
- To the charms we will place its ring, in the tricolor piece we incorporate the ring in the yellow circle, and we close it with the help of the fine tip pliers. For the white one we place the ring in any of the circles.
🐾🐾🐾
🐾🐾🐾
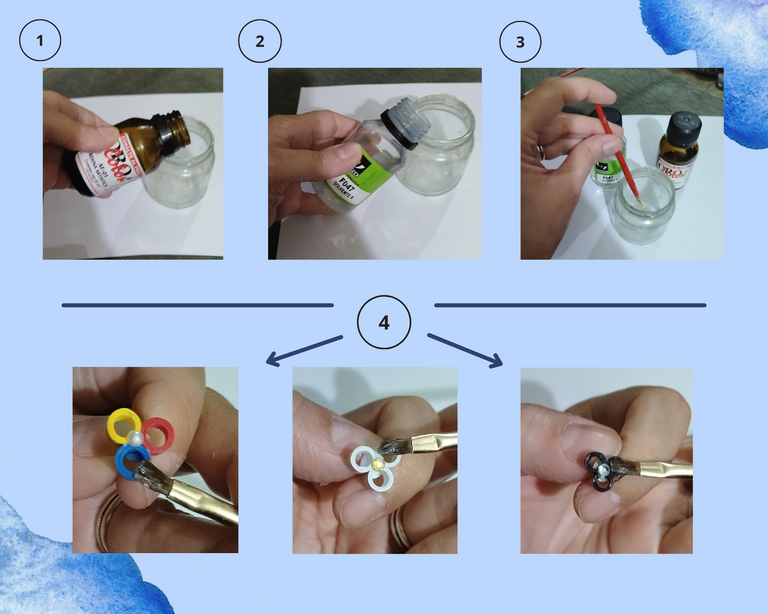
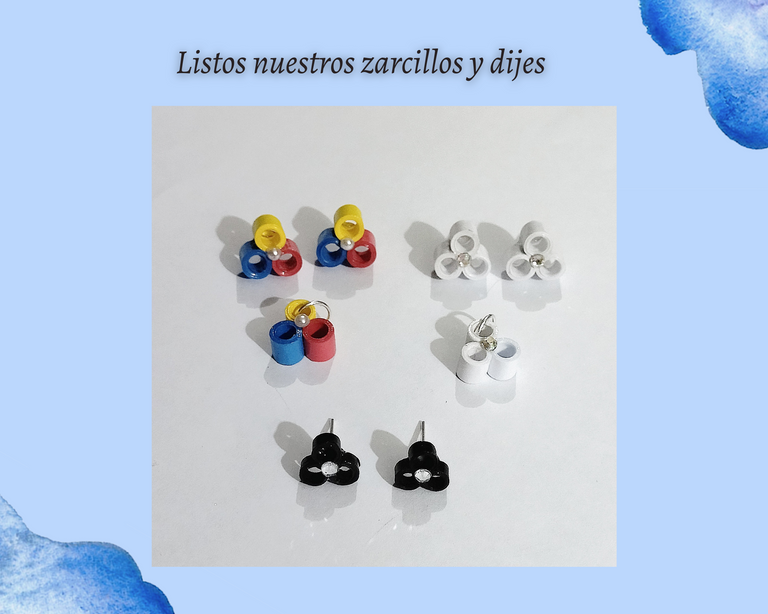
• Ahora aplicaremos la resina para darle su protección a las piezas, tomamos una parte de resina, otra de solvente, vertemos en el frasco de vidrio y revolvemos, una vez disuelto, aplicaremos a nuestras piezas, zarcillos y dijes, por la parte delantera y trasera, dejamos secar de un día para otro. Y listoooo. Tenemos nuestros dijes y zarcillos listos. 😃
- Now we will apply the resin to give protection to the pieces, we take a part of resin, another part of solvent, pour into the glass jar and stir, once dissolved, we will apply to our pieces, tendrils and charms, on the front and back, let dry overnight. And that's it. We have our charms and tendrils ready. 😃
🐾🐾🐾
🐾🐾🐾
🐾🐾🐾
Ahora vamos con el collar fantasma. 👻
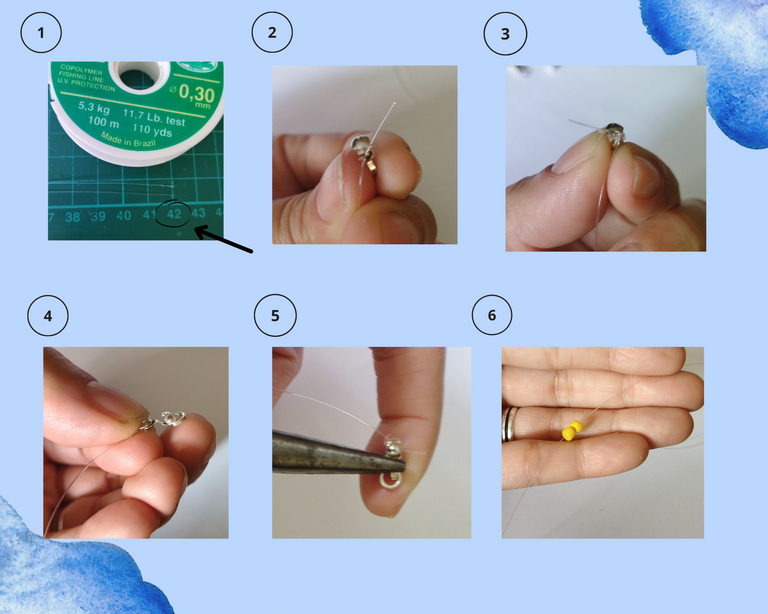
• Tomamos nuestro nylon de 0.30mm de grosor, cortamos 2 tiras de 42 cms, tomando en cuenta que vamos a usar un par de centímetros para enrollar en el tapa nudos para que no se nos salga, y también dependiendo de la medida del cuello de la persona, si deseas que tú collar quede ajustado o más suelto para lucir tu hermoso dije.
• Tomamos nuestro tapa nudos pequeño y procedemos a meter la punta del nylon en un agujero que trae el tapa nudos luego lo enrollamos alrededor de él, yo suelo dar unas dos vueltas para que quede ajustado y no se salga, luego con la ayuda del alicate punta fina cerramos el tapa nudos. Cómo se podrán fijar quedó un extremo del tapa nudos abierto, por allí colocamos una de las argollas y cerramos.
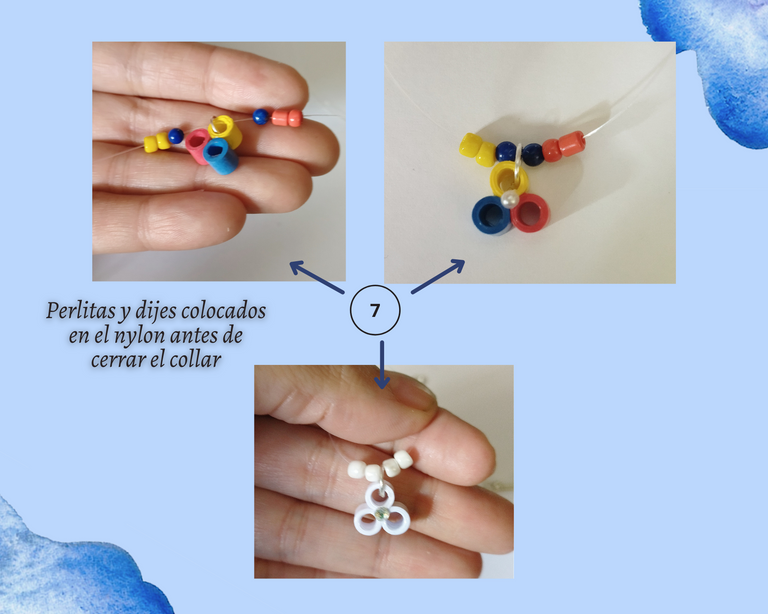
• Ahora procedemos a meter nuestras perlitas y el dije en el collar antes de cerrar, en uno vamos a colocar dos amarillas, una azul colocamos nuestro dije tricolor, seguimos con la otra azul y para finalizar dos rojas.
• Para el otro collar fantasma repetimos el mismo procedimiento anterior, con la diferencia que colocaremos dos perlitas blancas, nuestro dije y luego las otras dos perlitas blancas.
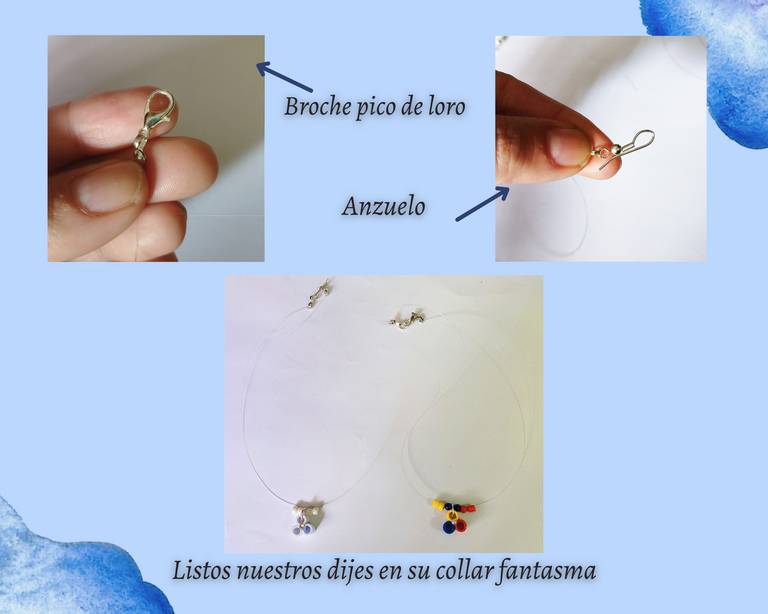
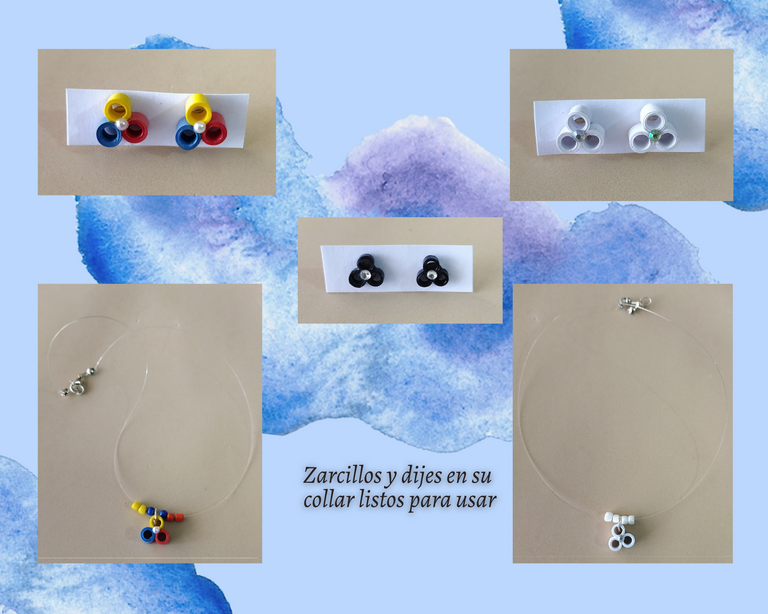
• Procedemos a cerrar nuestro collar fantasma, repitiendo lo que hicimos con el tapa nudos anterior pero en vez de colocar la argolla colocamos el broche pico de loro o el anzuelo y cerramos con la ayuda de nuestro alicate punta fina. (Al finalizar todo el procedimiento, les hablaré del anzuelo). 😁 Y ya tenemos nuestros zarcillos y los dos collares, con nuestros dijes listos para usar. 🥰
Now let's go with the ghost necklace. 👻
We take our 0.30mm thick nylon, cut 2 strips of 42 cms, taking into account that we will use a couple of centimeters to wind in the knot cover so it does not come off, and also depending on the size of the neck of the person, if you want your necklace to be tight or looser to show off your beautiful pendant.
We take our small knot cover and proceed to put the tip of the nylon in a hole that brings the knot cover then we roll it around it, I usually give about two laps so that it is tight and does not come out, then with the help of the fine tip pliers we close the knot cover. As you can see, one end of the knot cover is left open, place one of the rings there and close it.
Now we proceed to put our beads and the pendant in the necklace before closing, in one we are going to place two yellow ones, a blue one we place our tricolor pendant, we continue with the other blue one and to finish with two red ones.
For the other ghost necklace we repeat the same procedure above, with the difference that we will place two white beads, our pendant, the other two white beads.
We proceed to close our ghost necklace, repeating what we did with the previous knot cover but instead of placing the ring we place the parrot beak clasp or the hook and we close it with the help of our fine tip pliers. (At the end of the whole procedure, I will tell you about the hook). 😁 And now we have our earrings and the two necklaces, with our charms ready to wear. 🥰
🐾🐾🐾
🐾🐾🐾
🐾🐾🐾
• Por último colocamos nuestros zarcillos en sus cartones, le colocamos sus tapas y todo listo para la venta o para su uso. 😃
- Finally we place our tendrils in your cartons, put your lids on and everything is ready for sale or for use. 😃
🐾🐾🐾
🐾🐾🐾
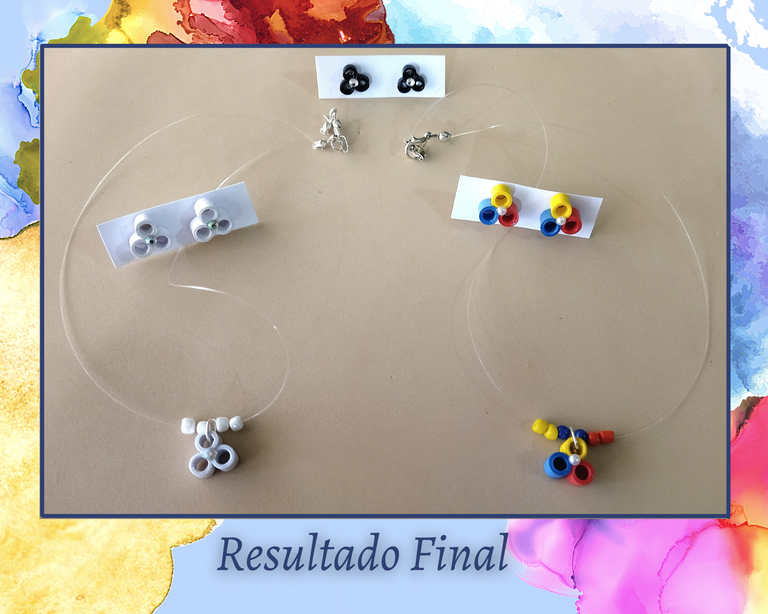
Resultado Final:💕
Final Result:💕
🐾🐾🐾
🐾🐾🐾
Les cuento que los zarcillos negros los hice para mi uso personal, aparte que es uno de mis colores preferidos, me encantan los zarcillos súper pequeños y como les he mencionado anteriormente, me gusta trabajar con piezas pequeñas, que aún siendo más difíciles de manejar se ven muy lindos y súper delicados. 💖
Tips 💡
• Le hablo de los anzuelos, ¿Porque usar anzuelos, si ellos son bases para zarcillos colgantes? Elaborando uno de mis trabajos, me pongo a analizar los anzuelos y me dije, pero si los cierro totalmente sirven como broches, son súper prácticos, no se dañan de tanto abrirlo y cerrarlo como suele pasar los broches pico de loro, y aparte te sirven para salir de una emergencia si no dispones de los broches, y de allí en adelante comencé a usarlos como broches para mis prendas personales, y al usar mis accesorios le enseñaba mi práctica idea mis conocidos y hasta a mis clientes, a los cuales les pareció magnífica idea y hasta comenzaron a pedirme sus conjuntos con ellos. 😜 Para evitar que puyen, aunque a mí no me a pasado, podemos cortarle un poco la punta con un alicate y listoooo. Un tips especial que pueden usar para emergencias, abaratar costos o para usarlo en tus creaciones permanentemente.
• Las piezas las realice del color de mi preferencia, pero como siempre les sugiero, lo pueden realizar del color y combinación que más les guste, alternar los cristales y las perlas por los detalles que sean de su agrado. Deja volar tu imaginación 💖
• Tomemos en cuenta que los zarcillos podemos también realizarlos colgantes, solo procedemos a realizar todas nuestras piezas estilo dije colocándoles una argolla a todos, y les colocamos un anzuelo o base para zarcillo colgante. Puedes hacerlo de la manera que más te guste. Pensándolo bien, les hubiese hecho uno fijo y uno colgante, para otra ocasión con alguna otra creación, se las hare de las dos maneras. 😉
¿Que les pareció, les gustó?
Espero que sí, que les haya gustado mi explicación, procedimiento y fotos, los hice con mucho cariño por y para ustedes.
"Deja salir esa musa que te inspira, y deja volar tu imaginación".
Gracias a todos, nos vemos en la próxima. 🐾🐱💕
I tell you that I made the black tendrils for my personal use, besides that it is one of my favorite colors, I love super small tendrils and as I mentioned before, I like to work with small pieces, that even being more difficult to handle they look very cute and super delicate. 💖
Tips 💡
- I tell you about the hooks, why use hooks, if they are bases for dangling tendrils? Elaborating one of my works, I start to analyze the hooks and I said to myself, but if I close them completely they serve as brooches, they are super practical, they are not damaged by opening and closing them as it usually happens with the parrot beak brooches, and besides they are useful to get out of an emergency if you do not have the brooches, and from then on I began to use them as brooches for my personal garments, and when I used my accessories I showed my practice to my acquaintances and even to my clients, who thought it was a great idea and even began to ask me for their outfits with them. 😜 To prevent them from stinging, although it hasn't happened to me, we can cut a little bit the tip with pliers and that's it. A special tip that you can use for emergencies, to reduce costs or to use it in your creations permanently.
- I made the pieces in the color of my preference, but as I always suggest, you can do it in the color and combination that you like, alternating the crystals and pearls for the details that are to your liking. Let your imagination fly 💖
- Let's take into account that the tendrils can also be made as pendants, we just proceed to make all our pendant style pieces placing a ring to all of them, and we place a hook or base for the pendant tendril. You can do it any way you like. On second thought, I would have made one fixed and one hanging, for another occasion with some other creation, I will make them both ways 😉.
What did you think, did you like it?
I hope you did, I hope you liked my explanation, procedure and photos, I made them with love for you.
"Let out that muse that inspires you, and let your imagination fly".
Thank you all, see you next time. 🐾🐱💕


