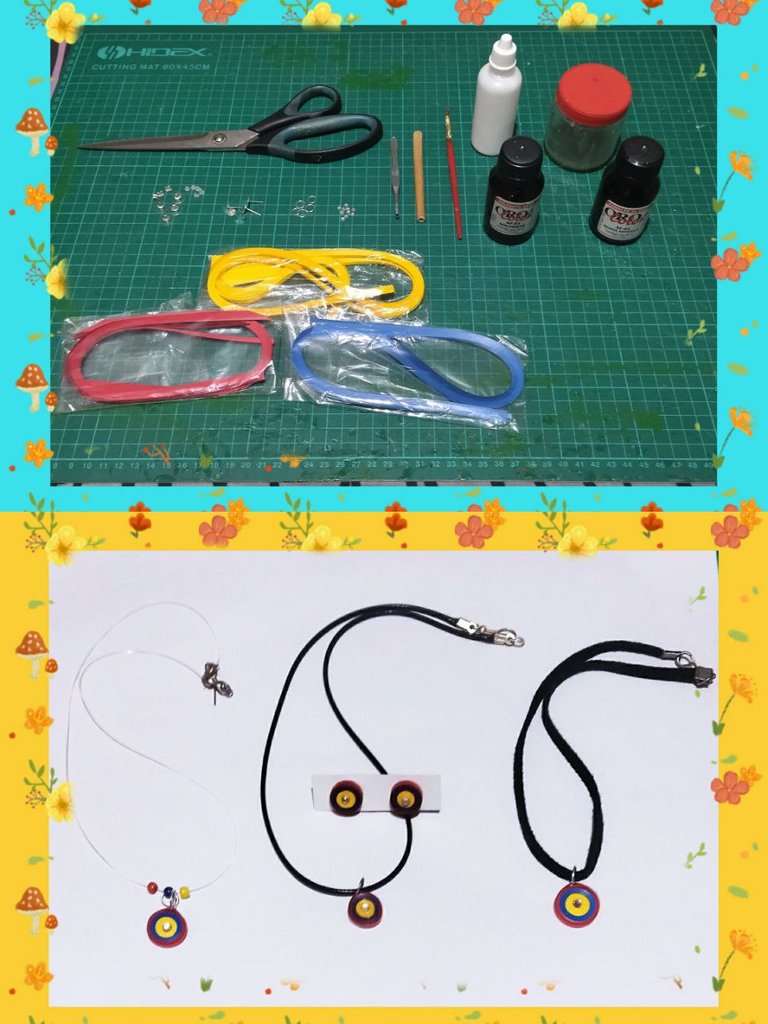
Hola a todos... 😺💙
Hola mi gente de Hive, a la gente de la comunidad #hivediy, y en especial a todo el grupo de gente perteneciente a #hivemasterclass, y a las profesoras @laloretoyya y @elizabeths14 , por las clases que nos han estado dando en los últimos días por medio de telegram, por tanta paciencia, por la enseñanza que nos han impartido y la ayuda que nos han brindado tan desinteresadamente. Gracias por el recibimiento que nos brindado en la plataforma... 😃💕
Hello everyone... 😺💙
Hello my Hive people, to the people of the #hivediy community, and especially to the whole group of people belonging to #hivemasterclass, and to the teachers @laloretoyya and @elizabeths14 , for the classes they have been giving us in recent days via telegram, for so much patience, for the teaching they have given us and the help they have given us so selflessly. Thank you for the reception that you have given us on the platform....
Hoy estoy el doble de emocionada que la vez anterior, ¿Porque? Porque vamos a iniciar la práctica. 😄👏
Les voy a comenzar a mostrar lo que amo hacer y quiero compartirlo con ustedes esperando, que este conocimiento que les voy a proporcionar, lo reciban y lo usen para aprender y que los pueda ayudar en su día a día, para hacer sus propias creaciones para vender u obsequiar a sus seres amados.
Si quieres disipar alguna duda con respecto a la técnica usada en este post, puedes visitar mi post anterior, por acá abajo te dejo el link.
Today I am twice as excited as last time, why? Because we are going to start the practice. 😄👏
Today I am twice as excited as last time, why? Because we are going to start the practice.
I am going to start showing you what I love to do and I want to share it with you hoping that this knowledge that I am going to give you, you will receive it and use it to learn and that it can help you in your day to day, to make your own creations to sell or give as gifts to your loved ones.
If you want to dispel any doubts regarding the technique used in this post, you can visit my previous post, here below I leave the link.
Ahora comencemos a crear:
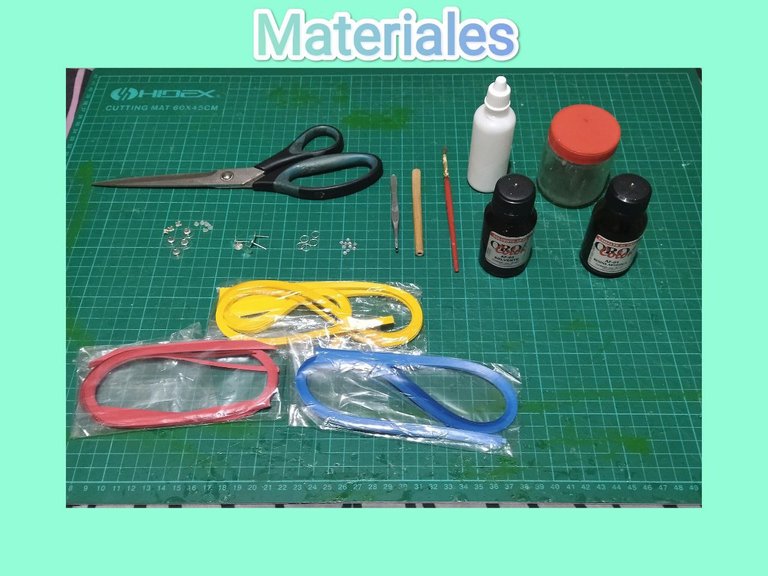
¿Que necesitamos?
Materiales:
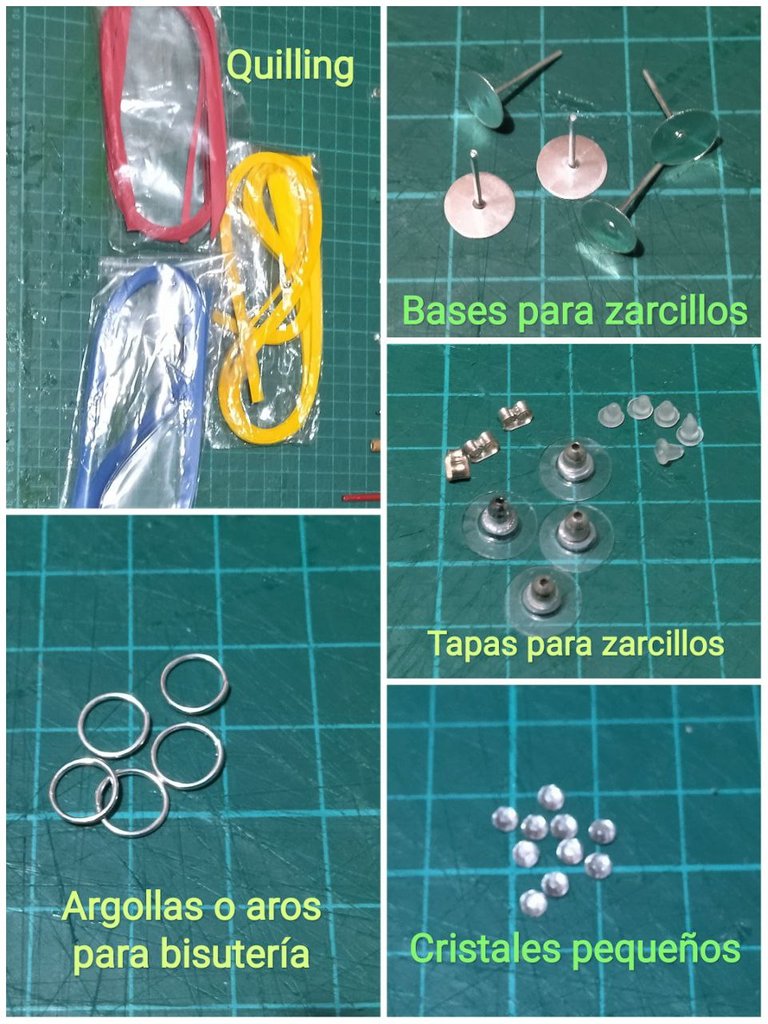
• Quilling: cintas de 3 milímetros. Amarilla, azul y rojo.
• Bases para zarcillos medianas plateadas.
• Tapas para zarcillos antialérgicas.
• Argollas o aros de bisutería medianos plateadas.
• Cristales pequeños.
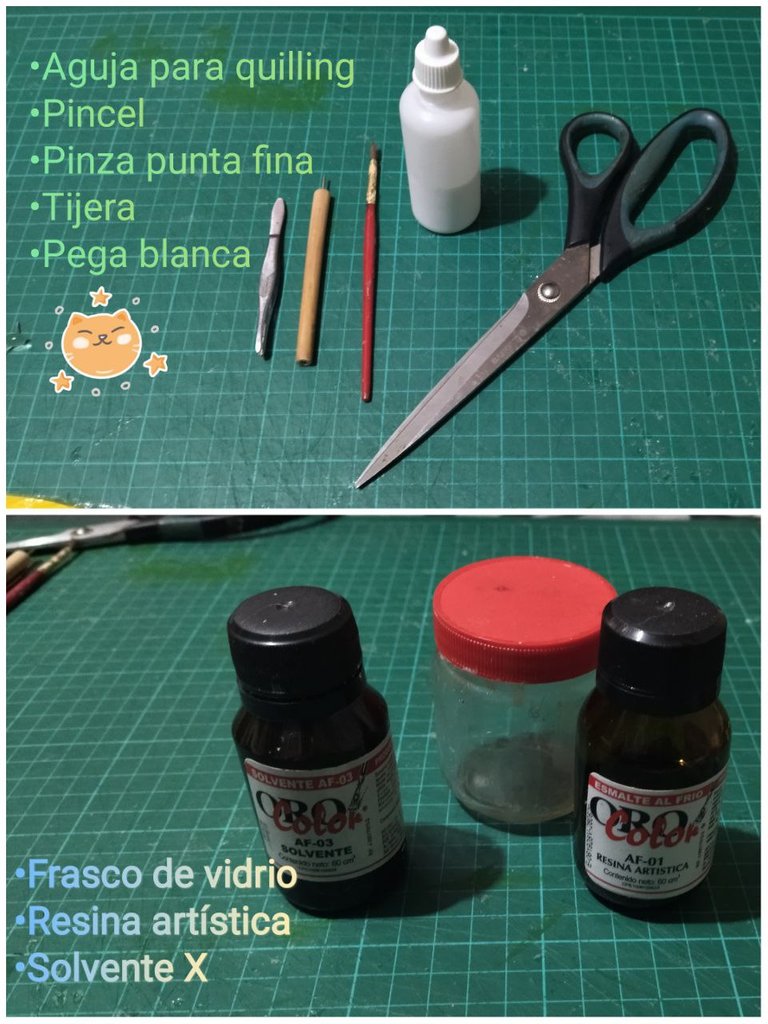
• Aguja para quilling.
• Pega Blanca.
• Resina artística.
• Solvente X.
• Frasco de vidrio pequeño.
• Pincel.
• Tijeras.
• Pinza punta fina
Now let's start creating:
What do we need?
Materials:
- Quilling: 3 millimeter ribbons. Yellow, blue and red.
- Silver-plated medium sized bases for tendrils.
- Anti-allergic covers for tendrils.
- Medium silver-plated jewelry rings.
- Small crystals.
- Quilling needle.
- White glue.
- Artistic resin.
- Solvent X.
- Small glass bottle.
- Brush.
- Scissors.
- Fine tip tweezers
Vamos con el Paso a Paso:
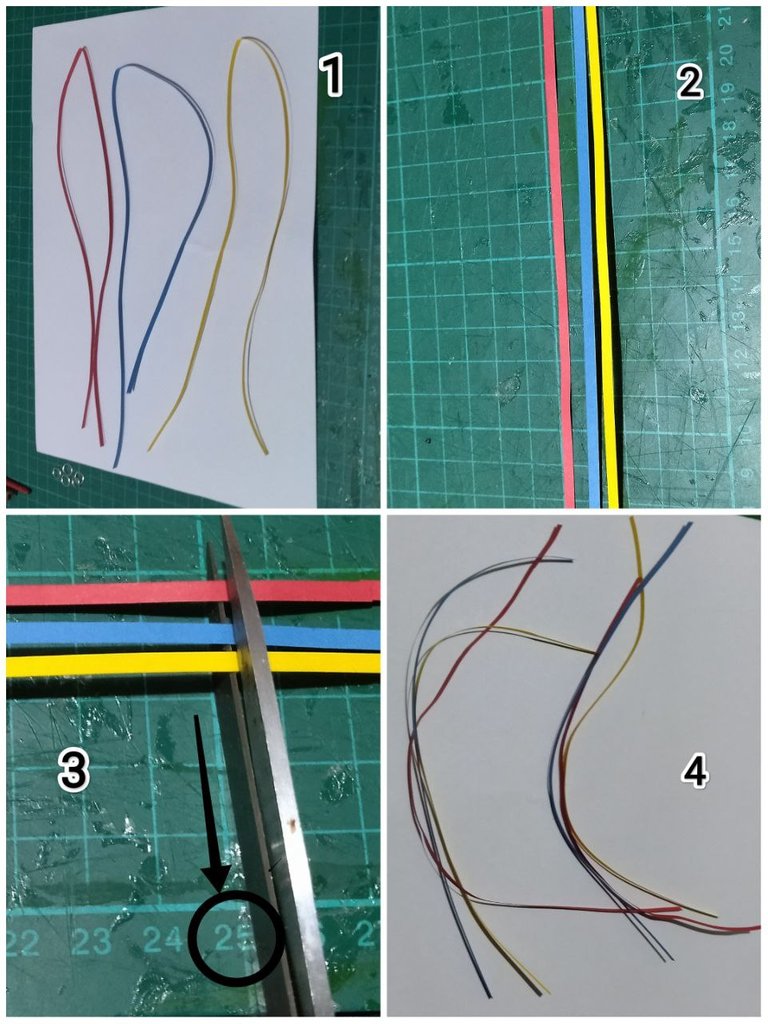
• Tomamos 3 cintas, una amarilla, una azul y una roja. Utilicé cintas de 3 milímetros de ancho, por 50 centímetros de largo, de cada una tomé y corté 25 centímetros. De este corte nos sale para hacer el par de zarcillos.
Let's go with the Step by Step:
- We took 3 ribbons, one yellow, one blue and one red. I used ribbons of 3 millimeters wide, by 50 centimeters long, from each one I took and cut 25 centimeters. From this cut we get to make the pair of tendrils.
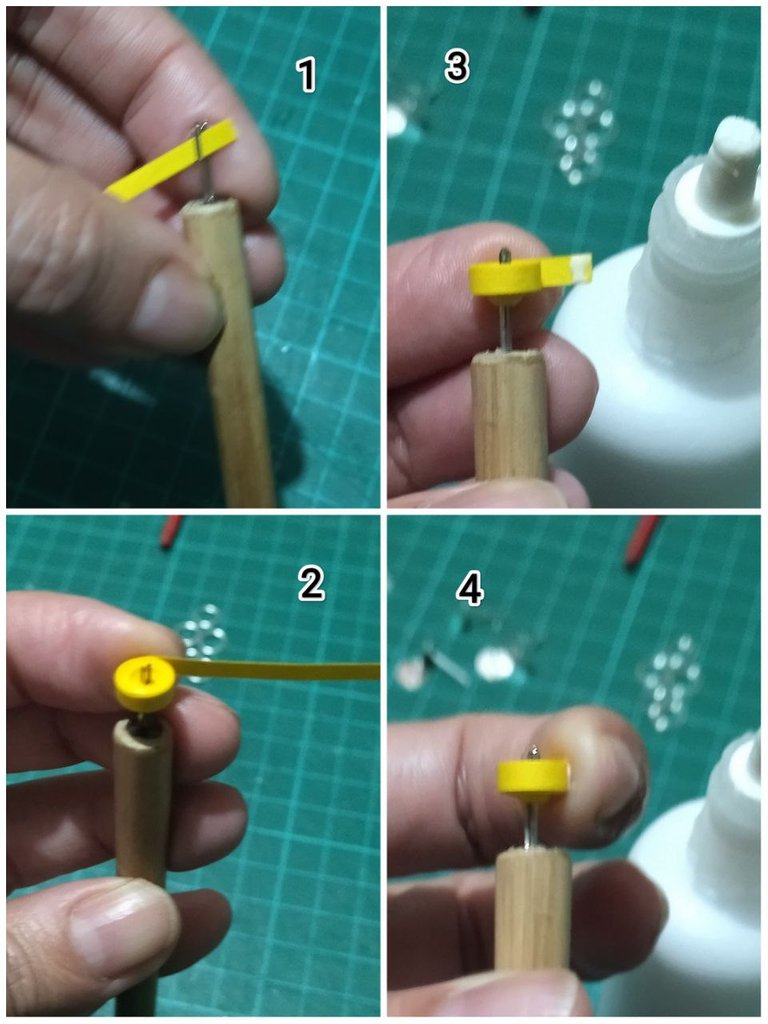
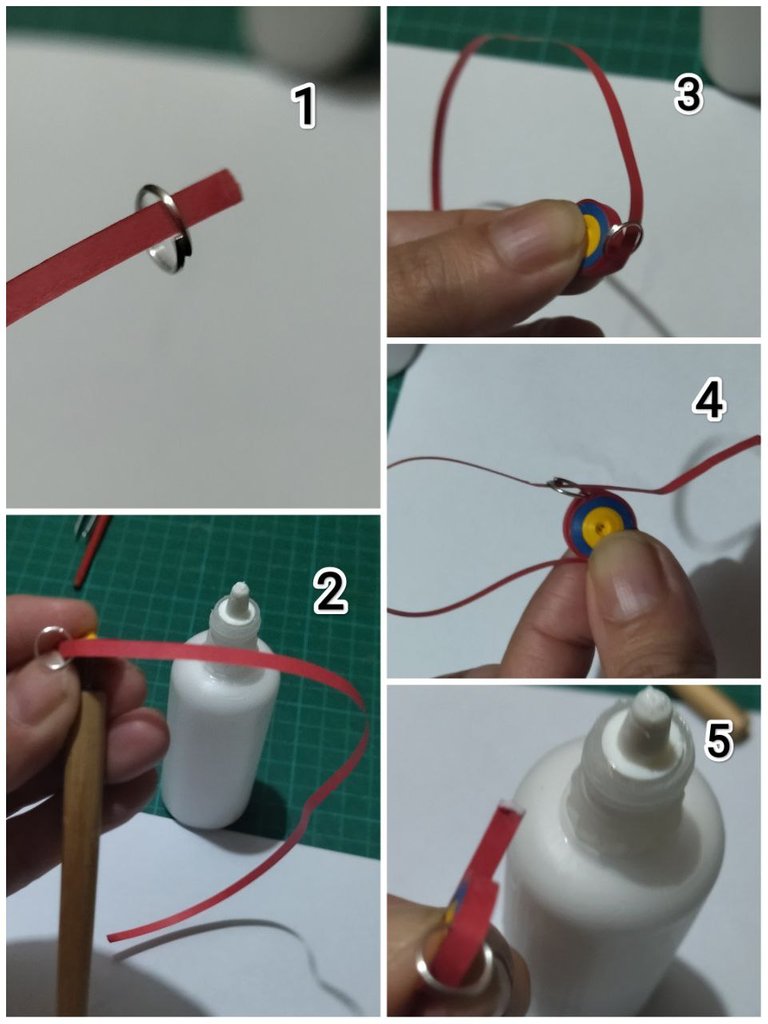
• Comenzamos tomando el quilling amarillo y colocando el primer extremo de la cinta en la aguja, comenzamos a enrollar hasta llegar a final, en la punta colocamos un punto de cola blanca y presionamos con el dedo hasta que selle.
- We begin by taking the yellow quilling and placing the first end of the ribbon on the needle, we begin to roll until we reach the end, at the tip we place a dot of white glue and press with the finger until it seals.
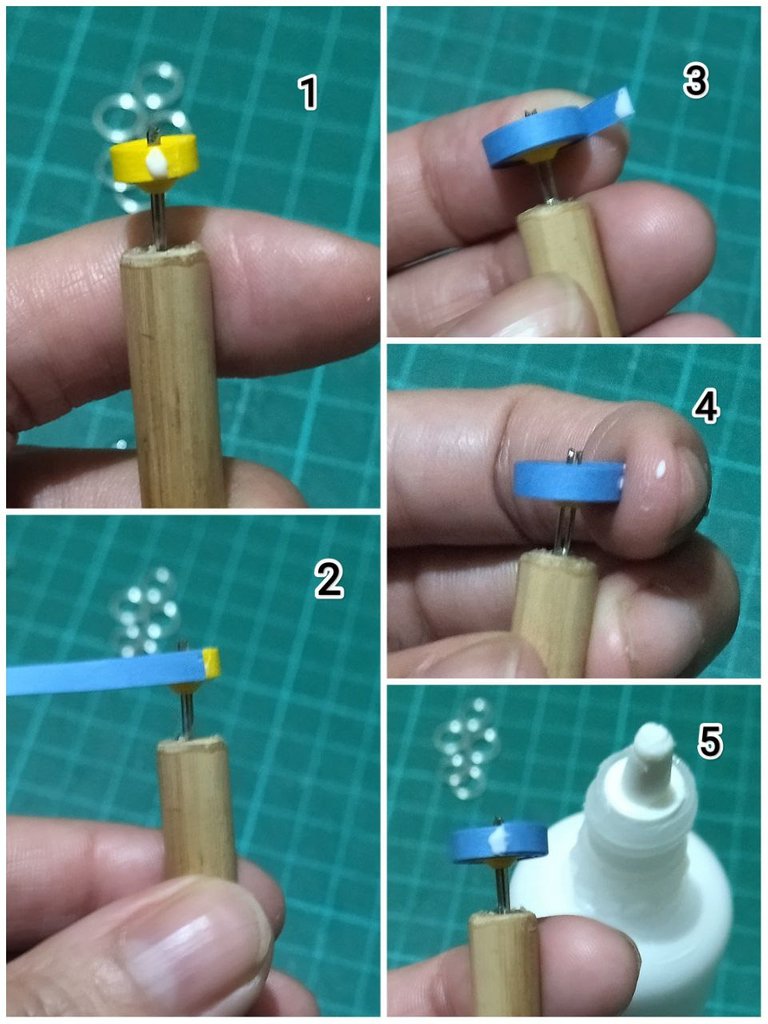
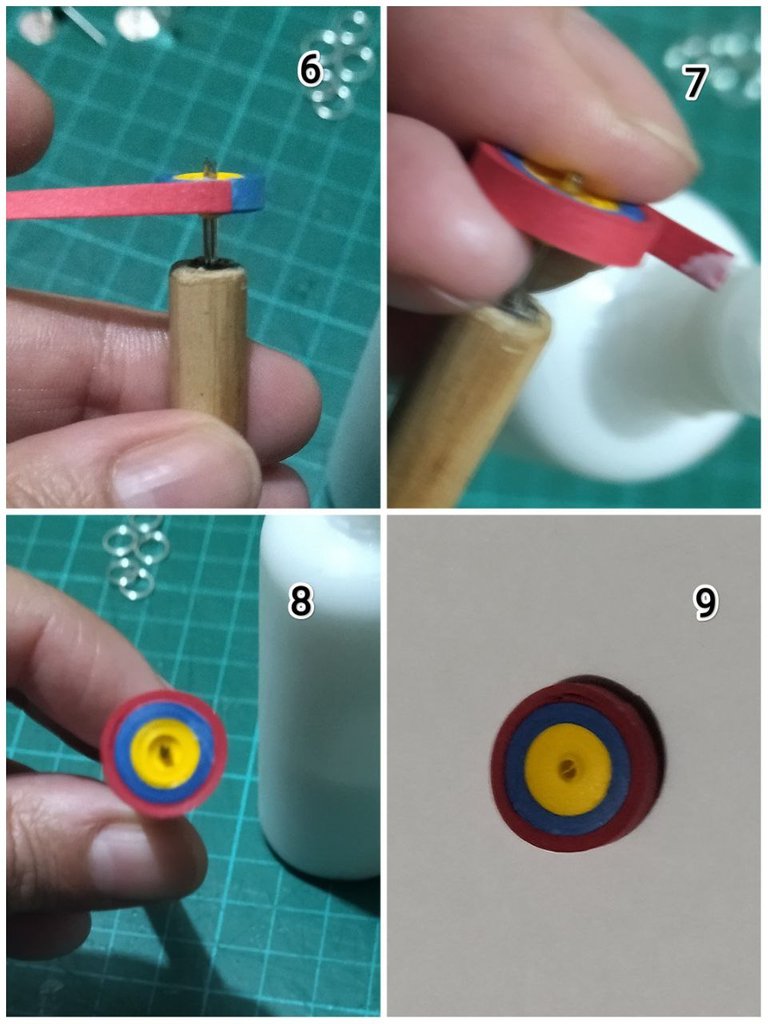
• En este momento procedemos a colocar un punto de cola blanca justo al finalizar la cinta que acabamos de sellar, y colocamos la primera punta de la cinta azul presionamos unos segundos hasta que selle también, y continuamos enrollando hasta llegar al final de la cinta azul repitiendo el paso anterior, colocando un punto de pega presionando con el dedo para que selle y justo al final de la parte sellada, colocamos otro punto de pega y colocamos el primer extremo de la cinta roja, procediendo a terminar de enrollar, colocar el punto de pega en el extremo final de la cinta y presionar con el dedo para concluir y sellar.
De esta manera ya tenemos nuestro botón o círculo cerrado de colores terminado.
- At this point we proceed to place a point of white glue just at the end of the tape that we just sealed, and place the first end of the blue ribbon, press a few seconds until it also seals, and continue rolling until the end of the blue ribbon repeating the previous step, placing a point of glue pressing with the finger to seal and just at the end of the sealed part, place another point of glue and place the first end of the red ribbon, proceeding to finish rolling, place the point of glue at the end of the tape and press with the finger to finish and seal.
In this way we already have our button or closed circle of colors finished.
• Para hacer el dije repetimos el procedimiento anterior con la única diferencia que, faltando la mitad de la cinta roja por terminar de enrollar, procedemos a meter la argolla o aro de bisutería, pueden seguir enrollando con la aguja y cada vez que llegas a la argolla vas introduciendo la cinta hasta terminar de enrollar la cinta, colocar el punto de pega al final y sellar. En mi caso por la experiencia y para mayor comodidad, saco el círculo o botón de la aguja, presionando con firmeza para que el círculo no se suelte, continúo enrollando y metiendo la cinta por el aro o argolla con mis dedos hasta finalizar el procedimiento. Y allí tenemos nuestro dije terminado ya con la argolla incorporada.
- To make the pendant we repeat the previous procedure with the only difference that, missing half of the red ribbon to finish winding, we proceed to put the ring or costume jewelry ring, you can continue winding with the needle and each time you reach the ring you introduce the ribbon until you finish winding the ribbon, place the glue stitch at the end and seal. In my case, for my experience and for convenience, I take the circle or button off the needle, pressing firmly so that the circle does not come loose, I continue winding and inserting the ribbon through the ring or ring with my fingers until the procedure is finished. And there we have our finished pendant with the ring already incorporated.
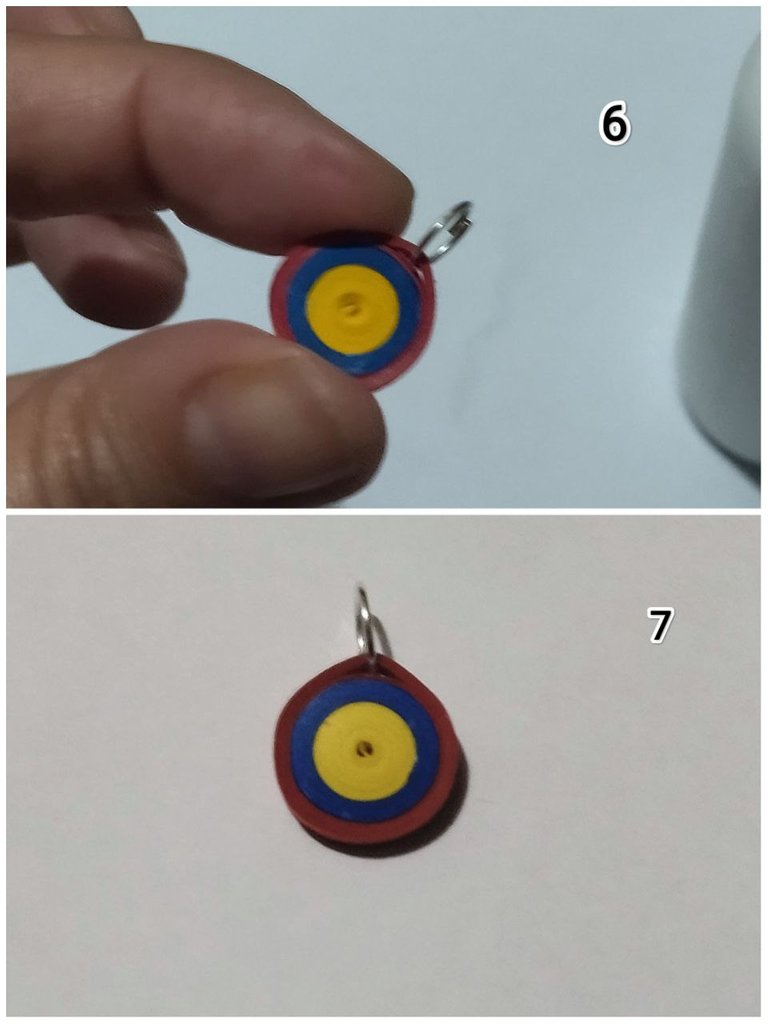
• Ahora procedemos a armar los zarcillos, tomamos la base para zarcillos, le colocamos pega blanca, ponemos el botón centrado en la base con el pegamento, repetimos la misma acción con el otro botón y lo colocamos en una superficie con la parte del botón hacia abajo y la base hacia arriba, dejamos secar por unas horas. Ya tenemos nuestros zarcillos en su base.
- Now we proceed to assemble the tendrils, we take the base for tendrils, we put white glue, we put the button centered on the base with the glue, we repeat the same action with the other button and place it on a surface with the button side down and the base up, let it dry for a few hours. Now we have our tendrils on their base.
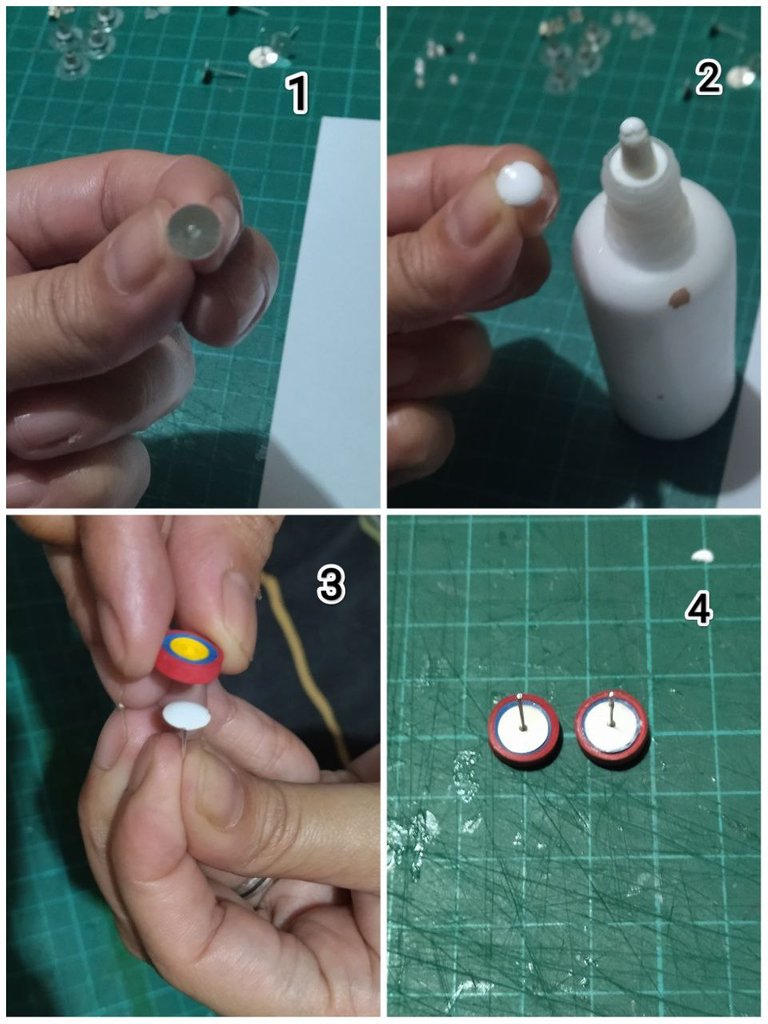
• Una vez secas las bases junto al botón, procedemos a colocar el detalle del cristal, tomamos la pinza punta fina, con la punta agarramos el cristal, previamente le ponemos un punto de pega en el centro del botón y colocamos el bello cristal que le va a dar un toque delicado a nuestra pieza, repetimos el procedimiento con el dije.
- Once the bases are dry next to the button, we proceed to place the crystal detail, we take the fine tip tweezers, with the tip we grab the crystal, previously we put a point of glue in the center of the button and place the beautiful crystal that will give a delicate touch to our piece, we repeat the procedure with the pendant.
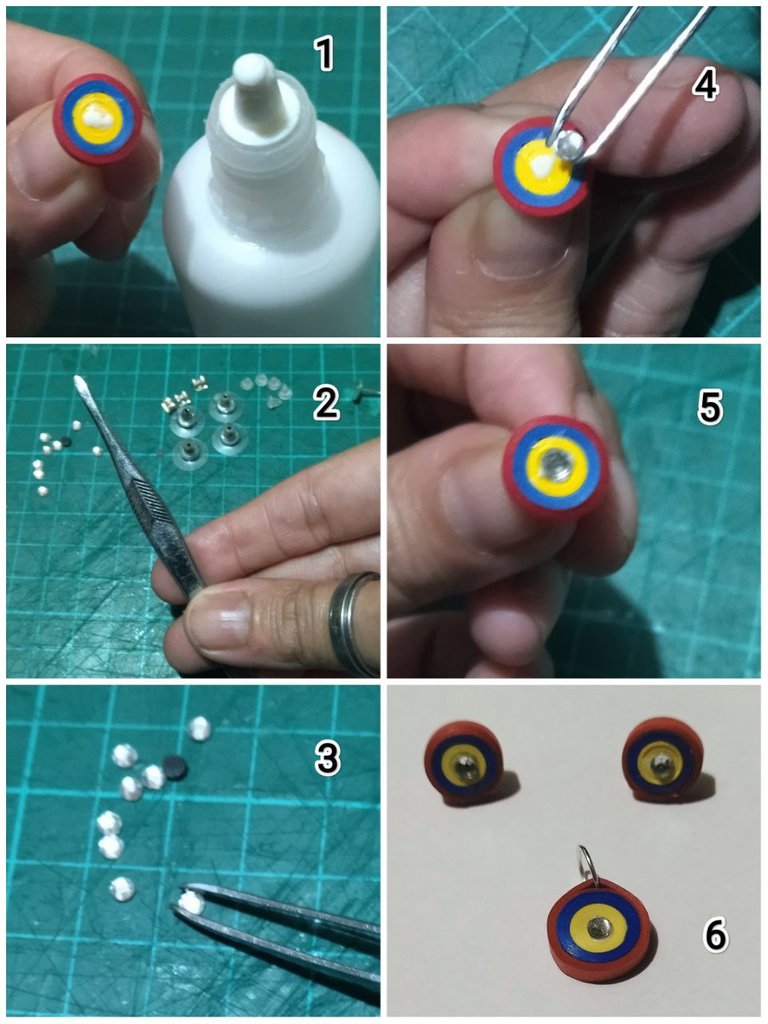
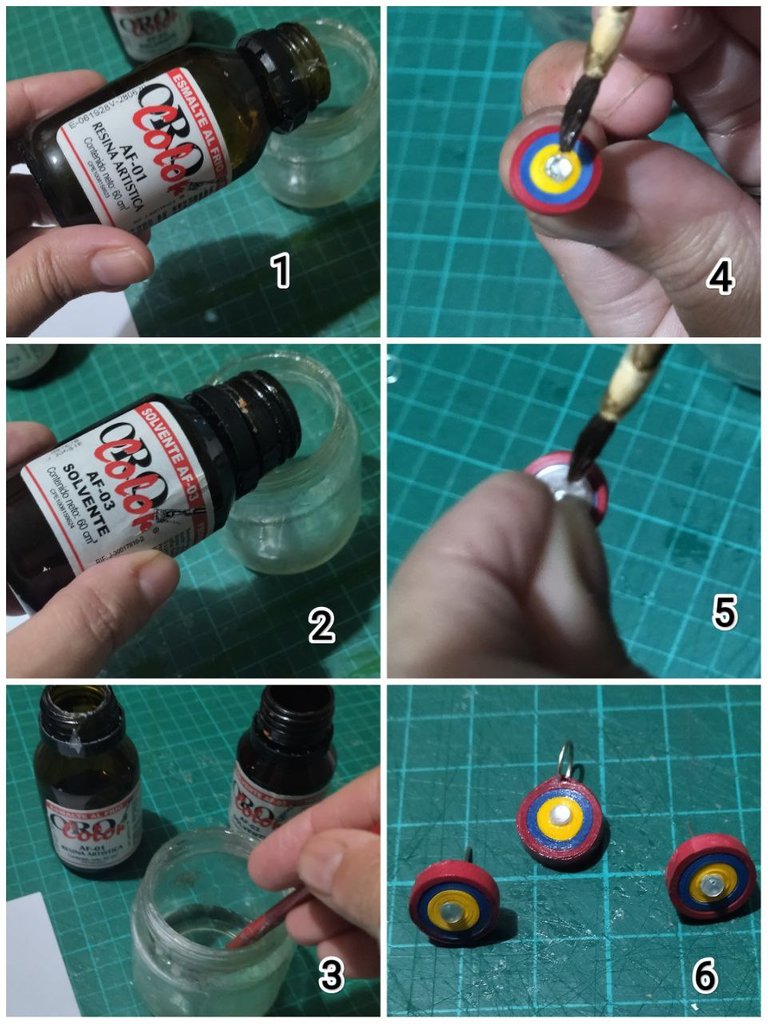
• Como siguiente paso viene la aplicación de la resina, tomamos el frasco de vidrio, agregamos una parte de resina al frasco y una parte de solvente X para diluir, de manera que no quede muy espeso para que no se forme un pegoste, en mi caso me gusta dejarlo lo más diluido posible para que toda la pieza lo absorba, mezclamos ambos y con el pincel, procedemos la aplicación a la pieza tanto por la parte delantera, como por la parte trasera del zarcillo y el dije, dejamos secar unos minutos y repetimos el mismo procedimiento. Una vez terminado, dejamos secar recomendablemente de un día para el otro.
- As a next step comes the application of the resin, we take the glass bottle, add one part of resin to the bottle and one part of solvent X to dilute, so that it is not too thick so that it does not form a sticky, In my case I like to leave it as diluted as possible so that the whole piece absorbs it, mix both and with the brush, proceed to apply to the piece both on the front and on the back of the tendril and the pendant, let dry a few minutes and repeat the same procedure. Once finished, we let it dry, preferably from one day to the next.
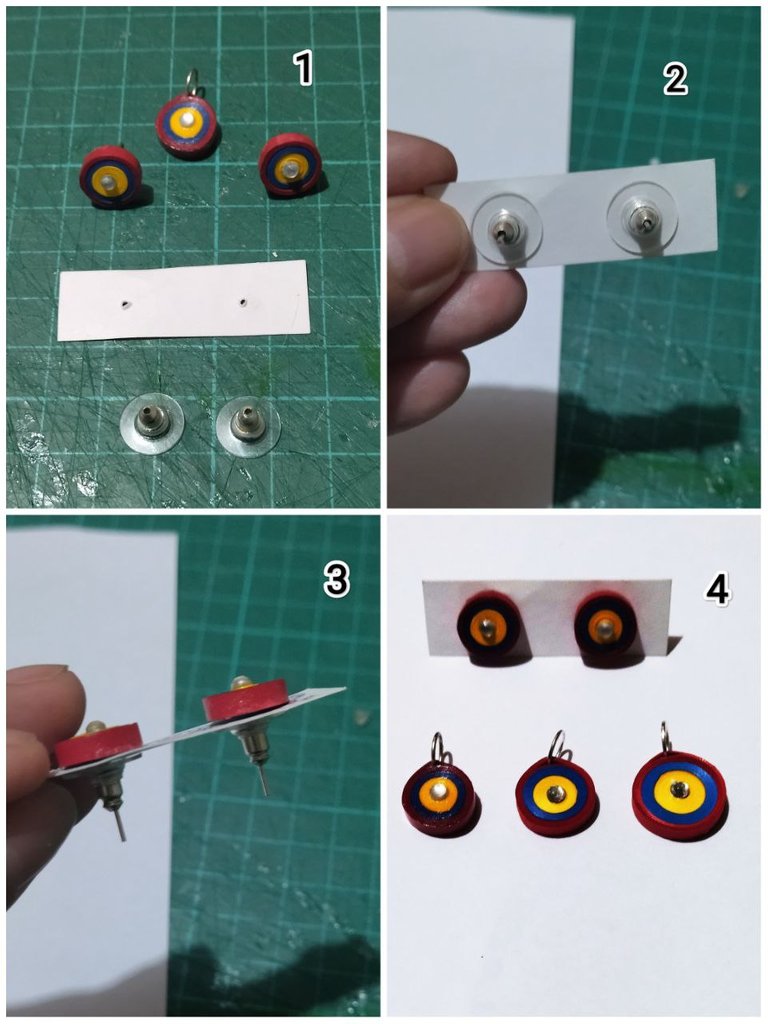
• Pasado el día de secado de la pieza, ya para culminar podemos tomar un cartón recortar un rectángulo y abrirle dos huequitos para introducir los zarcillos y colocarle sus bases, y el dije lo colocamos en el collar que más nos guste. Y listo tenemos terminados nuestros hermosos zarcillos y dije, que elaboramos con tanto cariño.
- After the day of drying the piece, and to finish we can take a cardboard cut a rectangle and open two holes to introduce the earrings and place their bases, and the pendant we place it in the necklace that we like. And ready we have finished our beautiful earrings and pendant, which we made with so much love.
Resultado Final:
Final Result:
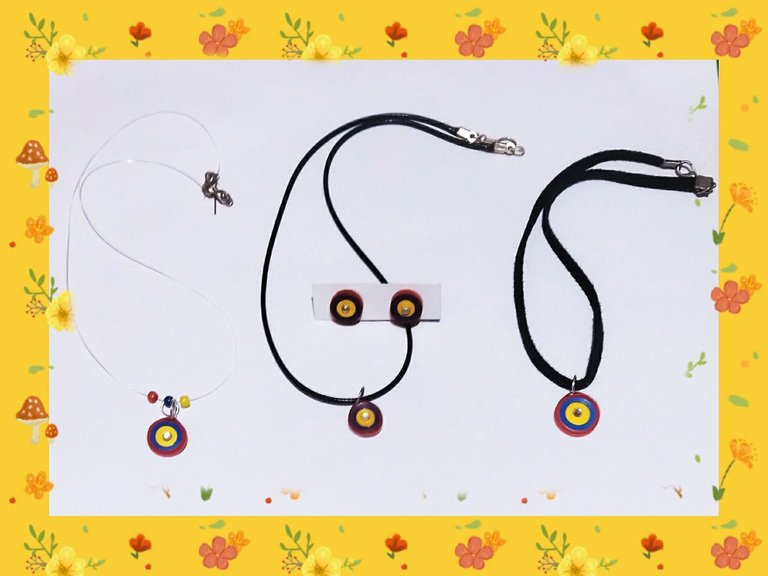
Vamos con unas tips o recomendaciones personales:
• En mi caso utilice cintas amarillas, azul y rojo, para combinarlas y sacar los colores de la bandera de mi hermoso país Venezuela. Pero puedes usar cintas del color de tu preferencia para realizar la combinación que más te guste. No necesariamente deben ser tres colores, hay un sin fin de colores los cuales puedes usar, combinando dos, tres, cuatro colores o todos los que desees. También use una medida específica de quilling, para el tamaño del botón que me interesaba, quise hacer unos botones pequeños de zarcillos para que luzcan delicados, pero ustedes pueden jugar con las medidas, para hacer el botón del tamaño que más les guste, pueden hacerlo más grande o más pequeño aún. Los zarcillos y el dije pueden hacerlos de diferentes tamaños así sean de la misma combinación, hice uno del tamaño de los zarcillos y otros dos un poco más grandes, porque de repente pueden querer que luzca más llamativo en su cuello, pueden tomar en cuenta que ese dije pueden usarlo para un collar, gargantilla, cadena, shokers, collar fantasma, etc, pero también pueden usarlo para colocarlo como colgante o de manera fija en una pulsera y hasta en una base para anillo. En un próximo post, mostraré como hacer diversas pulseras, anillos y hasta unos zarcillos colgantes, con dicho botón o círculo combinado. 😀
• El colocarle la argolla de una vez al dije, fue una idea que se me ocurrió ya que el papel es muy delicado y si una vez terminado el dije, intentamos introducir la argolla a la fuerza, podemos terminar maltratando o rompiendo el papel y lamentablemente dañar el trabajo que con tanto esfuerzo hemos realizado. No podemos de ninguna manera perder material.
• En el caso de las bases para zarcillos y argollas, use de color plateado, pero ellas vienen de diversos colores, puedes usar las que prefieras, solo te recomiendo usar el mismo color para todo el conjunto, zarcillos y dije, para mantener la armonía.
• Los cristales también vienen en diferentes tonalidades, puedes usar el que más te guste, también puedes usar perlitas o aplicarle cualquier detalle a la pieza para darle un toque delicado. Pero también si prefieres puedes no colocarle nada en el centro.
• Las bases para zarcillos también vienen en diversos estilos, prefiero usar las antialérgicas o en dado caso las de silicón. Pero como dije anteriormente puedes usar las que tengas a la mano o consigas con más facilidad y que hagan armonía con la base del zarcillo.
• En el caso de la pega blanca recomiendo usar la más fuerte que consigan, yo uso la pega de carpintería ya que todo queda más resistente y difícil para que se despegue, eso lo digo a la hora de pegar la base del zarcillo, las cintas si puedes pegarlas con pega escolar, pero siempre ten presente que lo ideal es usar materiales de calidad, para realizar el mejor de los trabajos y que el cliente o la persona a la que le vamos a dar un detalle creado por nosotros, quedé totalmente satisfecho y tenga un producto terminado de calidad y sobre todo jamás tenga nada negativo que decir.
• La resina artística y el solvente X, lo uso de la marca Kantec u Oro Color en esta última marca le llaman a la resina brillo espejo, esas son las mejores marcas que existen en mi país Venezuela, pero si te encuentras en otro país puedes usar la marca de tu preferencia pero que sea la mejor que exista en tu mercado. ¿Para que usamos la resina? Para darle un toque plastificado a la pieza y protegerla de cualquier daño. Debemos tener en cuenta que con todo y la protección que le damos con la resina, de igual manera hay que evitar en lo absoluto que a la pieza le caiga agua, podría causarles un daño severo y tampoco debe ser sometida a exposiciones prolongadas al sol o altas temperaturas, ya que podría alterar el color de la pieza.
Let's go with some personal tips or recommendations:
- In my case I used yellow, blue and red ribbons, to combine them and bring out the colors of the flag of my beautiful country Venezuela. But you can use ribbons of the color of your preference to make the combination that you like. It does not necessarily have to be three colors, there are endless colors which you can use, combining two, three, four colors or as many as you want. I also used a specific size of quilling, for the size of the button I was interested in, I wanted to make some small tendrils buttons to make them look delicate, but you can play with the sizes, to make the button the size you like, you can make it bigger or even smaller. The earrings and the charm can be made in different sizes even if they are of the same combination, I made one of the size of the earrings and two others a little bigger, because suddenly you may want it to look more striking on your neck, you can take into account that this charm can be used for a necklace, choker, chain, shokers, ghost necklace, etc, but you can also use it as a pendant or fixed on a bracelet and even on a ring base. In a next post, I will show how to make various bracelets, rings and even some dangling tendrils, with such combined button or circle. 😀
- I came up with the idea of attaching the ring at once to the pendant, because the paper is very delicate and if once the pendant is finished, we try to force the ring in, we can end up mistreating or breaking the paper and unfortunately damage the work that we have done with so much effort. We cannot in any way lose material.
- In the case of the bases for tendrils and rings, I used silver color, but they come in different colors, you can use the ones you prefer, I just recommend using the same color for the whole set, tendrils and pendant, to maintain harmony.
- The crystals also come in different shades, you can use the one you like the most, you can also use pearls or apply any detail to the piece to give it a delicate touch. But if you prefer, you can also use nothing in the center.
- The bases for tendrils also come in different styles, I prefer to use the anti-allergic ones or in some cases the silicone ones. But as I said before, you can use the ones you have at hand or that you can get easily and that match the base of the tendril.
- In the case of the white glue I recommend using the strongest you can get, I use the carpentry glue because everything is more resistant and difficult to take off, I say that when gluing the base of the tendril, the ribbons if you can stick them with school glue, but always keep in mind that the ideal is to use quality materials, to make the best of the work and that the customer or the person to whom we will give a detail created by us, will be completely satisfied and have a quality finished product and above all never have anything negative to say.
- The artistic resin and the solvent X, I use the brand Kantec or Oro Color in this last brand they call the resin mirror shine, those are the best brands that exist in my country Venezuela, but if you are in another country you can use the brand of your preference but that is the best that exists in your market. What do we use the resin for? To give a plasticized touch to the piece and protect it from any damage. We must keep in mind that with all the protection that we give with the resin, we must also avoid water to the piece, it could cause severe damage and should not be subjected to prolonged exposure to the sun or high temperatures, as it could alter the color of the piece.
¿Que les pareció, les gustó?
Espero que sí, que les haya gustado mi explicación, procedimiento y fotos, los hice con mucho cariño por y para ustedes.
Gracias a todos, nos vemos en la próxima 🐾🐱💕
What did you think, did you like it?
I hope you did, I hope you liked my explanation, procedure and photos, I made them with a lot of love for you.
Thank you all, see you next time 🐾🐱💕
Todas las fotos usadas en este post son de mi autoría y han sido sacadas y editadas en mi celular personal un Redmi 9T.
All photos used in this post are of my authorship and have been taken and edited on my personal cell phone a Redmi 9T.


