Hola a todos... 😃💞
Estoy muy feliz de encontrarme por acá nuevamente, sigo llena de expectativas y mucha ilusión de que mi incursión en este nuevo mundo sea de gran provecho, para conocer las grandes cosas que se encuentren por acá y a su vez para poderles poco a poco mostrar cosas buenas de mí, del día a día, de lo que me gusta hacer y a qué me dedico.
Cómo les dije en mi presentación, una de las cosas que me encanta y la que he tratado de explotar en los últimos años, es el arte de las manualidades. Desde que me hablaron del quilling me llamo la atención y al tener por primera vez en mis manos esos materiales que me mandó mi hermana me dije, vamos a ver cómo es esto, una vez que comencé no pare y comenzaron a venir las ideas. No niego que me falta mucho camino por recorrer ya que esa arte del quilling tiene muchísima variedad, porque se puede combinar con miles de cosas, para dar un toque hermoso a cualquier detalle que quieras realizar.
Hello everyone... 😀💞
I am very happy to be here again, I am still full of expectations and hope that my incursion into this new world will be of great benefit, to know the great things that are found here and in turn to be able to show you little by little good things about me, the day to day, what I like to do and what I do.
As I told you in my presentation, one of the things that I love and that I have tried to exploit in recent years, is the art of crafts. Since I was told about quilling, it caught my attention and when I had in my hands for the first time those materials that my sister sent me, I said to myself, let's see how this is, once I started I did not stop and the ideas began to come. I do not deny that I still have a long way to go because the art of quilling has a lot of variety, because it can be combined with thousands of things, to give a beautiful touch to any detail you want to make.
¿Y qué es lo mejor de todo?
Que es un material súper sencillo de conseguir y usar, son tiras de papel del color, largo y ancho de tu preferencia, las puedes comprar cortadas, pero lo más fascinante de esto es que las puedes hacer o cortar tú mismo, comprando cartulina o papel de diversos colores o puedes utilizar todo el papel que puedas reciclar en casa, sin importar que no sea unicolor, ¿quién sabe si te pueda salir algo super original con ese papel que te consigas en tu hogar?
Me gustaría antes de empezar a compartir algunas cosas prácticas que he realizado, y por supuesto regalarles todas aquellas nuevas ideas para poner en práctica que vayan surgiendo de mi imaginación día a día, explicarles en teoría e imagen, que es el quilling y algunas palabras básicas para que se vayan familiarizando con ellas, y de esta manera no haya que ser tan repetitiva post a post ya que ustedes tendrán noción de que les estaré hablando.
And what is the best of all?
It is a super simple material to get and use, they are strips of paper of the color, length and width of your choice, you can buy them cut, but the most fascinating thing about this is that you can make or cut them yourself, buying cardboard or paper of different colors or you can use all the paper you can recycle at home, no matter if it is not unicolor, who knows if you can get something super original with that paper that you get at home?
Before I start sharing some practical things that I have done, and of course give you all those new ideas to put into practice that arise from my imagination day by day, I would like to explain in theory and image, what is quilling and some basic words so that you become familiar with them, and in this way I don't have to be so repetitive post to post since you will have a notion of what I will be talking about.
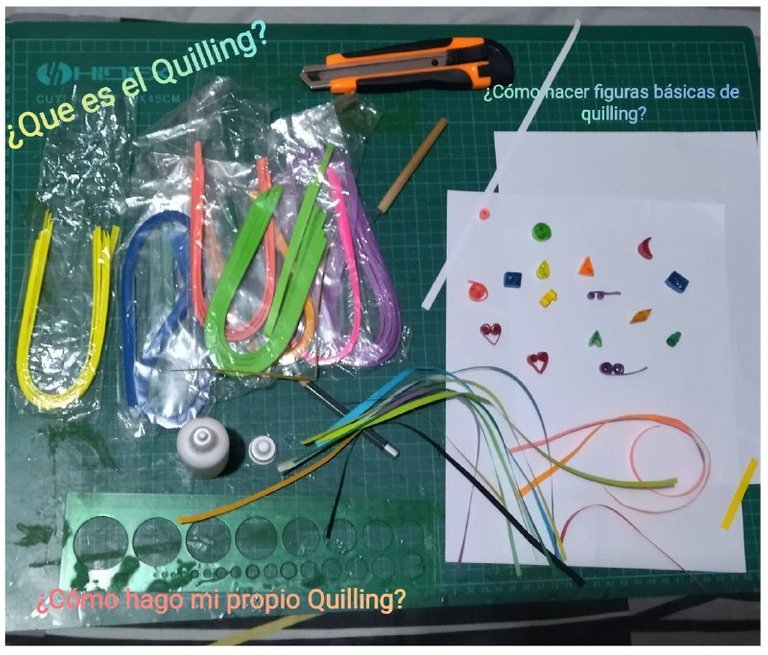
¿Qué es el quilling o técnica de quilling art?
También llamado por algunos filigrana. El quilling son tiras de papel, y esa técnica no es más que el arte manual, de darle forma o enrollar de manera artística, las cintas de papel de distintos tamaños, largo/ancho, viniendo derivado casi todo lo que realicemos a partir de un círculo y de allí al conocer en un principio las formas básicas, dejar volar nuestra imaginación para crear gran variedad de apliques de todos tamaños y poderlos transformar en figuras finales que podemos usar para adornar algo específico como una caja, porta llaves, percheros, etc, o combinarlo con otros materiales para realizar, dijes, anillos, zarcillos, pulseras, llaveros, cintillos, y un sin fin de cosas hermosas.
What is quilling or quilling art technique?
Also called by some people filigree. The quilling are strips of paper, and that technique is nothing more than the manual art, to shape or roll in an artistic way, the paper ribbons of different sizes, length / width, coming derived almost everything we do from a circle and from there to know at first the basic forms, Let our imagination fly to create a variety of appliqués of all sizes and transform them into final figures that we can use to decorate something specific as a box, key holder, coat rack, etc, or combine it with other materials to make charms, rings, earrings, bracelets, key chains, headbands, and an endless number of beautiful things.
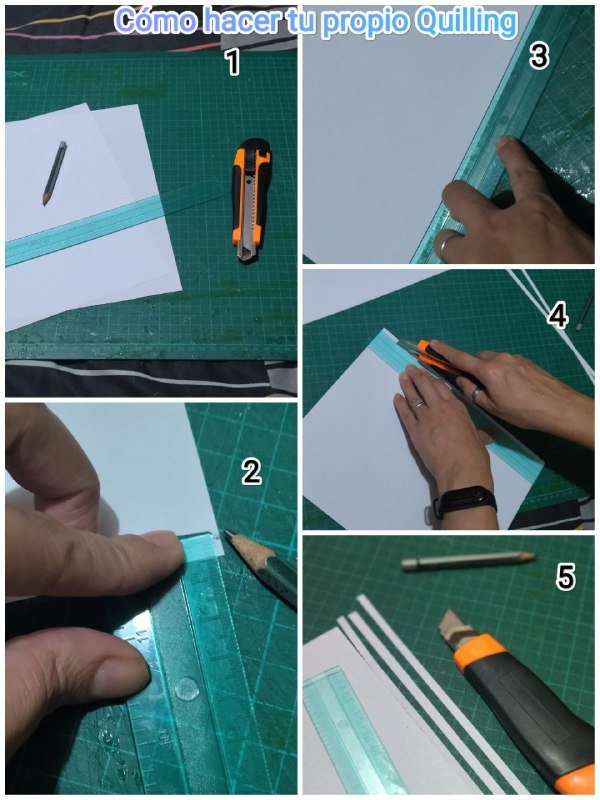
¿Cómo hacer tus propias cintas con papel comprado o reciclado en casa?
En lo personal a lo largo de este tiempo he usado cintas compradas ya que me hice de bastante material en mis inicios, piezas creadas, vendidas e inmediatamente hacia una inversión comprando más y más cintas de variados colores y medidas. Por supuesto, si en algún momento quería agregar un toque diferente o tenía carencia de algún color, optaba por elaborarla yo misma.
Materiales:
•Hojas de papel (cartulina preferiblemente)
•Cutting mat
•Regla
•Lapiz
•Cutter o exacto
Se toma el trozo de papel de su preferencia, lo colocamos en una superficie plana y que sea de corte donde podamos utilizar un cúter y no rasgar esa superficie, preferiblemente un cutting mat (si lo tienes), con una regla se mide el grosor necesario, las cintas compradas más que todo vienen de 3 milímetros, 6 milímetros y 9 milímetros, pero quizás podamos necesitar algún otro grosor, traza un punto con un lápiz, al principio y al final de la hoja, sujetamos la regla con firmeza para que no se mueva en la medida marcada y pasamos con seguridad el cúter en todo el largo de la hoja, todo esto para asegurar que salgan unas tiras bien rectas y regulares. Así repetimos las veces que sea necesario según el número de cintas que necesitemos.
How to make your own ribbons with purchased or recycled paper at home?
Personally, throughout this time I have used purchased ribbons since I had enough material in my beginnings, created pieces, sold them and immediately made an investment buying more and more ribbons of various colors and sizes. Of course, if at some point I wanted to add a different touch or was lacking in some color, I opted to make it myself.
Materials:
-Sheets of paper (card stock preferably).
-Cutting mat
-Ruler
-Pencil
-Cutter
We take the piece of paper of your preference, we place it on a flat surface and that is cut where we can use a cutter and not tear that surface, preferably a cutting mat (if you have it), with a ruler we measure the necessary thickness, the tapes bought mostly come in 3 millimeters, 6 millimeters and 9 millimeters, but perhaps we may need some other thickness, draw a point with a pencil, at the beginning and end of the sheet, hold the ruler firmly so that it does not move in the marked measure and safely pass the cutter along the entire length of the sheet, all this to ensure that strips come out straight and regular. This way we repeat as many times as necessary according to the number of ribbons we need.
Hablemos de esas formas básicas, ¿que necesitamos y cómo hacerlas?
Materiales necesarios:
• Cintas del color de tu preferencia
• Aguja para enrollar el quilling
• Regla con diversas medidas de circunferencia.
• Cola blanca, en mi caso la vierto en los envases pequeños que vamos a desechar de gotas, son muy útiles para usarlos con las cintas ya que te proporcionan la pequeña cantidad adecuada que necesitas para pegar.
Formas básicas.
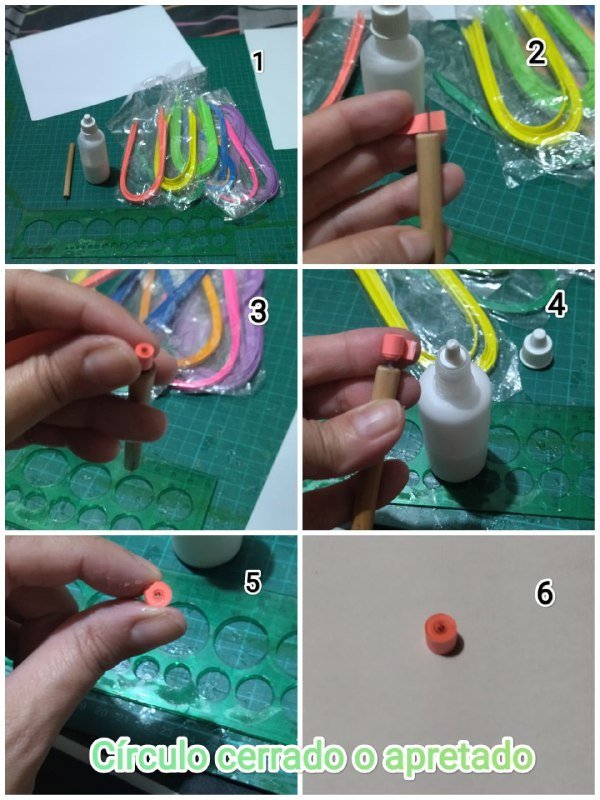
• Círculo cerrado o apretado:
Tomamos una cinta del color, largo y grosor de tu preferencia, la aguja, colocamos la cinta en la aguja y procedemos a enrollar sin soltar, al terminar de enrollar la cinta, colocamos un puntito de pega en el último extremo que queda de la cinta y pegamos, esperamos unos segundos que sellé, sacamos de la aguja con sumo cuidado y listo nuestro circulo apretado.
Let's talk about those basic shapes, what do we need and how to make them?
Materials needed:
- Ribbons in the color of your choice.
- Needle to roll the quilling
- Ruler with different circumference measures.
- White glue, in my case I pour it in the small containers that we are going to discard drops, they are very useful to use them with the ribbons as they provide you with the right small amount you need to glue.
Basic shapes.
-Closed or tight circle:
We take a ribbon of the color, length and thickness of your preference, the needle, we place the ribbon on the needle and proceed to roll without releasing, when we finish rolling the ribbon, we place a dot of glue on the last remaining end of the ribbon and glue, we wait a few seconds for it to seal, we remove from the needle very carefully and ready our tight circle.
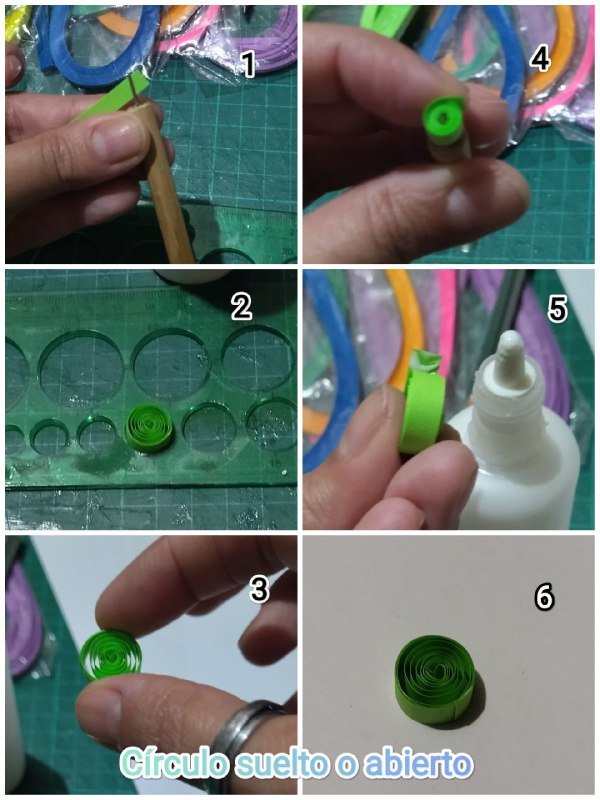
• Círculo abierto o suelto:
Tomamos una cinta del color, largo y grosor de tu preferencia, la aguja, colocamos la cinta en la aguja, terminamos de enrollar la cinta, sacamos de la aguja y colocamos ese círculo en la regla de medidas de circunferencia, en el ancho que más te interese. Sacamos el circulo con sumo cuidado sin soltar y procedemos a pegar el extremo que queda y listo ya tenemos nuestro circulo abierto.
- Open or loose circle:
We take a ribbon of the color, length and thickness of your preference, the needle, place the ribbon on the needle, finish winding the ribbon, remove from the needle and place the circle on the ruler of circumference measures, in the width that interests you most. We remove the circle very carefully without letting go and proceed to glue the remaining end and ready we have our circle open.
Básicamente de estos dos círculos y principalmente del círculo abierto derivan todas las demás formas. Voy a explicar unas tres más y luego procederé a realizar un muestrario de diversas formas, la cual les dejaré por este medio. Al explicarles este otro par de formas, al ver el muestrario tendrán la noción de cómo hacerlas, allí tendrán los nombres de ellas, así pues, pueden usarlo y sacarle provecho.
Basically from these two circles and mainly from the open circle derive all the other shapes. I am going to explain three more and then I will proceed to make a sampler of different shapes, which I will leave you here. By explaining this other pair of shapes, when you see the pattern book you will have the notion of how to make them, there you will have the names of them, so you can use it and take advantage of it.
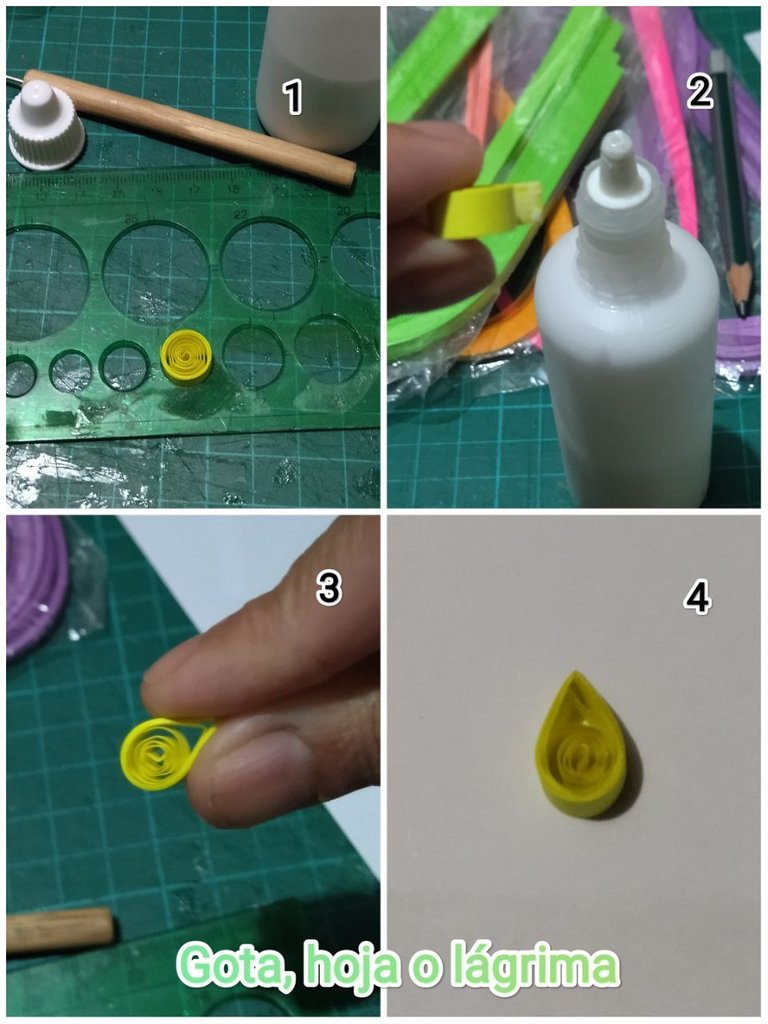
•Gota, hoja o lágrima:
Realizamos un círculo abierto con la circunferencia de su preferencia, una vez listo procedemos con el dedo índice y pulgar a presionar un extremo y listo allí tenemos una gota, hoja o lágrima. También podemos hacerla con un círculo cerrado solo presionando con más fuerza el extremo del mismo.
-Drop, leaf or teardrop:
We make an open circle with the circumference of your preference, once ready we proceed with the index finger and thumb to press one end and ready there we have a drop, leaf or teardrop. We can also make it with a closed circle just pressing harder the end of it.
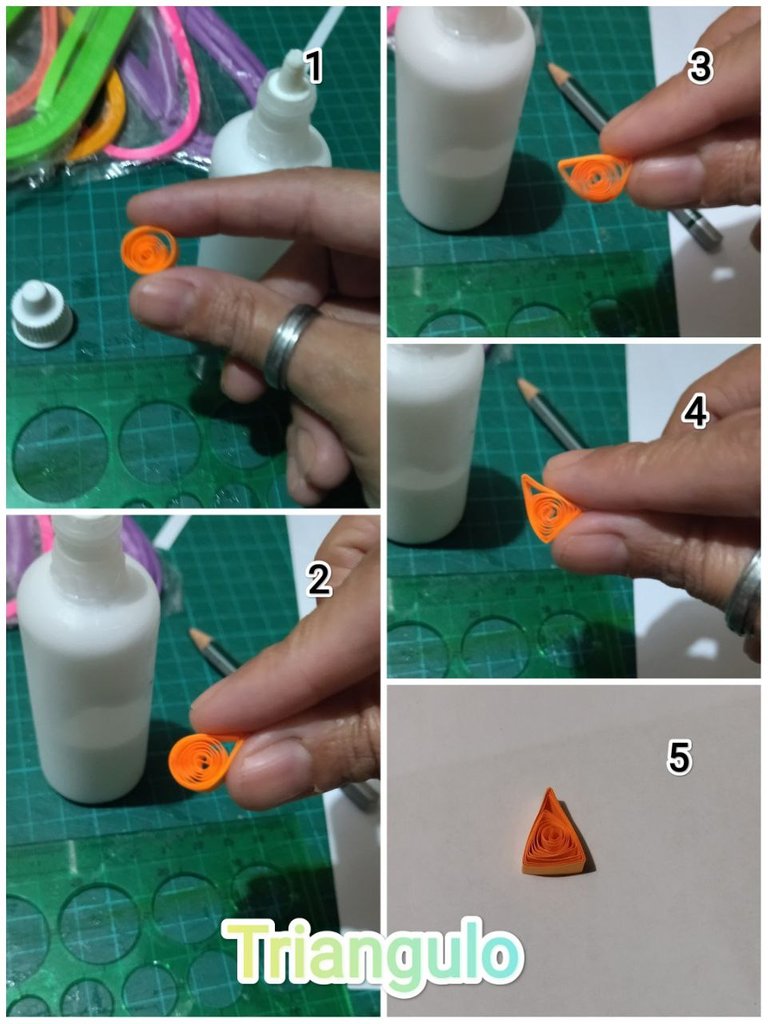
•Triángulo:
Procedemos a realizar un círculo abierto o cerrado con la circunferencia de su preferencia y procedemos a presionar con el dedo índice y pulgar uno a uno, tres extremos del círculo. De esta manera obtenemos nuestro triángulo.
-Triangle:
We proceed to make an open or closed circle with the circumference of your preference and proceed to press with the index finger and thumb one by one, three ends of the circle. In this way we obtain our triangle.
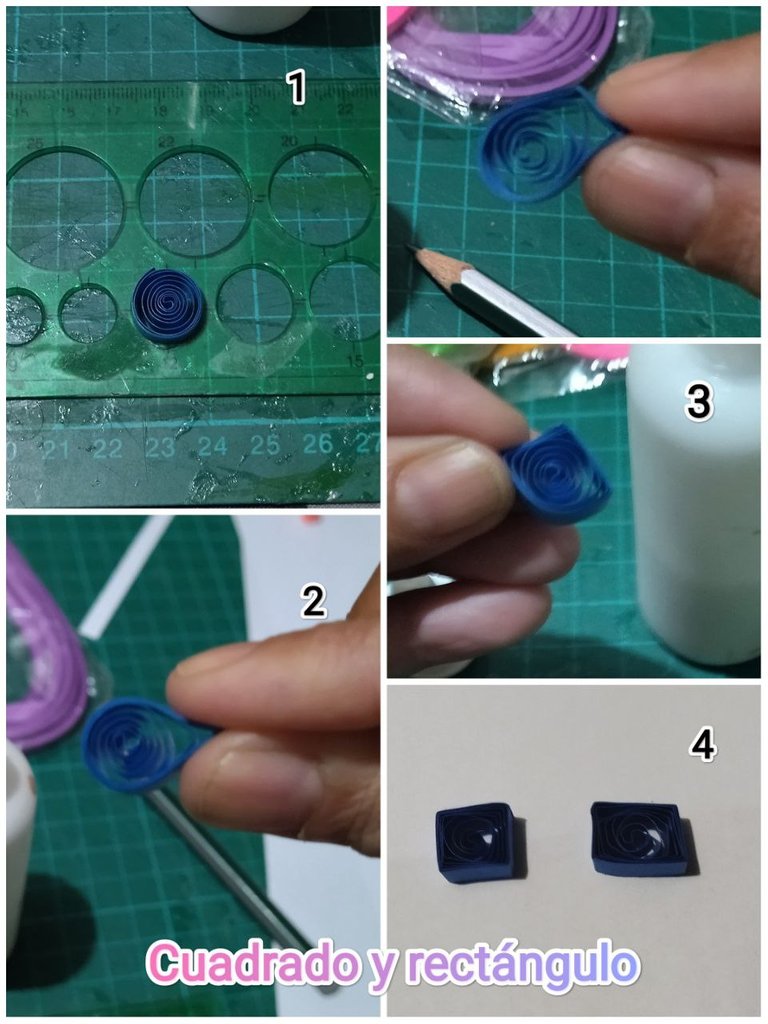
•Cuadrado y rectángulo:
Procedemos a realizar un círculo abierto o cerrado con la circunferencia de su preferencia y procedemos a presionar con el dedo índice y pulgar uno a uno, cuatro extremos del círculo. Para el cuadrado deben quedar los cuatro extremos con la misma medida, para el rectángulo deben quedar dos extremos con una medida más ancha y dos con una medida más corta. De esta manera obtenemos nuestro cuadrado y rectángulo.
-Square and rectangle:
We proceed to make an open or closed circle with the circumference of your preference and proceed to press with the index finger and thumb one by one, four ends of the circle. For the square should be the four ends with the same measure, for the rectangle should be two ends with a wider measure and two with a shorter measure. In this way we obtain our square and rectangle.
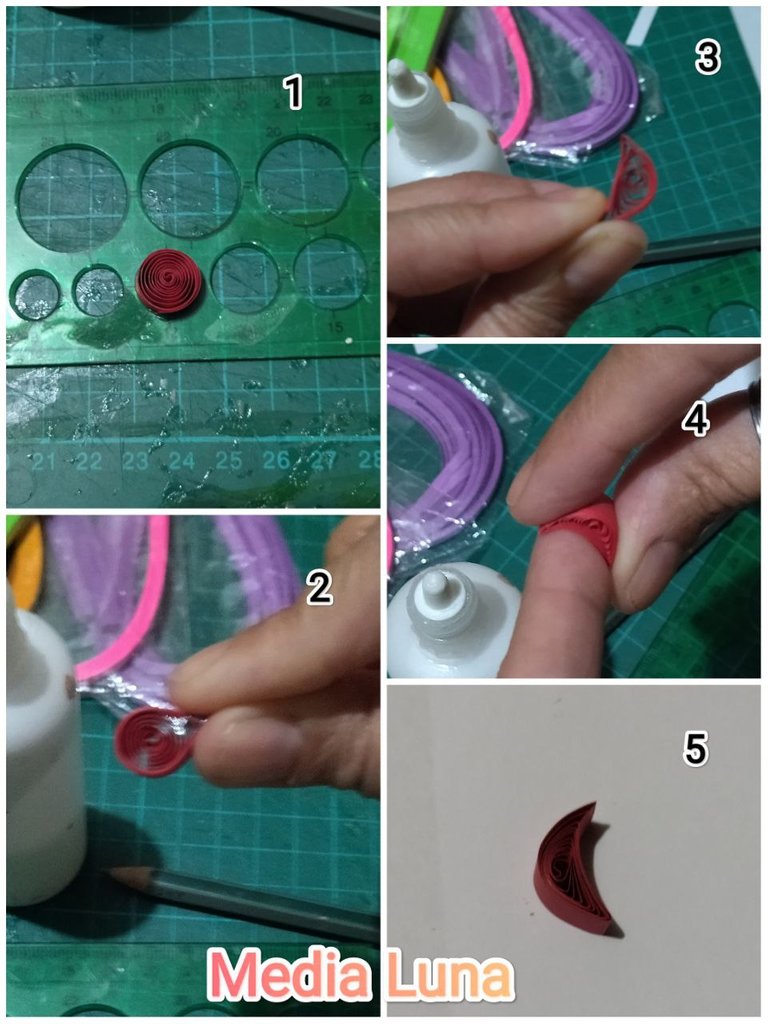
•Media luna:
Procedemos a realizar un círculo abierto o cerrado con la circunferencia de su preferencia y procedemos a presionar con el dedo índice y pulgar uno a uno, dos extremos del círculo, luego con ayuda del dedo índice y pulgar tomamos la pieza y con el dedo índice de la otra mano, presionamos con la forma del dedo, soltamos. De esta manera obtenemos nuestra media luna.
-Half moon:
We proceed to make an open or closed circle with the circumference of your preference and proceed to press with the index finger and thumb one by one, two ends of the circle, then with the help of the index finger and thumb we take the piece and with the index finger of the other hand, we press with the shape of the finger, we release. In this way we obtain our half moon.
También tenemos formas básicas en espiral voy a explicar un par y algunas otras las anexo al muestrario.
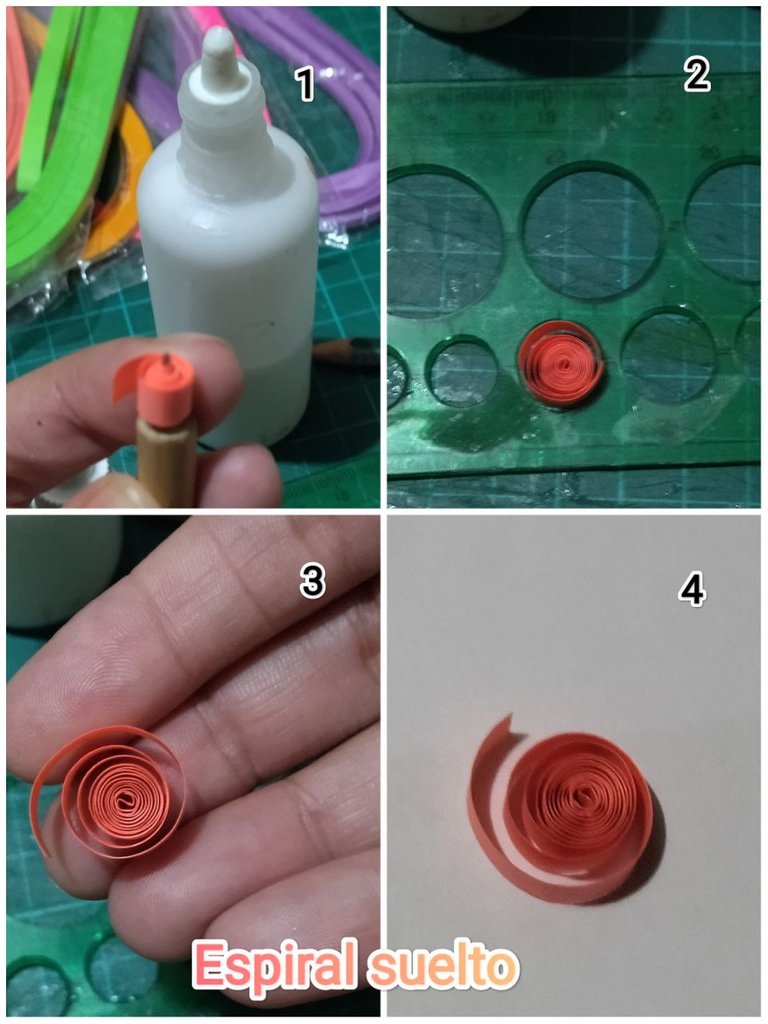
•Espiral Suelto:
Tomamos una cinta del color y ancho de tu preferencia, procedemos a meter la cinta en la aguja para quilling y enrollamos hasta llegar al final y soltamos. Y listo tenemos nuestro espiral abierto.
We also have basic spiral shapes I am going to explain a couple and some others I attach them to the sampler.
-Loose Spiral:
We take a ribbon of the color and width of your preference, we proceed to put the ribbon in the quilling needle and we roll until we reach the end and release. And ready we have our open spiral.
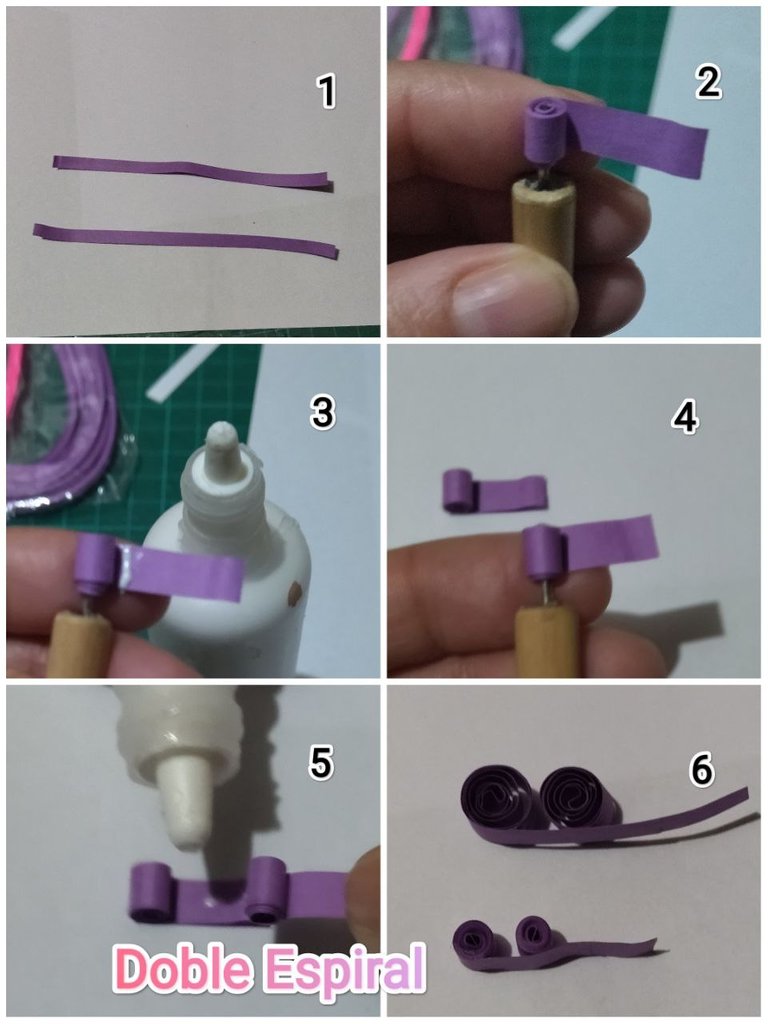
•Doble espiral:
Tomamos una cinta del color y ancho de tu preferencia, procedemos a meter la cinta en la aguja para quilling y enrollamos casi hasta llegar al final, le colocamos un punto de pega al círculo y pegamos para que no se suelte, luego hacemos el mismo procedimiento con otra cinta, al finalizar las unimos ambas hacia el mismo lado. Y listo tenemos nuestra doble espiral.
-Double spiral:
We take a ribbon of the color and width of your preference, we proceed to put the ribbon in the quilling needle and we roll it almost to the end, we put a glue point to the circle and we glue it to the circle. Then we do the same procedure with another ribbon, at the end we join them both to the same side. And ready we have our double spiral.
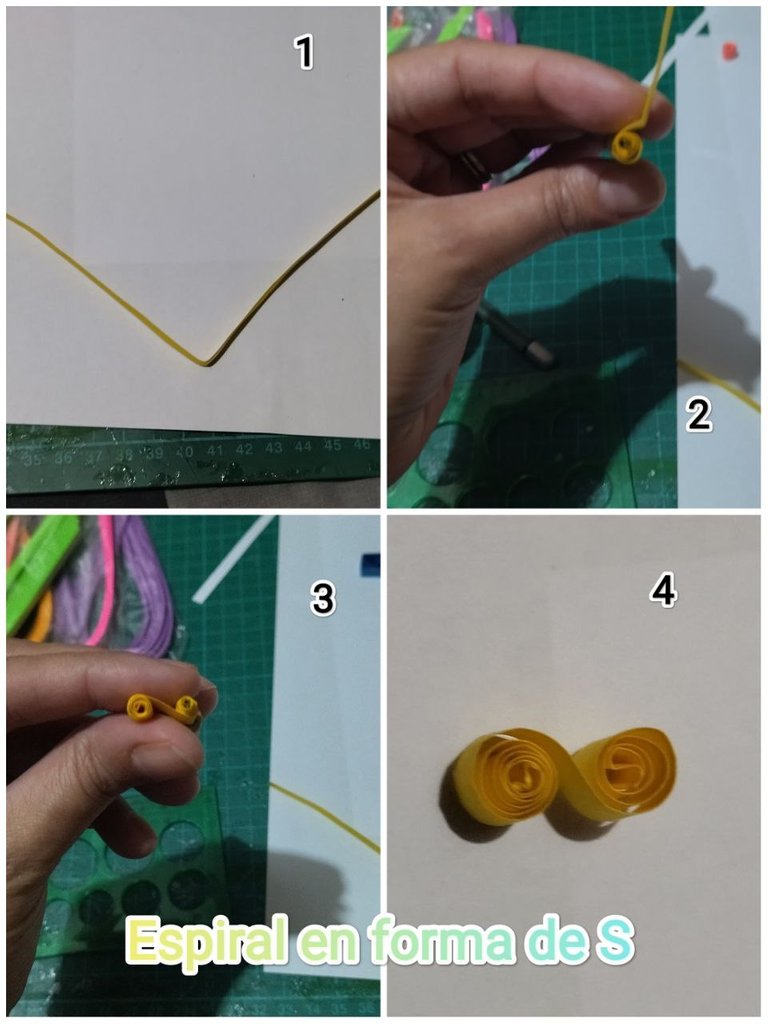
•Espiral en S:
Tomamos una cinta del color y ancho de tu preferencia, dividimos por la mitad, procedemos a meter la cinta en la aguja para quilling y enrollamos hasta llegar al final de la primera mitad y soltamos, luego hacemos el mismo procedimiento con otra mitad de la cinta, pero enrollamos de manera inversa. Y listo tenemos nuestro espiral en S.
-S spiral:
We take a ribbon of the color and width of your preference, divide it in half, proceed to put the ribbon in the quilling needle and roll it until we reach the end of the first half and release it, then we do the same procedure with another half of the ribbon, but we roll it in reverse. And ready we have our S spiral.
Con estas formas básicas ya tendremos una noción de cómo realizar las innumerables formas existentes en la técnica de quilling, combinarlas y de allí sacar muchísimas figuras para la gran cantidad de decoraciones y apliques que podemos hacer. Deja volar tu imaginación.
Ahora les anexo un muestrario de mi autoría, con los nombres de diversas formas para que puedan tenerlo y usarlo de manera personal cuando vayan a trabajar con el quilling.
Muestrario:
With these basic shapes we will already have a notion of how to make the countless existing shapes in the quilling technique, combine them and from there get a lot of figures for the large number of decorations and appliqués that we can make. Let your imagination fly.
Now I am enclosing a sample book of my authorship, with the names of different shapes so that you can have it and use it personally when you are going to work with quilling.
Sample book:
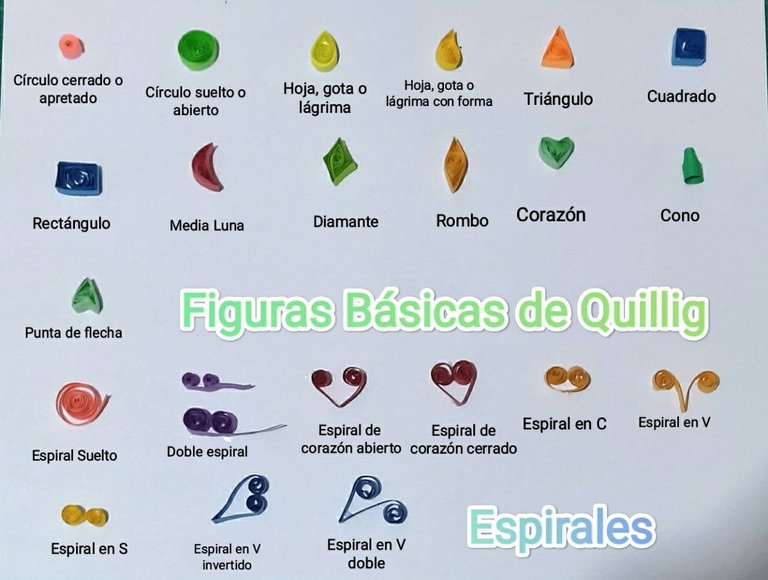
De aquí en adelante comenzamos con la práctica de todas las ideas que vengan a mi mente para regalárselas y las pongan en práctica. Comenzaremos con cosas súper sencillas, hasta llegar a las más complejas.
Quiero mencionarles por acá, a pesar de ser mi segundo post, que estoy asistiendo a unas excelentes clases de un curso magistral de Hive desde 0, dictadas por @laloretoyya , gracias por tu paciencia y por todos los conocimientos que estás impartiendo, para que muchas personas incursionen en este mundo y logren grandes éxitos, aún tengo muchas cosas por aprender y sé que por ese medio lo conseguiré. Estás clases me las recomendó mi amiguita @danielapevs , gracias mi Pao, si no fuera por ti, no estuviera por acá, y por supuesto en ese curso aprendiendo cada día más y más.
Espero les haya gustado mi explicación, procedimiento y fotos, los hice con mucho cariño para ustedes.
Gracias a todos, nos vemos en la próxima… 😘😺💕
From now on we will start practicing all the ideas that come to my mind to give them to you and put them into practice. We will start with very simple things, until we get to the most complex ones.
I want to mention here, despite being my second post, that I am attending some excellent classes of a master course of Hive from 0, taught by @laloretoyya, thanks for your patience and for all the knowledge that you are imparting, so that many people venture into this world and achieve great success, I still have many things to learn and I know that by this means I will get it. These classes were recommended to me by my friend @danielapevs, thank you my Pao, if it were not for you, I would not be here, and of course in this course learning more and more every day.
I hope you liked my explanation, procedure and photos, I made them with love for you.
Thank you all, see you in the next one... 😘😺💕

Todas las fotos son de mi autoria tomadas y editadas con mitelefono Redmi 9T
All photos are my own, taken and edited with my Redmi 9T phone.


