
Muy buenos días a todos comunidad de Hive, espero estén excelente, el día de hoy quiero enseñarles un pequeño truco que podemos implementar para sacarle
mayo calidad y detalles a nuestras imágenes utilizando Photoshop pero si no lo tenemos a mano siempre podemos utilizar una herramienta de las que ya
les he hablado anteriormente y es Photopea que es un clon un poco mas recortado de Photoshop Online pero con muchas herramientas
y que nos servirá igualmente para esta guía.
Very good morning to all Hive community, I hope you are excellent, today I want to show you a little trick that we can implement to get more quality and details to our images using Photoshop but if we do not have it at hand we can always use a tool that is already in use.
quality and details to our images using Photoshop but if we don't have it at hand we can always use a tool of which I have already
I have spoken to you previously and it is Photopea that is a clone a little more trimmed of Photoshop Online but with many tools
and that will be equally useful for this guide.
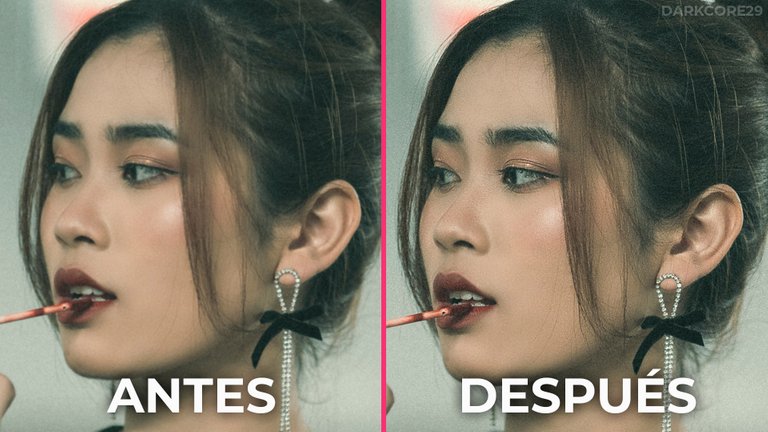
Con solo unos pasos podremos sacarle mas detalles a tus fotos en las zonas que desees dándoles más vida con solo unos filtros, así que comencemos!
Para ello abriremos nuestra imagen en nuestro programa de edición, en mi caso Photoshop, e iremos a 'Abrir' y seleccionaremos nuestra foto, una vez abierta nos iremos a la sección de Capas a nuestra derecha y arrastraremos la capa de nuestra imagen a abajo hasta el simbolo de +para duplicarla, haremos esto dos veces (Para así tener una copia de seguridad de nuestra imagen original en el programa por si nos equivocamos), una vez tenemos 3 capas (1 de respaldo y 2 copias) seleccionamos la que está de primera en la parte superior y le daremos click derecho y seleccionaremos la opción 'Convertir en Objeto Inteligente'.
Una vez hecho esto, presionamos la combinación de teclas Ctrl + U para abrir el panel de Tono y Saturación y en él vamos a usar el deslizados de la Saturación y la colocaremos en -100 para dejar nuestra imagen en tonos grises y damos en OK, y ahora nos iremos a Filtros - Otro - Paso Alto, en esta ventana de Paso Alto, vamos a colcoar un valor que se ajuste a nuestras necesidades, puede estar entre el 2.0 y 10.0 aproximadamente, pero ustedes pueden ir jugando con este valor hasta tener un resultado que nos guste y que no sea muy exagerado.
Ahora simplemente con esta capa en gris aún seleccionada volveremos al Panel de Capas y en los Modos de Fusión que estarán arriba del panel de capas, cambiaremos de 'Normal' a 'Superponer' (También podemos usar el modo 'Luz Suave' dependiendo como nos guste mas) y listo!
With just a few steps we will be able to get more details to your photos in the areas you want giving them more life with just a few filters, so let's start!
To do this we will open our image in our editing program, in my case Photoshop, and go to 'Open' and select our photo, once opened we will go to the Layers section on our right and drag the layer of our image down to the + symbol to duplicate it, We will do this twice (so we have a backup of our original image in the program in case we make a mistake), once we have 3 layers (1 backup and 2 copies) we select the first one at the top and we will right click on it and select the option 'Convert to Smart Object'.
Once this is done, press the key combination Ctrl + U to open the Hue and Saturation panel and in it we will use the Saturation slider and set it to -100 to leave our image in gray tones and click OK, and now we will go to Filters - Other - High Pass, in this High Pass window, we will place a value that fits our needs, it can be between 2. 0 and 10.0 approximately, but you can play with this value until you have a result that you like and that is not too exaggerated.
Now simply with this gray layer still selected we will go back to the Layers Panel and in the Blend Modes that will be on top of the layers panel, we will change from 'Normal' to 'Overlay' (We can also use the 'Soft Light' mode depending on how we like it better) and that's it!
Ahora supongamos que nos gusta como quedó nuestro efecto pero hay zonas donde no quieres que se vea este nuevo enfoque porque se exageran las texturas o no se ve bien, pues arreglemos eso.
Para ello en el Panel de Capas nos vamos a los simbolos de abajo y daremos click en la que es un rectangulo blanco con un circulo gris en el centro para hacer una Máscara de Capa (Esto aún teniendo seleccionada nuestra capa con el efecto de 'Paso Alto', ahora veremos que se nos hizo un rectangulo blanco al lado de nuestra capa, presionaremos la tecla 'B' para usar la herramienta Pincel y seleccionaremos el color negro y un tamaño de pincel medio y la Dureza en 0 para que sea un pincel difuso y 'pintaremos' de negro las zonas donde no queremos que se vea el efecto de enfoque y verás como desaparece como por arte de magia!.
NOTA: Si borraste una zona sin querer, puedes recuperarla pintando esa zona con el color Blanco!
Ya cuando estemos satisfechos con nuestra imagen solo quedaría guardarla, esto podemos hacerlo yendo a Archivo - Guardar Como... - Seleccionamos la carpeta donde queremos guardar nuestra imagen y en formato JPEG damos en Aceptar y listo, hemos terminado amigos!
Now let's suppose that we like how our effect looks but there are areas where we don't want this new focus to be seen because the textures are exaggerated or it doesn't look good, so let's fix that.
To do this in the Layers Panel we go to the symbols below and click on the one that is a white rectangle with a gray circle in the center to make a Layer Mask (This still having selected our layer with the effect of 'High Pass', now we will see that we made a white rectangle next to our layer, We will press the 'B' key to use the Brush tool and select the black color and a medium brush size and set the Hardness to 0 to make it a diffuse brush and 'paint' in black the areas where we don't want the focus effect to be seen and you will see how it disappears as if by magic! .
NOTE: If you erased an area unintentionally, you can recover it by painting that area with the color White!
Once we are satisfied with our image, we only have to save it, we can do this by going to File - Save As.... - Select the folder where we want to save our image and in JPEG format click on OK and that's it, we're done friends!
Música Utilizada
Track: Arcando - In My Head (feat. Britt Lari) [NCS Release]
Music provided by NoCopyrightSounds.
Watch: Link
Free Download / Stream: Link
Track: Jo Cohen and Sex Whales - We Are [NCS Release]
Music provided by NoCopyrightSounds.
Watch: Link
Free Download / Stream: Link
Espero este pequeño tutorial les haya gustado y servido mucho, si es así no olviden en compartirlo y apoyarlo, proximamente seguiré subiendo contenido como este para ustedes, un abrazo para todos!
I hope you liked this little tutorial, if so do not forget to share it and support it, soon I will continue uploading content like this for you, a hug for everyone!
▶️ 3Speak


