Spanish
Hola Hivers!
Se que he estado un poco perdida pero estos días son un poco ajetreados para mi, con la limpieza de la casa, desempolvar las cosas de navidad (después de un año guardados) ver si las luces sirven, ustedes me entienden 😉, pero aquí estoy de vuelta y les quise traer algo que hice para decorar mi arbolito de navidad, unas estrellas 🌟 hechas con foami escarchado, las cuales son muy fáciles de hacer y lucen muy llamativas con la decoración 🎄.
Así que les dejo por aquí 👇 el paso a paso de como hacerlas a ver si se animan 😊.
Necesitan:
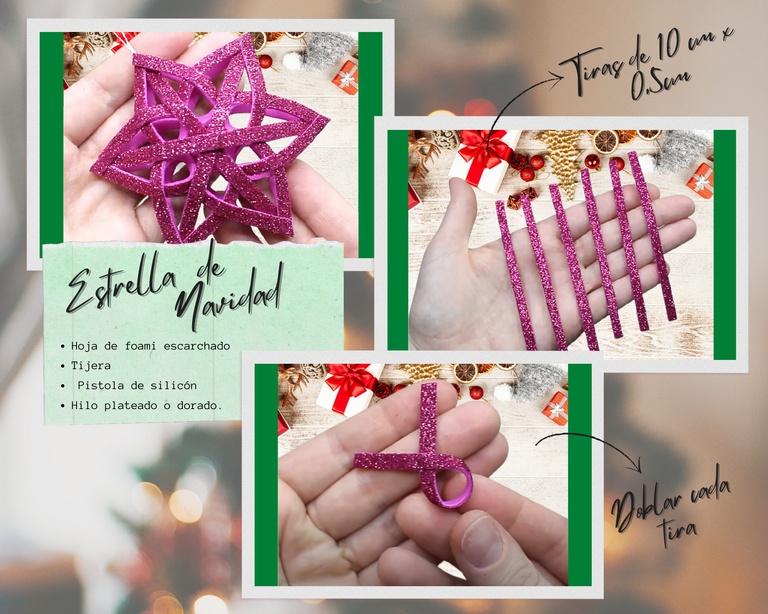
- Hoja de foami escarchado del color de su preferencia. (yo escogí uno que va con mi decoración de este año)
- Tijera
- Regla
- Pistola de silicón
- Hilo plateado o dorado.
Paso 1
Cortar 6 tiras de 10 cm de largo por 0,5 cm de ancho.
Paso 2
Doblar cada tira en forma de medio lazo (como se muestra en la imagen ☝️) pegándolo con silicón para que no pierdan la forma.
Paso 3
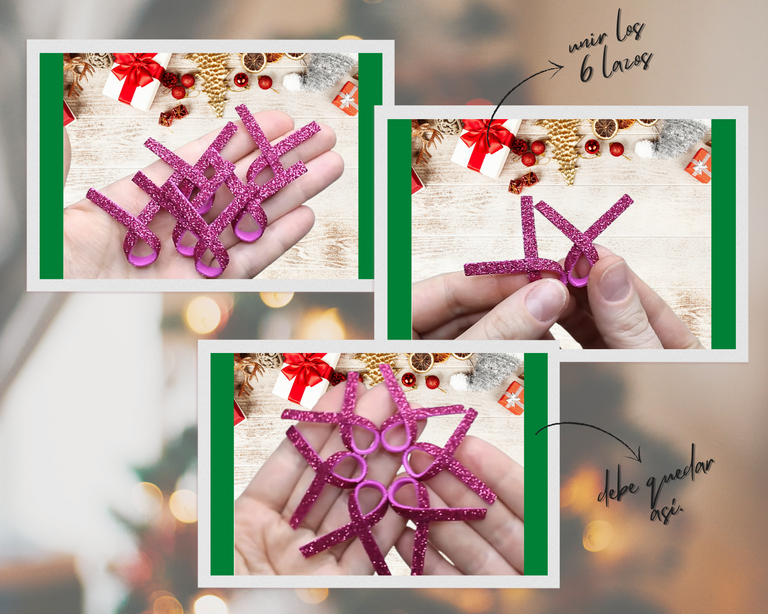
Luego de tener los 6 medios lazos, se pegan con un puntico de silicón unos con otros hasta formar una especie de circulo (ver imagen 👇)
Paso 4
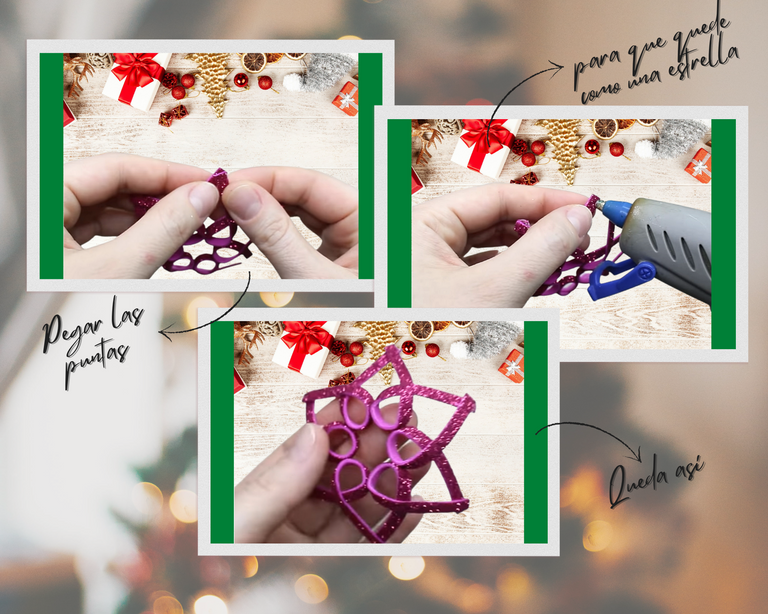
Después se unen las puntas unas con otras con un punto de silicón (como se muestra en la imagen 👇) así ya va tomando la forma de estrella 🌟.
Nota: Al tener todas las puntas unidas, con la tijera se le cortan el exceso que sobre sale en las esquinas para que así quede mas prolijo y se vean mas como puntas de estrella. (Se me olvido tomar foto en ese paso 😋)
Paso 5
Luego cortamos 3 tiras de 8 cm de largo por 0,5 cm de ancho las cuales vamos a pegar desde una punta de la estrella hasta la punta opuesta. (ver imagen 👇)

Paso 6
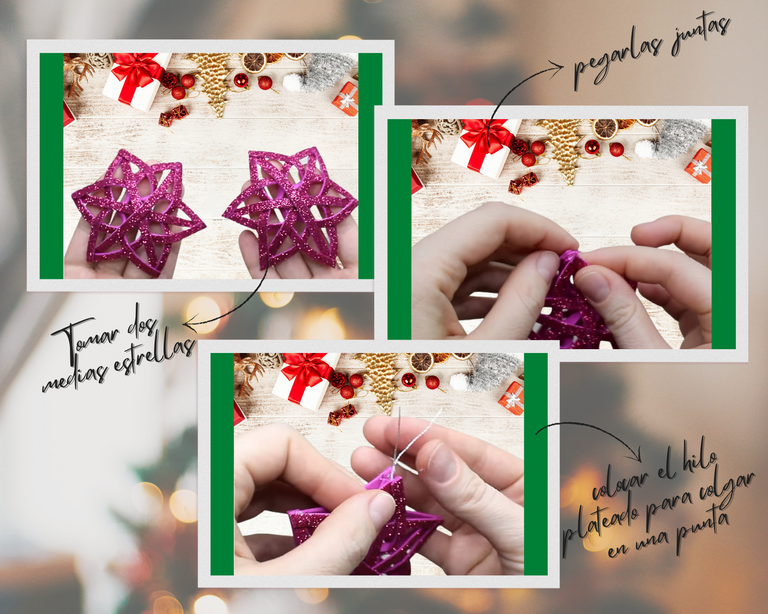
Cuando tengamos dos medias estrellas listas, las vamos a pegar una contra la otra, dejándola parte escarchada hacia el lado de afuera.
No olviden colocar el hilo plateado o dorado en una de las puntas para poder colgarlo en nuestro árbol de navidad 🎄.
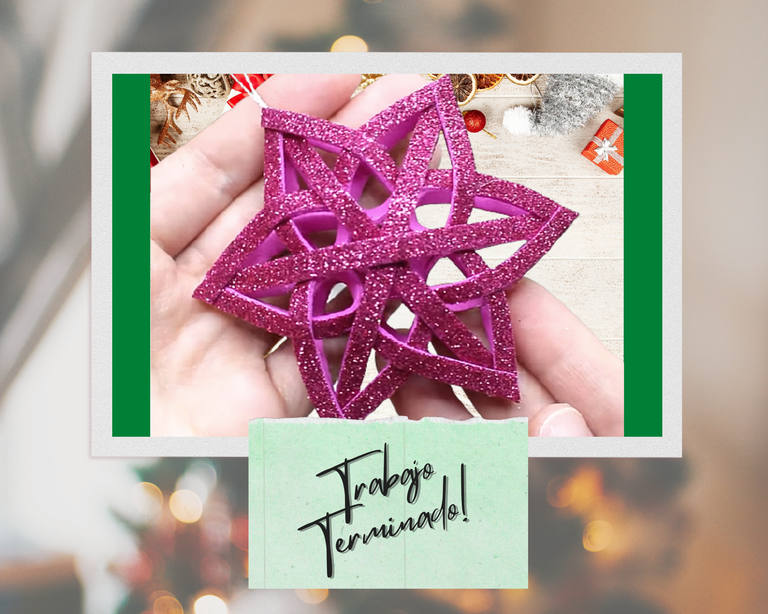
Y listo! eso es todo ya tenemos nuestro hermoso adorno para decorar lo que queramos.
Espero que les gustara este pequeño DIY que nos ayuda a la decoración de estas festividades, particularmente a mi me encantaron y creo que hare de todos los colores para el próximo año 🤣🤣🤣.
Como siempre estoy atenta a sus comentarios 👇 y espero que se animen ha crear estas hermosas estrellas 🌟, si lo hacen espero me dejen sus fotos a ver que tal les quedaron.
Saludos a todos desde Venezuela, me despido hasta el siguiente post, con cariño Alvac.art 💋
(Collage de fotos elaborado en www.canva.com)

English
Hello Hivers!
I know I've been a bit lost but these days are a bit busy for me, with cleaning the house, dusting off the Christmas things (after a year saved) see if the lights work, you understand me 😉, but here I am back and I wanted to bring them something I made to decorate my Christmas tree, some stars 🌟 made with frosted foami, which are very easy to make and look very striking with the decoration 🎄.
So I leave you here 👇 the step by step of how to do them to see if they cheer up 😊.
They need:
- Frosted foami sheet in the color of your choice. (I chose one that goes with my decoration this year)
- Scissor
- Rule
- Silicone gun
- Silver or gold thread.
Step 1
Cut 6 strips 10 cm long by 0.5 cm wide.
Step 2
Fold each strip in the shape of a half loop (as shown in the image ☝️), gluing it with silicone so that it does not lose its shape.
Step 3
After having the 6 half loops, they are glued with a point of silicone with each other until they form a kind of circle (see image 👇)
Step 4
Then the tips are joined with each other with a point of silicone (as shown in the image 👇) so it is already taking the shape of a star 🌟.
Note: By having all the points joined, with the scissors the excess that comes out in the corners is cut so that it is neater and they look more like star points. (I forgot to take a photo in that step 😋)
Step 5
Then we cut 3 strips of 8 cm long by 0.5 cm wide which we are going to glue from one end of the star to the opposite end. (see image 👇)
Step 6
When we have two half stars ready, we are going to glue them one against the other, leaving the frosted part on the outside.
Do not forget to place the silver or gold thread on one of the ends to be able to hang it on our Christmas tree 🎄.
And ready! that's all we already have our beautiful ornament to decorate whatever we want.
I hope you like this little DIY that helps us decorate these festivities, I particularly loved them and I think I'll make all the colors for next year 🤣🤣🤣.
As I am always attentive to your comments 👇 and I hope you are encouraged to create these beautiful stars 🌟, if you do, I hope you leave your photos to see how they turned out.
Greetings to all from Venezuela, I say goodbye until the next post, with love Alvac.art 💋
(Photo collage made at www.canva.com)


