When you come from a large family and you are the youngest sibling, you learn many things by observing your older siblings, this is my case; I have 9 brothers and sisters, each one of them has his own activity, today I want to present you a tutorial to make a crucifix with the technique of false wicker, I learned this with my brother Ramon "Mon" who at one stage of his life was dedicated to the development of pyrotechnic games and fireworks, when we were in the field I helped him to make them and I found it very interesting, so I learned very well this art and I have used it to make other things, What would you create with this technique? .
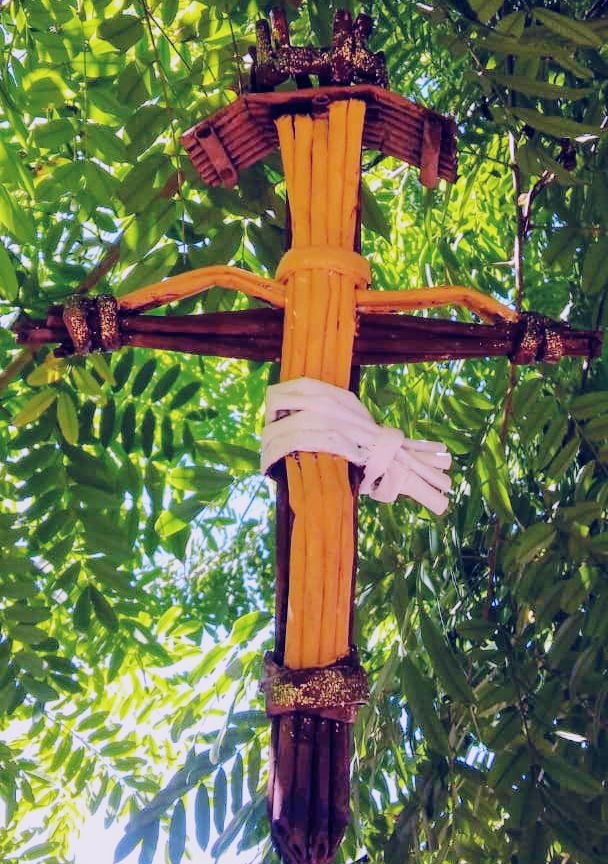
Esta es una técnica muy fácil, con la cual puedes realizar cualquier imagen o forma que desees, solo hace falta creatividad e ingenio.
Lista de Materiales a utilizar y herramientas:
-20 hojas blancas tamaño carta reciclables.
-Pinturas al frio: marrón, piel, blanco.
-Escarcha dorada.
-Tijeras.
-1 pedazo de alambre de 30 cm aproximadamente.
-Pegamento de almidón o en su defecto pega blanca escolar
This is a very easy technique, with which you can make any image or shape you want, you just need creativity and ingenuity.
List of materials to use and tools:
-20 white recyclable letter size sheets.
-Cold paints: brown, leather, white.
-Golden frost
-Scissors.
-1 piece of wire of 30 cm approximately.
-Starch glue or, failing that, white school glue.

Elaboración del pegamento de almidón:
Colocas en una olla una taza de agua y 1 cucharadas de maicena, revolviendo para disolver, la colocas al fuego por unos 5 minutos, no dejes de revolver para que no se hagan grumos. Esta listo nuestro pegamento, fácil de realizar.
Elaboration of the starch glue:
Place in a pot a cup of water and 1 tablespoon of cornstarch, stirring to dissolve, put it on the fire for about 5 minutes, do not stop stirring so that no lumps are made. Our glue is ready, easy to make.
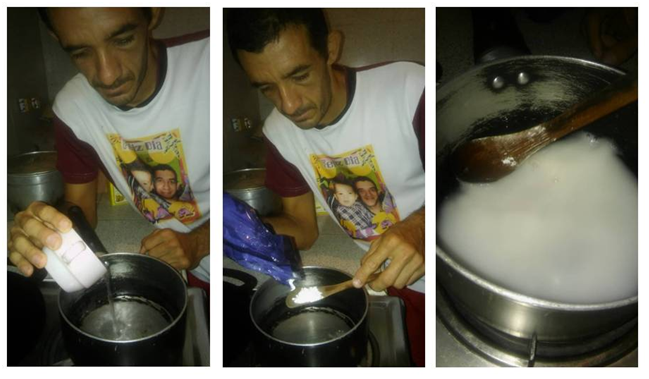
Fabricación del Crucifijo:
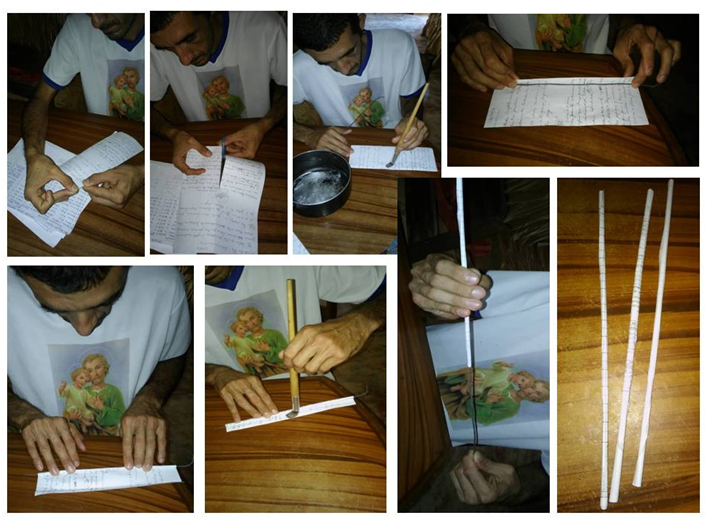
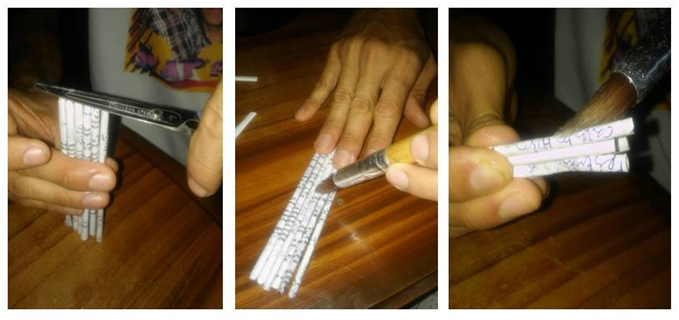
-Elaboración de las tiras de mimbre falso: tomamos las 20 hojas y las doblados a la mitad (por la parte más larga), con una tijera las recortarnos y obtenemos 40 tiras de hojas. Seguidamente tomamos el trozo de alambre y una tira de hoja le colocamos un poco de pegamento en un extremo, nos disponemos a fijar y enrollar en el alambre, colocamos pegamento en el otro extremo para fijar; cuando ya este bien sellado retiramos el alambre. Repetimos este proceso con las 39 tiras restantes, obteniendo 40 trozos de mimbre falso.
Manufacture of the Crucifix:
-Elaboration of the false wicker strips: we take the 20 leaves and fold them in half (by the longest part), with a scissors we cut them and we obtain 40 strips of leaves. Then we take the piece of wire and a strip of leaf we put a little glue at one end, we are ready to fix and roll on the wire, we put glue on the other end to fix; when it is well sealed we remove the wire. Repeat this process with the remaining 39 strips, obtaining 40 pieces of false wicker.
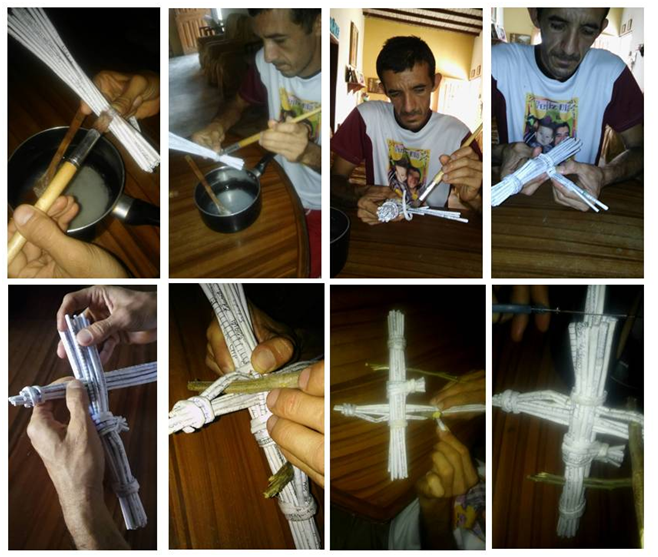
-Elaboración de la cruz y el cuerpo de Cristo crucificado: Primeramente tomamos un puño de tiras de mimbre (20 aproximadamente), con otra tira la atamos por uno de los extremos, para ello debemos colocar suficiente pegamento y colocar al sol para secar. Cuando ya este bien seco le vamos dando forma al cuerpo, levantando del mismo puñado 6 tiras la cuales doblamos un poco para hacer las piernas; luego tomamos 4 tiras para hacer otro amarre en la cintura el cual simulara el guayuco, las mojamos bien con el pegamento y las pasamos alrededor del puñado, con una de las mismas tiras enrollamos y amarramos las 7 restantes para fijar, recortamos el restante, colocando suficiente pegamento, para lograr que las piernas mantengan la separación puedes colocar un trozo de palo, colocamos a secar al sol. Ya seco nos disponemos a realizar el tronco transversal y lo brazos, para lo cual tomamos 8 tiras y con otra tira amarramos uno de los extremos, pasamos por el puñado del cuerpo y la cruz, haciendo un nuevo amarre para simular el cuello, dejamos secar (para sostener los amarres te puedes ayudar con ganchos de prensar ropa). Ahora levantamos 3 tiras para simular los brazos y doblamos un poco para separar del tronco, colocas pegamento para moldear y un trozo de madera para mantener levantado mientras seca, con otra tira amarramos el otro extremo fijando con suficiente pegamento y ayudando con un gancho para sostener. Doblamos las tiras de la parte superior del cuerpo para simular la cabeza y cortamos las tiras del tronco a la misma medida, colocamos un poco de pegamento para moldear y con los dedos aplastamos las tiras de la cabeza para dar forma y hacerlas mas anchas.
-Elaboration of the cross and the body of Christ crucified: First we take a fistful of wicker strips (20 approximately), with another strip we tie it by one of the ends, for it we must place enough glue and place it in the sun to dry. When it is dry, we give shape to the body, lifting from the same handful 6 strips which we bend a little to make the legs; then we take 4 strips to make another tie at the waist which will simulate the guayuco, we wet them well with glue and pass them around the handful, with one of the same strips we roll and tie the remaining 7 to fix, we cut the rest, placing enough glue, to ensure that the legs maintain the separation you can place a piece of stick, we place to dry in the sun. Once dry we are ready to make the transverse trunk and arms, for which we take 8 strips and with another strip we tie one of the ends, we pass through the handful of the body and the cross, making a new tie to simulate the neck, let dry (to hold the ties you can help with clothespins). Now we lift 3 strips to simulate the arms and bend a little to separate from the trunk, put glue to mold and a piece of wood to keep it up while it dries, with another strip we tie the other end fixing with enough glue and helping with a hook to hold. Fold the strips of the upper part of the body to simulate the head and cut the strips of the trunk to the same size, put some glue to mold and with your fingers flatten the strips of the head to give shape and make them wider.
-Elaboración del cabello: Tomamos 4 tiras de mimbre y las cortamos por la mitad, las alineamos bien y colocamos pegamento, para terminar de asegurar cortamos 3 pedazos pequeños y colocamos de forma transversal, colocamos al sol y dejamos secar.
- Elaboration of the hair: Take 4 wicker strips and cut them in half, align them well and place glue, to finish securing cut 3 small pieces and place them crosswise, place them in the sun and let them dry.
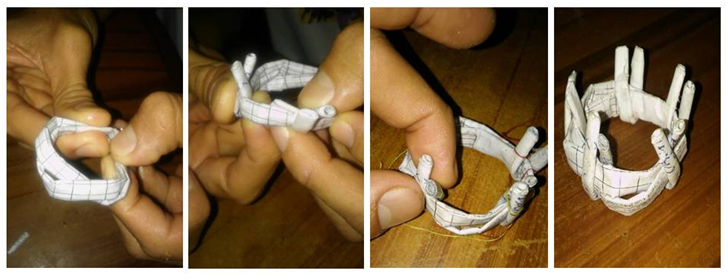
-Elaboración de la corona: con una tira le colocas suficiente pegamento para moldear y realizas una especie de circulo entrelazando la tira entre si; para las espinas recortas 5 pedazos pequeños, le colocas pegamento y amarras al circulo, para sostenerlas utilice hilo de costura para sostener, coloque al sol y deje secar.
- Elaboration of the crown: with a strip you put enough glue to mold and make a kind of circle intertwining the strip with each other; for the thorns cut 5 small pieces, put glue and tie to the circle, to hold them use sewing thread to hold, place in the sun and let dry.
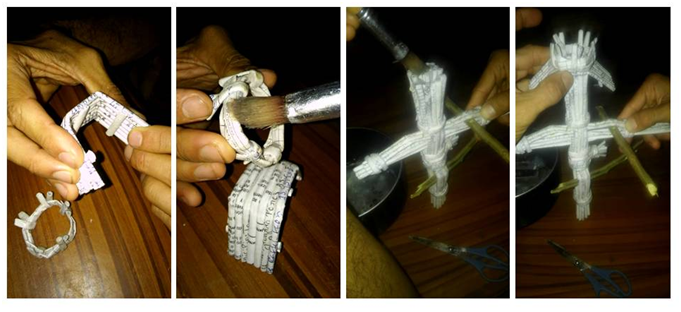
-Unión de las piezas: con todas las piezas secas, doble el cabello haciendo y le coloque pegamento para pegar la corona en la parte superior, en la parte inferior del cabello también coloque pegamento para pegarlo a la cabeza y al tronco, coloque al sol y deje secar.
-Joining the pieces: with all the pieces dry, fold the hair making and put glue to glue the crown on the top, at the bottom of the hair also put glue to glue it to the head and trunk, place in the sun and let dry.
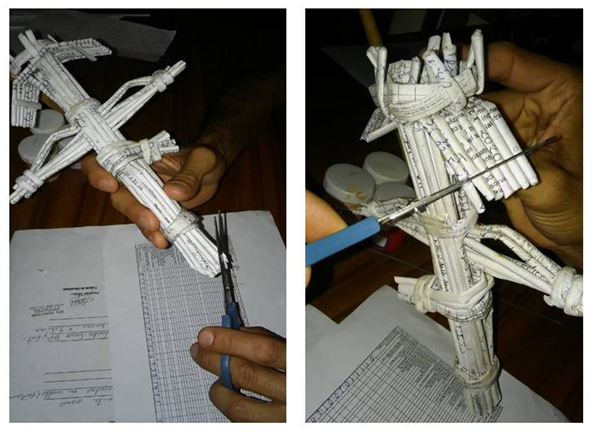
Con mi crucifijo ya listo, tome las tijeras y di los toques finales, cortando un poco los troncos de la cruz y así darle una mejor forma.
With my crucifix ready, I took the scissors and gave the final touches, cutting a little the trunks of the cross to give it a better shape.
Por ultimo tomo las pinturas al frio para dar vida a la imagen, pinte con marrón la cruz, corona y el cabello del Cristo; color piel el cuerpo del Cristo y con blanco el guayuco; utilice el dorado para dar unos toques finales en la corona y amarres del cuerpo en la cruz.
Finally I took the cold paints to give life to the image, I painted with brown the cross, crown and the hair of the Christ; skin color the body of the Christ and with white the guayuco; I used the gold to give some final touches on the crown and ties of the body on the cross.
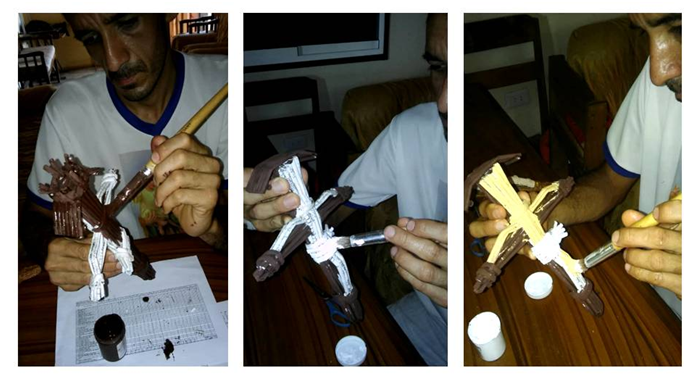
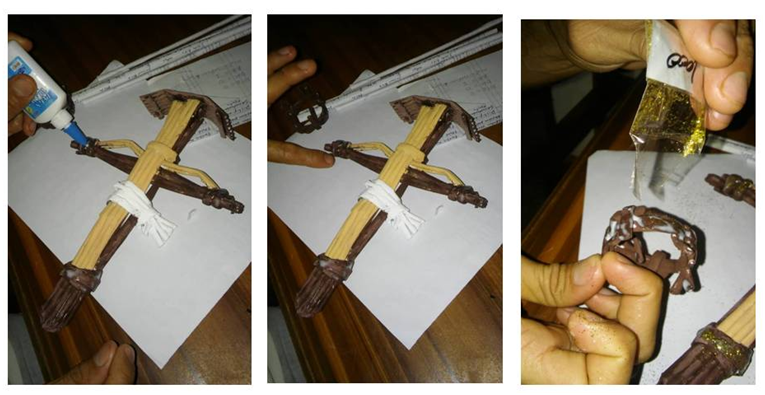
A pesar de que es una técnica fácil requiere tiempo para llevar a cabo la elaboración de una figura, ya que hay que respetar los tiempos de secado del pegamento y de cada una de las piezas, yo lo realice de forma rudimentaria, ya que este pegamento te ayuda a moldear y al secar la figura quedara dura y no perderá la forma que le dimos; pero si prefieres puedes sustituir el pegamento artesanal por el de tu preferencia y que sea de secado rápido.
Although it is an easy technique it requires time to carry out the elaboration of a figure, since it is necessary to respect the drying times of the glue and of each one of the pieces, I did it in a rudimentary way, since this glue helps you to mold and when drying the figure will be hard and will not lose the form that we gave him; but if you prefer you can substitute the artisan glue for the one of your preference and that is of fast drying.
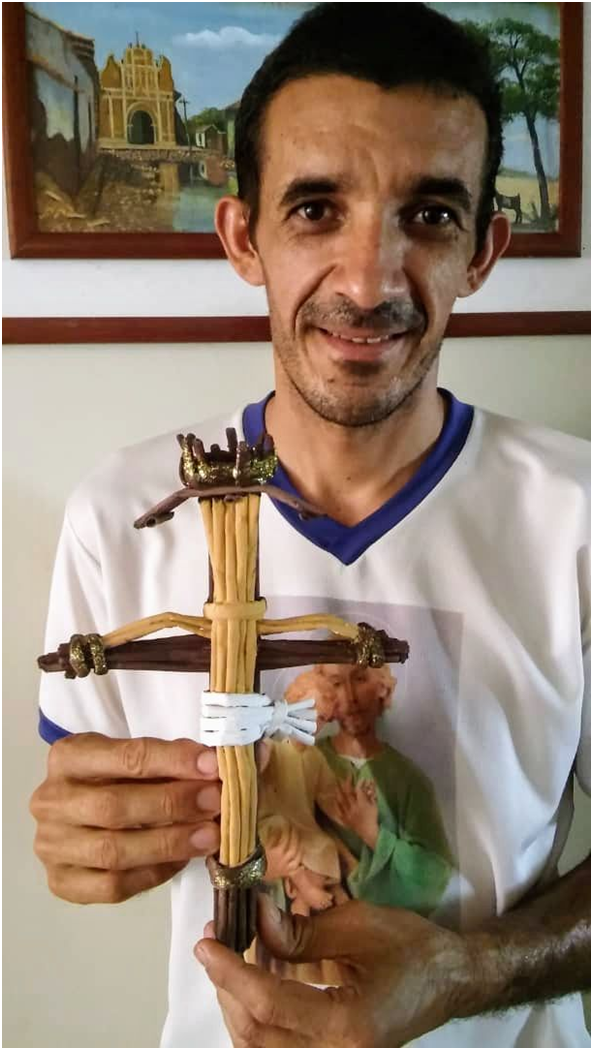
Espero les sea útil esta técnica y se animen a realizarla en casa, creando su pieza personalizada y compartiendo en la comunidad, me agradaría mucho leer tus comentarios y publicaciones; por ahora me despido hasta una nueva oportunidad, su amigo el Drhueso.
I hope you find this technique useful and encourage you to do it at home, creating your personalized piece and sharing it in the community, I would be very pleased to read your comments and publications; for now I say goodbye until a new opportunity, your friend Drhueso.

Las imágenes son de mi propiedad, fueron tomadas con mi teléfono celular marca LG / The images are my property, they were taken with my LG cell phone.
Translated with www.DeepL.com/Translator (free version)


