¡Hola, hola! Hivers y hermosa comunidad de NeedleWorkMonday, espero todos se encuentren súper bien, animados e inspirados 💟
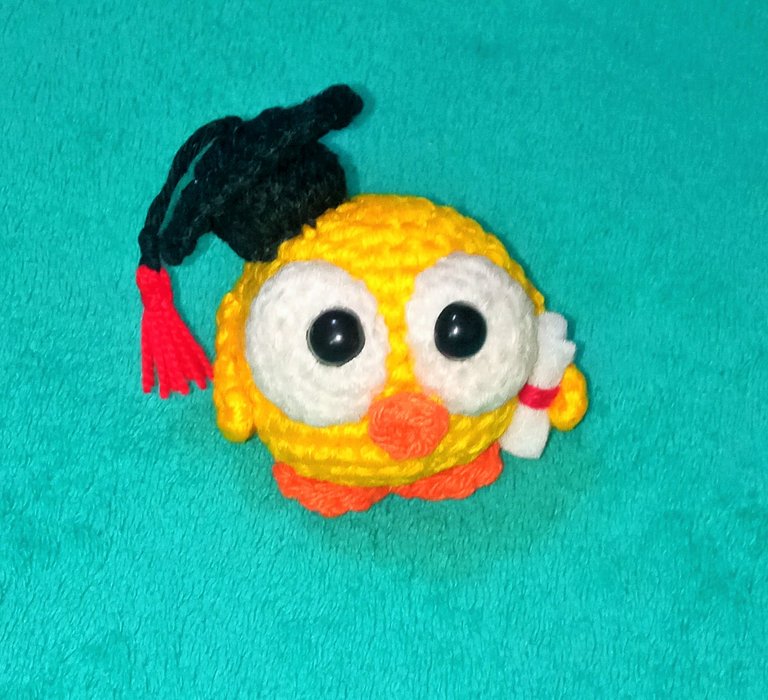
Para finales de este mes inician las graduaciones en Venezuela y motivada por eso decidí hacer un lindo pollito graduado tejido a crochet.
Este pollito lo hice sin tener un patrón previo, así que me toco tejer y destejer un par de veces para lograr el resultado deseado, pero fue un trabajo que realmente me gusto hacer ya que tenia muchas ganas de verlo terminado, y definitivamente valió la pena el trabajo porque quedo demasiado lindo el resultado final.
Hello, hello! Hivers and beautiful community of NeedleWorkMonday, I hope you all are feeling great, encouraged and inspired 💟
At the end of this month graduations start in Venezuela and that's why I decided to make a cute crochet graduation chick.
I made this chick without a previous pattern, so I had to knit and unknit a couple of times to achieve the desired result, but it was a work that I really liked to do because I really wanted to see it finished, and it was definitely worth the work because the final result was too cute.

Este pequeño amigurumi se puede usar como llavero y también como complemento en algún ramo de flores eternas, pienso que serian unas lindas opciones para usarlo en un regalo.
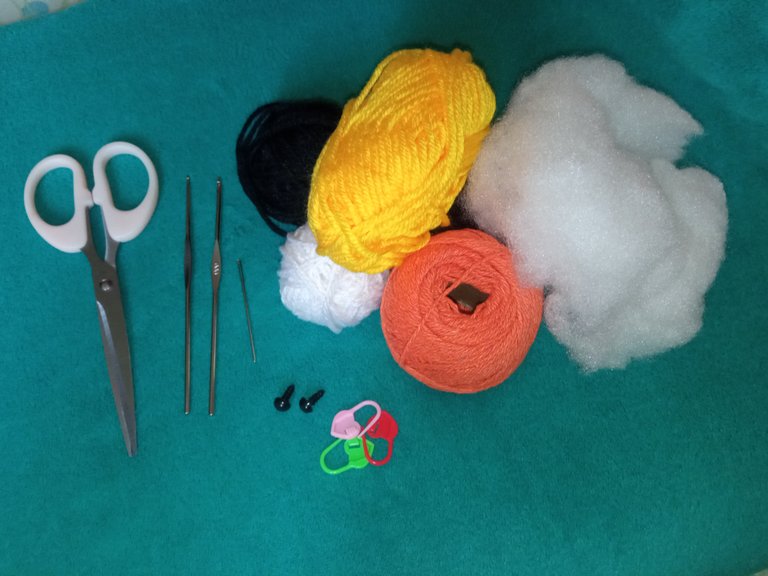
A continuación les contare sobre los materiales que use para realizar al pollito graduado y sobre el proceso de tejido.
MATERIALES:
-Estambre en color amarillo, anaranjado y blanco.
-Hilo de algodón color negro.
-Ganchillo #000.
-Aguja lanera.
-ojos de 8mm.
-Tijeras.
-Marcador de puntos.
-fieltro blanco y hilo rojo.
This little amigurumi can be used as a keychain and also as a complement in a bouquet of eternal flowers, I think it would be a nice option to use it as a gift.
Next I will tell you about the materials I used to make the graduated chick and about the knitting process.
MATERIALS:
- Yellow, orange and white yarn.
- Cotton thread in black color.
- Crochet hook #000.
- Wool needle.
- 8mm eyes.
- Scissors.
- Stitch marker.
- White felt and red thread.
PROCESO DE TEJIDO:
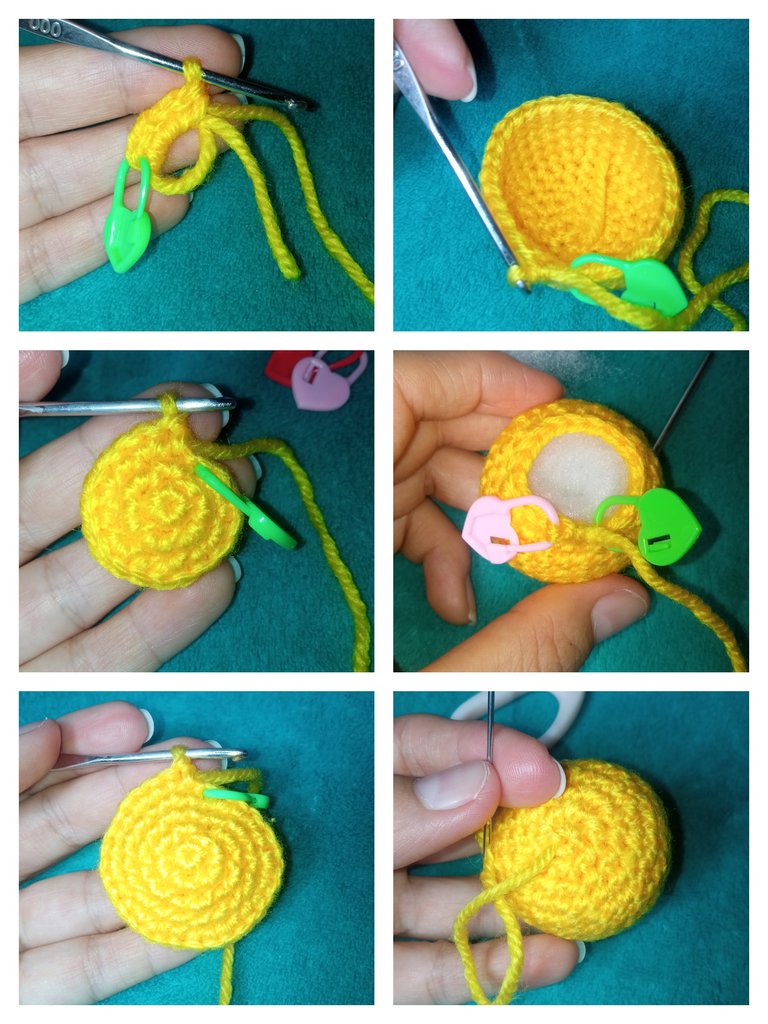
Para tejer el cuerpo del pollito lo que hice fue tejer una esfera en color amarillo, iniciando con 6 puntos bajos dentro de un anillo mágico, y haciendo aumentos en múltiplos de 6 hasta llegar a 30 puntos bajos, luego hice 5 vueltas todas de 30 puntos y luego fui haciendo disminuciones hasta obtener 6 puntos bajos y rellene la pieza hasta que quedara firme y cerré haciendo un anillo mágico invertido.
Un tip que aprendí recientemente es que para tejer esferas perfectas sin importar el tamaño del que la queramos hacer es, tejer la misma cantidad de vueltas simples que de aumentos; por ejemplo. si tejemos 5 vueltas haciendo aumentos también tejeremos 5 vueltas sin hacer aumentos y luego 5 vueltas haciendo disminuciones.
KNITTING PROCESS:
To knit the body of the chick what I did was to knit a yellow sphere, starting with 6 single crochets inside a magic ring, and making increases in multiples of 6 until I reached 30 single crochets, then I made 5 rounds of 30 stitches and then I made decreases until I obtained 6 single crochets and filled the piece until it was firm and closed it by making an inverted magic ring.
A tip I learned recently is that to knit perfect spheres no matter what size you want to make it, knit the same amount of single rows as increases; for example, if you knit 5 rows making increases you will also knit 5 rows without making increases and then 5 rows making decreases.
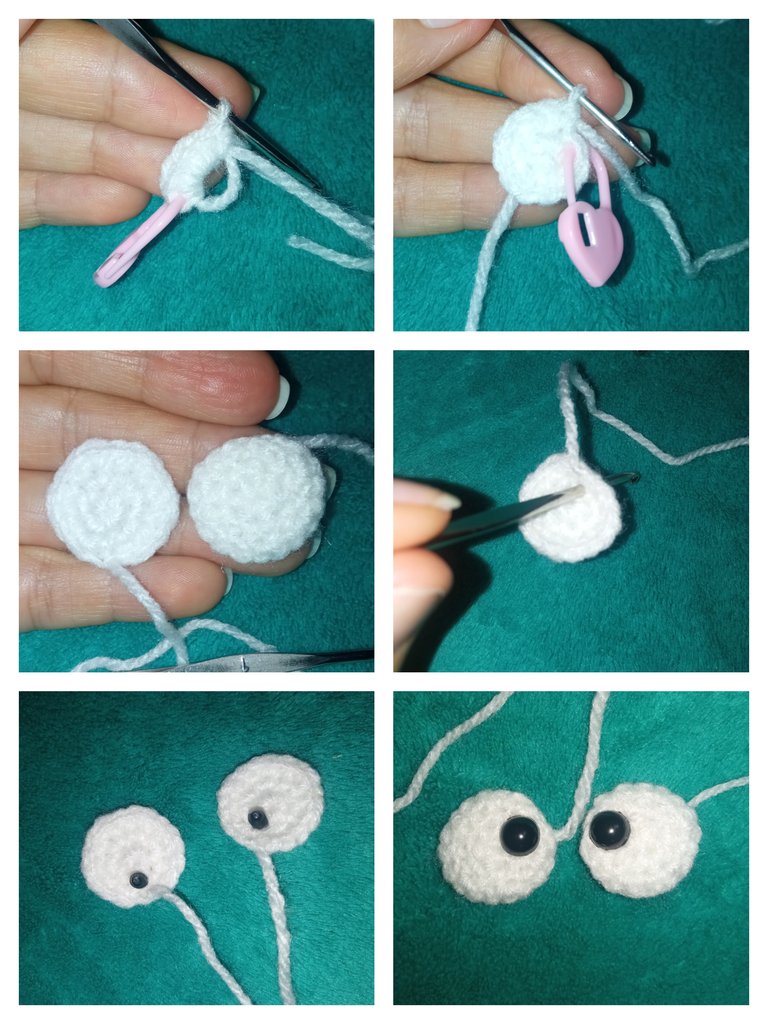
Para los ojos tejí 2 círculos de 18 puntos bajos de perímetro, iniciando con anillo mágico con 6 puntos bajos, y en total fueron 3 vueltas para llegar a los 18 puntos.
Decidí que la parte visible seria el revés del tejido ya que así se notan menos las vueltas del tejido y a mi parecer, en este caso, se ve mucho mejor.
Luego introduje los ojos de seguridad en cualquier punto de la segunda vuelta y los queme por la pate de atrás para asegurarlos y quedaran lo mas planos posible, ya que no los iba a introducir en el amigurumi.
For the eyes I knitted 2 circles of 18 double crochet stitches, starting with a magic ring with 6 double crochet stitches, and in total there were 3 rows to reach the 18 stitches.
I decided that the visible part would be the reverse side of the knitting, because this way the knitting loops are less noticeable and in my opinion, in this case, it looks much better.
Then I introduced the safety eyes in any stitch of the second row and burned them on the back side to secure them and make them as flat as possible, since I wasn't going to introduce them into the amigurumi.
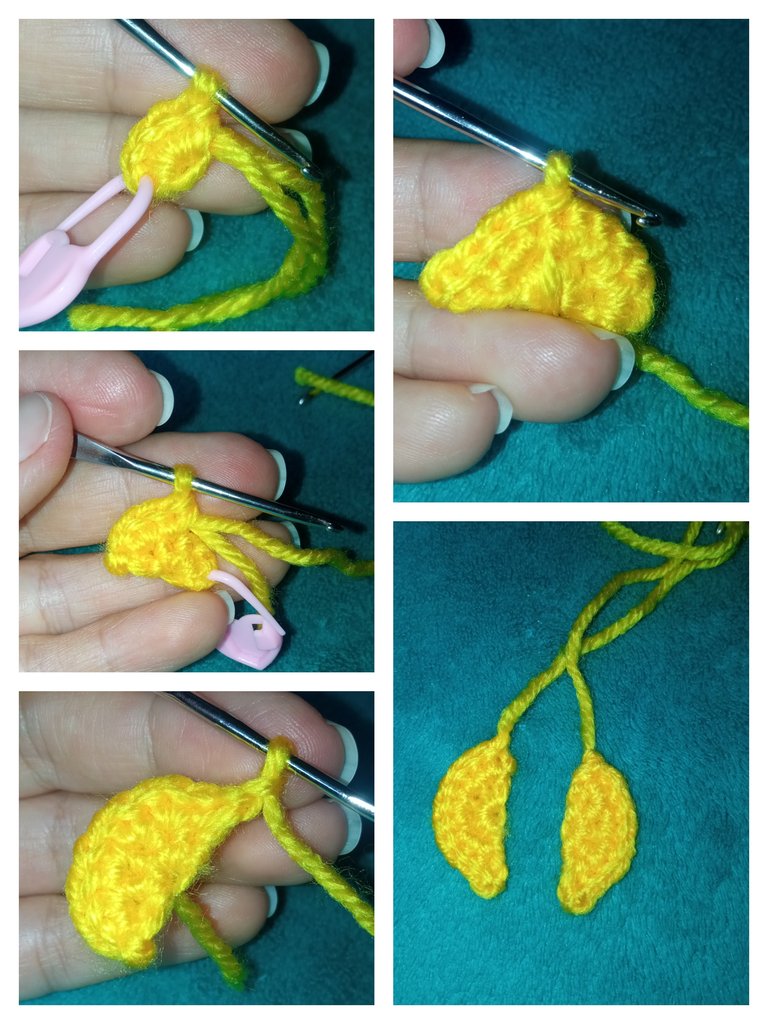
Las alas del pollito las tejí 2 piezas iguales en forma de media luna, lo que hice fue iniciar tejiendo 5 puntos bajos dentro de un anillo mágico y sin cerrar la vuelta realice 1 cadena y di la vuelta al tejido para realizar 5 aumentos y para finalizar tejí 10 puntos delicados sobre los puntos de la vuelta anterior, esto le daba mas firmeza a la pieza.
The wings of the chick I knitted 2 equal pieces in the shape of a half moon, what I did was to start knitting 5 low stitches inside a magic ring and without closing the round I made 1 chain and turned the fabric to make 5 increases and to finish I knitted 10 delicate stitches over the stitches of the previous round, this gave more firmness to the piece.
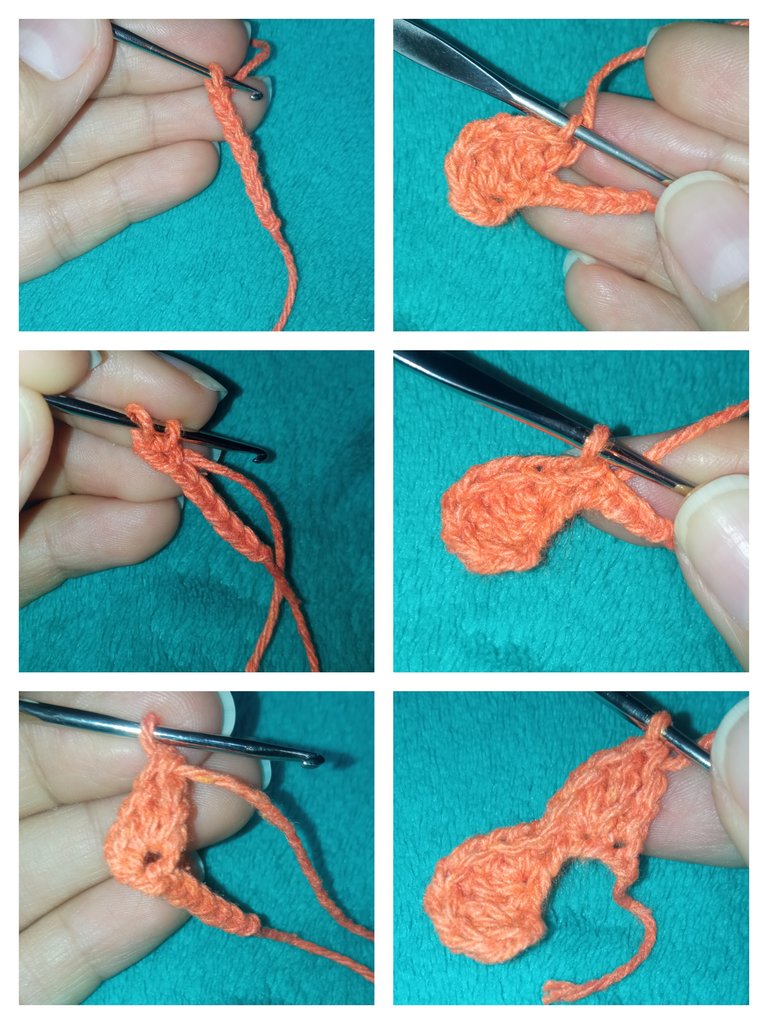
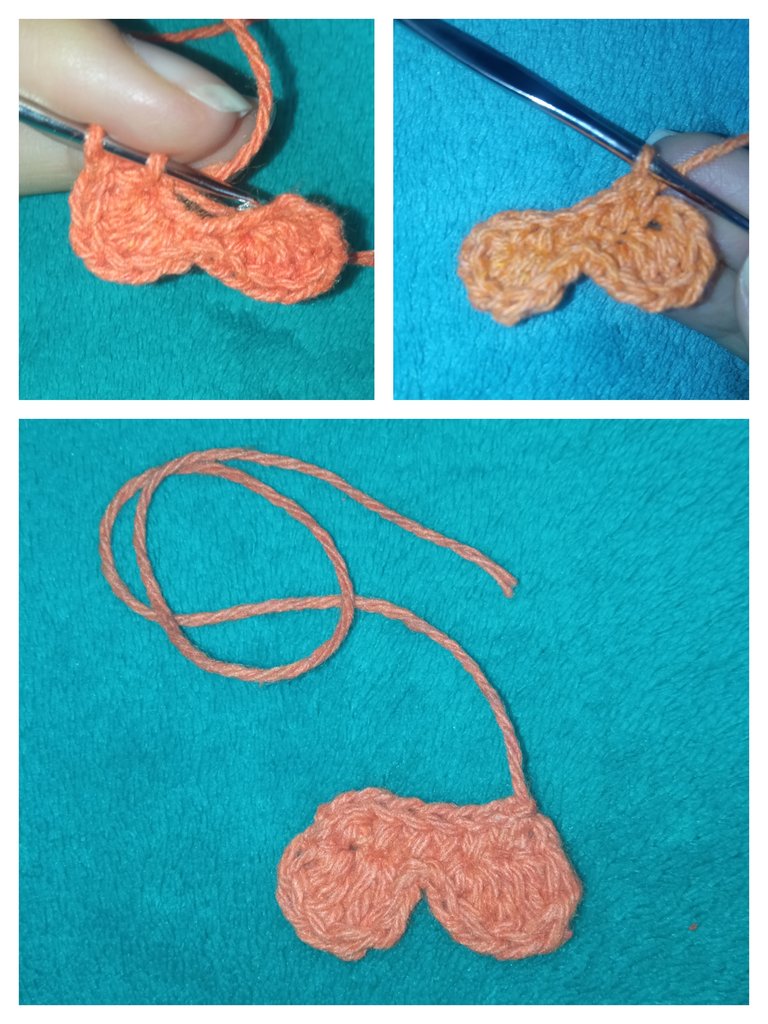
Para hacer las patitas del pollito, estaba indecisa entre tejerlas o hacerlas bordadas, pero termine tejiéndolas porque me parecía que le daba un toque mas vistoso a mi pollito.
Inicie tejiendo una cadeneta de 7 puntos, y en el segundo punto desde el ganchillo realice la siguiente secuencia (1Pb, 1Pa, 1dPa), en el siguiente punto tejí ( 1dPa, 1Pa, 1Pd), en los siguientes 2 puntos hacer 1 Pd en cada uno y volver a repetir las secuencias de (1Pb, 1Pa, 1dPa), en el siguiente punto tejí ( 1dPa, 1Pa, 1Pd), tejer 1 cad y por el otro lado de la cadeneta base tejer 6 Pb, cortar la hebra y asegurar el hilo.
To make the legs of the chick, I was undecided between knitting them or making them embroidered, but I ended up knitting them because I thought it gave a more colorful touch to my chick.
I started knitting a chain of 7 stitches, and in the second stitch from the crochet hook I made the following sequence (1sc, 1dc, 1tdc), in the next stitch I knitted ( 1tdc, 1dc, 1sl st), in the next 2 stitches make 1 sc in each stitch and repeat again the sequences of (1sc, 1dc, 1tdc), in the next stitch I knit ( 1tdc, 1dc, 1sl st), knit 1 ch and on the other side of the base chain knit 6 sc, cut the loop and secure the yarn.
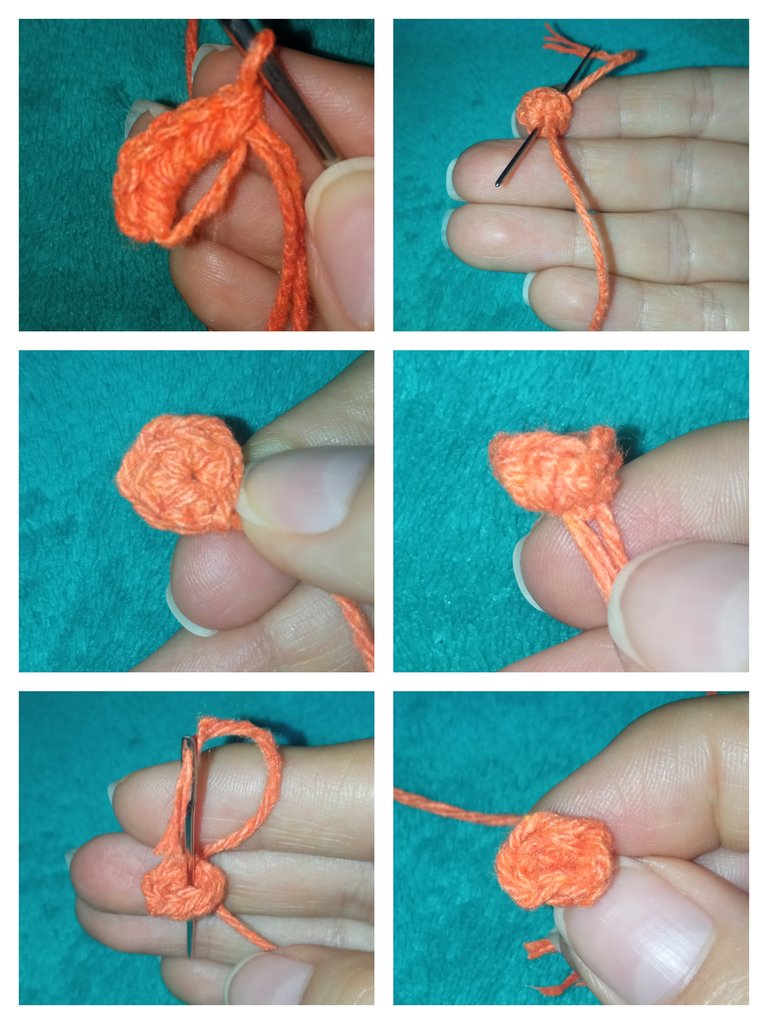
El pico del pollito fue bastante sencillo de hacer, simplemente tejí 6Pb dentro de un anillo mágico y cerré la vuelta con un punto deslizado, corte y asegure la hebra sobrante y luego le di forma de cono a la pequeña pieza.
The chick's beak was fairly simple to make, I simply knit 6Pb inside a magic ring and closed the loop with a slip stitch, cut and secured the excess loop and then shaped the little piece into a cone.
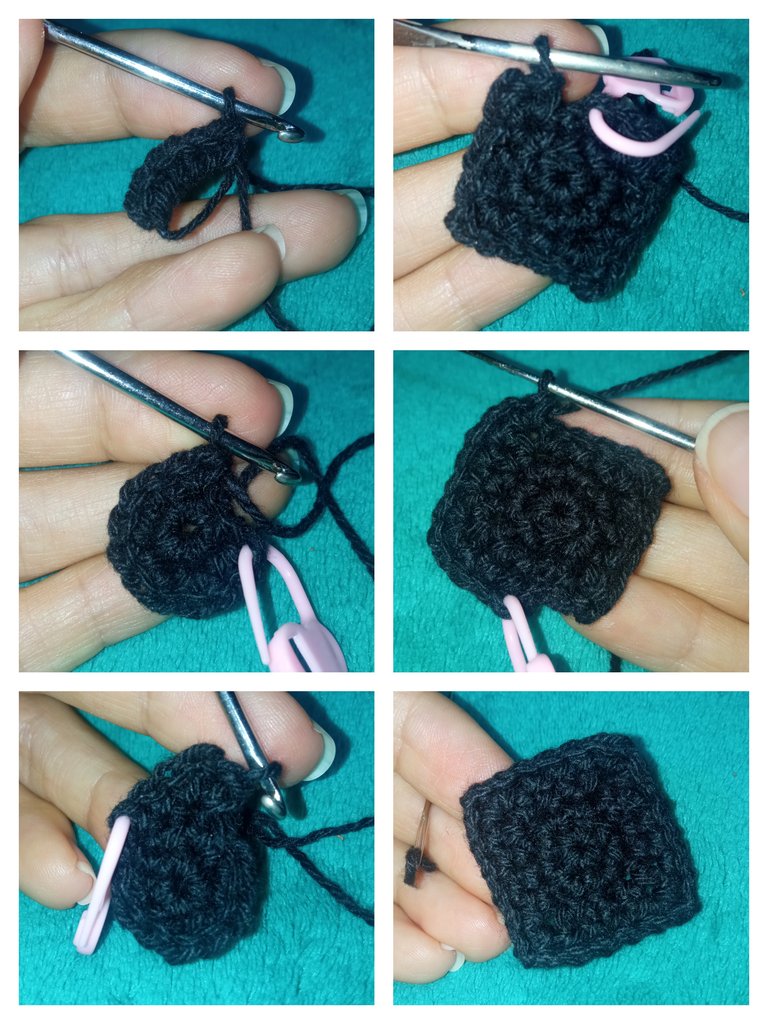
Inicialmente el birrete lo iba a tejer también con estambre pero no me agrado mucho el resultado final, ya que no tenia tanta firmeza, así que lo termine haciendo con hilo de algodón y este resultado si me gusto muchísimo.
El birrete lo hice en dos partes, una cuadrada que es lo de arriba y otra en forma de cilindro, y lo tejí siguiendo el siguiente patrón:
Para la parte cuadrada:
V1: Am con 6Pb
V2: 6 Aum
V3: tejer en BLO, 3 Pb, (1Pb, 2cad, 1Pb), saltar un punto, y repetir la secuencia 3 veces mas, así formaremos el cuadrado.
V4: [3Pb, en el espacio de las 2cad tejer (1Pb, 1cad, 1Pb)]x4
Luego cortar la hebra y asegurar y ocultar el sobrante.
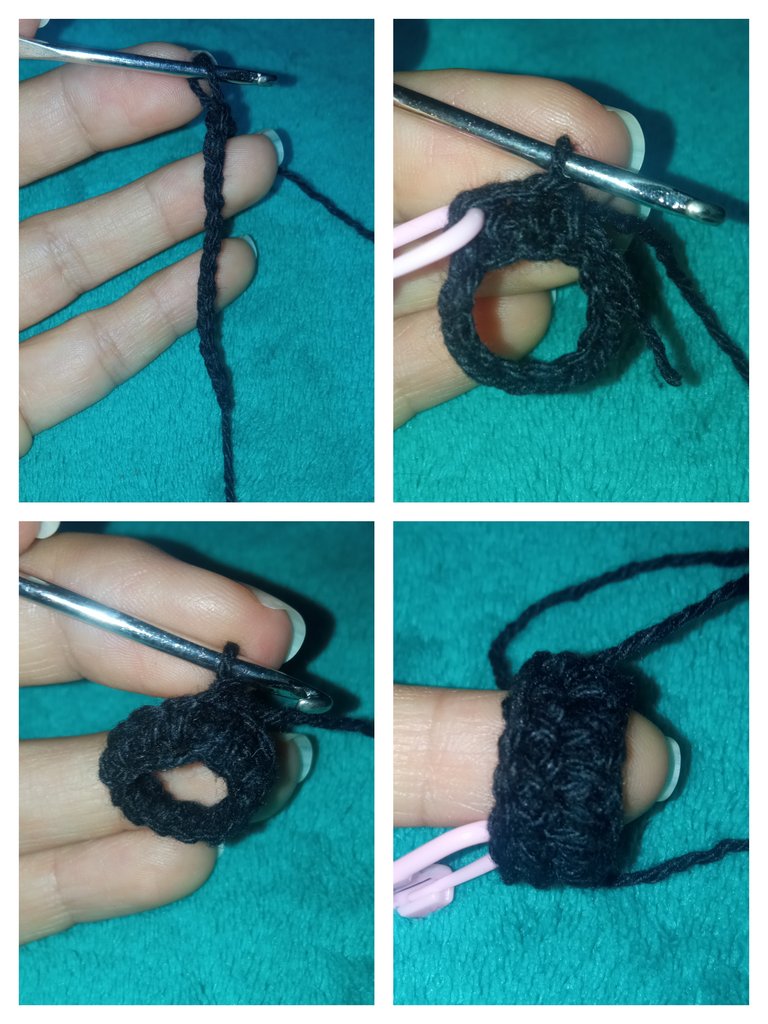
Para la parte cilíndrica:
V1: tejer 12 puntos cadena y cerrar con Pd para formar un anillo, luego tejer 12Pb dentro del anillo y cerrar con Pd.
V2: 12Pb, cerrar con Pd y cortar hebra larga para luego unir a la pieza cuadrada.
La unión se hace cociendo la pieza por la hebra que sobresale en la vuelta donde tejimos en BLO al hacer el cuadrado.
Initially I was going to knit the biretta also with worsted yarn but I didn't like the final result, because it wasn't so firm, so I ended up making it with cotton yarn and I really liked the result.
The biretta I made it in two parts, one square which is the top part and the other in the shape of a cylinder, and I knitted it following the following pattern:
For the square part:
R1: MR with 6sc.
R2: 6 inc.
R3: knit in BLO, 3sc, (1sc, 2ch, 1sc), skip a stitch, and repeat the sequence 3 more times, so we will form the square.
R4: [3sc, in the space of the 2ch knit (1sc, 1ch, 1sc)]x4
Then cut the loop and secure and hide the excess.
For the cylindrical part:
R1: knit 12 chain stitches and close with slip stitch to form a ring, then knit 12sc inside the ring and close with slip stitch.
R2: 12sc, close with slip stitch and cut long loop and then join to the square piece.
The join is made by sewing the piece through the loop that protrudes in the loop where we knit in BLO when making the square.
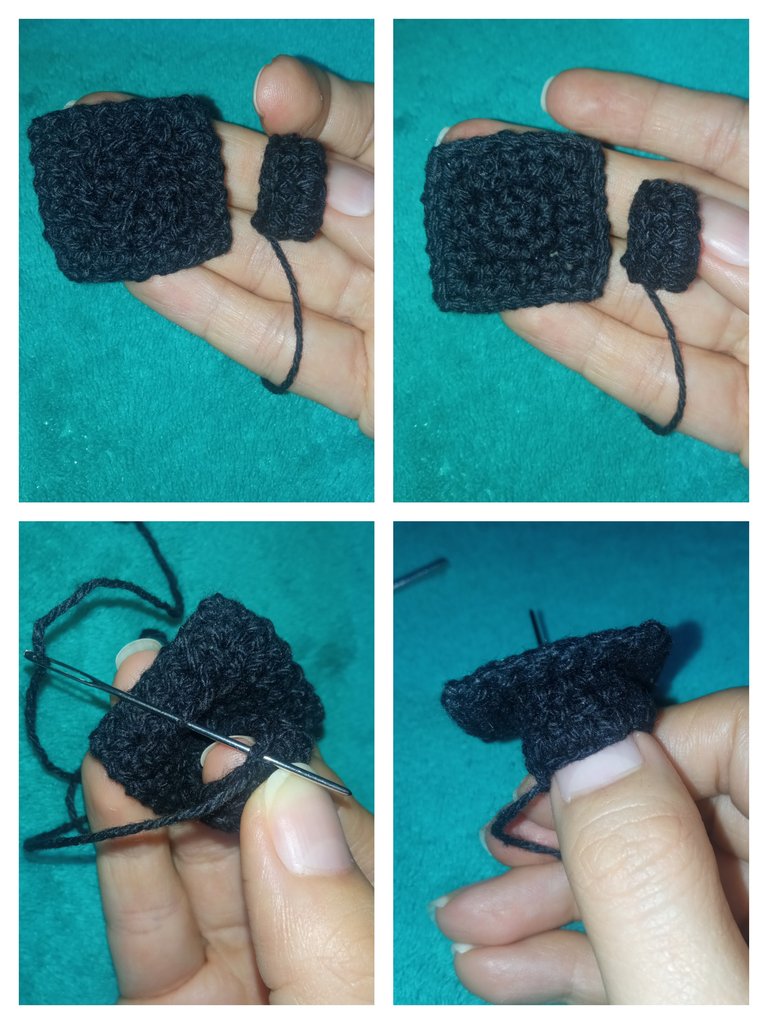
Por ultimo, fije todas las piezas con alfileres al cuerpo del pollito para luego cocerlas con aguja lanera, primero cosí los ojos, luego las alas, seguidamente el pico y las patitas y por ultimo el birrete.
También le coloque un pequeño diploma al pollito, ya que sin Diploma no hay graduación jajaja.... para hacerlo simplemente tomé un pequeño rectángulo de fieltro blanco, lo enrollé y le ate un hilo rojo y luego lo peque a una de las alitas, como si lo estuviera sosteniendo.
Finally, I pinned all the pieces to the body of the chick and then sewed them with a wool needle, first I sewed the eyes, then the wings, then the beak and the legs and finally the cap.
I also put a small diploma on the chick, because without Diploma there is no graduation hahaha .... to do it I simply took a small rectangle of white felt, rolled it up and tied a red thread and then small it to one of the wings, as if I was holding it.


REALMENTE DESEO LES HAYA GUSTADO TANTO COMO A MI EL RESULTADO FINAL DE ESTE LINDO POLLITO GRADUADO.
I REALLY HOPE YOU LIKED THE FINAL RESULT OF THIS CUTE LITTLE GRADUATE CHICK AS MUCH AS I DID.

Resultado Final / Final Result
ESPERO SUS BONITOS COMENTARIOS Y/O VOTOS, ASÍ ME MOTIVAN PARA SEGUIR COMPARTIENDO MIS CREACIONES CON USTEDES, YO ESTARÉ FELIZ DE RESPONDER TODOS SUS COMENTARIOS, ¡SEAN FELICES Y QUE LA MUSA DE LA CREATIVIDAD NUNCA LOS ABANDONE!
¡GRACIAS POR VISITAR MI BLOG!
Se despide de ustedes con mucho cariño su amiga Nathalie @laranitacrochet
I LOOK FORWARD TO YOUR NICE COMMENTS AND/OR VOTES, THIS WAY YOU MOTIVATE ME TO KEEP SHARING MY CREATIONS WITH YOU, I WILL BE HAPPY TO ANSWER ALL YOUR COMMENTS, BE HAPPY AND MAY THE MUSE OF CREATIVITY NEVER LEAVE YOU!
THANK YOU FOR VISITING MY BLOG!
Your friend Nathalie @laranitacrochet bids you a fond farewell.
*Todas las fotografías utilizadas en la publicación son propiedad de la autora.
*Las fotografías fueron tomadas y editadas con mi REDMI 9 y con la App FotoRoom.
*La traducción la hice en https://www.deepl.com/es/translator
*All photographs used in this publication are property of the author.
*The pictures were taken and edited with my REDMI 9 and the FotoRoom App.
*The translation was done at https://www.deepl.com/es/translator