
What's up fellow needle and thread lovers? I hope you are very well at the beginning of this week, I am very happy to share with you again and this time is special because I started a new project, you see a few months ago a friend had her first baby and the truth is I have not been able to see her and I have not had the opportunity to meet her baby, but now, I am close to meet her again and finally have the joy of meeting her little one and that is why, I want to give her something made with my own hands and of course made with all the love.
As you can see in the title, I will be making some booties using the hail stitch, which I think is a beauty, and not only that I also want to give her a little bag which I will upload the tutorial post later, and maybe I will tell you if my friend liked it or not, since I don't know what day exactly I will see her, but, I'm very excited....
¿Que tal compañeras amantes del hilo y la aguja? Espero que estén muy bien en este inicio de semana, yo estoy muy feliz de compartir con ustedes de nuevo y ésta vez es especial porque inicié un nuevo proyecto, verán hace unos meses una amiga tuvo a su primer bebé y la verdad no he podido verla y tampoco he tenido la oportunidad de conocer a su bebé, pero ahora, estoy cercana a poder encontrarme con ella de nuevo y al fin tener la dicha de conocer a su pequeño y es por eso que, quiero obsequiarle algo hecho con mis propias manos y por supuesto hecho con todo el cariño.
Como ven en el título, voy a estar haciendo unos escarpines utilizando el punto granizo, que a mi me parece una belleza, y no solo eso también quiero obsequiarle un saquito el cuál les subiré el post de tutorial más adelante, y tal vez les diga si a mi amiga le gustó o no, ya que no sé qué día exactamente la voy a ver, pero, estoy muy emocionada...
Materials
- Pabilo thread in white and blue colors (or you can use baby thread)
- 2mm needle
- Wool needle
- Scissors
- Measuring tape
For this tutorial, I won't give the directions on how to make the sole because I have already made some other booties tutorials, one of which you can see here and also this type of stitch has a bit more steps.
Materiales
- Hilo pabilo en colores blanco y azul (o pueden usar hilo bebé)
- Aguja de 2mm
- Aguja lanera
- Tijeras
- Cinta de medir
Para éste tutorial, no daré las indicaciones de como hacer la suela porque ya he hecho algunos otros tutoriales de escarpines, el cual uno de ellos pueden verlo aquí y además éste tipo de punto tiene un poco más de pasos.
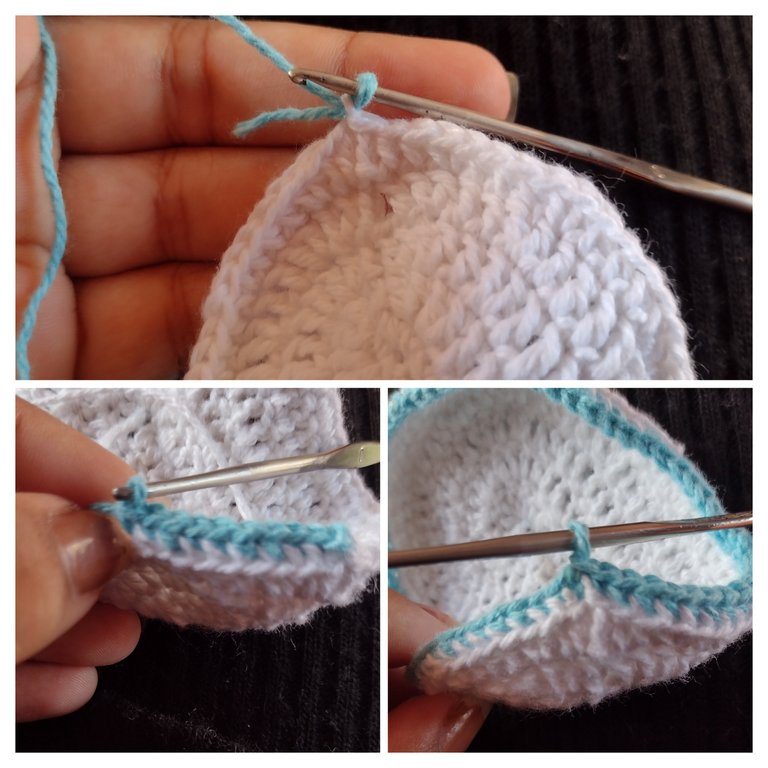
Once we have the sole ready and of the desired size, we proceed to make the upper, and for this we start the first row making only low stitches, for this escarpin I made the sole in white, but you can make it in the color you want with the combinations you want.
Una vez que tengamos la suela lista y del tamaño deseado, procedemos a hacer la capellada, y para ello iniciamos la primera fila haciendo sólo puntos bajos, para este escarpin hice la suela de color blanco, pero igual puedes hacerla del color que desees con las combinaciones que quieras.
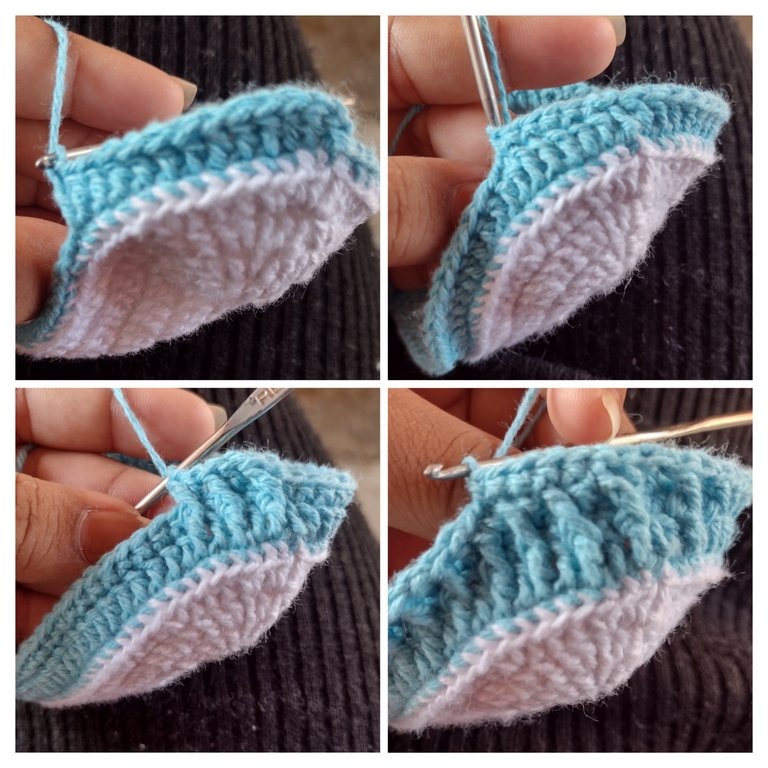
When we have the row of single crochet stitches ready, we proceed to make the second row with only double crochet, when we finish that row, we make the third row with double crochet again and then, in the fourth row we start making our hail stitch, we start making a double crochet in relief in front (this means that we pass the crochet hook through the front of the fabric) and in the next stitch, we make a normal double crochet and so on until we finish knitting the whole row, for the fifth row, we make a row with only single crochet stitches.
Cuando ya tengamos lista la fila de puntos bajos, procedemos a hacer la segunda fila con sólo puntos altos, cuándo terminemos esa vuelta, hacemos la tercera fila con puntos bajos de nuevo y luego, en la cuarta fila empezamos haciendo nuestro punto granizo, empezamos haciendo un punto alto en relieve por delante (esto quiere decir que pasamos el ganchillo por el frente del tejido) y en el siguiente punto, haremos un punto alto normal y así sucesivamente hasta terminar de tejer toda la fila, para la quinta fila, hacemos una vuelta sólo con puntos bajos.
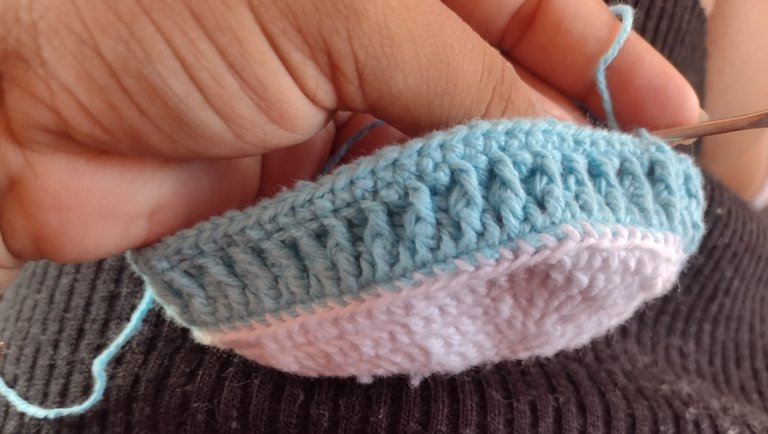
Once we have something like this, we proceed to make the toe of the scarpin, remember that when you make the normal high stitch, in the next stitch we make the high stitch in relief in front.
Una vez que tenemos algo así, procedemos a hacer la puntera del escarpin, recuerden que cuando hagan el punto alto normal, en el siguiente punto hacemos el punto alto en relieve por delante.
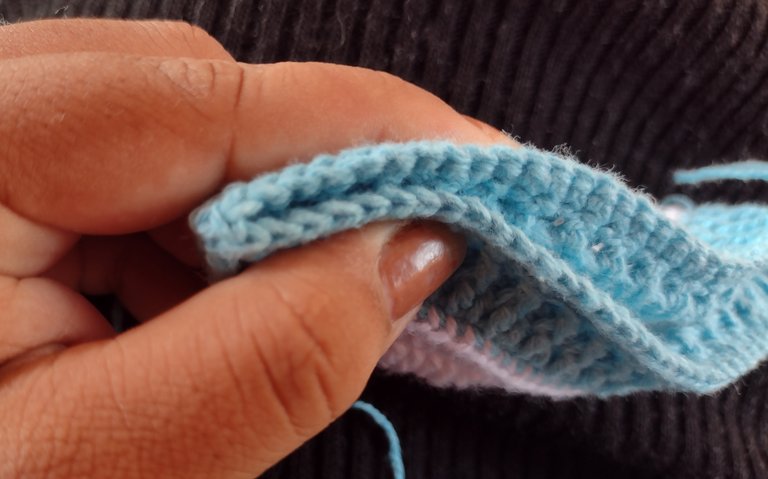
For the toe cap, we fold the scarpin in half and we will count 4 stitches on the sides, counting the center stitch we will count 9 stitches in total (this for the size from 0 to 3 months, if it is a bigger boot, more stitches count) and the part of the toe cap we leave it in pause to proceed to make the toe cap, you can cut the yarn, use another ball of the same color you have or you can also take the other end of the yarn from the ball you are using.
Para la puntera, doblamos el escarpin a la mitad y vamos a contar 4 puntos hacía los lados que contando el punto del centro serian 9 puntos en total (esto para la talla de 0 a 3 meses, si es una botita más grande, cuentan más puntos) y la parte de la capellada la dejamos en pausa para proceder a hacer la puntera, puedes cortar el hilo, usar de otro ovillo del mismo color que tengas o también puedes sacar el otro extremo del hilo del ovillo que estás usando.
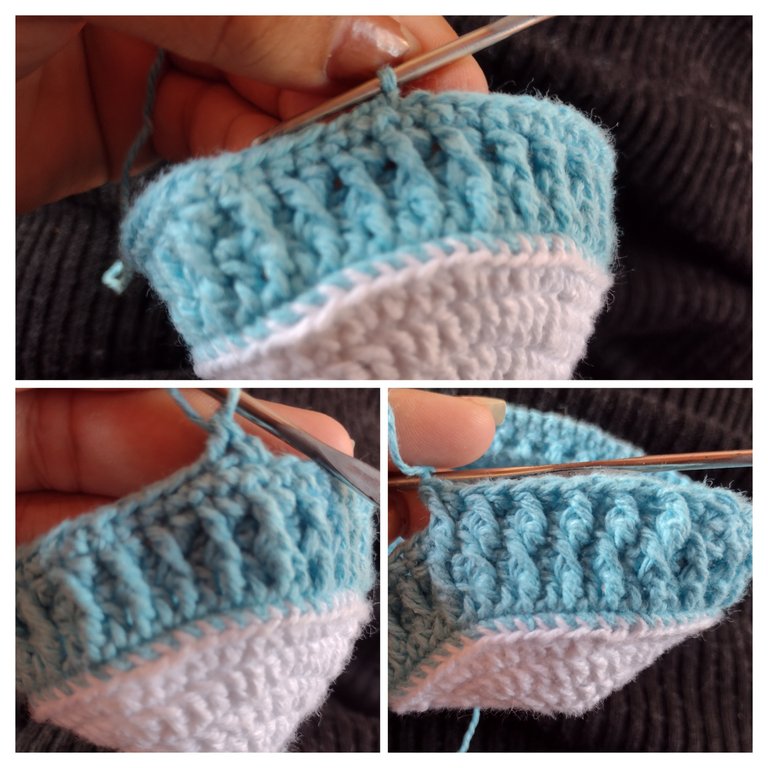
Once we have it marked, we count two stitches backwards from where we marked and there we introduce the yarn to start knitting, we omit the first stitch that we count of the last 2 and we start knitting in the stitch where we have marked, here it is very important that you notice if the stitch that you have before is a normal high stitch, or a raised stitch in front, if as in my case (as you can see in the photos), you have a raised stitch in front, then what you are going to do is a normal high stitch and so we will follow the sequence of knitting, it has to look like you are seeing in the photos, once we finish making the 9 stitches, we close that round making a slipped stitch in the second stitch that you can see at the end of the row.
Una vez que lo tenemos marcado, contamos dos puntos hacia atrás de dónde marcamos y ahí introducimos el hilo para empezar a tejer, omitimos el primer punto que contamos de los últimos 2 y empezamos a tejer en el punto dónde tenemos marcado, aquí es muy importante que se fijen si el punto que tienen anterior es un punto alto normal, o un punto en relieve por delante, si como en mi caso (como ves en las fotos), tienes un punto en relieve por delante entonces lo que vas a hacer es un punto alto normal y así vamos a seguir la secuencia del tejido, te tiene que quedar como estás viendo en las fotos, una vez terminemos de hacer los 9 puntos, cerramos esa vuelta haciendo un punto deslizado en el segundo punto que se ve al finalizar la fila.
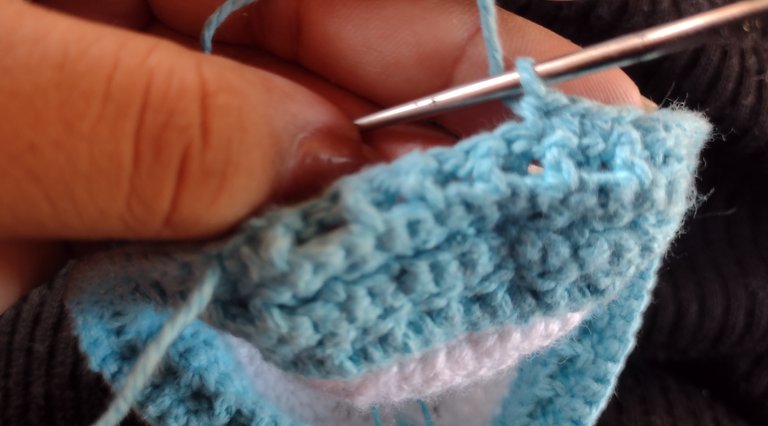
Then we go up making a slipped stitch and in the second row we make all low stitches, when we finish that row, we proceed to close it making a slipped stitch in the first stitch, after that, we go up with two slipped stitches in the following stitches and we do the same as in the first round, always paying attention if we first made a normal high stitch, or a raised stitch in front, we do this procedure until we have the toe of the desired size.
Luego subimos haciendo un punto deslizado y en la segunda fila hacemos todos puntos bajos, cuando terminemos esa fila, procedemos a cerrarla haciendo un punto deslizado en el primer punto, luego de eso, subimos con dos puntos deslizados en los siguientes puntos y hacemos lo mismo que en la primera vuelta, siempre fijándonos de si hicimos primero un punto alto normal, o un punto en relieve por delante, éste procedimiento lo hacemos hasta tener la puntera del tamaño deseado.
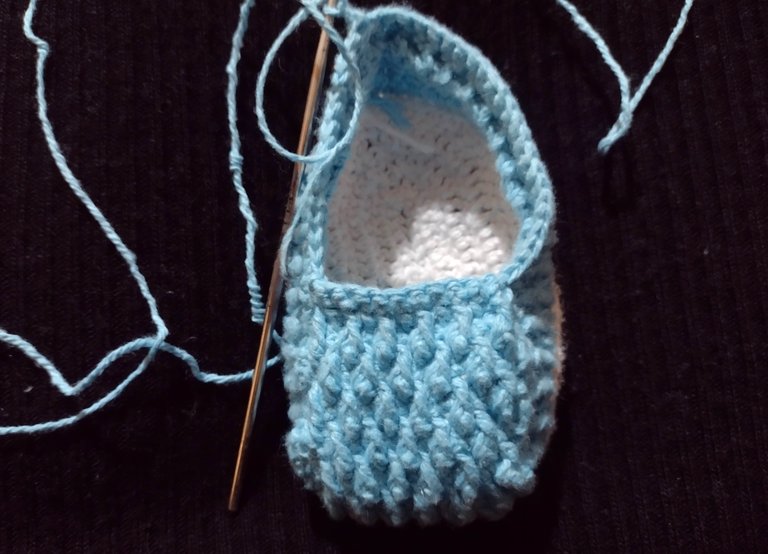
Once we have something like this, we will have to continue with the uppers, we do not have to make the toe too big because later the baby's foot may not fit and we must also finish the row with low stitches.
Una vez que tenemos algo así, tendremos que seguir con la capellada, no tenemos que hacer la puntera demasiado grande porque después puede que no entre el pie del bebé y también debemos terminar la fila con puntos bajos.
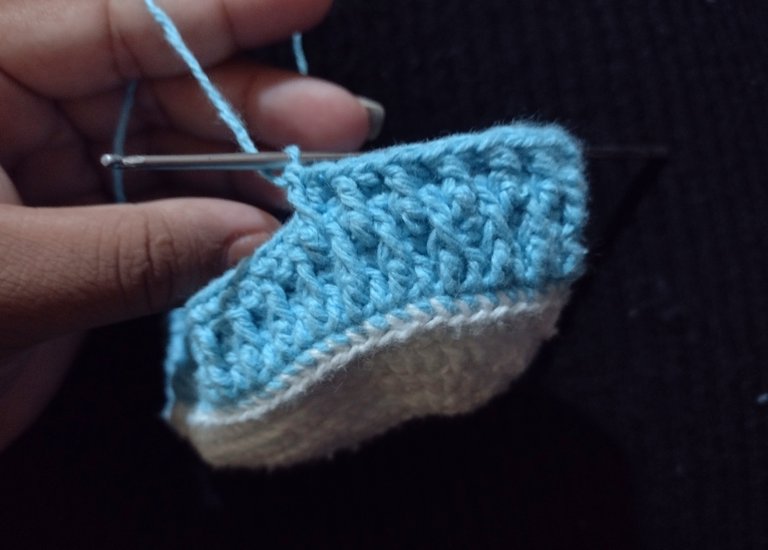
As we had already made low stitches before, we have to do the same as I explained before, the high stitches in relief in front and the normal high stitches, always paying attention to what we did in the previous row to do it in a different way in the next one...
Como ya habíamos hecho puntos bajos anteriormente, nos toca hacer lo que ya les expliqué de los puntos altos en relieve por delante y los puntos altos normales, siempre fijándonos en cuál hicimos en la vuelta anterior para hacerlo de distinta forma en la siguiente...
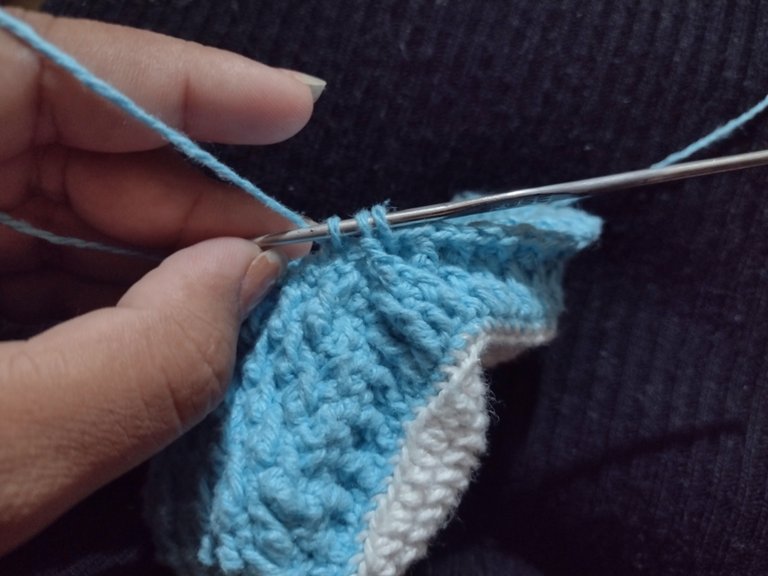
For the part of joining it with the toe, we have to make a small decrease, we achieve this by making the stitches normally as we have been doing them, but without closing completely and when we have the three stitches as you see in the picture, then we proceed to close and continue knitting as we have been doing and we will do the same at the other end of the toe, remember to make a row of low stitches for each row of high stitches/relief stitch in front.
Para la parte de unirla con la puntera, tenemos que hacer una pequeña disminución, ésto lo logramos haciendo los puntos normalmente como veníamos haciéndolos, pero sin cerrar completamente y cuando tengamos los tres puntos como ven en la foto, ahi procedemos a cerrar y seguimos tejiendo como ya veníamos haciendo y lo mismo haremos en el otro extremo de la puntera, recuerden que deben hacer una fila de puntos bajos por cada fila de puntos altos/punto en relieve por delante.

Once we have the boot of the desired height, we proceed to make the end of it, and for that, in the last row of high stitches, we will make a row of relief stitch at the back (in which the needle is passed behind the fabric).
Una vez que tengamos la botita del alto que deseamos, procedemos a hacer el final de esta, y para eso, en la última fila de puntos altos, haremos una fila de punto en relieve por detrás (en la cual se pasa la aguja por detrás del tejido).
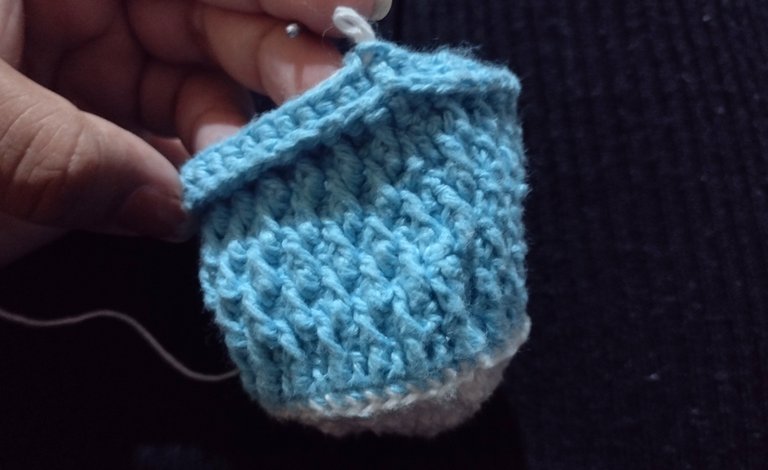
Then we close the row with the white color used at the beginning (which can be another color), we do not have to cut the yarn of the other color, we proceed to make a row of relief stitch on the back.
Luego cerramos la fila con el color blanco que use al principio (que puede ser otro color), no tenemos que cortar el hilo del otro color, procedemos a hacer igualmente una fila de punto en relieve por detrás.
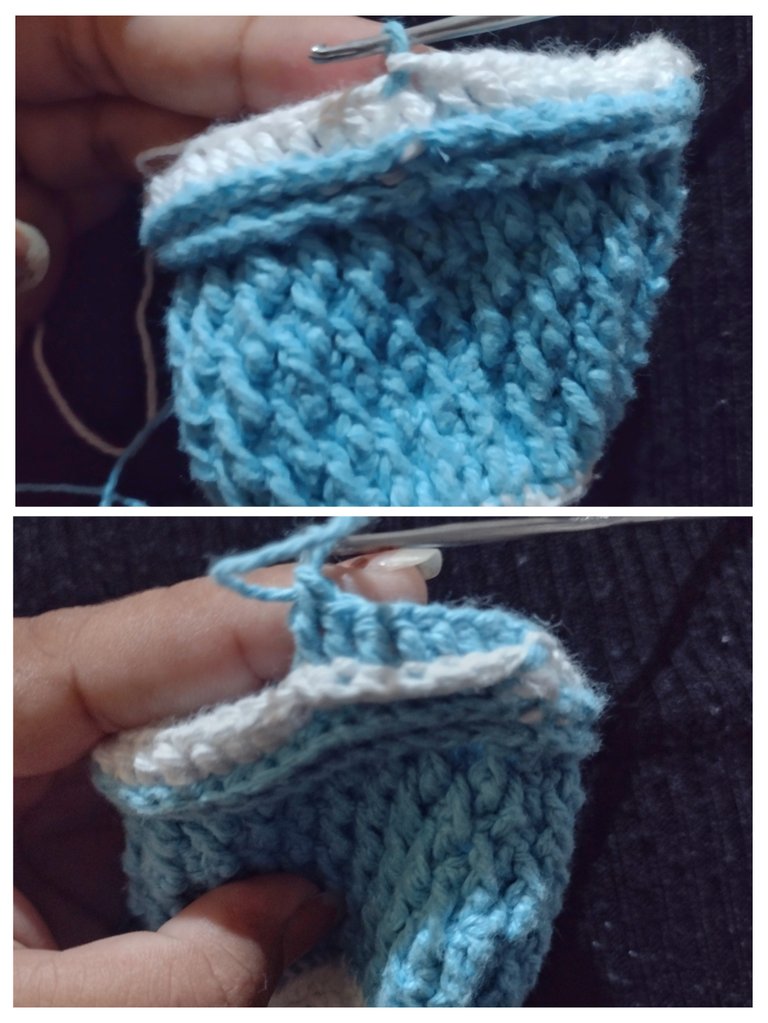
When we finish making that row, with the color we started with we proceed to make a last row of relief stitch on the back and when we finish we can cut the yarn, the previous rows we have been closing with a slipped stitch, but, this last one we are not going to close it yet because we are going to make a last row with the white color.
Cuando terminemos de hacer esa fila, con el color con que empezamos procedemos a hacer una última fila de punto en relieve por detrás y cuándo terminemos ya podremos cortar el hilo, las vueltas anteriores las hemos estado cerrando con un punto deslizado, pero, ésta última aún no la vamos a cerrar porque vamos a hacer una última vuelta con el color blanco.
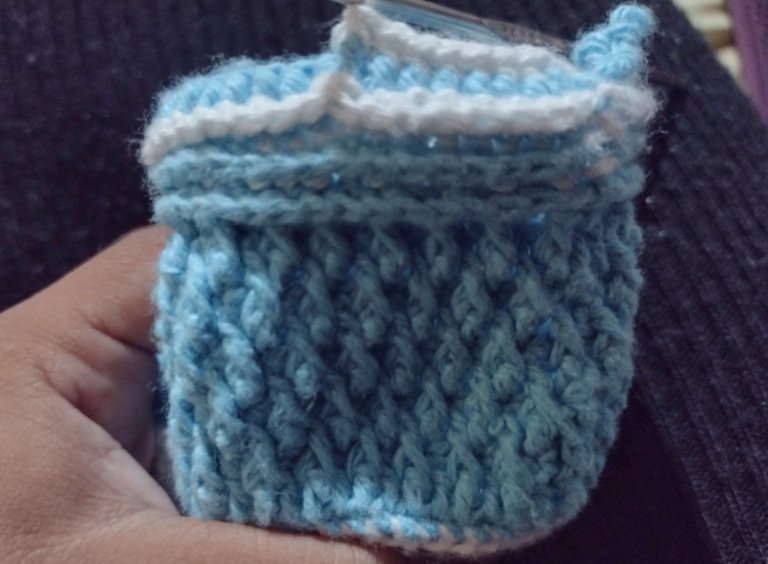
We make the last row with the white color, but this time we are going to make low relief stitches in front, in each of the previous stitches and all around the row... Finally we close the previous color with the knitting needle and the last row with the white we close it by making a slipped stitch, we hide the yarn with the knitting needle.
Hacemos la última vuelta con el color blanco, pero ésta vez vamos a hacer puntos bajos en relieve por delante, en cada uno de los puntos anteriores y por toda la vuelta... Ya por último cerramos el color anterior con la aguja lanera y el la última vuelta con el blanco la cerramos haciendo un punto deslizado, escondemos hilos con la aguja lanera.
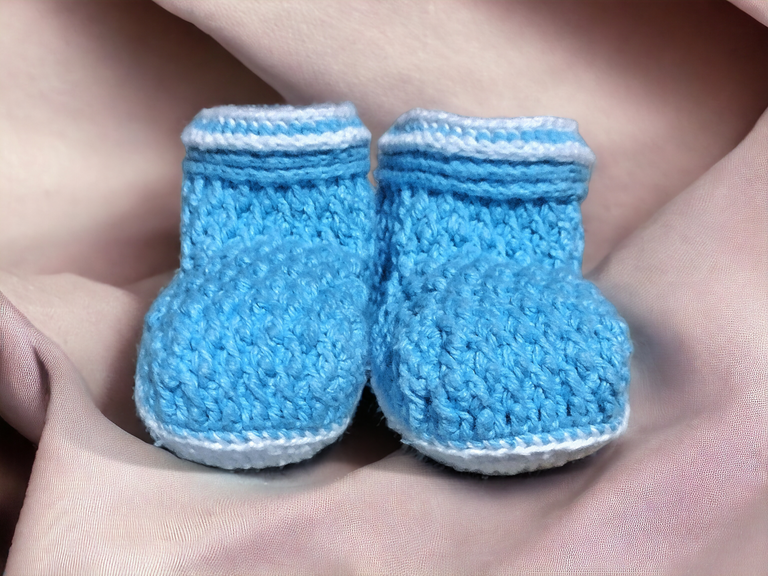
And this would be the final result of these booties, I hope you liked the result as much as I did and I hope I explained myself well, see you soon for the tutorial of the bag. Thank you very much for reading me ♥️
Y éste seria el resultado final de éstos escarpines, espero que les haya gustado el resultado tanto como a mí y espero haberme explicado bien, las veo pronto para el tutorial de el saquito. Muchas gracias por leerme ♥️
Cover made in Canva
Photo of the final result edited in Photoroom
Translated by DeepL
Portada hecha en Canva
Foto del resultado final editada en Photoroom
Traducido por DeepL