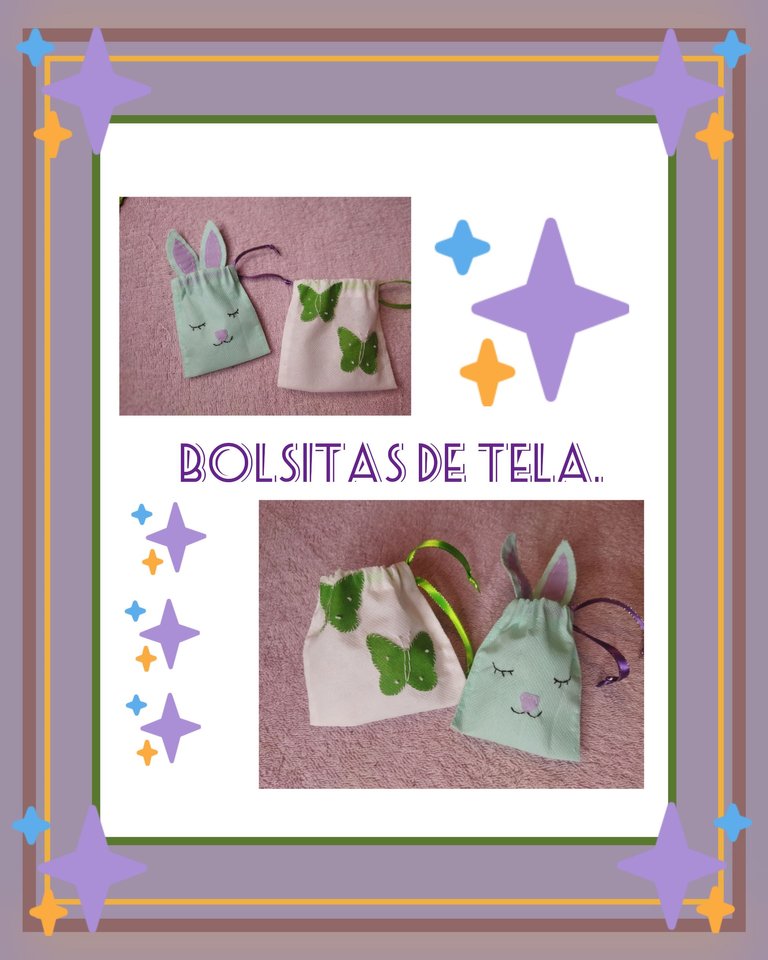
Bolsitas de tela.
Hola amigos de #hive, me da gusto volver a saludarlos. En estos días estuve conversando con mi mamá acerca de cómo combatir a las chiripas que suelen llegar a la casa, especialmente en aquellos lugares donde hay puertas y marcos de madera y ella me recomendó usar clavos de olor. Definitivamente el olor a clavitos a mí me fascina así que me encantó la idea y me dispuse a elaborar unas bolsitas para usarlas en mi cocina ya que por allí llegan con frecuencia las hormigas, no las chiripas. Además de espantarlas también mantendrá los espacios con una rica fragancia.
Materiales.
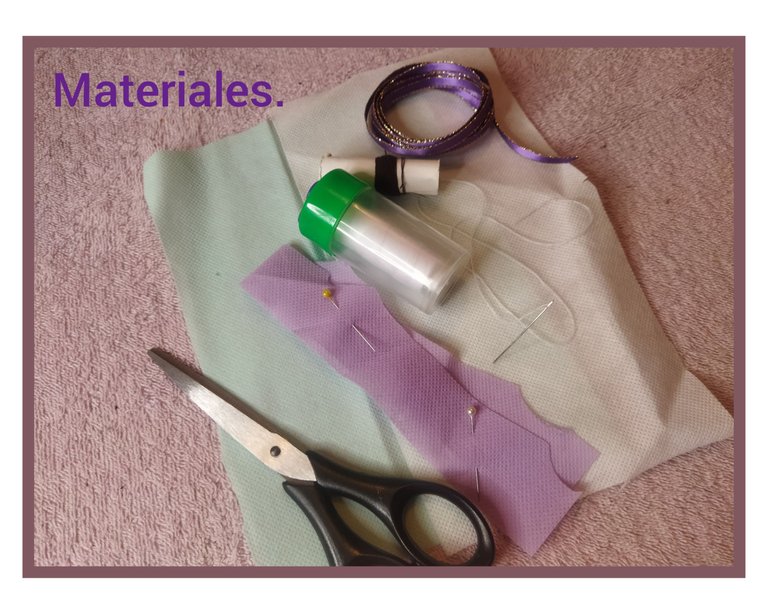
Para realizar estas bolsitas yo utilicé una tela llamada pop ya que tiene bastante ventilación y permitirá que el aroma de los clavitos salga y se expanda por todo el ambiente. También utilicé la regla escolar, lápiz de grafito, cinta de raso con borde dorado, aguja de coser, hilo de coser, moldes de papel, las tijeras y los alfileres.
Paso a paso.
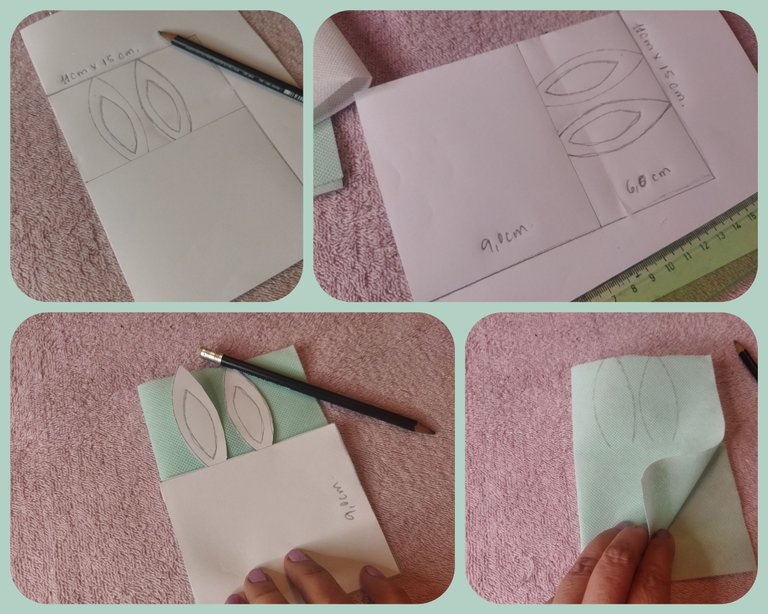
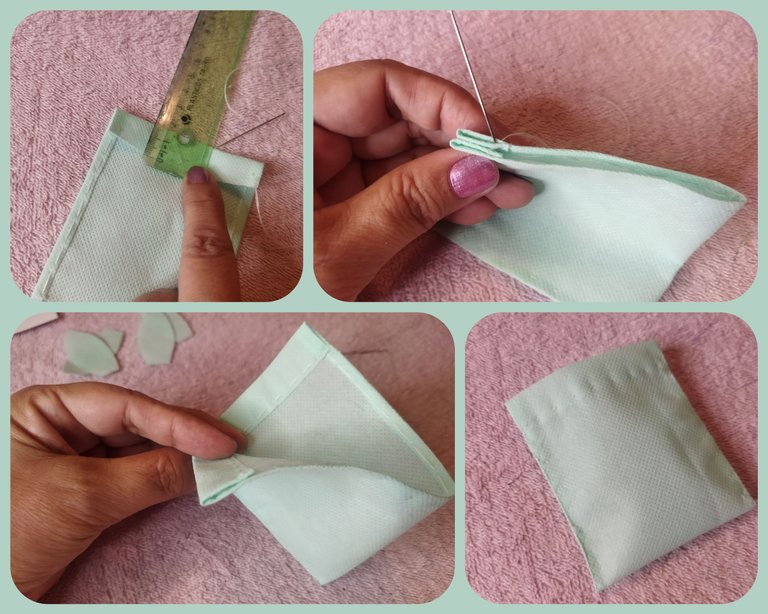
👆 Lo primero que hice fue buscar dos retazos de tela pop, uno blanco y otro verde agua. También seleccioné un trocito color rosa vieja y uno verde más intenso. Estos son pedacitos de telas que van quedando de otros proyectos y los reservo para este tipo de manualidades. Enseguida tomé el lápiz para dibujar más o menos el molde de lo que tenía en mente. Luego pasé ese molde a la tela verde. Medí y corté según la medida del molde. Después marqué y corté cuatro orejitas en la misma tela 👇.
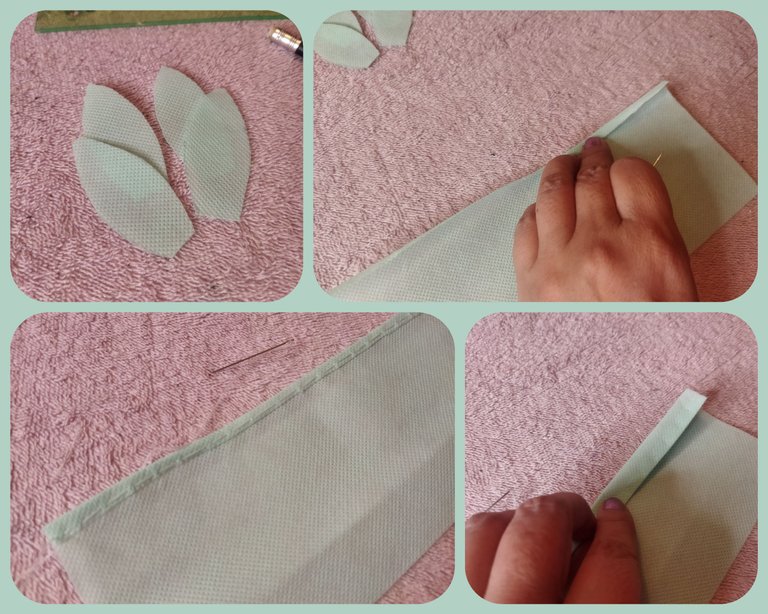
👆 Me quedó un rectángulo de 18cm de largo por 11cm de ancho. Lo doblé a la mitad y empecé haciendo un orillo o dobladillo de ½cm por cada uno de los laterales del rectángulo, que doblado formarán la bolsita. Igualmente hice un orillo por los dos extremos superiores, éstos los hice de 1½cm cada uno. Es importante saber si por ese espacio pasará la cinta de raso seleccionada 👇. Usando una hebra doble de hilo blanco pasé costura por los dos laterales de la derecha y luego por los dos laterales de la izquierda, de esa manera cerré la bolsita. NO COSÍ ARRIBA DONDE HICE EL DOBLADILLO DE 1½cm.
👇 Ahora con un poquito de tela rosa vieja dibujé y corté la forma de la parte interna de la oreja, las cosí en una de las orejas de color verde agua. Después cosí esta parte a la otra tela verde de la orejita.
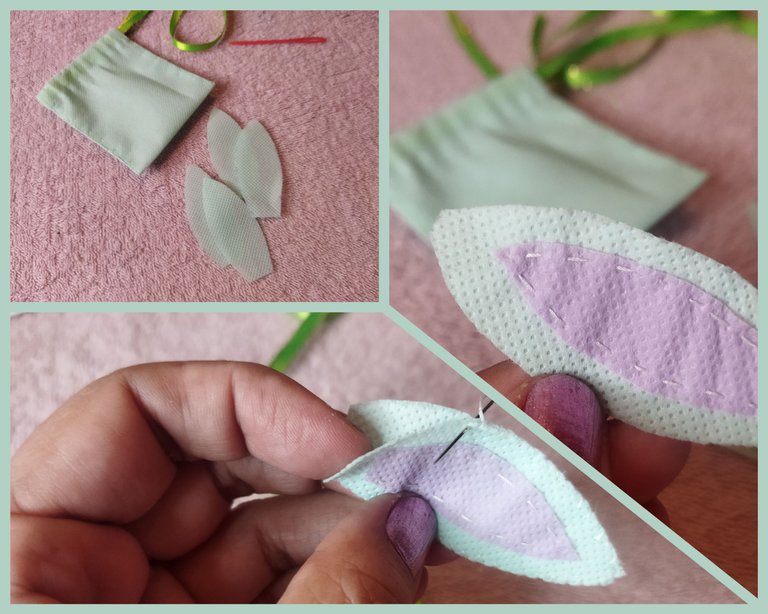
👇 Se me ocurrió después hacerle unos ojitos y la boca, si deseas hacerla similar te recomiendo bordar antes de cerrar la bolsita. Para bordar usé hilo de coser color marrón. La nariz la hice con un trocito de tela rosa vieja y la cosí con hilo blanco. Luego pasé la cinta por el espacio superior y pegué las orejitas solo en uno de los orillos superiores de la bolsita (el de atrás).

Resultado.
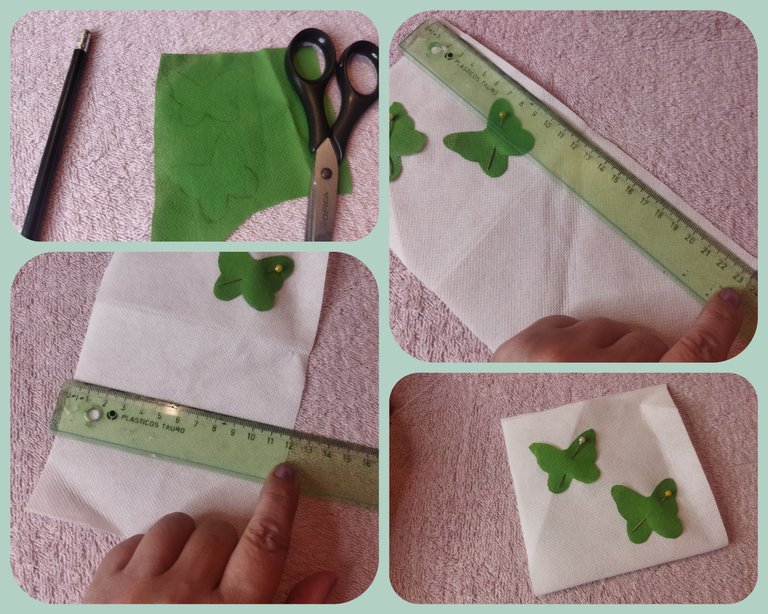
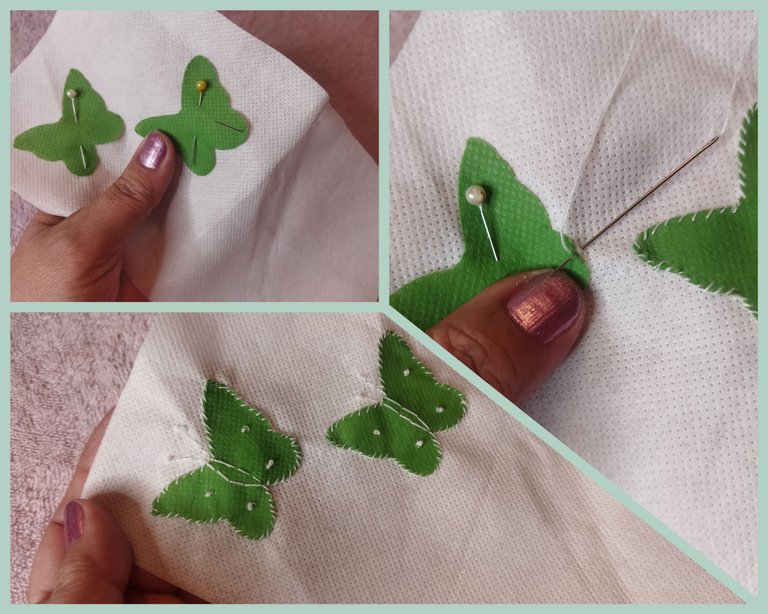
👇 Utilizando las otras medidas realicé una bolsita en tela blanca decorada con mariposas verdes. Para hacer las mariposas dibujé y saqué el molde sobre un papel, luego lo pasé a la tela verde, recorté y las cosí sobre la tela blanca de manera organizada. Con el hilo de coser color blanco le hice a las mariposas las antenas y unos puntos sobre sus alas.
🦋 Me encanta hacer este tipo de diseños porque puedo elegir la figura que más desee para decorarlas.
👇 Después de coser las mariposas cosí ambos laterales para hacer el dobladillo, igualmente cosí en la parte superior de la bolsita, sin olvidar dejar 1½cm por dónde pasará la cinta.
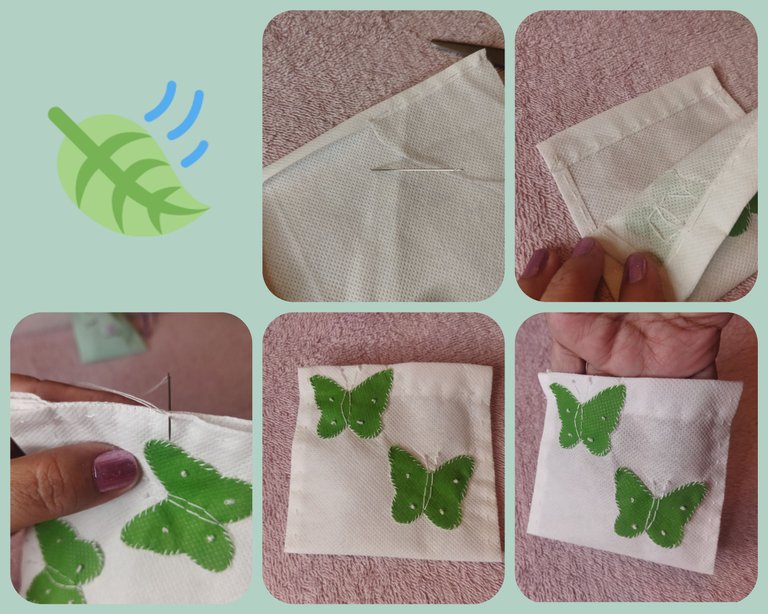
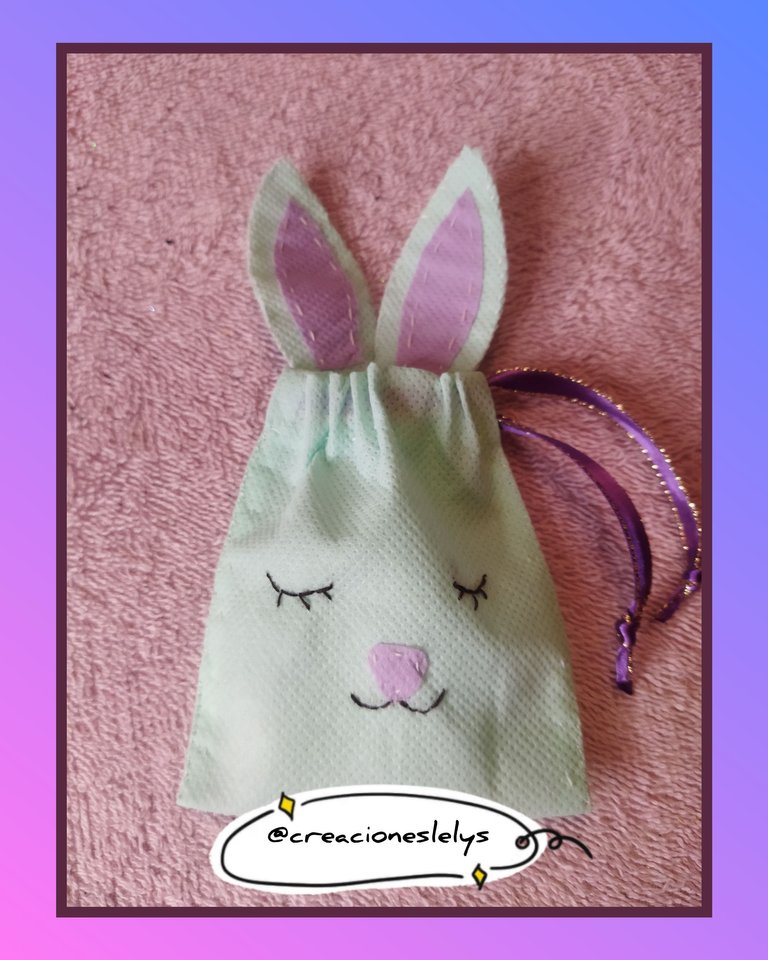
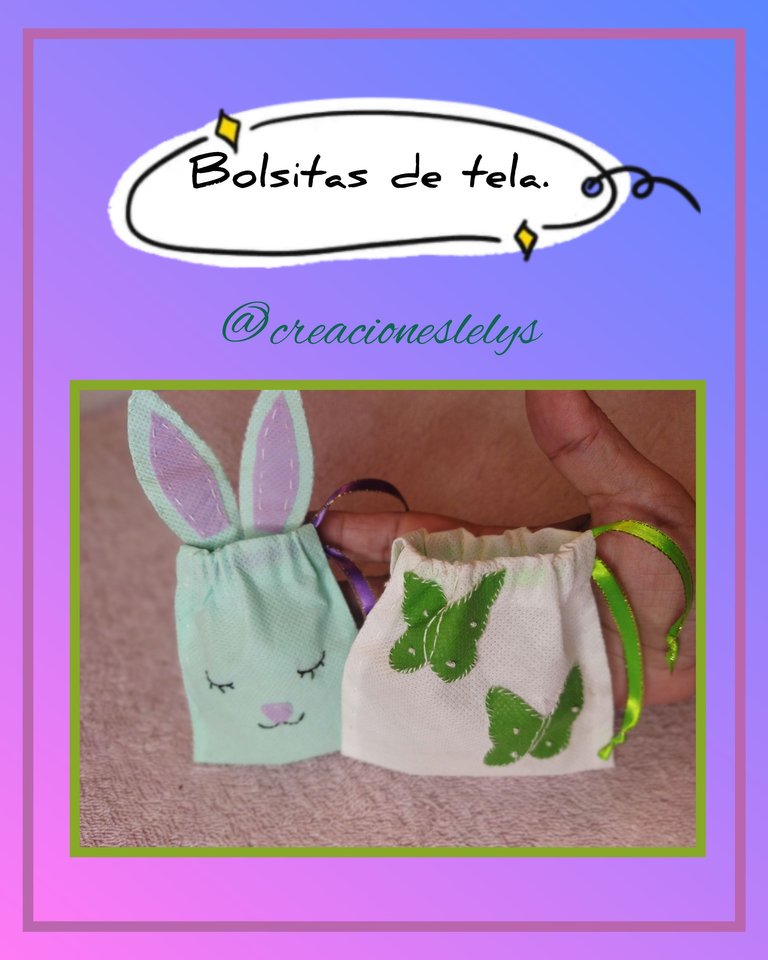
Como pueden ver el resultado es sorprendente, ya tengo dos bolsitas para meter los clavitos de olor. Estas bolsitas también puedo usarlas para entregar un obsequio, guardar las prendas o llevar mis pastillas. Son multifuncionales y sé que te gustará hacerlas.
Todas las fotos son de mi propiedad. Edité con Polish. Usé el traductor de Deepl. Bendiciones 🙏.
English.
Cloth bags.
Hello #hive friends, it's nice to greet you again. These days I was talking with my mom about how to combat the chiripas that usually come into the house, especially in those places where there are wooden doors and frames and she recommended using cloves. I am definitely fascinated by the smell of cloves so I loved the idea and I decided to make some sachets to use in my kitchen since that is where the ants often arrive, not the chiripas. Besides scaring them away it will also keep the spaces with a rich fragrance.
Materials.
To make these sachets I used a fabric called pop as it has plenty of ventilation and will allow the scent of the cloves to escape and spread throughout the room. **I also used a school ruler, a graphite pencil, satin ribbon with a gold edge, a sewing needle, sewing thread, paper templates, scissors and pins.
Step by step.
👆 The first thing I did was to find two scraps of pop fabric, one white and one aqua green. I also selected one little piece old pink and one more intense green. These are scraps of fabric left over from other projects and I reserve them for this type of craft. I then took the pencil to draw more or less the shape of what I had in mind. Then I transferred that mold to the green fabric. I measured and cut according to the size of the mold. Then I marked and cut four little ears out of the same fabric 👇.
👆 I was left with a rectangle 18cm long by 11cm wide. I folded it in half and started by making a ½cm selvage or hem on each of the sides of the rectangle, which when folded will form the pouch. I also made a selvage on the two upper ends, these I made of 1½cm each. It is important to know if the selected satin ribbon will pass through this space 👇. Using a double strand of white thread I sewed through the two sides on the right and then through the two sides on the left, in this way I closed the bag. I DID NOT SEW ON TOP WHERE I DID THE 1½cm FOLD.
👇 Now with a little bit of old pink fabric I drew and cut out the shape of the inner part of the ear, I sewed them on one of the aqua green ears. Then I sewed this part to the other green fabric of the little ear.
👇 Then I thought of making some eyes and the mouth, if you want to make it similar I recommend you to embroider it before closing the bag. I used brown sewing thread for the embroidery. I made the nose with a small piece of old pink fabric and sewed it with white thread. Then I put the ribbon through the top space and glued the ears only on one of the top selvedges of the bag (the back one).
Result.
👇 Using the other measurements I made a little bag in white fabric decorated with green butterflies. To make the butterflies I drew and drew the mold on a piece of paper, then I transferred it to the green fabric, cut out and sewed them on the white fabric in an organized way. With the white sewing thread I made the butterflies' antennae and some stitches on their wings.
🦋 I love making this kind of designs because I can choose the figure I want the most to decorate them.
👇 After sewing the butterflies I sewed both sides to make the hem, I also sewed on the top of the bag, without forgetting to leave 1½cm where the ribbon will go through.
As you can see the result is amazing, I already have two bags to put the cloves in. These bags can also be used to give a gift, store clothes or carry my pills. They are multifunctional and I know you will enjoy making them.
All photos are my property. I edited with Polish. I used Deepl translator. blessings 🙏.