.gif)
Un saludo cariñoso a toda mi querida comunidad Needleworkmonday, una semana más nos regala la vida y que bonito poder pasar un momento con ustedes para compartir nuestros trabajos, intercambiar ideas y conocimientos y hacer de esta comunidad la mejor comunidad de todas dentro del ecosistema HIVE.
La verdad es que estos días han pasado volando y ya tenemos a Diciembre a la vuelta de la esquina; a partir de ahora comienza la cuenta regresiva para mi viaje y eso me hace muy feliz. Así que solo me queda correr para aprovechar cada minuto de mi tiempo para poder hacer todas las cosas que quiero.

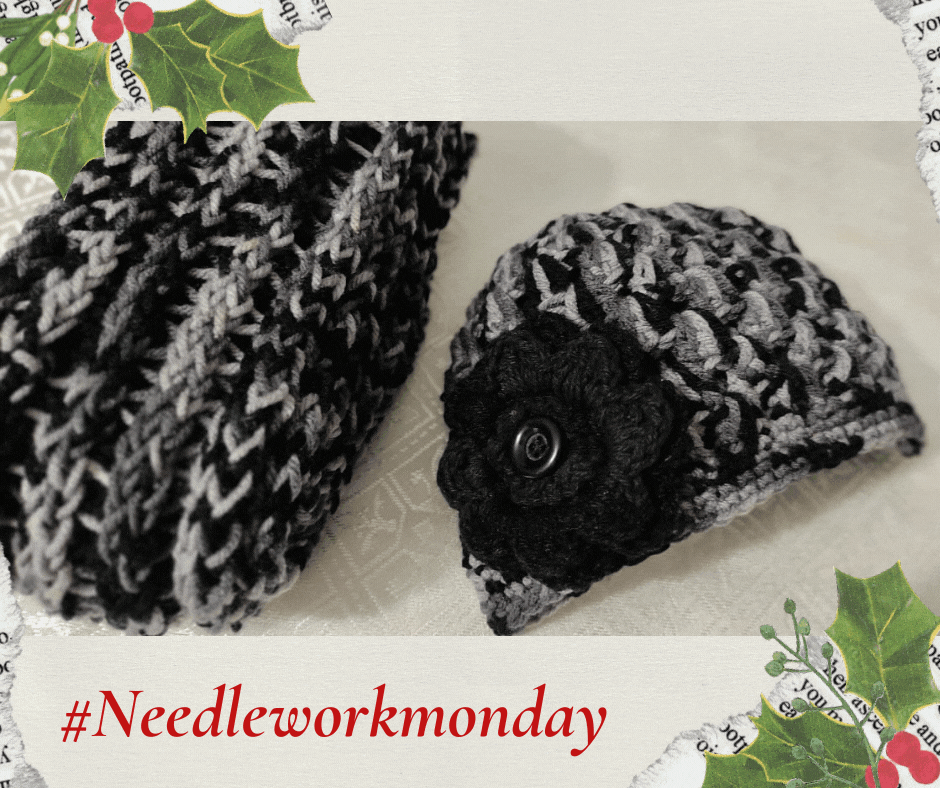
Una bufanda y gorro para alguien muy especial
El día de hoy he querido mostrarles el resultado final de Una bufanda iniciada en telar rectangular con punto calado. 🐞 , este proyecto lo inicié hace dos meses y fue hasta este fin de semana que lo volví a retomar ya que sueño con llevársela de regalo a mi querida suegra; a ella le gustan mucho este tipo de detalles tejidos y estoy segura que cuando lo vea le va a encantar porque allá en Táchira está haciendo mucho frio en este momento y desde hace días no ha parado de llover.
Aparte de eso he hecho un cálculo preciso y gracias a Dios el material me alcanzó para tejer la bufanda en telar y un gorro muy sencillo el cual les quiero enseñar hacer hoy con un sencillo paso a paso, espero que les guste y me entiendan.


Materiales que vamos a utilizar para la bufanda tejida en telar y el gorro hecho en crochet.
- 100 gramos de lana gruesa
- Aguja de tejer #4
Paso a paso

1ra vuelta. Lo primero que vamos a realizar es un aro Mágico. Dentro del aro vamos a levantar 3 cadenetas y seguido tejemos 2 puntos altos, luego tejemos 2 cadenetas y 3 puntos altos, así hasta tener 5 grupitos de 3 puntos altos cada uno separados siempre por 2 cadenetas, cerramos esa vuelta con un punto deslizado en la tercera cadeneta del inicio.
2da vuelta. En esta vuelta levantamos 4 cadenetas y nos metemos en el siguiente espacio de cadeneta de la vuelta anterior con un punto abanico es decir 3 puntos altos y dos cadenetas y 3 puntos altos, separando cada abanico con una cadeneta, para cerrar esa vuelta hacemos un punto deslizado en la tercera cadeneta del inicio.

En esta vuelta hacemos 3 cadenetas dos puntos altos dentro del mismo espacio vacío de la vuelta anterior, una cadeneta y en el siguiente espacio de cadeneta de la vuelta anterior hacemos un abanico de 3 puntos altos dos cadenetas y 3 puntos altos, luego tejemos una cadeneta y en el siguiente espacio metemos 3 puntos altos, nuevamente una cadeneta y en el siguiente hueco hacemos un abanico y así sucesivamente hasta terminar la vuelta cerrando con un punto deslizado en la tercera cadeneta de inicio.
Repetimos el mismo proceso de la vuelta anterior tantas veces queramos, en este caso tejemos 4 vueltas, cuando ya tenemos la circunferencia deseada hacemos 3 puntos altos en cada hueco de la vuelta anterior, sin abanicos. Y repetimos ese proceso según el largo deseado para su gorro, en mi caso lo hice de 6 vueltas.

Luego para finalizar tejemos una vuelta de 3 medios puntos y saltamos uno de la vuelta de base para ir reduciendo el tamaño del gorro. Luego en las siguientes vueltas hacemos puntos bajos para reducir aún más, calculando que no quede ni tan ajustado ni tan suelto.
En este caso la lana que utilicé es muy gruesa y por eso rinde bastante al momento de tejer.
Por ultimo hice una flor muy bonita para que resaltara en la pieza.


Estoy muy contenta con el resultado, estoy segura que a la que la mamá de mi esposo le va a gustar, ella es una persona muy especial que siempre nos ha brindado mucho cariño y ternura y estamos muy contentas de irla a visitar este mes de diciembre también.
Bien amigos, no dejen de finalizar esos proyectos que tenemos por allí iniciados y olvidados, estoy segura que para todo hay tiempo, así que ese por cerrar todos esos círculos antes de fin de año. Mi mamá tiene un dicho que dice “El orden es la principal regla del cielo” y bajo ese lema he insistido en los últimos meses en mi casa y en mi vida. Cuando hay orden todo fluye bien y se genera buena energía. Ahora que he terminado muchos proyectos puedo dar fe que todo esto es verdad. Les digo hasta pronto chicos y chicas, cuídense mucho y nos vemos en un próximo “Hecho con AMOR”.

.gif)
A warm greeting to all my dear Needleworkmonday community, one more week life gives us and how nice to spend a moment with you to share our work, exchange ideas and knowledge and make this community the best community of all within the HIVE ecosystem.
The truth is that these days have flown by and December is just around the corner; from now on the countdown to my trip begins and that makes me very happy. So I just have to run to take advantage of every minute of my time to be able to do all the things I want to.

A scarf and hat for someone very special
Today I wanted to show you the final result of [A scarf started on rectangular loom with openwork stitch. 🐞](https://peakd. com/hive-127911/@carolinacardoza/una-bufanda-iniciada-in-telar-rectangular-con-punto-calado-a-scarf-started-on-rectangular-loom-with-openwork-stitch) , this project I started two months ago and it was until this weekend that I took it up again since I dream of taking it as a gift to my dear mother-in-law; She really likes this kind of woven details and I am sure that when she sees it she will love it because it is very cold there in Táchira at the moment and it hasn't stopped raining for days.
Apart from that I have made a precise calculation and thank God the material was enough to weave the scarf on the loom and a very simple hat which I want to show you today with a simple step by step, I hope you like it and understand me.


Materials we are going to use for the loom-knitted scarf and the crochet hat.
- 100 grams of thick wool
- Knitting needle #4
Step by step

1st turn. The first thing we are going to make is a Magic Hoop. Inside the hoop we are going to raise 3 chains and then we knit 2 double crochets, then we knit 2 chains and 3 double crochets, until we have 5 groups of 3 double crochets each separated by 2 chains, we close that round with a slip stitch on the third chain from the beginning.
2nd row. In this row we pick up 4 chain stitches and go into the next chain stitch space of the previous row with a fan stitch, that is 3 double crochet and two chain stitches and 3 double crochets, separating each fan stitch with a chain stitch, to close this row we make a slip stitch in the third chain stitch from the beginning.

In this row we make 3 chain stitches two high stitches inside the same empty space of the previous row, one chain stitch and in the next chain stitch space of the previous row we make a fan of 3 high stitches two chain stitches and 3 high stitches, then we knit one chain stitch and in the next space we put 3 high stitches, again one chain stitch and in the next hole we make a fan and so on until we finish the row by closing with a slipped stitch in the third starting chain stitch.
We repeat the same process of the previous row as many times as we want, in this case we knit 4 rows, when we have the desired circumference we make 3 double crochet in each hole of the previous row, without fans. And we repeat this process according to the desired length for your hat, in my case I made it 6 rounds.

Then to finish we knit a row of 3 half stitches and skip one of the base row to reduce the size of the hat. Then in the following rows we knit a single crochet to reduce the size of the hat even more, making sure that it is neither too tight nor too loose.
In this case the yarn I used is very thick and therefore yields quite a lot when knitting.
Lastly I made a very pretty flower to stand out in the piece.


I am very happy with the result, I am sure that my husband's mother will like it, she is a very special person who has always given us a lot of love and tenderness and we are very happy to visit her this December too.
Well friends, do not stop finishing those projects that we have started and forgotten, I am sure that for everything there is time, so close all those circles before the end of the year. My mom has a saying that goes "Order is the main rule of heaven" and under that motto I have insisted in the last months in my house and in my life. When there is order everything flows well and good energy is generated. Now that I have finished many projects I can attest that all this is true. I say see you soon boys and girls, take care of yourselves and see you in a next "Made with LOVE".
