

Hello my dear readers, I hope you had or are having an excellent day. And then came the carnivals and with them, the days of beach, rumba and above all of comparsas and many costumes.
Like many parents, we know that in schools, nowadays everything is a cause for celebration and carnivals were not far behind. Like every year at my daughter's school, they do a sharing and ask for the children to be dressed up.
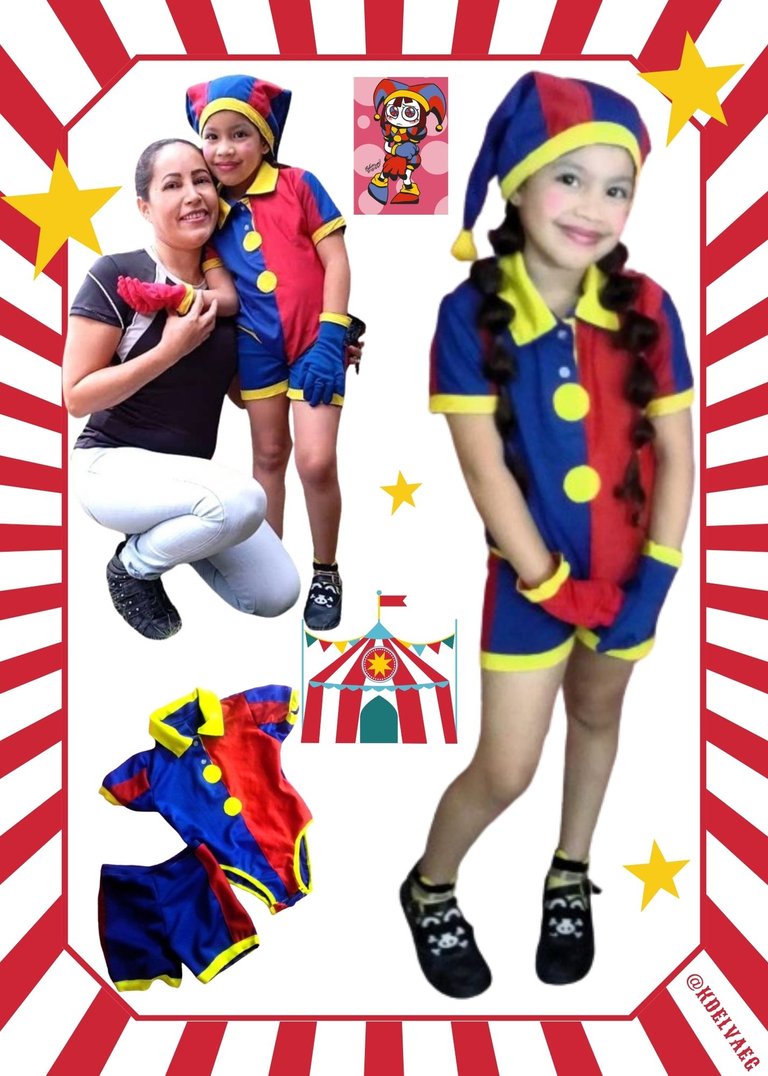
This year my daughter is delighted with a series called: "The Amazing Digital Circus". It's a bit like what we've been experiencing nowadays, with this virtual reality, (although I hope it doesn't get to these extremes).
It turns out that a young girl put on a virtual reality headset and gets trapped in the digital universe, taking on the role of a Jester. She and other characters don't remember anything about their past, not even their names. The owner of a circus names her Pomni and the only thing she wants is to find a way out, but it is very difficult for her to find it.
Well, I wanted to surprise my daughter, making a costume very similar to that of her favorite character and I confess that I don't have much experience sewing or cutting, but I did the best I could. And here I show you the step by step of how I made this costume.
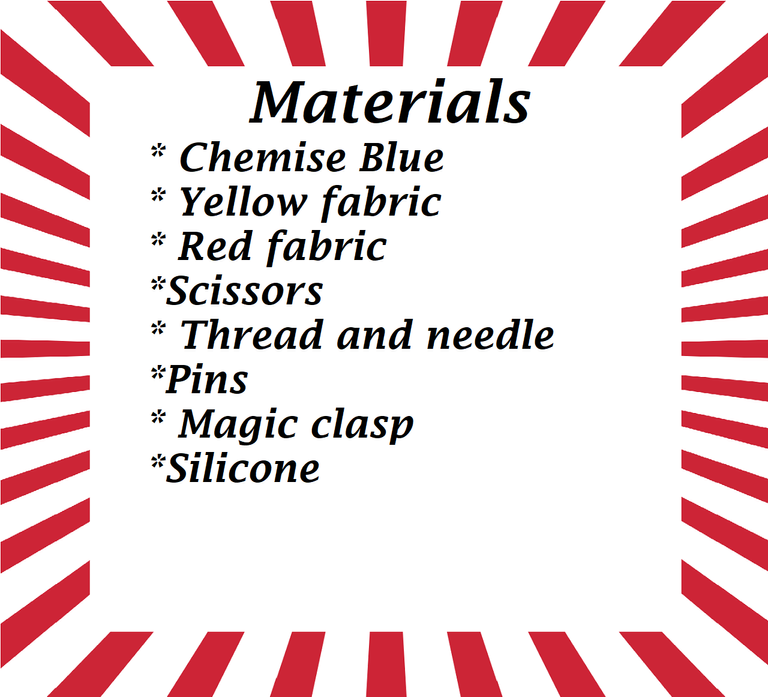
STEP BY STEP:
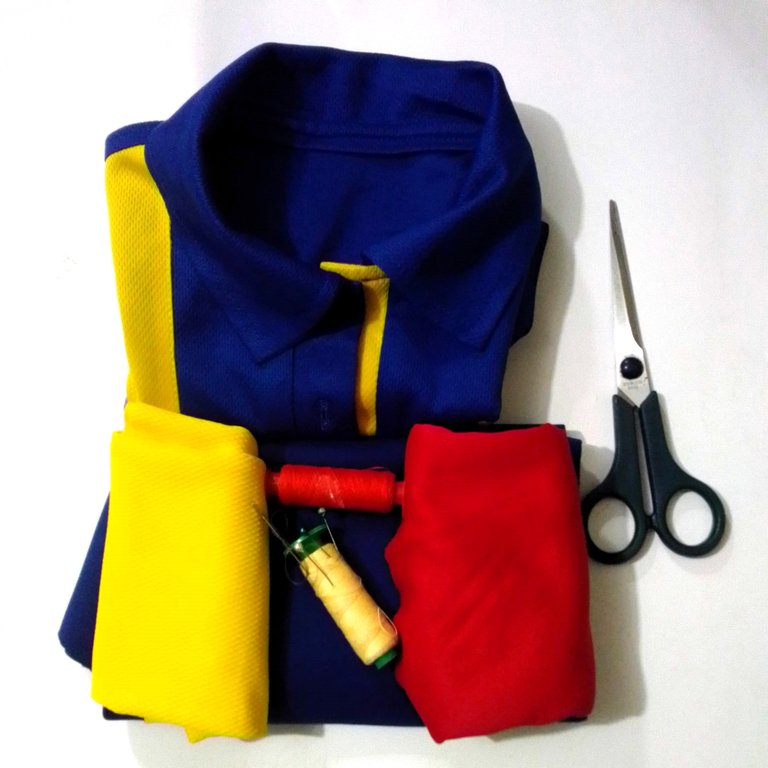
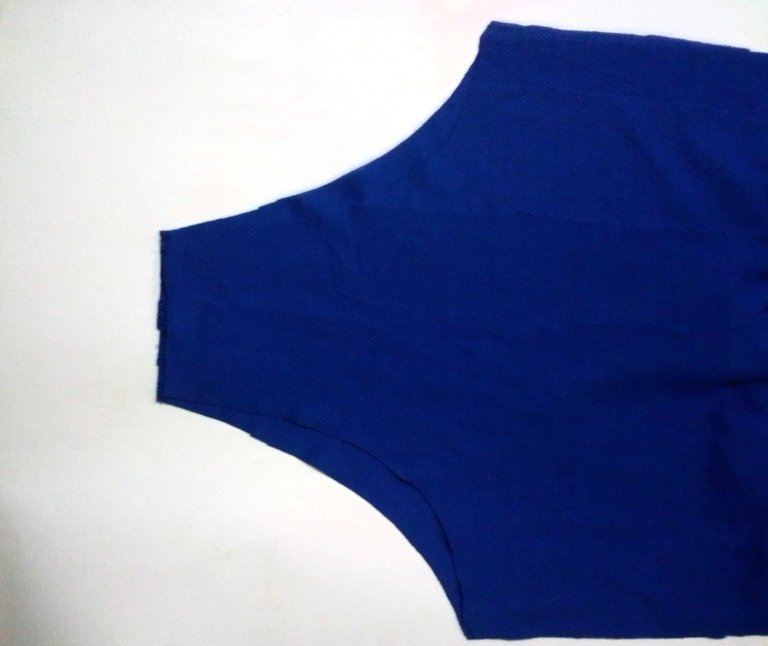
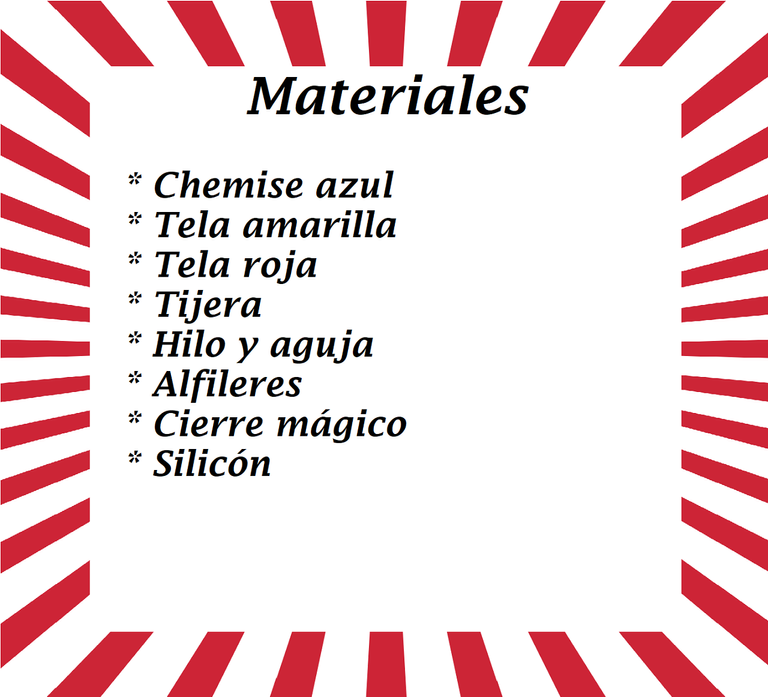
I had this chemise that I wore as a uniform for a company, a few years ago. I had it in storage, waiting for a moment to use it in anything I could think of, and now its time has come. Since I didn't have enough fabric to make the suit, I remembered the chemise, which would be ideal because of the color.
As you can see, my daughter is quite big, but with a few adjustments, it will fit perfectly.


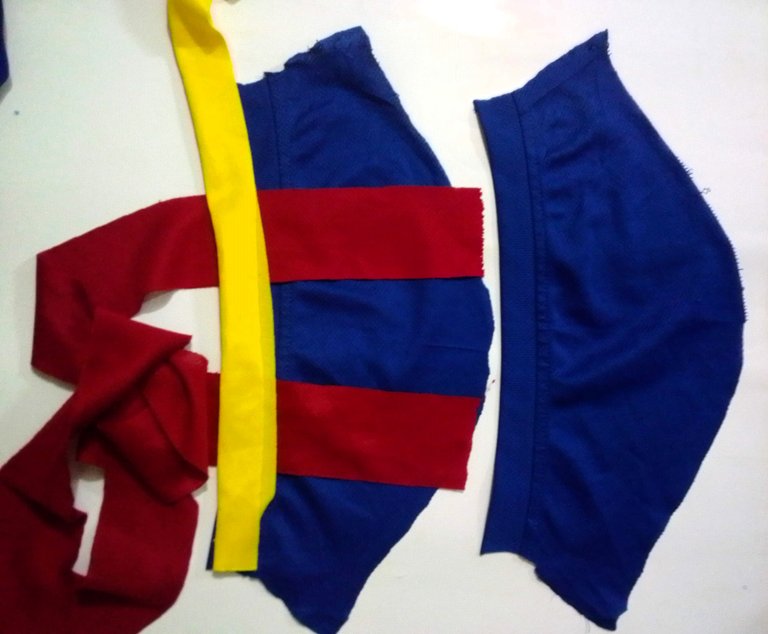
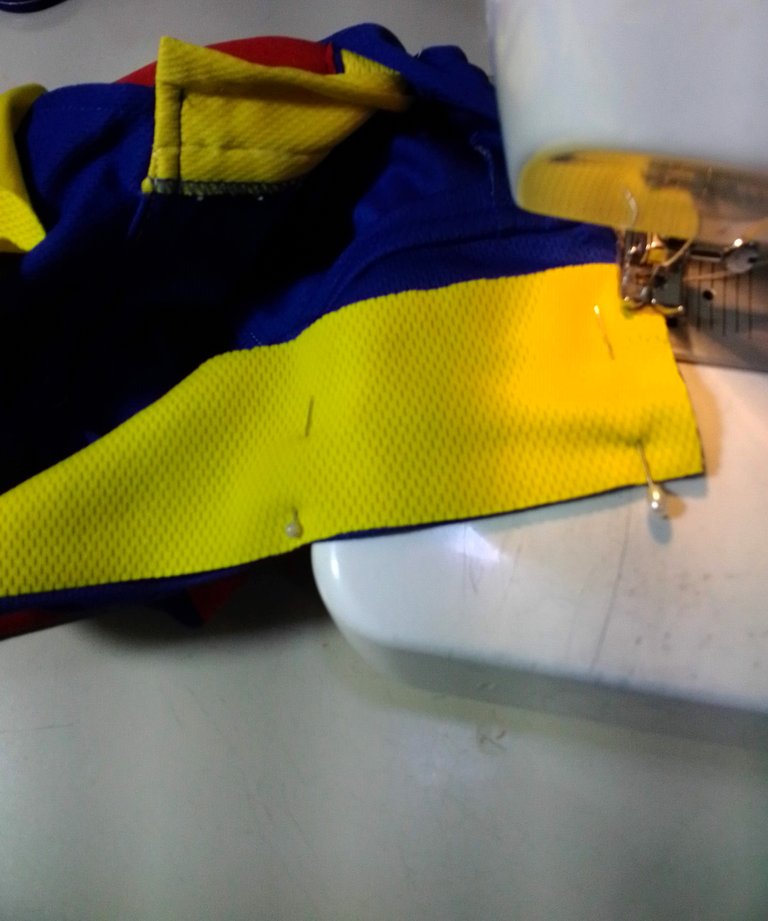
I unstitched the sleeves and it had some red straps, about 5 cm long, that I had left from previous jobs and that serve me wonderfully for this work. So I'll place them as shown in the picture. And with the yellow fabric, I'll sew a strip all the way around the edge of the sleeve cuff.
With the help of a flannel, which fits my daughter well, I cut the chemise to the size of the white flannel, leaving a margin for sewing.

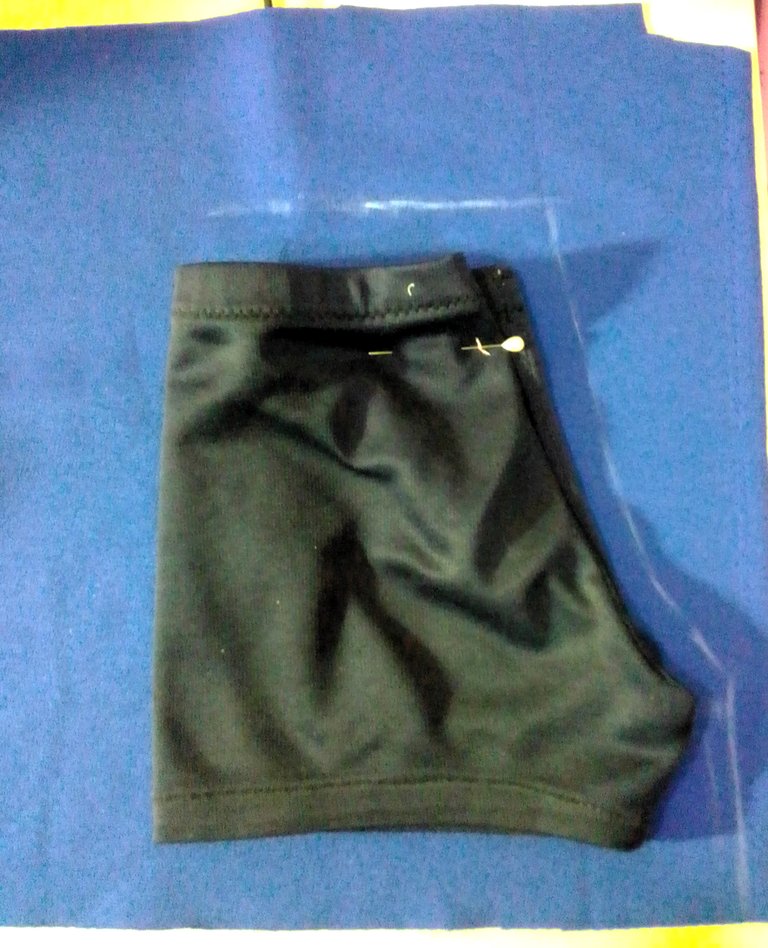
With the help of a bathing suit, trim the bottom of the shirt. The idea is to make a kind of bodysuit (I don't know what you call it in other countries, but it's like a whole bathing suit, but with a collar and sleeves).
 |  |  |
|---|
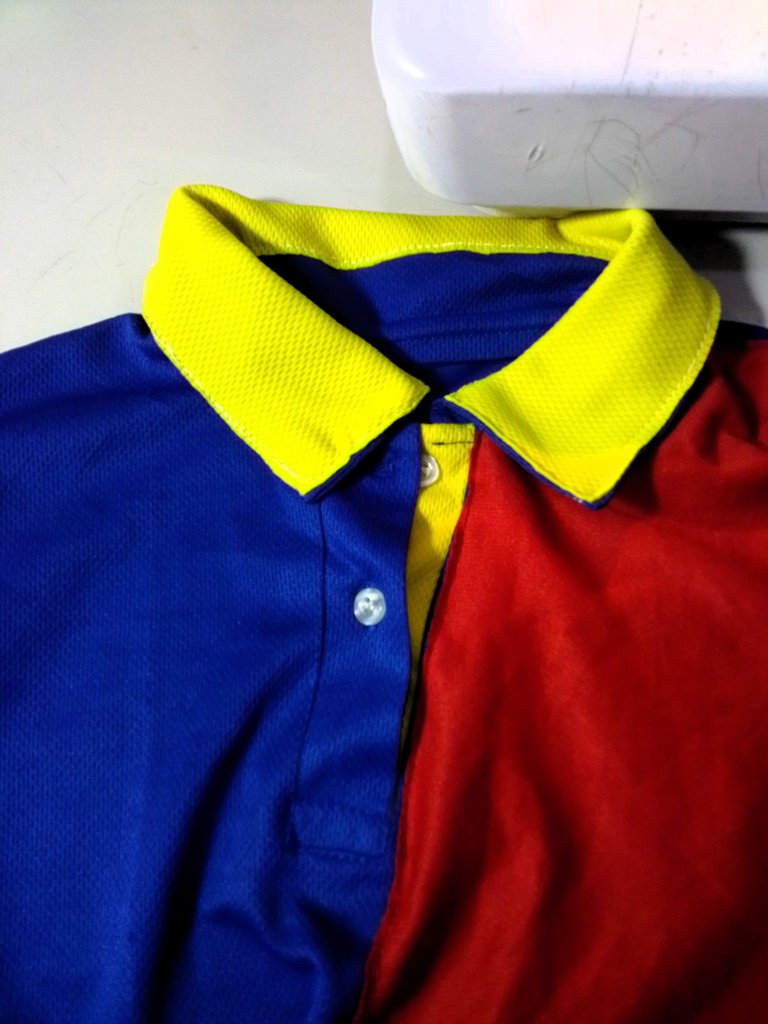
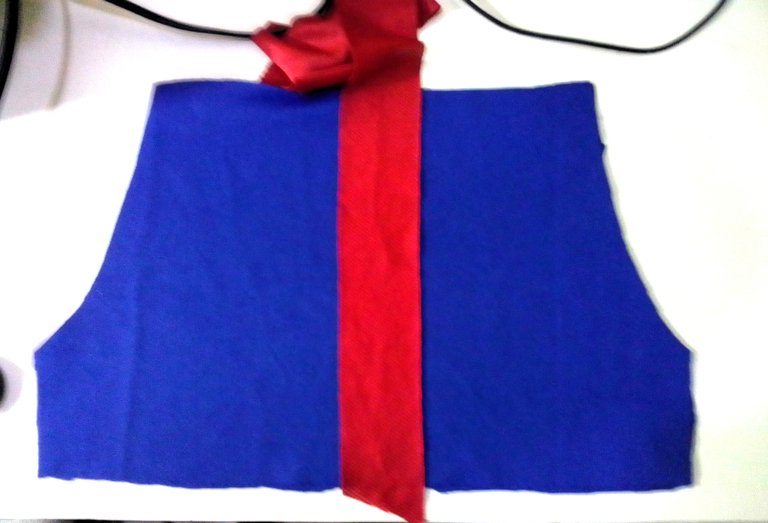
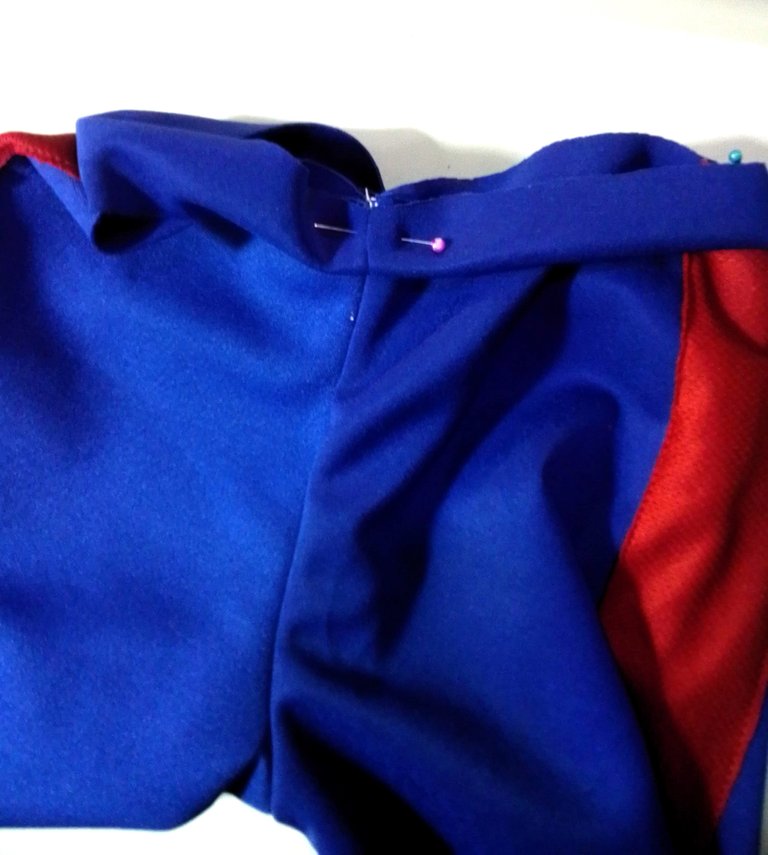
Now I proceed to assemble the red fabric, both in the front and in the back. I placed the red fabric right where the button opening is, I know it's not in the center, but I didn't want to complicate my life, so I put it there, not that it was going to look bad either. I sewed all over the center and around the edges as well, trying not to make it stick, especially on the neck and shoulder part.
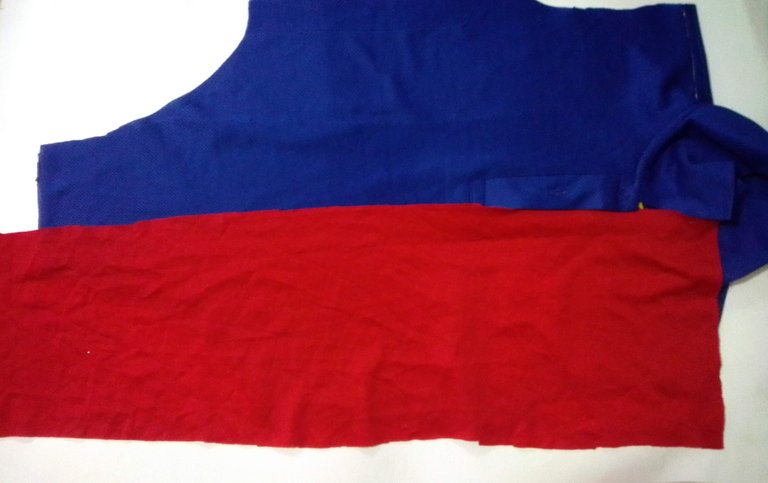
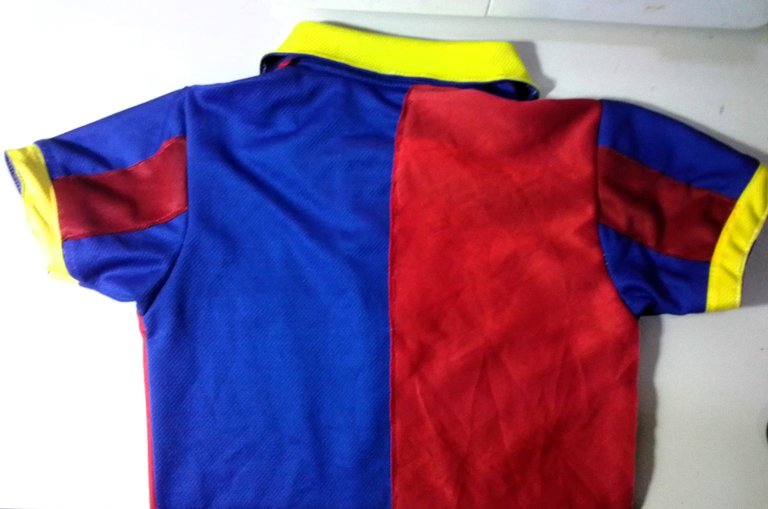
I did the same procedure for the back, keeping in mind to place the red part on the opposite side of where I placed the front.

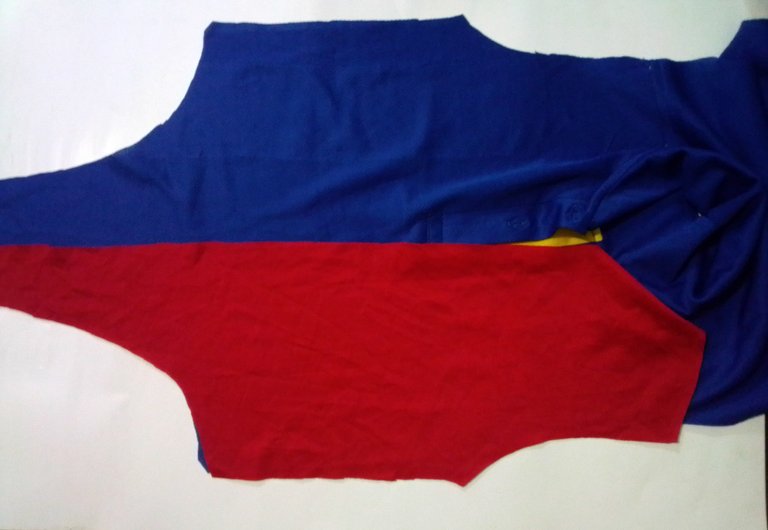
Once all that process is done, I sew the sleeves and close the sides.

I'll use a strip of yellow fabric and glue it on the neck, I just placed it on the side that goes up, just as shown in the picture.
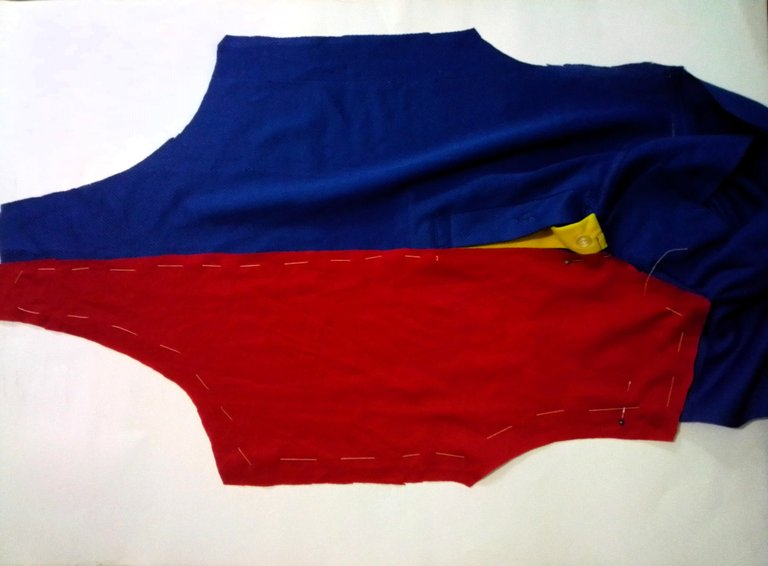
And I've got the top of the suit ready. I placed a thin, magically fastened strip at the bottom so I could close it, I just forgot to take the picture.

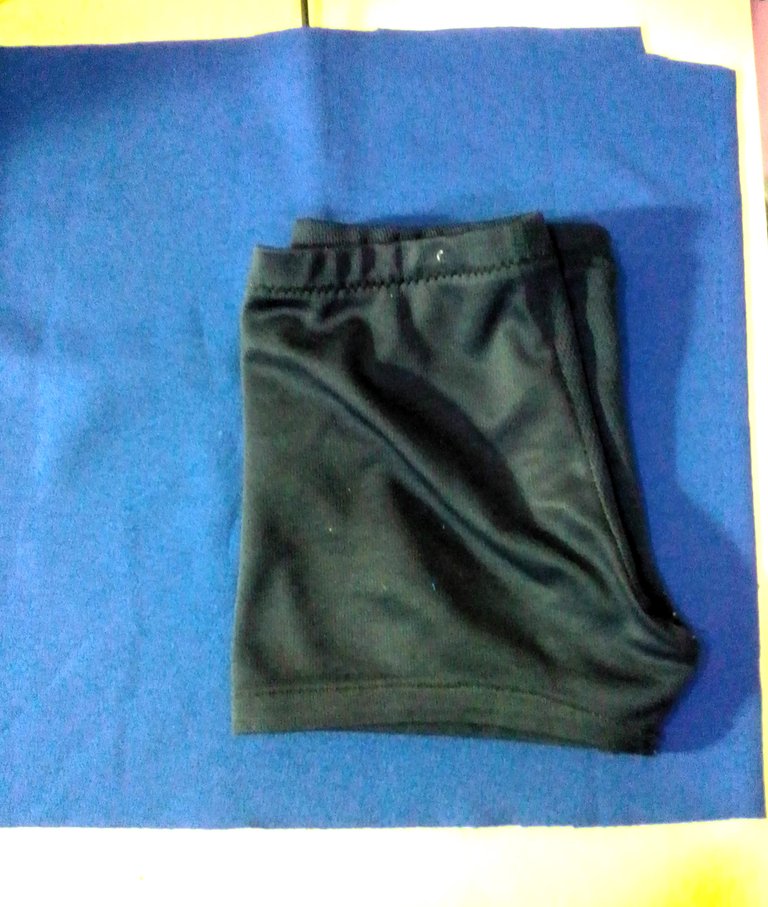
With the blue fabric, I cut a pair of shorts, I really didn't know it was so easy and quick to make.
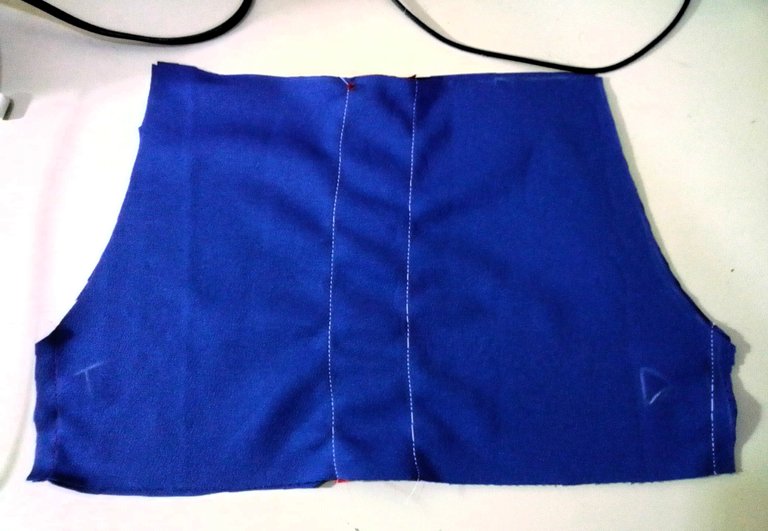
With the sample of one of my daughter's shorts, I made the cuts. I spread out the fabric and position the pants as shown in the picture, mark the front and then turn it horizontally to the left side and mark the back and trim. Scoop out two equal parts.
 |  |
|---|
 |  |
|---|
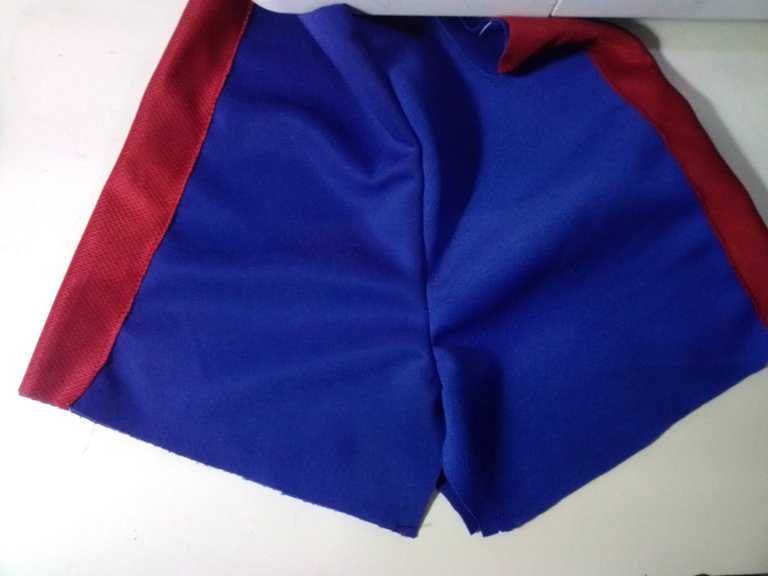
I sew a red strip down the middle, on both sides. Then I put the two pieces together and sew on the curved part of both sides. And then I close the bottom, sewing the two parts together. Then, as the fabric I used for the pants, it is a fabric that stretches a lot, cut out a long strip, to place it at the waist, stretching a little, so I don't need elastic.
 |  |
|---|
 |  |
|---|
Once the pants were ready, I just put a yellow strip to make the edge on the legs.
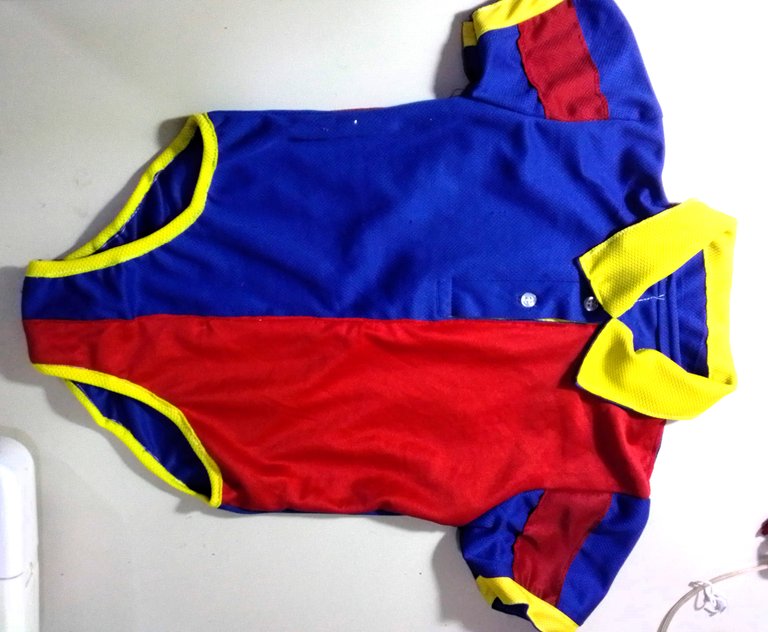
And now, I've got the suit ready.


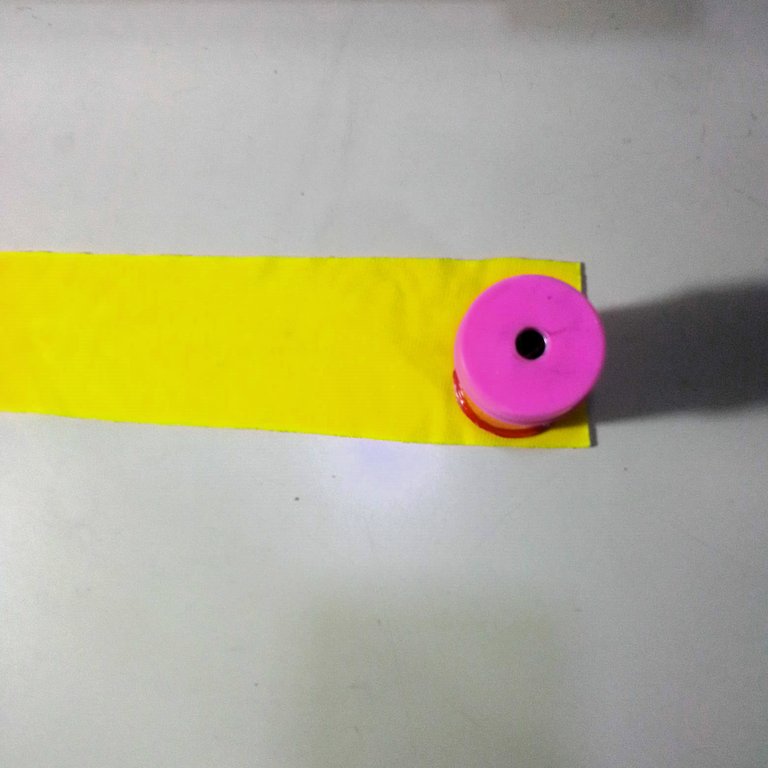
On the yellow cloth I marked three circles, which I later realized, I only needed two. And I took a picture only of that, I forgot to take the picture when I glued it to the suit, which I did as fast as possible, with the help of the silicone.

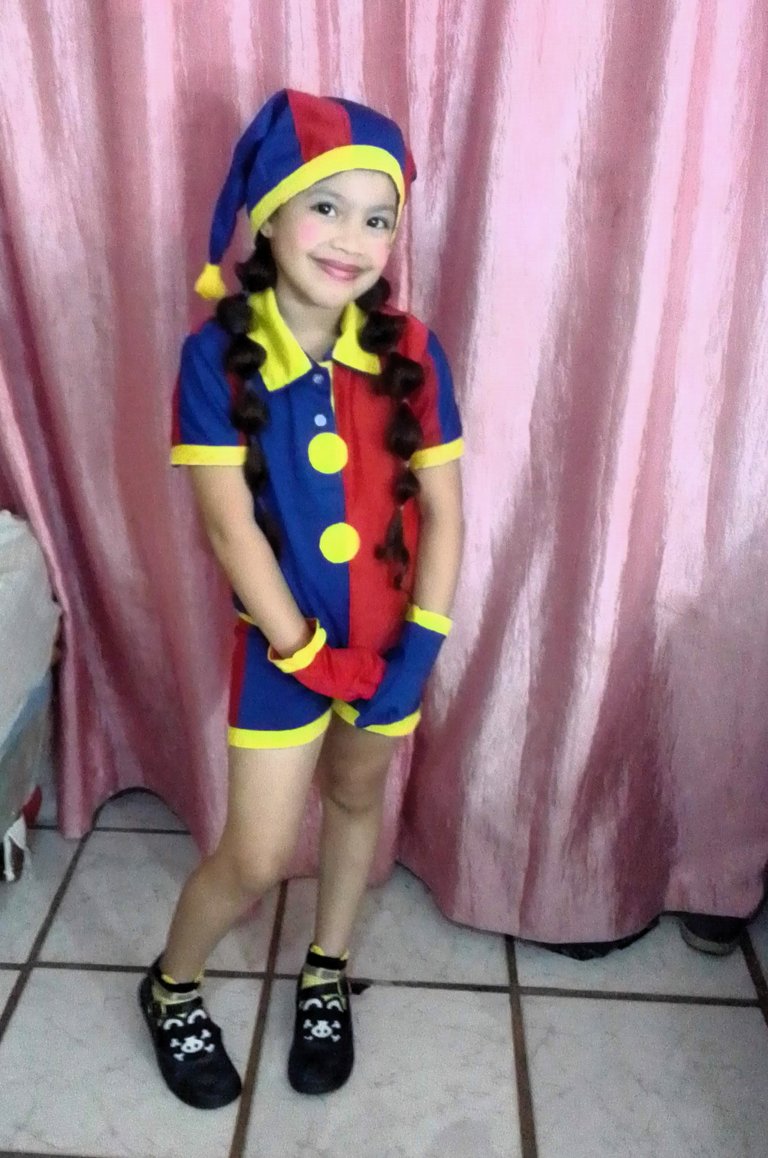
And now I present the finished suit.
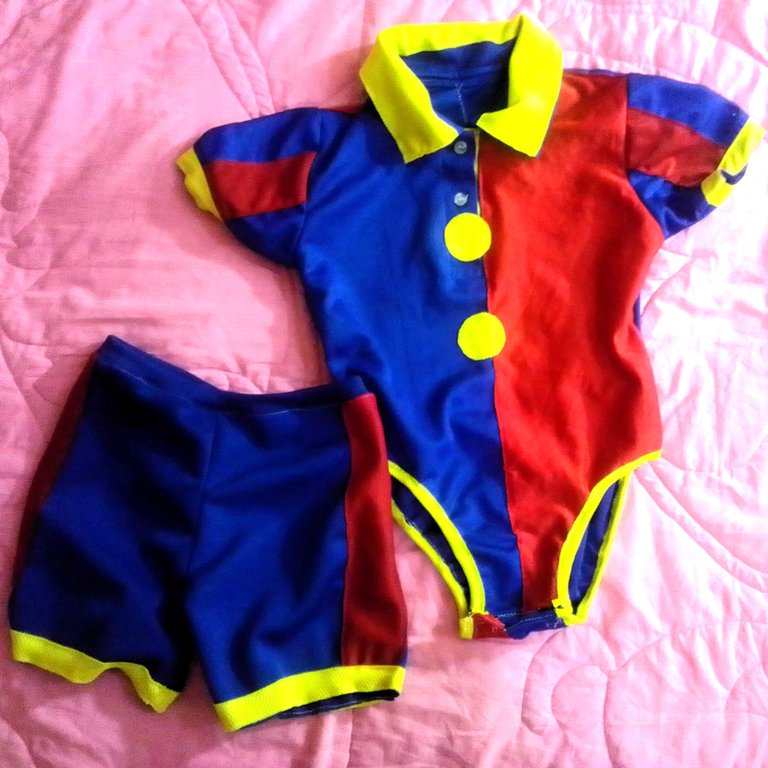


And my little girl is ready to go to school to wear her Pomni suit. For not having any experience in sewing, I don't look bad at all. What do you guys think?
And the truth is that my daughter (and it's not because she's my daughter) looks gorgeous in her outfit.
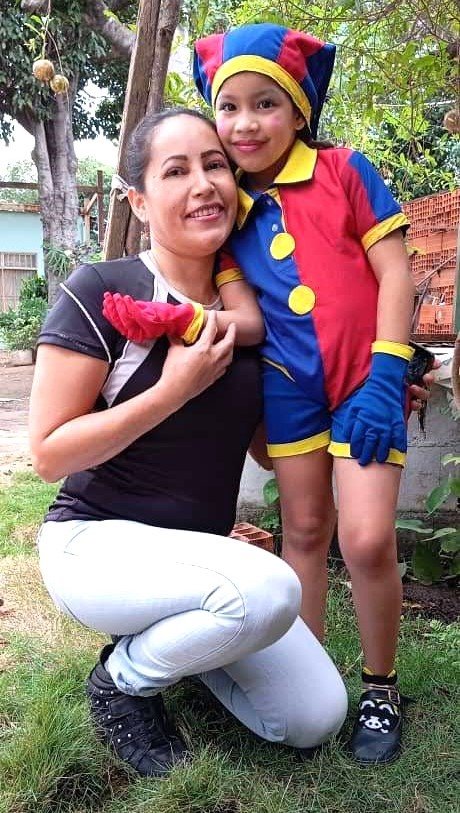
Here I am, with my baby, proud of how the suit turned out and much more because I made it on my own.
I hope you liked this tutorial that I gladly prepared for you. I'll do the second part soon, don't miss it. I say goodbye as always, but not before thanking you for taking a little of your valuable time to visit my blog and support me. And as the saying goes, "Do good and look at whom."
Content of the original creation:
❤️ All photos are mine, taken and edited with my Alcatel phone.
💛 The cover image, was made with the Canva app and edited by me.
💜 The divider images were taken from glitter-graphics.com.
💚 The English translation was done with the help of bing.com/translator.
🧡 The letters indicating the languages were taken from fontmeme.com.

Hola mis queridos lectores, espero que hayan tenido o tengan un excelente día. Y se llegaron los carnavales y con ello, los días de playa, de rumba y sobre todo de comparsas y muchos disfraces.
Como muchos padres, sabemos que en las escuelas, hoy en día todo es motivo de celebración y los carnavales no se quedaron atrás. Como todos los años en el colegio de mi hija, hacen un compartir y pidieron que los niños fueran disfrazados.
Este año mi hija anda encantada con una serie que se llama: "El Asombroso Circus Digital". Se trata un poco de lo que se ha estado viviendo hoy en día, con esto de la realidad virtual, (aunque espero que no se llegue a estos extremos).
Resulta que una jovencita, se colocó un casco de realidad virtual y queda atrapada en el universo digital, asumiendo un rol de un Bufón. Ella y otros personajes más, no recuerdan nada de su pasado, ni siquiera sus nombres. El dueño de un circo, le coloca el nombre de Pomni y lo único que ella quiere es buscar una salida, pero se le hace muy difícil encontrar.
Bueno, yo quería sorprender a mi hija, realizando un traje muy parecido al de su personaje preferido y les confieso que no tengo mucha experiencia cosiendo, ni cortando, pero hice lo más que pude. Y aquí les muestro el paso a paso de como realice este traje.
PASO A PASO:
Tenía este chemise que use de uniforme para una empresa, hace unos años. La tenía guardada, esperando algún momento para usarla en cualquier cosa que se me ocurriera, y ya llego su momento. Como no tenía tela suficiente para hacer el traje, pues me acordé del chemise, que sería el ideal por el color.
Como pueden ver, a mi hija le queda bastante grande, pero con algunos ajuste, le quedara perfecto.
Le descosí las mangas y tenía unas tiras en color rojo, como de 5 cm aproximadamente, que me quedaron de trabajos anteriores y que me sirven de maravilla para este trabajo. Así que las colocaré tal como se muestra en la imagen. Y con la tela amarilla, le coseré una tira por todo el borde del puño de la manga.
Con la ayuda de una franela, que le queda bien a mi hija, corte el chemise al tamaño de la franela blanca, dejando un margen para la costura.
Con la ayuda de un traje de baño, recorte la parte de abajo de la camisa. La idea es hacer especie de un body (no sé cómo se le dice en otros países, pero es como un traje de baño entero, pero con cuello y mangas).
| | |
|---|
Ahora procedo hacer el montaje de la tela roja, tanto en la parte delantera, como en la parte de atrás. Coloque la tela roja justo donde está la abertura de los botones, sé que no está en el centro, pero no me quise complicar la vida, así que la coloque allí, tampoco es que se iba a ver mal. Cosí por todo el centro y por los bordes también, tratando de que no quede sobresaliente, sobre todo en la parte del cuello y el hombro.
Hice el mismo procedimiento por la parte de atrás, teniendo en cuenta de colocar la parte roja en el contrario de donde coloque la parte delantera.
Una vez hecho todo ese proceso, le coso las mangas y cierro por los costados.
Usaré una tira de tela amarilla y la pegaré en el cuello, solo coloqué por la parte que va hacia arriba, tal como se muestra en la imagen.
Y ya tengo lista, la parte de arriba del traje. Le coloqué una tira fina, de cierre mágico en la parte de abajo para poder cerrarlo, solo que se me olvido tomarle la foto.
Con la tela azul, corte un short (pantalón corto), la verdad es que no sabía que era tan fácil y rápido de hacer.
Con la muestra de un short de mi hija, hice los corte. Extendí la tela y coloco el pantalón como se muestra en la imagen, marco la parte delantera y luego lo giro en horizontal hacia el lado izquierdo y marco la parte trasera y recorto. Saque dos partes iguales.
| |
|---|
| |
|---|
Le coso por el centro, una tira roja, en ambos lados. Luego uno las dos piezas y coso por la parte curva de ambos lados. Y luego cierro la parte de abajo, cosiendo las dos partes juntas. Luego, como la tela que use para el pantalón, es una tela que estira bastante, recorte una tira larga, para colocársela en la cintura, estirando un poco, así no necesito de elástica.
| |
|---|
| |
|---|
Ya listo el pantalón, solo le coloqué una tira amarilla para hacer el borde en las piernas.
Y ahora sí ya tengo listo el traje.
En la tela amarilla marqué tres círculos, que después fue que me di cuenta, que solo necesitaba dos. Y le tome foto solo a eso, se me paso tomar la foto cuando lo pegue al traje, que lo hice por lo más rápido, con la ayuda del silicón.
Y ahora si ya les presento el traje finalizado.

Y ya está lista mi niña, para ir al colegio a lucir su traje de Pomni. Para no tener experiencia en costura, no me quedo nada mal. ¿Qué opinan ustedes?
Y la verdad es que mi hija (y no es porque sea mi hija) se ve preciosa con su traje.
Aquí yo, con mi bebe, orgullosa de como le quedo el traje y mucho más porque lo hice yo solita.
Espero que te haya gustado este tutorial que con mucho gusto preparé para ti. Pronto haré la segunda parte, no te lo pierdas. Me despido como siempre, no sin antes agradecerte por tomarte un poco de tu valioso tiempo para visitar mi blog y apoyarme. Y como dice el refrán: "Haz el bien y no mires a quién".
Content of the original creation:
❤️ All photos are mine, taken and edited with my Alcatel phone.
💛 The cover image, was made with the Canva app and edited by me.
💜 The divider images were taken from glitter-graphics.com.
💚 The English translation was done with the help of bing.com/translator.
🧡 The letters indicating the languages were taken from fontmeme.com.
